This is the multi-page printable view of this section.
Click here to print.
Return to the regular view of this page.
Welcome
This documentation supports the Poppy release of FOLIO. Use the Releases menu to select a released version as needed.
Welcome to FOLIO documentation. FOLIO is an open source project that creates a new paradigm for collaboration between libraries, developers, and vendors. This open platform moves the industry well beyond the traditional library management system, offering libraries more choices of features and services.
A modern library ecosystem
The FOLIO project aims to facilitate a sustainable, community-driven collaboration around the creation of a modern technology ecosystem that empowers libraries through open source applications to manage library resources and expand library value.
Development of the FOLIO platform is driven by the transparent collaboration of librarians, developers, and vendors. A Product Council provides oversight of platform development, with representation from the many institutions and organizations involved. A healthy number of communication channels supports ongoing interactions to move the project forward.
FOLIO is an open source Library Services Platform developed by libraries, vendors, and developers who collaborate to reimagine library software. The collaboration enables librarians and vendors alike to contribute functional expertise and developers in any area of library workflows. Due to the open source nature of the platform and choice of service providers, libraries can speed up the delivery of extensible or enhanced software and deliver the enhancement(s) to the community without relying on a particular vendor’s roadmap.
1 - About FOLIO
FOLIO is an open source Library Services Platform (LSP). The platform supports core functionality for the management of print and electronic resources. Built natively for the cloud, FOLIO uses a modern microservices architecture to allow libraries to choose applications they need. As a result, FOLIO moves beyond the traditional integrated library system, allowing anyone to freely build on the platform’s core functionality or to extend it through the development of applications that deliver new services.
Supporting partners and contributors
FOLIO is 100% driven by and open to the community. As a true open source project, any library or library consortium can choose to host and operate FOLIO locally. The software is free to any library.
If you do want to take advantage of commercial hosting or support services, there are many opportunities to engage with vendors in the FOLIO community. Services include: implementation, hosting, service, and support and training. See a list of vendors who currently offer implementation, hosting, and support services for FOLIO:
Note that some consortia also offer FOLIO support for member libraries.
1.1 - Glossary
This section of the documentation contains links to external sites. Please be advised that these external sites are not maintained by the FOLIO Documentation Group and may be aligned with a different FOLIO release.
| Term or Acronym
|
Description
|
| Accounting code
|
A reference number used to identify a vendor in an external payment system.
|
| Acquisition unit
|
An additional layer you can add to acquisitions records that restricts a user’s ability to interact with those records unless they have been assigned to that unit. For example, you may create acquisition units to represent the different libraries within your library system. Units are defined and determined by your library in the Settings app.
|
| Allocated fund
|
A fund that has been assigned a monetary value for the fiscal year and therefore has money to spend.
|
| Analytic
|
An analytic is a portion of a work (like a volume in a series) that can be described separately from the work itself. Analytics can be created for articles in a journal, volumes of a monograph, or issues of a serial
|
| Availability
|
The status of an item in terms of circulation (for example, available; recently returned). In FOLIO, "Item Status" displays availability.
|
| Batch group
|
Invoices grouped together for export to an external accounts payable system. Invoices from the same library are generally processed together, as determined by the batch group assignment on each invoice.
|
| Bound-with
|
Multiple, separate bibliographic titles that are bound together in a single volume, most frequently by a former owner but also sometimes by a publisher and for other reasons.
|
| Budget
|
A finance record that describes the amount of money available for a fiscal year within a fund that includes a definition of the allowed expenditure percentage and allowed encumbrance percentage. Transfers and allocations transactions are performed against a budget. Expense classes can be assigned to a budget.
|
| Bug
|
An error, fault or flaw in a software system.
|
| Campus
|
The second level of the four level location structure (Institution -> Campus -> Library -> Location). The structure is hierarchical - a campus must be linked to one institution, and a library must be linked to one campus.
|
| Central tenant
|
The administrative tenant when Enhanced Consortial Support (ECS) is enabled. Also referred to as a primary tenant. |
| Child record
|
Associated with linking bound-withs, which allows for "links" between separate bibliographic records and/or a bibliographic record and items belonging to another bibliographic record. Child records are those associated bibliographic records.
|
| CQL
|
Contextual Query Language. A formal language for representing queries to Information Retrieval systems such as web indexes, bibliographic catalogues and museum collection information.
|
| CRUD
|
Create, Read, Update, Delete. The basic actions that can be taken on a record in a software system.
|
| Department
|
Organizations at a library’s institution of which patrons and staff may be a part, for example, Campus Facilities or Chemical Engineering.
|
| Discovery display name
|
The name of a service point to be displayed to patrons in a discovery layer, if needed.
|
| Effective call number (item), eye readable
|
A way of presenting the call number that may be easier for a human being to read.
|
| Effective call number (item), normalized
|
A standardized way of presenting the call number that may be harder for a human being to read, but easier for a machine to process.
|
| Expense class
|
A fiscal entity used to track transactions against a specific purpose or function within a Fund.
|
| Item effective location
|
FOLIO has permanent and temporary location fields on the Holdings and Items records. There is built-in logic for FOLIO to compute the item's "effective location" based on what values are set.
|
| eHoldings
|
Contains information such as the resource’s URL, call number, etc to enable staff to locate and manage library electronic holdings.
|
| Encumbrance
|
An amount of money that the library commits to pay to a vendor from a fund budget for ordered materials that will be invoiced in the future.
|
| ERM
|
Electronic Resource Management. ERM is used within the FOLIO community to describe functions that manage the acquisition, licensing, access, maintenance, usage, retention, and de-selection of electronic resources.
|
| eUsage
|
App that tracks statistics for access and use of electronic resources.
|
| Expiration date (patron blocks)
|
The date at which the patron block is removed from the patron record, and the blocked privileges are restored to their user account.
|
| Expiration date (user record)
|
The amount of time set before the user record lapses and the user no longer has active permissions or has ability to borrow items
|
| Fee/fine
|
Charges attached to patron records for reasons such as damaged materials, late item returns, or rental fees.
|
| Fiscal year
|
The twelve-month period a library uses to manage its finances.
|
| FOLIO
|
Future of Libraries is Open. An open-source collaboration of libraries, developers and vendors building an open source library services platform. It supports traditional resource management functionality and can be extended into other institutional areas.
|
| Fund
|
A fiscal entity used to track transactions against a general purpose or function' within a ledger. Funds are associated with only one ledger. Fund information persists from year to year as new budgets are created for the fund each year.
|
| FYRO
|
Fiscal year roll-over. After ordering and invoice processing is completed for the fiscal year, a library performs fiscal year roll-over processes to open new fiscal year budgets, close budgets from the prior fiscal year, and create encumbrance transactions in the new fiscal year.
|
| Group
|
A collection of one or more funds grouped together. A group can bring multiple funds together regardless of fiscal year and ledger which enables the total amount of money available or allocated across multiple funds to be analyzed.
|
| Hidden permission
|
A permission that you do not see in the list of permissions to assign to users. Hidden permissions are generally very granular permissions that are bundled together in larger permissions sets that are then made viewable to assign to users.
|
| Holdings
|
A data record that contains information such as location, call number, and volumes owned, to enable staff to locate and manage library holdings. Holdings records may describe library holdings that are physical, electronic, or other formats.
|
| Human-Readable Identifier (HRID)
|
A record identifier that can be naturally read by users. Usually an HRID is alphanumeric and shorter than the lengthier universal identifier (UUID). Not all records have human-readable identifiers.
|
| Identifier
|
A unique label of a record, such as an ISBN, ASIN, or OCLC number.
|
| ILS
|
Integrated Library System. A centralized system where you do most or all of major library transactions such as cataloging, circulation, electronic resource management, etc.
|
| In-app report
|
A specific report or reporting function that has been developed as an added feature in a FOLIO app, rather than via an external reporting tool that an institution may be using.
|
| Instance
|
A bibliographic record. Contains bibliographic and administrative information about a particular title or item; are mostly derived from full bibliographic records (in MARC or other formats) and are intended to provide information for library staff to identify and select records in order to perform work on associated holdings and items.
|
| Institution
|
In FOLIO, an Institution is the top level of the four-level location structure (Institution -> Campus -> Library -> Location).
|
| Invoice
|
A list of the payments due for materials ordered by a library from a vendor.
|
| Invoice line
|
The individual line items being paid for within each invoice. Each line consists of a description of the materials being paid for, the costs incurred, and a vendor reference number. Invoices are primarily a sum of the information from these lines.
|
| ISBN
|
International Standard Book Number: global unique identifier for a book.
|
| ISBN, normalized
|
International Standard Book Number, in a standard form without spaces or hyphens.
|
| ISSN
|
International Standard Serial Number. A global unique identifier for a serial.
|
| Item
|
A data record representing a single item. Contains information needed to identify and track a single item or piece, such as barcode, availability, and material type.
|
| Item HRID
|
Human readable ID. A FOLIO generated or migrated ID for the Item record.
|
| Item status
|
A field that currently reflects item availability, and in future development will also reflect information about an item's staff processing, and needs for future use.
|
| KB
|
Knowledge base. A self-serve web-based library of information about a product, topic, etc.
|
| LDP
|
Library Data Platform. A project that develops an open-source analytics platform (https://github.com/library-data-platform) which can be utilized by FOLIO reporting (https://github.com/folio-org/folio-analytics) for statistical and operational analytics. The term, "LDP," is sometimes also used as a shorthand for a specific component of the platform, such as the LDP database or the LDP query builder app which runs in FOLIO.
|
| Ledger
|
A collection of funds that need to be kept fiscally separate from another ledger’s collection of funds. All funds within a ledger share future fiscal year rollover behavior. Each fund record is assigned to only one ledger.
|
| Library
|
The third level of the four-level location structure (Institution -> Campus -> Library -> Location). The structure is hierarchical - a library must be linked to one campus, and a location must be linked to a library. A library may have more than one location.
|
| Loan type
|
An optional element in FOLIO circulation rules. Items must have a permanent loan type and can also have a temporary loan type. If an item has a temporary loan type set, that is the loan type that would be matched on in circulation rules.
|
| Location
|
The fourth level of the four-level location structure (Institution -> Campus -> Library -> Location). Locations are used in functionality including item routing, fees and fines, and remote storage configuration. Items may also have an “effective location” value that is used in circulation.
|
| Long-term loan
|
A loan with a loan period interval specified in days, weeks, or months, or determined by a fixed due date. A long-term loan is always due at 11:59 PM on its due date. All of its notices are delivered in real time except for notices triggered by loan due date/time, which are delivered overnight.
|
| LSP
|
Library Services Platform. The next generation of library automation systems that extend and improve upon the functions of the ILS (integrated library system). The term was coined by Marshall Breeding in 2011.
|
| Material type
|
A required field on the item record, used as an optional element in FOLIO circulation rules. The field is intended to describe the material nature of a specific item, with the intention to permit more specific information than resource type alone.
|
| Metadb
|
The open-source analytics platform used in LDP (Library Data Platform), introduced at CNI Fall 2020.
|
| MM
|
Metadata Management. MM is used within the FOLIO community to describe essential bibliographic management functions, such as creating, editing, suppressing, deleting, importing, exporting, replacing, overlaying, and reporting.
|
| Mode of issuance
|
The abstract form of the resource (eg., monograph, subunit).
|
| Net transfers
|
Money transferred between funds during a fiscal year.
|
| Okapi
|
Okapi is the FOLIO-provided gateway system for managing apps and communication between system modules. System administrators and hosting providers use Okapi as an essential tool to manage FOLIO performance, upgrade or remove modules, and maintain available permissions. In contrast, library staff generally only use Okapi when they need to query FOLIO APIs for information. See https://github.com/folio-org/okapi/blob/master/doc/guide.md for more detailed technical documentation.
|
| Order
|
A purchase order featuring a list of titles or packages (physical or electronic) being ordered by a library from a vendor.
|
| Organization
|
Any institution with whom your library interacts (this may or may not be an institution from whom you purchase materials).
|
| Package (in Orders)
|
A purchase order that represents the acquisition of multiple titles.
|
| Parent record
|
The main link in a bound-with situation: It will have an item record (and thus barcode) that all other bibliographic records associated with a given bound-with volume can link to. Child records are those associated bibliographic records. Child records will have LKR fields in the bibliographic record that include the ADM number of the parent record and "Enum. Level.1" information found in the parent record's item record. Doing this allows all item record information in the parent record to display in the child record, so the same barcode, sublibrary, collection, description, call number, etc. will show up for all titles in a bound-with.
|
| Patron blocks
|
Optional limits that libraries can impose on patron circulation privileges, removing privileges when the limits are exceeded. For example, a library can say that if a patron has five lost items, they can no longer borrow books until that number is reduced to four lost items or fewer.
|
| Patron groups
|
Types or classes of library users.
|
| Permission
|
Value granted to a FOLIO user that allows them access to view, create, update or delete records in FOLIO, or to carry out specific FOLIO tasks.
|
| Permission set
|
A group of permissions that allows a user to perform a specific set of tasks.
|
| Persona
|
A detailed biography of a fictitious user of a software product. A software design team creates a persona for each category it deems important to serve.
|
| Piece
|
A subsection of a receiving title that is expected to be received. For example, if the ordered title is a journal subscription, then a piece of that title could be volume one of the journal.
|
| POL
|
Purchase Order Line. A purchase order line contains one of the titles or packages being ordered by the library. Orders can contain multiple order lines.
|
| Proxy
|
A person who is authorized (by a sponsor) to act on their behalf to checkout, renew, recall, etc.
|
| Query search
|
Criteria or elements included in a data request from a system or dB.
|
| quickMARC
|
An editor for MARC records that opens from the Inventory app to edit specific MARC records.
|
| RA
|
Resource Access. RA is used within the FOLIO community to describe functions that allow libraries to circulate and provide access to materials and support patron service needs.
|
| Receiving
|
The management of information about ordered materials that have arrived at a library by delivery from a vendor. Also known as serials check-in and arriving.
|
| Resource type
|
Defined by RDA vocabulary list, rdacontent.
|
| RM
|
Resource Management. RM is used within the FOLIO community to describe a category of acquisitions functions which include Finance/Budgets, Organizations/Vendors, Orders, Invoices, and Electronic Resource Management.
|
| RTAC |
RTAC stands for Real Time Availability Checker. It is a FOLIO module that libraries can use to provide holdings and item availability in a discovery layer. RTAC is configured by your FOLIO systems administrator and does not appear in the FOLIO user interface. |
| Service point
|
A service point in FOLIO is a setting that libraries configure to support circulation functions. Every FOLIO item must have a location, and every location must have an attached service point. You must set up at least one service point to be able to check items in and out; allow patrons to request items; charge and collect fines; and put items in transit between locations at your library.
|
| Shelving lag time
|
Locally determined time-frame between the return of material and the time it should be reshelved. This functionality is not yet in place for FOLIO.
|
| Short-term loan
|
A loan with a loan period specified in minutes or hours. All short-term loan notices are delivered in real time.
|
| SIG
|
Special Interest Group. A SIG consists of a group of subject-matter experts that are interested in contributing to a specific functional area of the FOLIO platform.
|
| Sponsor
|
A person who authorizes another person to do something on his or her behalf, i.e., checkout, renew, recall, etc.
|
| SRS
|
Source Record Storage. A storage layer in FOLIO. If an instance has an underlying MARC record, then this record is stored in SRS. The underlying MARC record is also named the source of truth.
|
| Tag
|
A label applied to a FOLIO record that allows for cross-app faceting, filtering, record batching and reporting.
|
| Tenant
|
A client in FOLIO whose data are stored separately and are accessible and visible separately from other clients. FOLIO installations may be “single-tenant” or “multi-tenant” depending on how their hosting environment is configured. A client is typically a library or a branch library. Each tenant uses its own set of deployed modules.
|
| Token
|
A value in a notice used to dynamically fill content in a notice when it is sent. For example, if a notice template includes the token {{item.title}}, when the notice is generated, {{item.title}} will be replaced by the title of the item to which the notice is referring.
|
| User
|
Any person who interacts with or performs tasks in FOLIO.
|
| UM
|
User Management. UM is used within the FOLIO community to describe practices at libraries for managing patron and staff records, including permissions to the FOLIO system itself.
|
| Vendor
|
Any institution from whom your library purchases materials or services.
|
| Visible permission
|
One that you can see in the list of permissions in the UI. They can be assigned to users directly or used to create groups of permissions called permission sets that can be assigned to users directly.
|
| Voucher
|
A record generated to transmit information to the Accounts Payable system which is needed to make payment on an invoice.
|
1.2 - FOLIO Terminology
The list of terminology and definitions is designed to provide a common framework and language for community members to use when discussing FOLIO. The definitions have been left at a deliberately high level to provide for flexibility and to avoid unintentionally excluding common usage. This approach also recognizes that the definitions as they currently stand may not be in a completed or detailed enough state. This point was emphasized at the Tri-Council meeting on April 13, 2023, particularly around Platform, there was distress over the fact that there are many valid and important uses of the word Platform (e.g. Platform Minimal or Okapi-Stripes Platform) and these current definitions do not reference/acknowledge these terms. As such, this work is ongoing and definitions will continue to be refined appropriately.
FOLIO is an acronym: the “Future Of Libraries Is Open”. This adjective can be used to describe a platform, project, product, or community, among other things.
The FOLIO Project is a community effort to create an open-source library services platform. The FOLIO Project has a governance model that defines three councils and their roles, membership, and other groups.
The **FOLIO Library Services Platform (LSP)[^1] **, is open-source software that implements a Library Services Platform including traditional LMS / ILS and other functionality. The FOLIO LSP is the Product of the FOLIO Project. This is the actualized output of the project, including both code and documentation describing functionality and use.
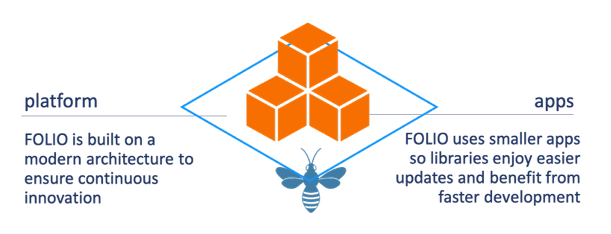
The term FOLIO Platform (see 2016 visualization) refers to the architecture and foundational components of the FOLIO Product that support the suite of apps that make up the full FOLIO LSP. The FOLIO Platform may be used by other projects, such as Project ReShare.
A FOLIO App is a cohesive set of functionality that fulfills a defined business purpose and has a user interface (whether that’s a GUI or API) within the FOLIO LSP. An App is composed of one or more FOLIO Modules.
FOLIO Modules are software components which comprise FOLIO Apps (see platform overview & module types ).
The FOLIO Community is a community of individuals and organizations involved with the FOLIO Project. The community includes libraries, vendors, subject matter experts, developers, documentation writers, etc. The community is open to all, whether affiliated with a FOLIO Member Organization or not. Community members must follow the FOLIO code of conduct.
[^1] A Library Services Platform, or LSP, was a term first coined by Marshall Breeding to distinguish next generation library management systems from the legacy “Integrated Library System” https://librarytechnology.org/document/25609. The definitions and differences between LSPs and ILSes, used in part for marketing purposes, admittedly are flexible and along a continuum. We do not endeavor to provide our own separate, more specific definition, but rather use the term LSP to describe the FOLIO product because we think it is most consistent with what the FOLIO product is and its place in the library management system marketplace.
1.3 - Features
The FOLIO LSP includes the domains that support the library’s operations such as circulation, acquisitions, cataloging, and e-resources management. Each domain is comprised of multiple, smaller apps (for example a check-in or checkout app within the circulation domain). For example, features include the ability to:
- Manage the library inventory including cataloging and bibliographic management functions
- Manage vendors, budgets, orders, and invoicing when acquiring materials
- Manage electronic resources including holdings, licenses, and agreements
- Manage users including library staff, faculty, and students
- Support different patron types, loan types, fines and fees structures, recalls, holds, and various reporting functions
- Circulate items and define circulation rules including loan, fines, notices, and requests policies
- Manage data import and export
1.4 - Benefits
FOLIO is developed through a community collaboration of libraries, vendors, and developers, coming together to build the open-source library services platform. The community of libraries is central to the development of FOLIO’s strategic product roadmap, direction, and governance. Libraries’ subject matter expertise is central to the development of FOLIO and inform the features and functionality across the different FOLIO domains.
Extensible
The FOLIO microservices system architecture supports development efforts and contributions from multiple teams, which can constitute different libraries and/or service providers who work in parallel and focus on their areas of expertise. As a result, the platform can be extended by different developers to deliver new and improved services to users. FOLIO has been developed for interoperability and includes APIs to support external functions.
Modern
FOLIO features a modern user interface that provides for an easy and intuitive way to understand the workflows, the presentation of information, and navigation within the system.
Service choice-oriented
FOLIO is supported via an ‘open source as a service’ model, which allows the library to implement FOLIO independently or choose among multiple service organizations to provide implementation, hosting, and support services. The library can therefore operate a fully supported open source solution with a complete range of services available from a variety of providers.
1.5 - License
The FOLIO project underscores transparency by ensuring the public availability of the code repository, software releases, and the platform roadmap. The open source software is available under a permissive Apache 2 open source license. FOLIO is a project with the Open Library Foundation, a 501(c)(3) non-for-profit organization.
See the Apache 2 license.
2 - Getting Started
Thinking about getting started with FOLIO? Check out the resources below to familiarize yourself with the platform.
See FOLIO in action
Check out these videos to learn about FOLIO:
Ready to experience FOLIO for yourself?
Access one of our demo sites and explore FOLIO features and functionality.
Login: diku_admin / admin
Work with a demo site
Once you’ve accessed a demo site, you can experiment with the platform to see how it works. Some examples of things you can try include:
- Check out an item, and check it back in
- Update an item record with quickMARC
- Update licenses and agreements for an electronic resource
- View and edit a patron record
Install FOLIO for yourself
You’ve played with the platform, and now you’re ready to install something for yourself. There are different ways to set up and run FOLIO. The type of installation you do and the components you install depends upon your goals.
See Install FOLIO for types of installations and deployments.
2.1 - Install FOLIO
Types of installations and deployments
You can work with, install and deploy FOLIO in different ways:
- Pre-built Vagrant boxes
- Single-server deployment
- Kubernetes deployment
Pre-built Vagrant boxes
If you just want to try FOLIO without installing it, you can run one of the pre-built Vagrant boxes. This will take a couple of minutes to download and run a virtual machine with a FOLIO instance and sample data that can be used right away.
See Vagrant boxes for more information.
Single-server
You can choose to host and operate FOLIO locally. In this scenario, the installation of FOLIO is self-managed, and is performed on a single-server without the usage of software orchestration solutions such as Kubernetes. This configuration is recommended if you have a single tenant or you can estimate beforehand the number of tenants and resources that your FOLIO instance will handle; otherwise you should consider a Kubernetes deployment.
One of the goals of FOLIO is extensibility. Libraries and vendors can build on existing apps, or develop new apps that extend the library into areas such as campus ERP, research administration, and more. In addition to the coding and testing tools, a developer will probably want to explore the whole FOLIO system, and would need a local instance. Usually, this is a virtual machine with a single-server deployment of FOLIO.
See Single server with containers for more information.
Kubernetes
FOLIO’s built-in multi-tenant capabilities make it straightforward to harness economies of scale and improve efficiencies for libraries. In this scenario, FOLIO will be deployed on a cluster of servers using Kubernetes for orchestration. This configuration allows the addition of new tenants and hardware resources on demand and it is ideal if you need to scale-up your FOLIO instance in the future.
See Kubernetes example for more information.
Prerequisites
Memory
At least 24 GB memory are needed to run the official platform-complete set of FOLIO modules.
Infrastructure
FOLIO requires
- a PostgreSQL server
- an OpenSearch or Elasticsearch server
- a Kafka server
Optional is
- a MinIO object store or an Amazon S3 bucket
PostgreSQL
FOLIO requires PostgreSQL 12 or any later version.
pg_hba.conf must be configured for md5 password authentication. Some PostgreSQL distributions default to scram-sha-256 password authentication failing the FOLIO installation with this error message:
Opening SQLConnection failed: com/ongres/scram/common/stringprep/StringPreparation
java.lang.NoClassDefFoundError: com/ongres/scram/common/stringprep/StringPreparation
The FOLIO development teams are working on enabling the more secure scram-sha-256 method, see FOLIO-2411 and the issues it lists in its Issues Link section.
2.1.1 - Host names
Choosing the host names of front-end and back-end has implications on deployment, security and performance.
The frond-end host serves the content to be displayed in the browser. The back-end exposes Okapi and the APIs of the back-end modules.
Same host name
Front-end and back-end can be provided on the same host so that they use the same host name, the back-end is served on a special URL path.
Existing example:
Advantages:
- Most secure solution. Using a single host name allows to use the most restrictive configuration regarding cross-origin resource sharing (CORS) and cross-site request forgery (CSRF).
- Most simple security configuration.
Disadvantages:
- Requires a path based proxy. Example snippet for nginx:
        location /okapi/ {
                proxy_pass http://127.0.0.1:9130/;
                proxy_redirect default;
        }

        location / {
                root /var/www/tenanta;
                try_files $uri /index.html;
        }
- Using a content delivery network (CDN) might require different cache configurations for front-end and back-end URL paths.
Two host names on same site
Some FOLIO deployments use different host names for font-end and back-end, and the host names belong to the same site. Example for site folio.org:
“Same site” has a special meaning, learn more at https://web.dev/samesite-cookies-explained/ and https://publicsuffix.org/ .
Advantages:
- Simple host name based configuration, requires no path based proxy configuration.
- Continuously tested on FOLIO’s reference environments.
Disadvantages:
- Slower because the browser needs to send extra “preflight” OPTIONS HTTP requests for cross-origin resource sharing (CORS) protection resulting in latency.
- Less secure as it requires a configuration that weakens the security restrictions regarding cross-origin resource sharing (CORS) and cross-site request forgery (CSRF).
Two host names on different sites
FOLIO doesn’t support running front-end and back-end on host names that belong to different sites.
Fictional example:
This requires removing security restrictions regarding cross-origin resource sharing (CORS) and cross-site request forgery (CSRF) and likely violates security rules required by law or policy.
FOLIO prevents this configuration for the most security sensitive module, the single-sign-on (SSO) module mod-login-saml.
2.1.2 - Single server or PC: fresh install
These are installation instructions for installing a platform-complete distribution of FOLIO on a PC, including inside a Vagrant box. A single PC installation of FOLIO is useful for demo and testing purposes.
The instructions should also work for a demo / testing installation on a single server. Note all of the instructions mentioning <YOUR_IP_ADDRESS> and <YOUR_HOST_NAME>, and configure them according to your network environment.
This is not considered appropriate for a production installation. A production installation should distribute the modules over multiple servers and use some kind of orchestration.
FOLIO Single Server components
A FOLIO instance is divided into two main components. The first component is Okapi, the gateway. The second component is the UI layer which is called Stripes. The single server with containers installation method will install both.
This documentation shows how to install a platform-complete distribution of Lotus.
Throughout this documentation, the sample tenant “diku” will be used. Replace with the name of your tenant, as appropriate.
System requirements
These requirements apply to the FOLIO environment. So for a Vagrant-based install, they apply to the Vagrant VM.
Software requirements
| Requirement |
Recommended Version |
| Operating system |
Ubuntu 20.04.02 LTS (Focal Fossa) 64-bits |
| Java |
OpenJDK 11 |
| PostgreSQL |
PostgreSQL 12 |
Hardware requirements
| Requirement |
FOLIO Base Apps |
FOLIO Extended Apps |
| RAM |
24GB |
40GB |
| CPU |
4 |
8 |
| HD |
100 GB SSD |
350 GB SSD |
Vagrant setup
For testing FOLIO installation on a PC, it’s recommended to use Vagrant to separate the many FOLIO software components from the host PC, and to allow for saved snapshots and rolling back as needed.
-
Install Vagrant.
See the Vagrant download and installation instructions.
-
Install a virtualization product.
For Windows, install VirtualBox.
-
Install an Ubuntu box.
Create a Vagrantfile like the following.
# -*- mode: ruby -*-
# vi: set ft=ruby :

Vagrant.configure("2") do |config|
  config.vm.box = "ubuntu/focal64"

  config.vm.network "forwarded_port", guest: 9130, host: 9130
  config.vm.network "forwarded_port", guest: 80, host: 80
  config.vm.network "forwarded_port", guest: 9200, host: 9200

  config.vm.provider "virtualbox" do |vb|
    vb.memory = "49152"
  end
end
Run vagrant up in the folder with the Vagrantfile.
-
SSH into the Vagrant box.
vagrant ssh
For a Vagrant-based installation, all of the following instructions assume you are working within the Vagrant enviornment via vagrant ssh. You will likely want to open additional ssh connections to the box for later steps such as following changes to the Okapi log file.
Installing Okapi
Okapi requirements
-
Update the APT cache.
sudo apt update
-
Install Java 11 and verify that Java 11 is the system default.
sudo apt -y install openjdk-11-jdk
sudo update-java-alternatives --jre-headless --jre --set java-1.11.0-openjdk-amd64
-
Import the PostgreSQL signing key, add the PostgreSQL apt repository, and install PostgreSQL.
wget --quiet -O - https://www.postgresql.org/media/keys/ACCC4CF8.asc | sudo apt-key add -
sudo add-apt-repository "deb http://apt.postgresql.org/pub/repos/apt/ focal-pgdg main"
sudo apt update
sudo apt -y install postgresql-12 postgresql-client-12 postgresql-contrib-12 libpq-dev
-
Configure PostgreSQL to listen on all interfaces and allow connections from all addresses (to allow Docker connections).
- Edit (via sudo) the file /etc/postgresql/12/main/postgresql.conf to add line listen_addresses = ‘*’ under the “Connection Settings” line in the “Connections and Authentication” setting.
- In the same file, increase max_connections (e.g. to 500). Save and close the file.
- Edit (via sudo) the file /etc/postgresql/12/main/pg_hba.conf to add line host all all 0.0.0.0/0 md5
- Restart PostgreSQL with command sudo systemctl restart postgresql
-
Import the Docker signing key, add the Docker apt repository and install the Docker engine.
sudo apt -y install apt-transport-https ca-certificates gnupg-agent software-properties-common
wget --quiet -O - https://download.docker.com/linux/ubuntu/gpg | sudo apt-key add -
sudo add-apt-repository "deb https://download.docker.com/linux/ubuntu $(lsb_release -cs) stable"
sudo apt update
sudo apt -y install docker-ce docker-ce-cli containerd.io
-
Configure Docker engine to listen on network socket.
-
Create a configuration folder for Docker if it does not exist.
sudo mkdir -p /etc/systemd/system/docker.service.d
-
Create a configuration file /etc/systemd/system/docker.service.d/docker-opts.conf with the following content.
[Service]
ExecStart=
ExecStart=/usr/bin/dockerd -H fd:// -H tcp://127.0.0.1:4243
-
Restart Docker.
sudo systemctl daemon-reload
sudo systemctl restart docker
-
Install docker-compose.
Follow the instructions from official documentation for docker. The instructions may vary depending on the architecture and operating system of your server, but in most cases the following commands will work.
sudo curl -L \
  "https://github.com/docker/compose/releases/download/1.27.4/docker-compose-$(uname -s)-$(uname -m)" \
  -o /usr/local/bin/docker-compose
sudo chmod +x /usr/local/bin/docker-compose
-
Install Apache Kafka and Apache ZooKeeper. Apache Kafka and Apache ZooKeeper are required by FOLIO mod-pubsub. Both Kafka and ZoopKeepr are installed below using docker-compose.
Take into account that you have to change the KAFKA_ADVERTISED_LISTENERS value for the private IP of your server, instead of 10.0.2.15 for a Vagrant box.
mkdir ~/folio-install
cd folio-install
vim docker-compose-kafka-zk.yml
Insert this content into the file. Change the IP Address in KAFKA_ADVERTISED_LISTENERS to the local IP of your server on which you run Kafka:
version: '2'
services:
  zookeeper:
    image: wurstmeister/zookeeper
    container_name: zookeeper
    restart: always
    ports:
      - "2181:2181"
  kafka:
    image: wurstmeister/kafka
    container_name: kafka
    restart: always
    ports:
      - "9092:9092"
      - "29092:29092"
    environment:
      KAFKA_LISTENERS: INTERNAL://:9092,LOCAL://:29092
      KAFKA_ADVERTISED_LISTENERS: INTERNAL://<YOUR_IP_ADDRESS>:9092,LOCAL://localhost:29092
      KAFKA_LISTENER_SECURITY_PROTOCOL_MAP: LOCAL:PLAINTEXT,INTERNAL:PLAINTEXT
      KAFKA_INTER_BROKER_LISTENER_NAME: INTERNAL
      KAFKA_AUTO_CREATE_TOPICS_ENABLE: "true"
      KAFKA_ZOOKEEPER_CONNECT: zookeeper:2181
      KAFKA_BROKER_ID: 1
      KAFKA_LOG_RETENTION_BYTES: -1
      KAFKA_LOG_RETENTION_HOURS: -1
Note: The IP address <YOUR_IP_ADDRESS> should match the private IP of your server. This IP address should be reachable from Docker containers. Therefore, you can not use localhost.
- For a Vagrant installation, the IP address should be 10.0.2.15.
You can use the /ifconfig command in order to determine the private IP.
sudo mkdir /opt/kafka-zk
sudo cp ~/folio-install/docker-compose-kafka-zk.yml /opt/kafka-zk/docker-compose.yml
cd /opt/kafka-zk
sudo docker-compose up -d
Create a database and role for Okapi
You will need to create one database in PostgreSQL to persist the Okapi configuration.
-
Log into the PostgreSQL server as a superuser.
sudo su -c psql postgres postgres
-
Create a database role for Okapi and a database to persist Okapi configuration.
CREATE ROLE okapi WITH PASSWORD 'okapi25' LOGIN CREATEDB;
CREATE DATABASE okapi WITH OWNER okapi;
-
Create a database role and database to persist tenant data.
CREATE ROLE folio WITH PASSWORD 'folio123' LOGIN SUPERUSER;
CREATE DATABASE folio WITH OWNER folio;
-
Exit psql with \q command
Once you have installed the requirements for Okapi and created a database, you can proceed with the installation. Okapi is available as a Debian package that can be easily installed in Debian-based operating systems. You only need to add the official APT repository to your server.
-
Import the FOLIO signing key, add the FOLIO apt repository and install okapi.
wget --quiet -O - https://repository.folio.org/packages/debian/folio-apt-archive-key.asc | sudo apt-key add -
sudo add-apt-repository "deb https://repository.folio.org/packages/ubuntu focal/"
sudo apt update
sudo apt-get -y --allow-change-held-packages install okapi=4.13.2-1 # R1-2022 Okapi version
sudo apt-mark hold okapi
Please note that the R1-2022 FOLIO release version of Okapi is 4.13.2-1. If you do not explicitly set the Okapi version, you will install the latest Okapi release. There is some risk with installing the latest Okapi release. The latest release may not have been tested with the rest of the components in the official release.
-
Configure Okapi to run as a single node server with persistent storage.
- Edit (via sudo) file /etc/folio/okapi/okapi.conf to reflect the following changes:
role="dev"
port_end="9340"
host="<YOUR_IP_ADRESS>"
storage="postgres"
okapiurl="http://<YOUR_IP_ADDRESS>:9130"
docker_registries -- See explanation in okapi.conf file. Default is unauthenticated.
log4j_config=“/etc/folio/okapi/log4j2.properties”
Note: The properties postgres_host, postgres_port, postgres_username, postgres_password, postgres_database should be configured in order to match the PostgreSQL configurations made previously.
Edit (via sudo) log4j2.properties. Make sure Okapi logs into a file and define a RollingFileAppender :
appenders = f

appender.f.type = RollingFile
appender.f.name = File
appender.f.fileName = /var/log/folio/okapi/okapi.log
appender.f.filePattern = /var/log/folio/okapi/okapi-%i.log
appender.f.layout.type = PatternLayout
appender.f.layout.pattern = %d{HH:mm:ss} [$${FolioLoggingContext:requestid}] [$${FolioLoggingContext:tenantid}] [$${FolioLoggingContext:userid}] [$${FolioLoggingContext:moduleid}] %-5p %-20.20C{1} %m%n
appender.f.policies.type = Policies
appender.f.policies.size.type = SizeBasedTriggeringPolicy
appender.f.policies.size.size = 200MB
appender.f.strategy.type = DefaultRollOverStrategy
appender.f.strategy.max = 10

rootLogger.level = info
rootLogger.appenderRefs = f
rootLogger.appenderRef.f.ref = File
-
Restart Okapi
sudo systemctl daemon-reload
sudo systemctl restart okapi
The Okapi log is at /var/log/folio/okapi/okapi.log.
-
Pull module descriptors from the central registry.
A module descriptor declares the basic module metadata (id, name, etc.), specifies the module’s dependencies on other modules (interface identifiers to be precise), and reports all “provided” interfaces. As part of the continuous integration process, each module descriptor is published to the FOLIO Registry at https://folio-registry.dev.folio.org.
curl -w '\n' -D - -X POST -H "Content-type: application/json" \
   -d '{ "urls": [ "https://folio-registry.dev.folio.org" ] }' \
  http://localhost:9130/_/proxy/pull/modules
Okapi log should show something like
INFO  ProxyContext         283828/proxy REQ 127.0.0.1:51424 supertenant POST /_/proxy/pull/modules  okapi-4.13.2
INFO  PullManager          Remote registry at https://folio-registry.dev.folio.org is version 4.13.2
INFO  PullManager          pull smart
  ...
INFO  PullManager          pull: 3466 MDs to insert
INFO  ProxyContext         283828/proxy RES 200 93096323us okapi-4.13.2 /_/proxy/pull/modules
Okapi is up and running!
Create a new tenant
-
Switch to the working directory.
cd ~/folio-install
-
Create a tenant.json file:
{
  "id" : "diku",
  "name" : "Datalogisk Institut",
  "description" : "Danish Library Technology Institute"
}
-
Post the tenant initialization to Okapi.
curl -w '\n' -D - -X POST -H "Content-type: application/json" \
  -d @tenant.json \
  http://localhost:9130/_/proxy/tenants
Note: In this installation guide, the Datalogisk Institut is used as an example, but you should use the information for your organization. Take into account that you have to use the id of your tenant in the next steps.
-
Enable the Okapi internal module for the tenant
curl -w '\n' -D - -X POST -H "Content-type: application/json" \
  -d '{"id":"okapi"}' \
  http://localhost:9130/_/proxy/tenants/diku/modules
Install Elasticsearch
You have to install elasticsearch (ES) in order to be able to do queries. You need to point the related modules, at least mod_pubsub and mod_search to your ES installation (this will be described further down).
Follow this guide to install a three-node Elasticsearch cluster on a Single Server: Installation of Elasticsearch.
Note for completeness: To make use of the full capabilities of FOLIO, it is required to install more services which do not generically belong to FOLIO. For example, if you want to make use of FOLIO’s data export functionality, you have to install a minio Server or make use of an Amazon S3 bucket. The installation of these services and the configuration of FOLIO to connect to these services is not part of this guide. They might be included in later versions of this guide for some commonly employed services.
Install a Folio Backend
-
Post data source information to the Okapi environment for use by deployed modules. The Okapi environment variables will be picked up by every module that makes use of them during deployment. Supply at least these environment variables:
curl -w '\n' -D - -X POST -H "Content-Type: application/json" -d "{\"name\":\"DB_HOST\",\"value\":\"<YOUR_IP_ADDRESS>\"}" http://localhost:9130/_/env
curl -w '\n' -D - -X POST -H "Content-Type: application/json" -d "{\"name\":\"DB_PORT\",\"value\":\"5432\"}" http://localhost:9130/_/env
curl -w '\n' -D - -X POST -H "Content-Type: application/json" -d "{\"name\":\"DB_DATABASE\",\"value\":\"folio\"}" http://localhost:9130/_/env
curl -w '\n' -D - -X POST -H "Content-Type: application/json" -d "{\"name\":\"DB_USERNAME\",\"value\":\"folio\"}" http://localhost:9130/_/env
curl -w '\n' -D - -X POST -H "Content-Type: application/json" -d "{\"name\":\"DB_PASSWORD\",\"value\":\"folio123\"}" http://localhost:9130/_/env
curl -w '\n' -D - -X POST -H "Content-Type: application/json" -d "{\"name\":\"ELASTICSEARCH_HOST\",\"value\":\"<YOUR_IP_ADDRESS>\"}" http://localhost:9130/_/env
curl -w '\n' -D - -X POST -H "Content-Type: application/json" -d "{\"name\":\"ELASTICSEARCH_PASSWORD\",\"value\":\"s3cret\"}" http://localhost:9130/_/env
curl -w '\n' -D - -X POST -H "Content-Type: application/json" -d "{\"name\":\"ELASTICSEARCH_URL\",\"value\":\"http://<YOUR_IP_ADDRESS>:9200\"}" http://localhost:9130/_/env
curl -w '\n' -D - -X POST -H "Content-Type: application/json" -d "{\"name\":\"ELASTICSEARCH_USERNAME\",\"value\":\"elastic\"}" http://localhost:9130/_/env
curl -w '\n' -D - -X POST -H "Content-Type: application/json" -d "{\"name\":\"INITIAL_LANGUAGES\",\"value\":\"eng, ger, swe\"}" http://localhost:9130/_/env
curl -w '\n' -D - -X POST -H "Content-Type: application/json" -d "{\"name\":\"KAFKA_HOST\",\"value\":\"<YOUR_IP_ADDRESS>\"}" http://localhost:9130/_/env
curl -w '\n' -D - -X POST -H "Content-Type: application/json" -d "{\"name\":\"KAFKA_PORT\",\"value\":\"9092\"}" http://localhost:9130/_/env;
curl -w '\n' -D - -X POST -H "Content-Type: application/json" -d "{\"name\":\"OKAPI_URL\",\"value\":\"http://<YOUR_IP_ADDRESS>:9130\"}" http://localhost:9130/_/env
curl -w '\n' -D - -X POST -H "Content-Type: application/json" -d "{\"name\":\"SYSTEM_USER_PASSWORD\",\"value\":\"pub-sub\"}" http://localhost:9130/_/env
Note: Make sure that you use your private IP for the properties DB_HOST, KAFKA_HOST and OKAPI_URL. (In a Vagrant environment, 10.0.2.15 should work.) Change passwords as you like, but make sure that you use the same passwords in your installations of the database and elasticsearch. SYSTEM_USER_PASSWORD will be used by mod-pubsub and mod-search. It needs to be the same as those used for the system users system-user, pub-sub and mod-search (and potentially more system generated users).
Set the ELASTICSEARCH_* variables so that they point to your Elasticsearch installation.
You may at this point also want to set environment variables for modules which are not part of Okapi’s global env vars. Follow these instructions Change Environment Variables of a Module (cf. the section named “When the module has not yet been deployed”).
Confer the module documentations on github to learn about configuration options for the modules by setting environment variables. For example, for mod-search, look at https://github.com/folio-org/mod-search#environment-variables .
You can also find a list of environment variables for each module at the Overview - Metadata section of the module’s page in Folio org’s Dockerhub. For example, for mod-search, this is at https://hub.docker.com/r/folioorg/mod-search.
-
Check out platform-complete.
cd $HOME
git clone https://github.com/folio-org/platform-complete
cd platform-complete
- Checkout the latest stable branch of the repository (one which has undergone bugfest or hotfix testing)
git checkout R1-2022-hotfix-2
-
Deploy and enable the backend modules.
Deploy the backend modules
Deploy all backend modules of the release with a single post to okapi’s install endpoint. This will deploy and enable all backend modules. Start with a simulation run:
curl -w '\n' -D - -X POST -H "Content-type: application/json" -d @$HOME/platform-complete/okapi-install.json http://localhost:9130/_/proxy/tenants/diku/install?simulate=true\&preRelease=false
The system will show you what it will do. It will also enable dependent frontend modules (which may not be of a release version).
Now, actually deploy and enable the backend modules.
Note: Edit the following to “loadSample%3Dtrue” instead if you want to load some reference data (this will populate your inventory with sample data, which might be unwanted if you want to later migrate your own inventory data):
curl -w '\n' -D - -X POST -H "Content-type: application/json" -d @$HOME/platform-complete/okapi-install.json http://localhost:9130/_/proxy/tenants/diku/install?deploy=true\&preRelease=false\&tenantParameters=loadReference%3Dtrue%2CloadSample%3Dfalse
This will pull the Docker images from Docker Hub and spin up a container on your host for each backend module.
Progress can be followed in the Okapi log at /var/log/folio/okapi/okapi.log
This will run for 15 minutes or so.
If that fails, remedy the error cause and try again until the post succeeds.
Check, what is in your Discovery:
curl -w '\n' -D - http://localhost:9130/_/discovery/modules | grep srvcId
There should be 65 modules in your Okapi discovery - those which are in okapi-install.json - if all went well.
Check, what Docker containers are running on your host:
sudo docker ps --all | grep mod- | wc
This should also show the number 65.
Get a list of backend modules that have now been enabled for your tenant:
curl -w '\n' -XGET http://localhost:9130/_/proxy/tenants/diku/modules | grep mod- | wc
There should be 65 of these as well.
Now you have installed a complete FOLIO backend.
Congratulations !
The backend of the new tenant is ready.
Now, you have to set up a Stripes instance for the frontend of the tenant, create a superuser for the tenant and optionally secure Okapi.
Install the frontend, Folio Stripes
You have an Okapi instance running, you can proceed to install Stripes. Stripes is bundled and deployed on a per tenant basis.
Install Stripes and nginx in a Docker container. Use the docker file of platform-complete.
  cd ~/platform-complete
  edit docker/Dockerfile
    ARG OKAPI_URL=http(s)://<YOUR_DOMAIN_NAME>/okapi
    ARG TENANT_ID=diku # Or change to your tenant's name
<YOUR_DOMAIN_NAME> is usually your server name (host name plus domain), unless you are doing a redirect from some other domain. The subpath /okapi of your domain name will be redirected to port 9130 below, in your nginx configuration. Thus, the Okapi port 9130 does not need to be released to outside of your network.
Edit docker/nginx.conf to include this content below. Replace the server name and IP address with what is in the original version of nginx.conf:
server {
  listen 80;
  server_name <YOUR_SERVER_NAME>;
  charset utf-8;
  access_log  /var/log/nginx/host.access.log  combined;

  # front-end requests:
  # Serve index.html for any request not found
  location / {
    # Set path
    root        /usr/share/nginx/html;
    index       index.html index.htm;
    include mime.types;
    types {
      text/plain lock;
    }
    try_files $uri /index.html;
  }

  # back-end requests:
  location /okapi {
    rewrite ^/okapi/(.*) /$1 break;
    proxy_pass http://<YOUR_IP_ADDRESS>:9130/;
  }
}
<YOUR_SERVER_NAME> should be the real name of your server in your network. <YOUR_SERVER_NAME> should consist of host name plus domain name, e.g. myserv.mydomain.edu. If you are not doing a redirect <YOUR_SERVER_NAME> equals to <YOUR_DOMAIN_NAME>.
Note: If you want to host multiple tenants on a server, you can configure NGINX to either open a new port for each tenant or set up different paths on the same port (e.g. /tenat1, /tenant2).
Edit the url and tenant in stripes.config.js. The url will be requested by a FOLIO client, thus a browser. Make sure that you use the public IP or domain of your server. Use http only if you want to access your FOLIO installation only from within your network.
  edit stripes.config.js
      okapi: { 'url':'http(s)://<YOUR_DOMAIN_NAME>/okapi', 'tenant':'diku' },
You might also edit branding in stripes.config.js, e.g. add your own logo and favicon as desired. Edit these lines:
  branding: {
    logo: {
      src: './tenant-assets/mybib.gif',
      alt: 'My Folio Library',
    },
    favicon: {
      src: './tenant-assets/mybib_icon.gif'
    },
  }
Build the Docker container
Build the docker container which will contain stripes and nginx:
  sudo su
  docker build -f docker/Dockerfile --build-arg OKAPI_URL=http://<YOUR_DOMAIN_NAME>/okapi --build-arg TENANT_ID=diku -t stripes .
Sending build context to Docker daemon  1.138GB
Step 1/19 : FROM node:15-alpine as stripes_build
...
Step 19/19 : ENTRYPOINT ["/usr/bin/entrypoint.sh"]
 ---> Running in a47dce4e3b3e
Removing intermediate container a47dce4e3b3e
 ---> 48a532266f21
Successfully built 48a532266f21
Successfully tagged stripes:latest
This will run for approximately 15 minutes.
Make sure nginx is not already running on your VM
sudo service nginx stop
You will get an error if it was not already running, which is fine.
Make sure nothing else is running on port 80.
sudo apt install net-stat
netstat -anpe | grep ":80"
You should get no results.
Start the Docker container
Redirect port 80 from the outside to port 80 of the docker container. (When using SSL, port 443 has to be redirected.)
nohup docker run --name stripes -d -p 80:80 stripes
(Optionally) Log in to the Docker container
Check if your config file looks o.k. and follow the access log inside the container:
  docker exec -it <container_id> sh
  vi /etc/nginx/conf.d/default.conf

  tail -f /var/log/nginx/host.access.log
Exit sudo
exit
Enable the frontend modules for your tenant
Use the parameter deploy=false of Okapi’s install endpoint for the frontend modules and post the list of frontend modules stripes-install.json to the install endpoint. This will enable the frontend modules of the release version for your tenant.
First, simulate what will happen:
curl -w '\n' -D - -X POST -H "Content-type: application/json" -d @$HOME/platform-complete/stripes-install.json http://localhost:9130/_/proxy/tenants/diku/install?simulate=true\&preRelease=false
Then, enable the frontend modules for your tenant:
curl -w '\n' -D - -X POST -H "Content-type: application/json" -d @$HOME/platform-complete/stripes-install.json http://localhost:9130/_/proxy/tenants/diku/install?deploy=false\&preRelease=false\&tenantParameters=loadReference%3Dfalse
Get a list of modules which have been enabled for your tenant:
curl -w '\n' -XGET http://localhost:9130/_/proxy/tenants/diku/modules | grep id | wc
There should be 131 modules enabled.
This number is the sum of the following:
56 Frontend modules (folio_*)
9 Edge modules
65 Backend modules (R1-2022) (mod-*)
1 Okapi module (4.13.2)
These are all R1 (Lotus) modules.
You have installed all modules now. Check again what containers are running in docker:
sudo docker ps --all | wc
This should show 72 containers running.
The following containers are running on your system, but do not contain backend modules:
- Stripes
- 3 times Elasticsearch
- Kafka
- Zookeper
In sum, these are 6 containers which do not run backend modules. Also subtract the header line (of “docker ps”), and you will arrive at
72 - 7 = 65 containers which run backend modules .
Create a superuser
You need to create a superuser for your tenant in order to be able to administer it. This is a multi step process and the details can be found in the Okapi documentation. You can use a PERL script to execute these steps automatically. You only need to provide the tenant id, a username/password for the superuser and the URL of Okapi.
Install gcc on Ubuntu 20 (prerequisite to install Perl modules from cpan)
sudo apt install gcc
gcc --version
gcc (Ubuntu 9.3.0-17ubuntu1~20.04) 9.3.0

sudo apt install make
Install prerequiste Perl modules
sudo cpan install LWP.pm
sudo cpan install JSON.pm
sudo cpan install UUID::Tiny
Use the bootstrap-superuser.pl Perl script to create a superuser:
wget "https://raw.githubusercontent.com/folio-org/folio-install/master/runbooks/single-server/scripts/bootstrap-superuser.pl"
perl bootstrap-superuser.pl \
  --tenant diku --user diku_admin --password admin \
  --okapi http://localhost:9130
Now Stripes is running on port 80 (or 443, if you configured SSL) and you can open it using a browser.
Go to http(s)://<YOUR_HOST_NAME>/.
Log in with the credentials of the superuser that you have created.
Create Elasticsearch Index
Note : You might want to defer creating the ES index to a point of time after you have migrated some data to your freshly created FOLIO instance. If you have loaded sample data above and do not plan to migrate data, then you should create the index now.
[Note aside : This section follows https://github.com/folio-org/mod-search#recreating-elasticsearch-index ]
Create Elasticsearch index for the first time
Assign the following permission to user diku_admin:
search.index.inventory.reindex.post (Search - starts inventory reindex operation)
Use the “Users” app of the UI.
Get a new Token:
export TOKEN=$( curl -s -S -D - -H "X-Okapi-Tenant: diku" -H "Content-type: application/json" -H "Accept: application/json" -d '{ "tenant" : "diku", "username" : "diku_admin", "password" : "admin" }' http://localhost:9130/authn/login | grep -i "^x-okapi-token: " )
curl -w '\n' -D - -X POST -H "$TOKEN" -H "X-Okapi-Tenant: diku" -H "Content-type: application/json" -d '{ "recreateIndex": true, "resourceName": "instance" }' http://localhost:9130/search/index/inventory/reindex
HTTP/1.1 200 OK
vary: origin
Content-Type: application/json
Date: Fri, 22 Jul 2022 19:00:00 GMT
transfer-encoding: chunked

{"id":"02c8e76a-0606-43f2-808e-86f3c48b65c6","jobStatus":"In progress","submittedDate":"2022-07-22T19:00:00.000+00:00"}
Follow okapi.log. You will see a lot of logging:
/inventory-view RES 200 mod-inventory-storage …
Posting to the endpoint /search/index/inventory/reindex causes actions on all 3 elasticsearch containers (nodes).
Indexing of 200,000 instances takes 5-6 minutes.
Monitoring the reindex process
(This section follows https://github.com/folio-org/mod-search#monitoring-reindex-process .)
There is no end-to-end monitoring implemented yet, however it is possible to monitor it partially. In order to check how many records published to Kafka topic use inventory API. Instead of the id “02c8e76a-0606-43f2-808e-86f3c48b65c6” use the id that has been reported by your post to /search/index/inventory/reindex above:
curl -w '\n' -D - -X GET -H "$TOKEN" -H "X-Okapi-Tenant: diku" -H "Content-type: application/json" http://localhost:9130/instance-storage/reindex/02c8e76a-0606-43f2-808e-86f3c48b65c6
HTTP/1.1 200 OK
vary: origin
Content-Type: application/json
transfer-encoding: chunked

{
  "id" : "02c8e76a-0606-43f2-808e-86f3c48b65c6",
  "published" : 224823,
  "jobStatus" : "Ids published",
  "submittedDate" : "2022-07-22T19:15:00.000+00:00"
}
Compare the number “published” to the number of instance records that you have actually loaded or migrated to your FOLIO inventory.
Confirm that FOLIO is running
Log in to your frontend: E.g., go to http://<YOUR_HOST_NAME>/ in your browser.
Can you see the installed modules in Settings - Installation details ?
Do you see the right okapi version, 4.13.2-1 ?
Does everything look good ?
Il sistema è pronto !
2.1.3 - Single server with containers
A single server installation is being considered a non-production installation. For a production installation some kind of orchestration should be applied. A single server installation of FOLIO is useful for demo and testing purposes.
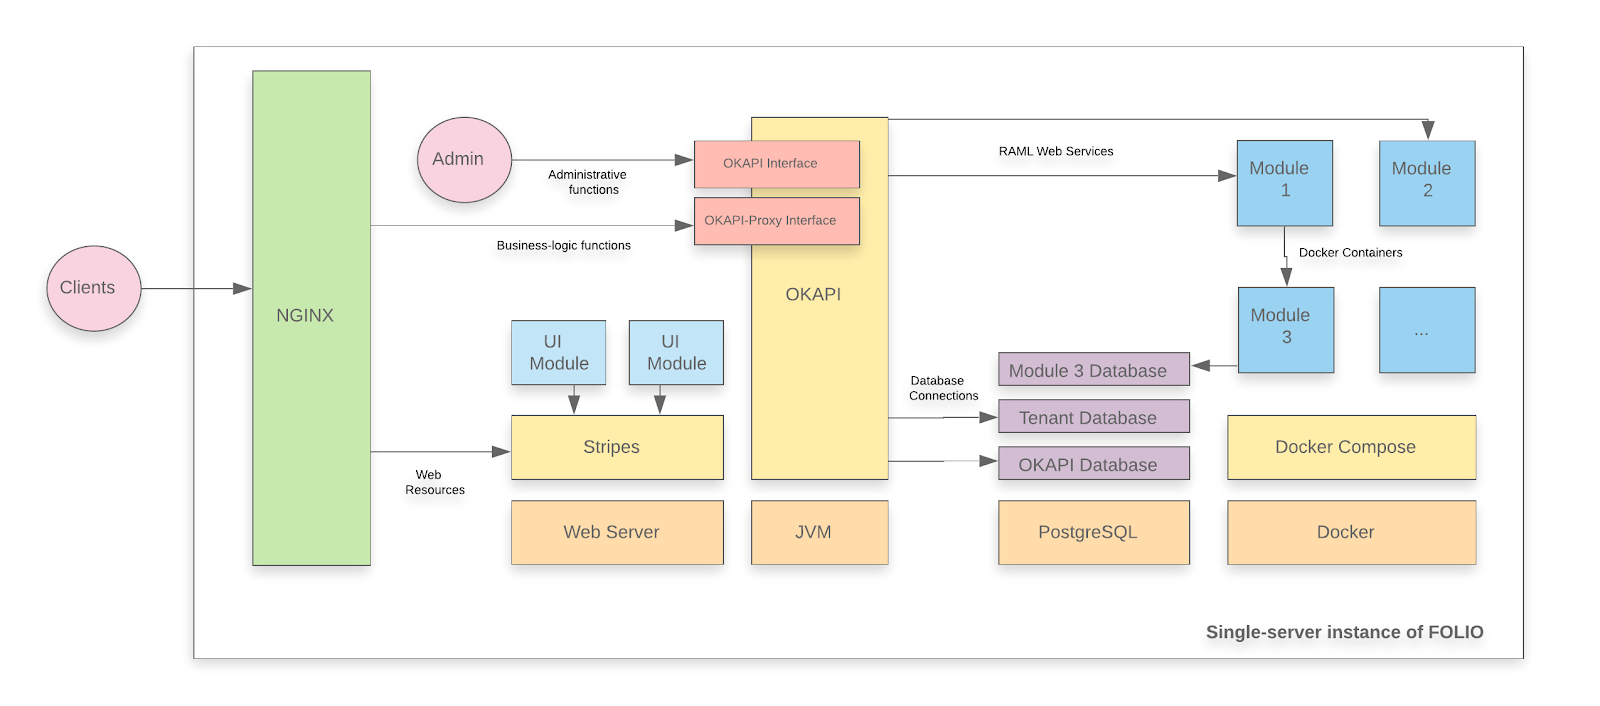
A FOLIO instance is divided into two main components. The first component is Okapi, the gateway. The second component is the UI layer which is called Stripes. The single server with containers installation method will install both.
Changes in the documentation
There are some changes in the idea of this documentation as compared to the documentations for previous releases (cf. Juniper or Iris documentations).
- This is a documentation for an upgrade of your FOLIO system. It assumes that you have already successfully installed Juniper (GA or a Juniper hotfix release) and now want to upgrade your system to Kiwi. If you are deploying FOLIO for the first time, or if you want to start with a fresh installation for whatever reasons, go to the Juniper single server documentation and come back here when you have installed Juniper.
- This documentation assumes that you have installed the platform-complete distribution and want to upgrade the modules of that distribution. Previous release documentations have been written for the more concise “platform-core” distribution. The platform-core distribution is not being supported, anymore.
System requirements
Software requirements
| Requirement |
Recommended Version |
| Operating system |
Ubuntu 20.04.02 LTS (Focal Fossa) 64-bits |
| FOLIO system |
Juniper (R2-2021) |
Hardware requirements
| Requirement |
FOLIO Extended Apps |
| RAM |
40GB |
| CPU |
8 |
| HD |
350 GB SSD |
I. Before the Upgrade
First do Ubuntu Updates & Upgrades
sudo apt-get update
sudo apt-get upgrade
sudo reboot
Check if all Services have been restarted after reboot: Okapi, postgres, docker, the docker containers (do: docker ps –all | more ). Stripes and nginx (you have started these in one container if you have followed the Juniper docs. Re-start this container).
The following actions in this section have been taken from the Kiwi Release Notes. There might be more actions that you might need to take for the upgrade of your FOLIO installation. If you are unsure what other steps you might need to take, study the Release Notes.
i. Change all duplicate item barcodes
Item barcode is unique now. Duplicate item barcodes fail the upgrade.
Before upgrade: Change all duplicate item barcodes. Find them with this SQL:
pslq folio
SET search_path TO diku_mod_inventory_storage;
SELECT lower(jsonb->>'barcode')
FROM item
GROUP BY 1
HAVING count(*) > 1;
 lower
-------
(0 rows)
Change “diku” to the name of your tenant. Use Inventory Item Barcode search to edit the duplicate barcode.
ii. Change all holdings sources to FOLIO
Holdings created by a MARC Bib, not a MARC Holdings, showed the source = MARC. The behavior was changed to show source = FOLIO for such holdings. Database tables might contain holdings records with incorrect source value. See here MODSOURMAN-627 - Script for retrieving holding by specific conditions.
Log in to your postgres database (on linux console, type “psql -U folio folio”) and select the Holdings where source name is not FOLIO or MARC :
SET search_path TO diku_mod_inventory_storage;
SELECT *
FROM holdings_record
WHERE holdings_record.jsonb ->> 'sourceId' = (
  SELECT id::text
  FROM holdings_records_source
  WHERE holdings_records_source.jsonb ->> 'name' != 'FOLIO' AND
    holdings_records_source.jsonb ->> 'name' != 'MARC');
(0 rows)

(END)
Replace ${tenant} by the name of your tenant. On a standard (test or demo) install, the tenant is “diku”.
If the holdings source is anything other than FOLIO or MARC (e.g. -), then change it to FOLIO.
iii. Install Elasticsearch
If you have not already done so in your Juniper Install (it was optional there) install Elasticsearch now in your running Juniper instance. Follow this guide to install a 3-node Elasticsearch cluster on a Single Server: Installation of Elasticsearch. This will also install mod-search and the frontend modules folio_inventory-es and folio_search in Juniper.
iv.Install a minIO-Server
If you want to use Data Export, you either have to use Amazon S3 or a minIO server.
So, for anyone who plans to use MinIO server instead of Amazon S3:
External storage for generated MARC records should be configured to MinIO server by changing ENV variable AWS_URL.
Installation of a MinIO server is not being covered in this documentation. Refer to:
MinIO Deployment and Management ,
Deploy MinIO Standalone .
v. More preparatory steps
There might be more preparatory steps that you need to take for your installation. If you are unsure what other steps you might need to take, study the Kiwi Release Notes.
II. Main Processing: Upgrade Juniper => Kiwi
This documentation assumes that you have Juniper Hotfix#3 running. Upgrade procedures for other Hotfixes or the GA Release might vary slightly. In particular, if this documentation refers to Juniper Release module versions, check if you have exactly that version running and if not, use the version that you had deployed.
II.i. Upgrade the Okapi Version / Restart Okapi
This needs to be done first, otherwise Okapi can not pull the new modules.
Read the Okapi Release Version from the platform-complete/install.json file.
- Clone the repository, change into that directory:
git clone https://github.com/folio-org/platform-complete
cd platform-complete
git fetch
There is a new Branch R3-2021-hotfix-2. We will deploy this version.
Check out this Branch.
Stash local changes. This should only pertain to stripes.config.js .
Discard any changes which you might have made in Juniper on install.json etc.:
git restore install.json
git restore okapi-install.json
git restore stripes-install.json
git restore package.json

git stash save
git checkout master
git pull
git checkout R3-2021-hotfix-2
git stash pop
Read the R3 Okapi version from install.json: okapi-4.11.1
Fetch Okapi as a Debian package from repository.folio.org .
Import the FOLIO signing key, add the FOLIO apt repository, install okapi (of this release):
wget --quiet -O - https://repository.folio.org/packages/debian/folio-apt-archive-key.asc | sudo apt-key add -
sudo add-apt-repository "deb https://repository.folio.org/packages/ubuntu focal/"
sudo apt-get update
sudo apt-get -y --allow-change-held-packages install okapi=4.11.1-1
Start Okapi in cluster mode
I install Okapi in cluster mode, because this is the appropriate way to install it in a production environment (although it is being done on a single server here, this procedure could also be applied to a multi-server environment). Strictly speaking, on a single server, it is not necessary to deploy Okapi in cluster mode. So you might want to stay with the default role “dev”, instead of “cluster”.
Change the port range in okapi.conf . Compared to Juniper, this needs to be done now, because Elasticsearch will occupy ports 9200 and 9300 (or is already occupying them) :
vim /etc/folio/okapi/okapi.conf
# then change the following lines to:
      - role="cluster"
      - cluster_config="-hazelcast-config-file /etc/folio/okapi/hazelcast.xml"
      - cluster_port="9001"
      - port_start="9301"
      - port_end="9520"
      - host="10.X.X.X"  # change to your host's IP address
      - nodename="10.X.X.X"
You can find out the node name that Okapi uses like this: curl -X GET http://localhost:9130/_/discovery/nodes . You have to use that value if you deploy Okapi in cluster mode. Not your host name and not “localhost”.
Edit interface and members in hazelcast.xml (if you deploy Okapi in cluster mode). If you run Okapi on a single server, this is your local IP address.
vim /etc/folio/okapi/hazelcast.xml
...
<tcp-ip enabled="true">
                <interface>10.X.X.X</interface>  # replace by your host's IP address
                <member-list>
                    <member>10.X.X.X</member>    # replace by your host's IP address
                </member-list>
</tcp-ip>
Send new Environment Variables for Hazelcast to Okapi (in case you haven’t been using Hazelcast so far):
curl -w '\n' -D - -X POST -H "Content-Type: application/json" -d "{\"name\":\"OKAPI_CLUSTERHOST\",\"value\":\"10.X.X.X\"}" http://localhost:9130/_/env
curl -w '\n' -D - -X POST -H "Content-Type: application/json" -d "{\"name\":\"HAZELCAST_IP\",\"value\":\"10.X.X.X\"}" http://localhost:9130/_/env
curl -w '\n' -D - -X POST -H "Content-Type: application/json" -d "{\"name\":\"HAZELCAST_PORT\",\"value\":\"5701\"}" http://localhost:9130/_/env
curl -w '\n' -D - -X POST -H "Content-Type: application/json" -d "{\"name\":\"HAZELCAST_FILE\",\"value\":\"/etc/folio/okapi/hazelcast.xml\"}" http://localhost:9130/_/env
Restart Okapi:
sudo systemctl daemon-reload
sudo systemctl restart okapi.service
Follow /var/log/folio/okapi/okapi.log . You should read something like this:
INFO DeploymentManager shutdown
...
Now Okapi will re-start your modules. Follow the okapi.log. It will run for 2 or 3 minutes. Check if all modules are running:
docker ps --all | grep "mod-" | wc
  62
Retrieve the list of modules which are now being enabled for your tenant (just for your information):
curl -w '\n' -XGET http://localhost:9130/_/proxy/tenants/diku/modules
...
}, {
  "id" : "okapi-4.11.1"
} ]
You should see 9 Edge modules (if you have started from Juniper HF#3; if you have started from Juniper-GA, you will see only 8 Edge modules), 52 Frontend modules (folio_*), 62 Backend modules (mod-*) (These are the modules of Juniper, platform-complete) + the Kiwi-Version of Okapi (4.11.1).
II.ii. Pull module descriptors from the central registry
A module descriptor declares the basic module metadata (id, name, etc.), specifies the module’s dependencies on other modules (interface identifiers to be precise), and reports all “provided” interfaces. As part of the continuous integration process, each Module Descriptor is published to the FOLIO Registry at https://folio-registry.dev.folio.org.
curl -w '\n' -D - -X POST -H "Content-type: application/json" \
  -d { "urls": [ "https://folio-registry.dev.folio.org" ]  http://localhost:9130/_/proxy/pull/modules
Okapi log should show something like
 INFO  ProxyContext         283828/proxy REQ 127.0.0.1:51424 supertenant POST /_/proxy/pull/modules  okapi-4.11.1
 INFO  PullManager          Remote registry at https://folio-registry.dev.folio.org is version 4.11.1
 INFO  PullManager          pull smart
  ...
 INFO  PullManager          pull: 3466 MDs to insert
 INFO  ProxyContext         283828/proxy RES 200 93096323us okapi-4.11.1 /_/proxy/pull/modules
II.iii. Deploy a compatible FOLIO backend
- Post data source information to the Okapi environment for use by deployed modules
curl -w '\n' -D - -X POST -H "Content-Type: application/json" -d "{\"name\":\"ELASTICSEARCH_HOST\",\"value\":\"10.X.X.X\"}" http://localhost:9130/_/env;
curl -w '\n' -D - -X POST -H "Content-Type: application/json" -d "{\"name\":\"ELASTICSEARCH_URL\",\"value\":\"http://10.X.X.X:9200\"}" http://localhost:9130/_/env;
curl -w '\n' -D - -X POST -H "Content-Type: application/json" -d "{\"name\":\"ELASTICSEARCH_USERNAME\",\"value\":\"elastic\"}" http://localhost:9130/_/env;
curl -w '\n' -D - -X POST -H "Content-Type: application/json" -d "{\"name\":\"ELASTICSEARCH_PASSWORD\",\"value\":\"s3cret\"}" http://localhost:9130/_/env;  # Use the password that you have chosen for Elasticsearch above !!
curl -w '\n' -D - -X POST -H "Content-Type: application/json" -d "{\"name\":\"INITIAL_LANGUAGES\",\"value\":\"eng, ger, swe\"}" http://localhost:9130/_/env;  # replace by the language codes for the languages that you need to support
Change 10.X.X.X to your local IP address. You can choose up to five INITIAL_LANGUAGES. To find out the language codes, view here mod-search: multi language search support .
The Okapi environment should now look something like this:
 curl -X GET http://localhost:9130/_/env
[ {
  "name" : "DB_DATABASE",
  "value" : "folio"
}, {
  "name" : "DB_HOST",
  "value" : "10.X.X.X"
}, {
  "name" : "DB_PASSWORD",
  "value" : "folio123"
}, {
  "name" : "DB_PORT",
  "value" : "5432"
}, {
  "name" : "DB_USERNAME",
  "value" : "folio"
}, {
  "name" : "ELASTICSEARCH_HOST",
  "value" : "10.X.X.X"
}, {
  "name" : "ELASTICSEARCH_PASSWORD",
  "value" : "s3cret"
}, {
  "name" : "ELASTICSEARCH_URL",
  "value" : "http://10.X.X.X:9200"
}, {
  "name" : "ELASTICSEARCH_USERNAME",
  "value" : "elastic"
}, {
  "name" : "HAZELCAST_FILE",
  "value" : "/etc/folio/okapi/hazelcast.xml"
}, {
  "name" : "HAZELCAST_IP",
  "value" : "10.X.X.X"
}, {
  "name" : "HAZELCAST_PORT",
  "value" : "5701"
}, {
  "name" : "INITIAL_LANGUAGES",
  "value" : "eng, ger, swe"
}, {
  "name" : "KAFKA_HOST",
  "value" : "10.X.X.X"
}, {
  "name" : "KAFKA_PORT",
  "value" : "9092"
}, {
  "name" : "OKAPI_CLUSTERHOST",
  "value" : "10.X.X.X"
}, {
  "name" : "OKAPI_URL",
  "value" : "http://10.X.X.X:9130"
}, {
  "name" : "SYSTEM_USER_PASSWORD",
  "value" : "pub-sub"
} ]
If you chose a different SYSTEM_USER_PASSWORD than the default (which you should do on a production system), then you will have to change the password of the user “pub-sub” in the system to the same value. Change the password of the user pub-sub via Settings - Passwords menu. Attention: If you change the password of the User pub-sub, then you will have to undeploy and re-deploy mod-pubsub ! Just upgrading mod-pubsub will not be enough. Otherwise, the cirulation log won’t work.
- Deploy the backend modules
Sidestep: Look, how many containers are running already now:
sudo docker ps | grep -v “^CONTAINER” | wc -l
68 containers are running:
- 62 Backend Modules of R2-2021
- Stripes with nginx
- 3 Nodes Elasticsearch
- Kafka & Zookeeper
2.1. Upgrade and enable mod-pubsub
First do a simulation run:
curl -w '\n' -D - -X POST -H "Content-type: application/json" -d '[ { "id" : "mod-pubsub-2.4.3", "action" : "enable" } ]' http://localhost:9130/_/proxy/tenants/diku/install?simulate=true
The deploy the module and enable it for the tenant (replace “diku” by the name of your tenant):
curl -w '\n' -D - -X POST -H "Content-type: application/json" -d '[ { "id" : "mod-pubsub-2.4.3", "action" : "enable" } ]' http://localhost:9130/_/proxy/tenants/diku/install?deploy=true\&preRelease=false\&tenantParameters=loadReference%3Dtrue
HTTP/1.1 200 OK
The old module instance, mod-pubsub-2.3.3, has been automatically undeployed by this operation.
2.2 Deploy all the other backend modules
Remove mod-pubsub-2.4.3 from the list ~/platform-complete/okapi-install.json because it has already been deployed.
Deploy all backend modules with this single script deploy-all-backend-modules.sh . You will also need this script deploy-backend-module.sh :
This will download all the necessary container images for the backend modules from Docker Hub and deploy them as containers to the local system :
./deploy-all-backend-modules.sh ~/platform-complete/okapi-install.json <YOUR_IP_ADDRESS>
This script will run for approx. 15 minutes. It will spin up one Docker container for each backend module using Okapi’s /discovery/modules endpoint.
You can follow the progress on the terminal screen and/or in /var/lib/folio/okapi/okapi.log .
Now the R3 (Kiwi) backend modules have been deployed, but have not yet been enabled for your tenant.
In addition, the R2 (Juniper) containers are still running on your system. The latter are enabled. This means that, right now, the system is still in the state “R2-2021 (Juniper)”, except for Okapi (but the Okapi is downward compatible to R2) and mod-pubsub.
There are 61 backend modules of R2 (all, except for mod-pubsub) and 65 backend modules of R3 running as containers on your system. Check this by typing
docker ps --all | grep "mod-" | wc
    126
Side Remark: Three of the backend modules have been deployed twice in the same version, because for those backend modules, the R2 version is the same as the R3 version. These modules are:
  mod-service-interaction:1.0.0
  mod-graphql:1.9.0
  mod-z3950-2.4.0
.
II.iv. Enable the modules for your tenant
Remove mod-pubsub-2.4.3 and okapi from ~/platform-complete/install.json because they have already been enabled.
Enable frontend and backend modules in a single post. But first, do a simulate run. Don’t deploy the modules because they have already been deployed (use the parameter deploy=false). Load reference data of the modules, but no sample data. If you don’t load reference data for the new modules, you might not be able to utilize the modules properly.
First, do a simulate run (replace “diku” by the name of your tenant):
curl -w '\n' -D - -X POST -H "Content-type: application/json" -d @/usr/folio/platform-complete/install.json http://localhost:9130/_/proxy/tenants/diku/install?simulate=true\&preRelease=false
Then, do enable the modules:
curl -w '\n' -D - -X POST -H "Content-type: application/json" -d @/usr/folio/platform-complete/install.json http://localhost:9130/_/proxy/tenants/diku/install?deploy=false\&preRelease=false\&tenantParameters=loadReference%3Dtrue
...
HTTP/1.1 100 Continue

HTTP/1.1 200 OK
Side Remark: folio_inventory-es-6.4.0, a frontend module POC for using mod-inventory with Elasticsearch, has been kept and even updated. But in Kiwi, you won`t need it, because there, mod-inventory and folio_inventory work with Elasticsearch, anyway. Therefore, you might want to disable folio_inventory-es-6.4.0.
Just for your information: Look, how many backend modules have now been deployed on your server:
curl -w '\n' -D - http://localhost:9130/_/discovery/modules | grep srvcId | wc
 128
The number 128 includes 5 Edge modules. Another important information: Get a list of modules (frontend + backend) that have now been enabled for your tenant:
curl -w '\n' -XGET http://localhost:9130/_/proxy/tenants/diku/modules | grep id | wc
  132
This number is the sum of the following:
- 56 Frontend modules (including folio_inventory-es)
- 10 Edge modules
- 65 Backend modules (R3-2021)
- 1 Okapi module (4.11.1)
These are all R3 (Kiwi) modules.
The backend of the new tenant is ready. Now, you have to set up a new Stripes instance for the frontend of the tenant.
Install Stripes and nginx in a Docker container. Use the docker file of platform-complete. Change OKAPI_URL to your server name or SAN - usually the name for which you have an SSL certificate. Change the TENANT_ID to your tenant ID:
cd ~/platform-core
edit docker/Dockerfile
    ARG OKAPI_URL=http(s)://<YOUR_DOMAIN_NAME>/okapi
    ARG TENANT_ID=diku # Or change to your tenant's name
Use https if possible, i.e. use an SSL certificate. <YOUR_DOMAIN_NAME> should then be the fully qualified domain name (FQDN) for which your certificate is valid, or a server alias name (SAN) which applies to your certificate. If using http, it is your server name (host name plus domain). The subpath /okapi of your domain name will be redirected to port 9130 below, in your nginx configuration.
Configure webserver to serve Stripes webpack: Edit docker/nginx.conf. Place your local server name – this is not necessarily equal to the server name for which you have an SSL certificate ! – in server_name and use your IP address in proxy_pass :
  edit docker/nginx.conf
server {
  listen 80;
  server_name <YOUR_SERVER_NAME>;
  charset utf-8;
  access_log  /var/log/nginx/host.access.log  combined;

  # front-end requests:
  # Serve index.html for any request not found
  location / {
    # Set path
    root        /usr/share/nginx/html;
    index       index.html index.htm;
    include mime.types;
    types {
      text/plain lock;
    }
    try_files $uri /index.html;
  }

  # back-end requests:
  location /okapi {
    rewrite ^/okapi/(.*) /$1 break;
    proxy_pass http://<YOUR_IP_ADDRESS>:9130/;
  }
}
<YOUR_SERVER_NAME> should be the real name of your server in your network. <YOUR_SERVER_NAME> should consist of host name plus domain name, e.g. myserv.mydomain.edu.
Edit the url and tenant in stripes.config.js. The url will be requested by a FOLIO client, thus a browser. Make sure that you use the public IP or domain of your server. Use http only if you want to access your FOLIO installation only from within your network.
  edit stripes.config.js
      okapi: { 'url':'http(s)://<YOUR_DOMAIN_NAME>/okapi', 'tenant':'diku' },
You might also edit branding in stripes.config.js, e.g. add your own logo and favicon as desired. Edit these lines:
  branding: {
    logo: {
      src: './tenant-assets/mybib.gif',
      alt: 'My Folio Library',
    },
    favicon: {
      src: './tenant-assets/mybib_icon.gif'
    },
  }
Finally, build the docker container which will contain Stripes and nginx :
  sudo su
  docker build -f docker/Dockerfile --build-arg OKAPI_URL=http(s)://<YOUR_DOMAIN_NAME>/okapi --build-arg TENANT_ID=diku -t stripes .
Sending build context to Docker daemon  1.138GB
Step 1/19 : FROM node:15-alpine as stripes_build
...
Step 19/19 : ENTRYPOINT ["/usr/bin/entrypoint.sh"]
 ---> Running in a47dce4e3b3e
Removing intermediate container a47dce4e3b3e
 ---> 48a532266f21
Successfully built 48a532266f21
Successfully tagged stripes:latest
This will run for approximately 15 minutes.
Stop the old Stripes container: docker stop
Completely free your port 80. Look if something is still running there: e.g., do
netstat -taupn | grep 80
If there should be something still running on port 80, kill these processes.
Start the stripes container:
Redirect port 80 from the outside to port 80 of the docker container:
nohup docker run -d -p 80:80 stripes
Log in to your frontend: E.g., go to http://<YOUR_HOST_NAME>/ in your browser.
-
Can you see the R3 modules in Settings - Installation details ?
-
Do you see the right okapi version, 4.11.1-1 ?
-
Does everything look good ?
If so, remove the old stripes container: docker rm <container id of your old stripes container> .
II.vi. Cleanup
Clean up. Undeploy all unused containers.
In general, all R2 modules have to be removed now. But some care has to be taken.
a) If you have more than one tenant on your server, some tenants may still need R2 modules ! Don’t delete those R2 modules. Check also for your supertenant; did you enable anything else than okapi for it ?
b) Sometimes, R2 versions are the same as R3 versions. In this case, you will have two containers of the same module version running on your system (because we have deployed it twice). You might just leave it as is. Okapi will do some kind of round robin between the two module instances.
But if you decide to delete (=undeploy) one of those containers from Okapi’s discovery, you should disable and re-enable the module for your tenants, afterwards.
Create a list of containers which are in your okapi discovery
curl -w '\n' -XGET http://localhost:9130/_/discovery/modules | jq '.[] | .srvcId + "/" + .instId' > dockerps.sh
sort dockerps.sh > dockerps.todelete.sh
This list should still contain the module versions of the old release:
=> backend modules (mod-*) of the old release (61 modules) + backend modules of the new release (62 = 65 - 3 which are the same in the old release) + 5 Edge modules =128 modules.
Of those 128 modules, 58 have now to be undeployed:
Undeploy all R2 modules (which are still running), except for at least one instance of mod-service-interaction:1.0.0, mod-graphql:1.9.0 and mod-z3950-2.4.0 (because they are on the same version in R2 and R3).
If you have deployed mod-service-interaction:1.0.0, mod-graphql:1.9.0 and mod-z3950-2.4.0 twice and want to undeploy one instance of them now, you will need to undeploy 61 modules.
Compare the list with list of R3 modules
Compare the list dockerps.todelete.sh with the list ~/platform-complete/okapi-install.sh (the R3 backend modules). First, sort this list:
sort okapi-install.json > okapi-install.json.sorted
Now, throw out all modules which are in okapi-install.json.sorted out of the list dockerps.todelete.sh .
This should leave you with a list of 58 (or 61) modules which are to be deleted now. If you decided to delete one of the instances of those modules which have been deployed twice, you should now have a list of 61 modules.
Edit dockerps.todelete.sh once again to make each line look like this (e.g. for mod-agreements; i.e. prepend “curl -w ‘\n’ -D - -XDELETE http://localhost:9130/_/discovery/modules/” to each line) :
curl -w '\n' -D - -XDELETE http://localhost:9130/_/discovery/modules/mod-agreements-4.1.1/<instId>
Finally, remove all unused modules
Add a line #!/bin/bash at the top of your delete script, make the script executable and then execute your delete script:
./dockerps.todelete.sh
This will be acknowledged by an “HTTP/1.1 204 No Content” for each module.
Now, finally once again get a list of the deployed backend modules:
curl -w '\n' -D - http://localhost:9130/_/discovery/modules | grep srvcId | wc
65
This should only contain the module versions of the new release now : 65 backend modules of R3-2021.
Compare this with the number of your running docker containers:
docker ps --all | grep "mod-" | wc
  65
docker ps --all | wc
  72
The following containers are running on your system, but do not contain backend modules:
Stripes
3x Elasticsearch
Kafka
Zookeper
In sum, these are 6 containers without backend modules.
Also subtract the header line (of “docker ps”), and you will arrive at 72 - 7 = 65 containers with backend modules (the figure of the first “wc”).
C’EST FINI !
Aftermath:
If you have undeployed one instance of mod-service-interaction:1.0.0, mod-graphql:1.9.0 and mod-z3950-2.4.0 each, do this now:
Disable those modules for your tenant and re-enable them. This will prevent Okapi form still trying to round robin with the deleted module instance. You also need to disable folio_dashboard-2.0.0 because it depends on mod-service-interaction-1.0.0 :
Disable the modules:
curl -w '\n' -D - -X POST -H "Content-type: application/json" -d '[ { "id": "mod-graphql-1.9.0", "action": "disable" }, { "id": "mod-z3950-2.4.0", "action": "disable" }, { "id": "mod-service-interaction-1.0.0", "action": "disable" }, { "id": "folio_dashboard-2.0.0", "action": "disable" } ]' http://localhost:9130/_/proxy/tenants/diku/install?simulate=true\&preRelease=false
curl -w '\n' -D - -X POST -H "Content-type: application/json" -d '[ { "id": "mod-graphql-1.9.0", "action": "disable" }, { "id": "mod-z3950-2.4.0", "action": "disable" }, { "id": "mod-service-interaction-1.0.0", "action": "disable" }, { "id": "folio_dashboard-2.0.0", "action": "disable" } ]' http://localhost:9130/_/proxy/tenants/diku/install?deploy=false\&preRelease=false\&tenantParameters=loadReference%3Dtrue%2CloadSample%3Dfalse
Re-enable the modules:
curl -w '\n' -D - -X POST -H "Content-type: application/json" -d '[ { "id": "mod-graphql-1.9.0", "action": "enable" }, { "id": "mod-z3950-2.4.0", "action": "enable" }, { "id": "mod-service-interaction-1.0.0", "action": "enable" }, { "id": "folio_dashboard-2.0.0", "action": "enable" } ]' http://localhost:9130/_/proxy/tenants/diku/install?simulate=true\&preRelease=false
curl -w '\n' -D - -X POST -H "Content-type: application/json" -d '[ { "id": "mod-graphql-1.9.0", "action": "enable" }, { "id": "mod-z3950-2.4.0", "action": "enable" }, { "id": "mod-service-interaction-1.0.0", "action": "enable" }, { "id": "folio_dashboard-2.0.0", "action": "enable" } ]' http://localhost:9130/_/proxy/tenants/diku/install?deploy=false\&preRelease=false\&tenantParameters=loadReference%3Dtrue%2CloadSample%3Dfalse
2.1.4 - Kubernetes example
The Rancher/Kubernetes solution allows for the addition of new tenants and hardware resources on demand. It is ideal if you need to scale-up your FOLIO instance in the future. This guide describes a Rancher/Kubernetes installation.
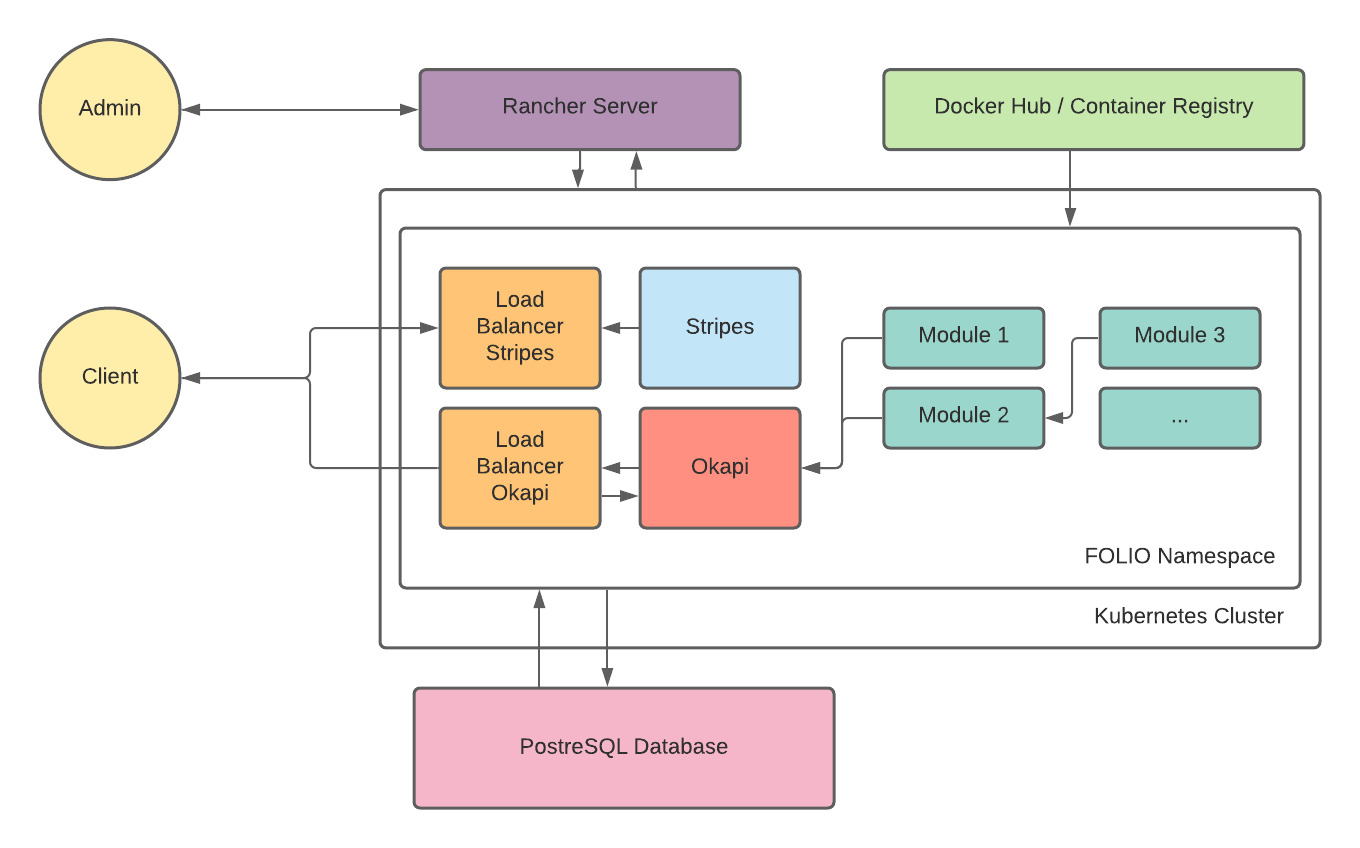
Deployment environments
FOLIO is a system built on micro-services. It is designed to be a multi-tenant cloud environment. Having said that, some institutions will also choose to deploy FOLIO on premise. The community can expect a wide range of deployment environments and mechanisms. This guide will describe some of the issues that need to be understood in a Rancher/Kubernetes environment and the choices around those issues. We will also label what are felt to be best practices when possible.
Public cloud vs on premise
A production ready FOLIO deployment will need adequate infrastructure for reliable service. The institution will have to decide where and how to deploy FOLIO. The public cloud vs on premise choice will define sets of alternatives for technology and tooling. For example, if a site chooses to deploy in AWS then it will have a set of tooling and technology that are not available on premise. It will also possibly use proprietary solutions such as RDS. The deployment process will be adapted for the specifics of each organization.
Virtual vs physical
Virtualization has become a common practice in data centers due to the convenience of managing virtual environments. However, some institutions may prefer physical servers for various reasons. The virtual vs physical choice need not be dictated by the cloud vs on premise choice. For example, you can run VMware in AWS. Fortunately, the deployment process for a FOLIO instance is practically the same in both scenarios.
Database considerations
FOLIO has been designed and developed with PostgreSQL as the default database engine. Although using Postgres isn’t mandatory, it is recommended for the vast majority of use cases. The main considerations with PostgreSQL and FOLIO are:
- Use a Cloud service such as Amazon RDS or Amazon Aurora.
- Set up a dedicated database server or cluster.
- Implement PostgreSQL-as-a-Service using Kubernetes.
- Use independent PostgreSQL servers for the components of FOLIO.
These choices will depend on each organization’s needs. However, from the FOLIO deployment perspective you only will need an accessible PostgreSQL service.
There are many orchestration tools for both on premise and cloud solutions, including but not limited to: Kubernetes, OpenShift, Docker Swarm or ECS (Amazon). In theory, you can use any of them to deploy FOLIO due to its microservice architecture, but the Rancher/Kubernetes solution is the most common within the FOLIO community and therefore it will be covered in this manual.
Deploy Rancher server
You will need a Rancher server for managing the Kubernetes cluster for FOLIO. This server should be accessible for all of the Kubernetes nodes in your cluster. If you are using AWS, you will need to configure a VPC, subnets and route tables.
A sample configuration and deployment procedure can be found at
https://github.com/folio-org/folio-install/tree/master/alternative-install/kubernetes-rancher/TAMU.
2.1.5 - Vagrant boxes
If you just want to try FOLIO without installing it, you can run one of the pre-built Vagrant boxes.
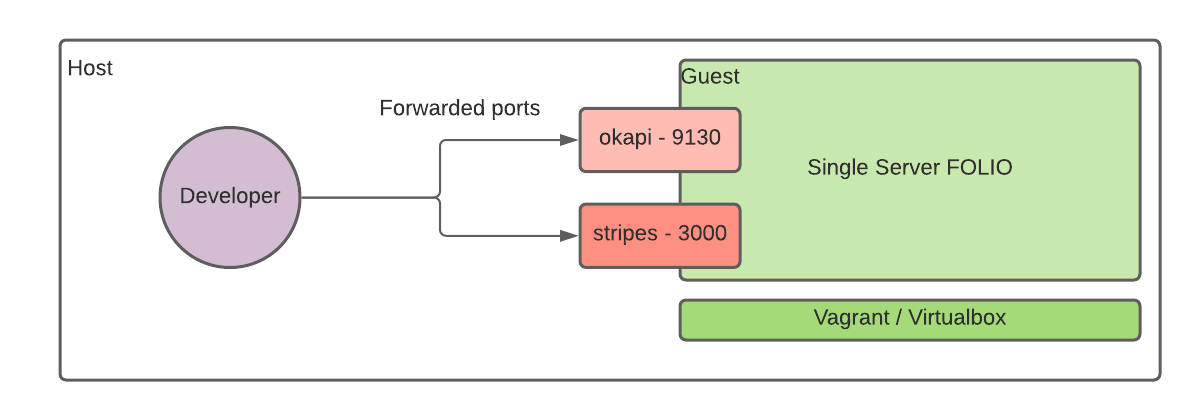
If you are a developer, you can get a FOLIO installation up and running quickly using a pre-built Vagrant box. These virtual machines have a Single server installation of FOLIO running. The Stripes and Okapi services can be accessed via port forwarding. You can create new modules on the host operating system and connect them to Okapi using a host only network that allows bidirectional connections between the host and the guest operating system.
At least 24 GB memory are needed to run the folio/release or folio/snapshot Vagrant box.
Please see https://dev.folio.org/tutorials/folio-vm/ for detailed instructions how to run a Vagrant box.
2.1.6 - Customizations
Note: This content is currently in draft status.
Branding Stripes
Stripes has some basic branding configurations that are applied during the build process. In the file stripes.config.js, you can configure the logo and favicon of the tenant, and the CSS style of the main navigation and the login. These parameters can be set under the branding key at the end of the file. You can add the new images in the folder tenant-assets and link to them in the configuration file.
In the config key you can set the welcomeMessage shown after login, the platformName that is appended to the page title and is shown in browser tabs and browser bookmarks. Add a header with additional information to the Settings > Software versions page via the aboutInstallVersion and aboutInstallDate properties, the latter is automatically converted into the locale of the user opening the page, for example 10/30/2023 or 30.10.2023.
Take into account that these changes will take effect after you build the webpack for Stripes.
Example stripes.config.js customization:
module.exports = {
  config: {
    welcomeMessage: 'Welcome, the Future Of Libraries Is OPEN!',
    platformName: 'FOLIO',
    aboutInstallVersion: 'Poppy Hot Fix #2',
    aboutInstallDate: '2023-10-30',
  },
  branding: {
    logo: {
      src: './tenant-assets/my-logo.png',
      alt: 'my alt text',
    },
    favicon: {
      src: './tenant-assets/my-favicon.ico',
    },
    style: {
      mainNav: {
        backgroundColor: "#036",
      },
      login: {
        backgroundColor: "#fcb",
      },
    },
  },
}
Okapi security
Make sure that you have secured Okapi before publishing it to the Internet. If you do not configure a super-tenant user and password for Okapi API, any user on the net could run privileged requests. The process of securing Okapi is performed with the secure-supertenant script and it is explained in the Single server deployment guides.
Additionally, it is recommended that you configure SSL certificates for Okapi in order to prevent data being sent as plain text over the Internet. Okapi does not have native HTTPS support, but you can set up a reverse proxy (e.g NGINX) that receives HTTPS requests and forwards them to Okapi. You can find more information about HTTPS on NGINX here. Also, if you are using an Ingress in Kubernetes, you can configure SSL certificates using Rancher. For more information on this process check here.
Email configuration
The module mod-email provides the role of delivering messages using SMTP server to send emails in FOLIO. It is used for sending notifications and restarting user passwords.
The mod-email module uses mod-configuration to get connection parameters. A detailed list of parameters can be found in the documentation of the module. The required configuration options are the following:
- EMAIL_SMTP_HOST
- EMAIL_SMTP_PORT
- EMAIL_USERNAME
- EMAIL_PASSWORD
- EMAIL_FROM
- EMAIL_SMTP_SSL
These parameters should be set in Okapi through POST requests using the name of the module: SMTP_SERVER. For example, the host configuration would look like this.
curl -X POST \
 http://localhost:9130/configurations/entries \
 -H 'Content-Type: application/json' \
 -H 'X-Okapi-Tenant: <tenant>' \
 -H 'x-okapi-token: <token>' \
 -d
   '{
     "module": "SMTP_SERVER",
     "configName": "smtp",
     "code": "EMAIL_SMTP_HOST",
     "description": "server smtp host",
     "default": true,
     "enabled": true,
     "value": "smtp.googlemail.com"
   }'
Take into account that this configuration is performed on a per tenant basis and the tenant ID is defined in the X-Okapi-Tenant header. Also, you have to be logged in as the superuser of the tenant and provide the access token in the header x-okapi-token. You can find an example of a login request here.
Once you have configured the mod-email module, you should configure other modules related to the email configuration. You should configure the users module and edge-sip2. You can find a Bash script that could be used to automate this process here. Make sure that you replace all of the environment variables required for the script.
Alternatively, if you deployed FOLIO on a Kubernetes cluster, you can create a Kubernetes Job for this task. This docker project https://github.com/folio-org/folio-install/tree/kube-rancher/alternative-install/kubernetes-rancher/TAMU/deploy-jobs/create-email can be built, pushed to the image registry and executed on the cluster similarly to other scripts mentioned in the Kubernetes deployment section.
Install and serve edge modules
These instructions have been written for a single server environment in which Okapi is running on localhost:9130.
If you do a test installation of FOLIO, you do not need to install any edge modules at all. Install an edge module in a test environment only if you want to test the edge module.
The Edge modules bridge the gap between some specific third-party services and FOLIO (e.g. RTAC, OAI-PMH). In these FOLIO reference environments, the set of edge services are accessed via port 8000. In this example, the edge-oai-pmh will be installed.
You can find more information about the Edge modules of FOLIO in the Wiki https://wiki.folio.org/display/FOLIOtips/Edge+APIs.
- Create institutional user. An institutional user must be created with appropriate permissions to use the edge module. You can use the included create-user.py to create a user and assign permissions.
python3 create-user.py -u instuser -p instpass \
    --permissions oai-pmh.all --tenant diku \
    --admin-user diku_admin --admin-password admin
If you need to specify an Okapi instance running somewhere other than http://localhost:9130, then add the –okapi-url flag to pass a different url. If more than one permission set needs to be assigned, then use a comma delimited list, i.e. –permissions edge-rtac.all,edge-oai-pmh.all.
- The institutional user is created for each tenant for the purposes of edge APIs. The credentials are stored in one of the secure stores and retrieved as needed by the edge API. See more information about secure stores. In this example, a basic EphemeralStore using an ephemeral.properties file which stores credentials in plain text. This is meant for development and demonstration purposes only.
sudo mkdir -p /etc/folio/edge
sudo vi /etc/folio/edge/edge-oai-pmh-ephemeral.properties
The ephemeral properties file should look like this.
secureStore.type=Ephemeral
# a comma separated list of tenants
tenants=diku
#######################################################
# For each tenant, the institutional user password...
#
# Note: this is intended for development purposes only
#######################################################
# format: tenant=username,password
diku=instuser,instpass
- Start edge module Docker containers.
You will need the version of the edge-modules available on Okapi for the tenant. You can run a CURL request to Okapi and get the version of the edge-oai-pmh module.
curl -s http://localhost:9130/_/proxy/tenants/diku/modules | jq -r '.[].id' | grep 'edge-'
- Set up a docker compose file in /etc/folio/edge/docker-compose.yml that defines each edge module that is to be run as a service. The compose file should look like this.
version: '2'
services:
  edge-oai-pmh:
    ports:
      - "9700:8081"
    image: folioorg/edge-oai-pmh:2.2.1
    volumes:
      - /etc/folio/edge:/mnt
    command:
      -"Dokapi_url=http://10.0.2.15:9130"
      -"Dsecure_store_props=/mnt/edge-oai-pmh-ephemeral.properties"
    restart: "always"
Make sure you use the private IP of the server for the Okapi URL.
- Start the edge module containers.
cd /etc/folio/edge
sudo docker-compose up -d
- Set up NGINX.
- Create a new virtual host configuration to proxy the edge modules. This needs to be done inside your Stripes container.
Log in to the stripes container, cd into the nginx configuration directory and create a new nginx configuration file there:
docker ps --all | grep stripes
docker exec -it <stripes container id> /bin/sh
cd /etc/nginx/conf.d
edit edge-oai.conf
Insert the following contents into the new file edge-oai.conf:
server {
  listen 8130;
  server_name <YOUR_SERVER_NAME>;
  charset utf-8;
  access_log  /var/log/nginx/oai.access.log  combined;
  location /oai {
    rewrite ^/oai/(.*) /$1 break;
    proxy_pass http://<YOUR_SERVER_NAEM>:9700/;
  }
}
YOUR_SERVER_NAME might be localhost. If you are working inside a Vagrant box, it is 10.0.2.15.
Exit the container and then restart the container:
docker restart <stripes container id>
You might also want to modify the Docker file that builds your Stripes container. So you will be able to re-build the container later or on some other machine.
Add the file edge-oai.conf (with the contents as above) to the directory $HOME/platform-complete/docker/.
Then add a line to the Dockerfile $HOME/platform-complete/docker/Dockerfile:
COPY docker/edge-oai.conf /etc/nginx/conf.d/edge-oai.conf
Commit your changes to a local (or personal or institutional) git repository.
Now, an OAI service is running on http://server:8130/oai .
- Follow this procedure to generate the API key for the tenant and institutional user that were configured in the previous sections. Currently, the edge modules are protected through API Keys.
cd ~
git clone https://github.com/folio-org/edge-common.git
cd edge-common
mvn package
java -jar target/edge-common-api-key-utils.jar -g -t diku -u instuser
This will return an API key that must be included in requests to edge modules. With this APIKey, you can test the edge module access. For instance, a test OAI request would look like this.
curl -s "http://localhost:8130/oai?apikey=APIKEY=&verb=Identify"
The specific method to construct a request for an edge module is documented in the developers website: https://dev.folio.org/source-code/map/ or you can refer to the github project of the edge module.
3 - Platform Essentials
In FOLIO, there are several parts of functionality that support library workflows
across FOLIO apps. These include:
3.1 - Item status
FOLIO is implementing a three-part item state function. The three factors are Availability; Needed for; and Process.
Once developed, the three factors for item state will interact to drive functionality, and display status information on the item record. For example, an item that has an Availability value of “Checked Out” and a Needed for value of “Reserves” might trigger a process that routes the item to Course Reserves staff when returned, and prevent other patrons from requesting the item in the meantime.
Only Availability is currently implemented. In various FOLIO apps, it is labeled Item status.
Availability
An item’s availability provides information about an item’s location and whether it can be circulated. In FOLIO, availability is currently labeled Item status.
Availability is a required value for an item. You cannot edit it directly. FOLIO processes, such as data import, ordering an item, checking an item in, or marking an item missing, set the availability value.
An item’s availability controls whether it can be loaned and whether it can be requested, even if the applicable circulation rule would otherwise allow the item to circulate.
Needed for
Needed for is not yet implemented in FOLIO.
When implemented, Needed for will allow libraries to assign a workflow for an item to follow to meet specific staff or patron needs. Some examples where Needed for might be used include item requesting; placing items on course reserve; or sending an item for binding. Needed for will be an optional value.
Process
Process is not yet implemented in FOLIO.
When implemented, Process will describe a staff process that an item is in. Common processes might include Digitization; Item Repair; or Cataloging. Process will be an optional value.
How Item Status Changes During Circulation
If a FOLIO library relies on an item’s status to inform patrons and control how that item is used, library staff should be aware of how item statuses change as part of circulation (requesting, check out, and check in.)
- When a patron requests an item, the item status may change to Paged, or, if the item is currently on loan, it may change to In transit when the item is returned.
- When a patron checks out an item, the item status will change to Checked out.
- When an item is checked in, the item status may change to Available or In Transit, depending on the status it has or where it was located when it is scanned in the Check In app.
Items in some statuses will warn library staff members that the item status is going to change, and ask them to confirm check in before proceeding.
Item statuses do not automatically revert
Importantly, FOLIO does not automatically reset an item status to what it was before it circulated. If your library uses item status to communicate information about an item, and then the item circulates, you will need to develop workflows to manually restore the item’s status once it is returned.
For example:
Suppose a library decides to use the item status Restricted to indicate that a certain collection should only be used if patrons are pre-approved for access. If the library staff member then checks out an item with a Restricted status to an approved patron, the status of that item will change to Checked out.
When the item is checked in, the status will change to Available or In Transit; FOLIO will not automatically change the status to Restricted. The library would need to use reporting tools or other workflows to identify the item when it is returned and change the status back to Restricted.
Currently implemented item statuses
| Item Status Name |
Description |
Apps that use this item status |
Can this status be set in Inventory? |
Can the item be checked out? |
Can the item be requested? |
Can the item be deleted in inventory? |
| Aged to lost |
The item was borrowed by a patron who did not return it; after a defined time frame, the item is marked as aged to lost and the patron is usually charged to replace the item. |
This status is set automatically by FOLIO system processes and cannot be manually set in Inventory. |
This status cannot be set in Inventory. |
An Aged to lost item cannot be checked out to a patron; this restriction cannot be overridden. |
An Aged to lost item cannot be recalled, placed on hold, or paged. |
An Aged to lost item cannot be deleted in Inventory. |
| Available |
The item is ready for circulation. |
An item can be marked as Available by the Inventory, Check In, or Data Import apps. The Inventory app automatically sets an item as Available if an item record is created manually in the app. |
This status cannot be manually set in Inventory after initial item creation. |
An Available item can be checked out to a patron; when that occurs, the item status changes to Checked out. |
An Available item cannot be recalled or placed on hold; it can be paged. |
An Available item can be deleted in Inventory (subject to dependencies check). |
| Awaiting delivery |
The item has been requested for delivery, but is not yet checked out to the patron and is in the delivery process. This item status generally indicates a problem with delivery; an item that is out for delivery will have a status of Checked out. |
This status is set by the Check in app. |
This status cannot be manually set in Inventory. |
An Awaiting delivery item can be checked out to a patron; when that occurs, the item status changes to Checked out. |
An Awaiting delivery item can be recalled and can be placed on hold; it cannot be paged. |
An Awaiting delivery item cannot be deleted in Inventory. |
| Awaiting pickup |
The item is requested and is now at the pickup location, waiting for the requester to borrow the item. |
An item is marked Awaiting pickup by the Check in app. |
This status cannot be manually set in Inventory. |
An Awaiting pickup item can be checked out to the requesting patron; when that occurs, the item status changes to Checked out. |
An Awaiting pickup item can be recalled and can be placed on hold; it cannot be paged. |
An Awaiting pickup item cannot be deleted in Inventory. |
| Checked out |
The item is on loan to a patron. |
An item is automatically marked as Checked out by the Check out app only. |
This status cannot be manually set in Inventory. |
A Checked out item is already in a checked out state; trying to check it out again will be prevented. |
A Checked out item can be recalled and can be placed on hold; it cannot be paged. |
A Checked out item cannot be deleted in Inventory. |
| Claimed returned |
A patron borrowed the item and has told the library that they returned the item, but there is no record in FOLIO of the item being returned and the item cannot be found. Libraries can use the Claimed returned item status in workflows while they search for the item. |
An item can be marked Claimed returned in the Users app. |
This status cannot be manually set in Inventory. |
A Claimed returned item cannot be checked out to a patron; this restriction cannot be overridden. |
A Claimed returned item cannot be recalled, placed on hold, or paged. |
A Claimed returned item cannot be deleted in Inventory. |
| Declared lost |
A patron borrowed the item and has told the library that they will be unable to return the item. Generally this is used when a patron has lost an item or it has been damaged beyond repair, but the patron does not want to wait for the item to age to lost automatically. |
An item can be marked Declared lost in the Users app. |
This status cannot be manually set in Inventory. |
A Declared lost item cannot be checked out to a patron; this restriction cannot be overridden. |
A Declared lost item cannot be recalled, placed on hold, or paged. |
A Declared lost item cannot be deleted in Inventory. |
| In process |
The item has been received at the library, but is not yet ready to circulate. |
An item is automatically marked as In process when it is received through the Receiving app. Items can also be marked as In process through the Data Import app. |
This item status can be applied in Inventory, depending on the item status the record is being changed from. |
An In process item can be checked out to a patron; if that occurs, the item status changes to Checked out. |
An In process item can be recalled and can be placed on hold; it cannot be paged. |
An In process item can be deleted in Inventory (subject to dependencies check). |
| In process (not requestable) |
The item is being worked on by library staff and patrons cannot request it. |
An item can be marked In process (not requestable) through the Inventory or Data import apps. |
This item status can be applied in Inventory, depending on the item status the record is being changed from. |
An In process (not requestable) item can be checked out to a patron; when that occurs, the item status changes to Checked out. |
An In process (not requestable) item cannot be recalled, placed on hold, or paged. |
An In process (not requestable) item can be deleted in Inventory (subject to dependencies check). |
| In transit |
The item is currently moving between two service points. |
An item is automatically marked as In transit by the Check in or Data import apps. If an item is marked as In transit by Data import, no service point information will display in the Inventory app. |
This status cannot be manually set in Inventory. |
An In transit item can be checked out to a patron; when that occurs, the item status changes to Checked out. |
An In transit item can be recalled and can be placed on hold; it cannot be paged. |
An In transit item can be deleted in Inventory (subject to dependencies check). |
| Intellectual item |
The item is a placeholder or dummy record; a physical item does not exist. Libraries can use this for electronic item records; for analytics management; or for any scenario where they need an item record for something that does not physically exist. |
An item can be marked Intellectual item through the Inventory or Data import apps. |
This item status can be applied in Inventory, depending on the item status the record is being changed from. |
An Intellectual item cannot be checked out to a patron; this restriction cannot be overridden. |
An Intellectual item cannot be recalled, placed on hold, or paged. |
An Intellectual item can be deleted in Inventory (subject to dependencies check). |
| Long missing |
The item is not on loan to a patron and cannot be located. This status can be used with the related item status of Missing to allow libraries to do several searches for an item before declaring it withdrawn. |
An item can be marked Long missing in the Users app or Inventory app. |
This item status can be applied in Inventory, depending on the item status the record is being changed from. |
A Long missing item can be checked out to a patron; FOLIO shows a warning to the staff member, and then allows the checkout if the staff member confirms they want to continue. When the checkout occurs, the item status changes to Checked out. |
A Long missing item cannot be recalled, placed on hold, or paged. |
A Long missing item can be deleted in Inventory (subject to dependencies check). |
| Lost and paid |
This item was borrowed by a patron who did not return it; the item was marked declared lost or aged to lost. The library and patron then resolved the associated fine. Once that resolution occurs, the item is marked as Lost and paid. |
This status is set automatically by FOLIO system processes and cannot be manually set in an app. |
This status cannot be manually set in Inventory. |
A Lost and paid item can be checked out to a patron; FOLIO shows a warning to the staff member, and then allows the checkout if the staff member confirms they want to continue. When the checkout occurs, the item status changes to Checked out. |
A Lost and paid item cannot be recalled, placed on hold, or paged. |
A Lost and paid item can be deleted in Inventory (subject to dependencies check). |
| Missing |
The item is not on loan to a patron and cannot be found. This status is generally used if the library is still searching for the item or waiting to see if it reappears. |
An item can be marked Missing through the Inventory or Data import apps. |
This item status can be applied in Inventory, depending on the item status the record is being changed from. |
A Missing item can be checked out to a patron; FOLIO shows a warning to the staff member, and then allows the checkout if the staff member confirms they want to continue. When the checkout occurs, the item status changes to Checked out. |
A Missing item can be placed on hold; it cannot be recalled or paged. |
A Missing item can be deleted in Inventory (subject to dependencies check). |
| On order |
The item has been ordered, but has not yet been received. |
An item is automatically marked as On order by the Orders app, when the order creates an item record, or through the Data Import app. |
This item status cannot be set in Inventory. |
An On order item can be checked out to a patron; if that occurs, the item status changes to Checked out. |
An On order item can be recalled and can be placed on hold; it cannot be paged. |
An On order item cannot be deleted in Inventory. |
| Order closed |
The order associated with the item was closed and the item was not received. |
An item is automatically marked Order closed by the Orders app if an order is closed and the item is not yet received. It can also be marked Order closed through the Data import app. |
This item status cannot be set in Inventory |
An Order closed item can be checked out to a patron without warning. When the checkout occurs, the item status changes to Checked out. |
An Order closed item can be placed on hold, it cannot be recalled or paged. |
An Order closed item can be deleted in Inventory (subject to dependencies check). |
| Paged |
The item had a status of Available and was then requested by a patron; the request process changes the item status to Paged. |
This status is set automatically by FOLIO system processes and cannot be set manually in an app. |
This status cannot be manually set in Inventory. |
A Paged item can be checked out to the patron who requested it; when that occurs, the item status changes to Checked out. |
A Paged item can be recalled and can be placed on hold; it cannot be paged since it already has a Paged status. |
A Paged item item cannot be deleted in Inventory. |
| Restricted |
The item is available, but the library wants to indicate that there are limits on its access. |
An item can be marked as Restricted through the Inventory or Data import apps. |
This item status can be applied in Inventory, depending on the item status the record is being changed from. |
A Restricted item can be checked out to a patron; when that occurs, the item status changes to Checked out. |
A Restricted item can be recalled and can be placed on hold; it cannot be paged. |
A Restricted item can be deleted in Inventory (subject to dependencies check). |
| Unavailable |
The item is not available to patrons. |
An item can be marked Unavailable through the Inventory or Data import apps. |
This item status can be applied in Inventory, depending on the item status the record is being changed from. |
An Unavailable item can be checked out to a patron; when that occurs, the item status changes to Checked out. |
An Unavailable item cannot be recalled, placed on hold, or paged. |
An Unavailable item can be deleted in Inventory (subject to dependencies check). |
| Unknown |
The item’s availability is not known. |
An item can be marked Unknown through the Inventory or Data import apps. |
This item status can be applied in Inventory, depending on the item status the record is being changed from. |
An Unknown item can be checked out to a patron; when that occurs, the item status changes to Checked out. |
An Unknown item cannot be recalled, placed on hold, or paged. |
An Unknown item can be deleted in Inventory (subject to dependencies check). |
| Withdrawn |
The item has been removed from the library’s collection. |
An item can be withdrawn through the Inventory or Data import apps. |
This item status can be applied in Inventory, depending on the item status the record is being changed from. |
A Withdrawn item can be checked out to a patron; FOLIO shows a warning to the staff member, and then allows the checkout if the staff member confirms they want to continue. When the checkout occurs, the item status changes to Checked out. |
A Withdrawn item cannot be recalled, placed on hold, or paged. |
A Withdrawn item can be deleted in Inventory (subject to dependencies check). |
3.2 - Locations
In FOLIO, locations are used to describe where items are located in a library.
Locations are required for any library that wants to use holdings or item records in the Inventory app. Locations are used in workflows with service points, borrowing and returning items, charging fines, requesting items, providing remote storage, and data export for holdings and item records.
The location setup has four hierarchical elements - each level of the hierarchy must have at least one value in order to create a value at the next, more specific level.
- Institution. An institution is the highest level of the FOLIO location hierarchy. An institution typically represents entities such as the college or university, though that is not a FOLIO requirement. You can create one or more institutions.
- Campus. A campus is the second highest level of the FOLIO location hierarchy, A campus typically represents distinct parts of an institution, like a physical or branch campus, or online programs, though that is not a FOLIO requirement.
- Library. A library is the third level of the FOLIO Location hierarchy. A library typically represents physical buildings on a campus, or domains of service on a virtual campus, though that is not a FOLIO requirement.
- Location. A location is the fourth and most detailed level of the FOLIO Location hierarchy. A location typically represents specific shelving areas, like the stacks, reserves, or specific language collections, though that is not a FOLIO requirement.
In practice, most libraries represent physical locations in their location tree, but FOLIO does not have a requirement to do so. Libraries can represent locations in a variety of ways.
- A library could choose to describe their collection by the physical location of the stacks, such as 3rd Floor, N side, Aisle 1, Side A.
- A library could choose to group their locations by administrative structure - for example, one institution with two campuses, one for professional degree libraries and one for undergraduate program libraries.
- A library could choose to include their electronic items in their location structure, and have an institution that represents physical items, and an institution that represents electronic items, each with their own campus, library and location structure nested below.
Permanent, temporary and effective locations
In Inventory, you can set permanent and temporary location values on a holdings and/or item record. A holding must have a value set for permanent location.
Using the values in the permanent and temporary location fields, FOLIO computes two effective locations - one on the holdings record, and one on the item record. Libraries do not set the effective location value - FOLIO computes it for them.
Examples
Temporary locations can be used to support various library workflows.
Example 1: Supporting a New Books section of the library
Smith University Library purchases a copy of The Midnight Library by Matt Haig, a popular new book. They want The Midnight Library to be shelved at the “Smith New Arrivals” location for three months, before it gets sent to its permanent location of “Smith Main Stacks.”
- When they order the item, library staff set the location on the PO line to “Smith Main Stacks”. This becomes the holdings permanent location for The Midnight Library.
- Using Data Import or Inventory workflows, staff then set the item temporary location for The Midnight Library to “Smith New Arrivals”. FOLIO then sets the item effective location to “Smith New Arrivals”, and that location is used by FOLIO when the book circulates.
- After The Midnight Library has been circulating for three months, library staff use Inventory or Data Import workflows to remove the item temporary location. That changes the item effective location to “Smith Main Stacks”, and FOLIO uses that location to circulate the item going forward.
Example 2: Supporting a library renovation
Pacific College is renovating their Arts Library. Staff need to move 5,000 items from the Arts Library to the Undergraduate Library during the nine month renovation.
- Library staff use Data Import workflows to set a holdings temporary location of “Undergrad Stacks” on the 5,000 holdings records, and then physically move the items.
- That changes the item effective location for all 5,000 items to “Undergrad Stacks”, and then FOLIO uses that location as they circulate.
- When the renovation is over and the items are returned to the Arts Library, library staff use Data Import workflows to remove the holdings temporary location from all 5,000 items, and that changes their effective locations back to “Arts Library.” FOLIO uses that location to circulate the items going forward.
Configuring Locations
To create the location tree, follow the steps outlined in Settings > Tenant.
Holdings and Item effective locations
FOLIO supports a holdings effective location and item effective location. Both fields are calculated automatically by FOLIO.
Holdings effective location
The holdings effective location is used to provide location information for holdings that are not always itemized, such as periodicals, microfilm, or in-process special collections. It is not used in item circulation workflows.
On the holdings record, there are three location fields:
- Holdings permanent location (required)
- Holdings temporary location (optional)
- Holdings effective location (computed value, set by FOLIO)
FOLIO sets the holdings effective location to the first value it finds in the following list:
- Holdings temporary location
- Holdings permanent location
Note that if your library is using SRS for MARC Holdings, you will not be able to edit the permanent holdings location field on the inventory record - that will only be editable in quickMARC. You will be able to set a holdings temporary location.
The Holdings effective location is always computed, but it will only display on the holdings detail record if there are no items attached to the holdings.
Item effective location
The item effective location is used by FOLIO to know the current home location for an item, and for staff and patrons to understand where to find an item in the library.
The item effective location is used in multiple apps, including Check out, Check in, Requests, and Users (when viewing loans and fee/fines).
On the item record, there are three location fields:
- Item permanent location (optional)
- Item temporary location (optional)
- Item effective location (computed value, set by FOLIO)
FOLIO sets the item effective location to the first value it finds in the following list:
- Item temporary location
- Item permanent location
- Holding temporary location
- Holding permanent location
Note that an item permanent location does not need to be set if the holding permanent location is set. Item effective location is what is used in circulation workflows, and it will inherit the holding permanent location if no location values are set directly on the item. If an item record is moved to a new holdings record, it will inherit its effective location and call number from the holdings record unless it has a temporary or permanent location or call number specified in the item record.
3.3 - Keyboard shortcuts
Keyboard shortcuts facilitate actions. For the apps listed below, you can view the available shortcuts while using the app. Note: Most apps do not use all the listed shortcuts. For example, Alt+c does not work in the Users app because you cannot duplicate a record in the Users app.
The action associated with the shortcut may vary slightly for different apps – for example, in the Dashboard app Alt+n is Create a new widget.
Keyboard shortcuts list
| Action |
Shortcut keys |
| Create a new record |
Alt+n |
| Edit a record |
Ctrl+Alt+e |
| Save a record |
Ctrl+s |
| Expand or collapse an accordion |
Spacebar |
| Expand all accordions |
Ctrl+Alt+b |
| Collapse all accordions |
Ctrl+Alt+g |
| Go to Search & Filter pane |
Ctrl+Alt+h |
| View keyboard shortcuts list |
Ctrl+Alt+k |
| Duplicate a record |
Alt+c |
| Close a modal or pop-up |
Esc |
| Copy |
Ctrl+c |
| Cut |
Ctrl+x |
| Paste |
Ctrl+v |
| Find |
Ctrl+f |
The following keyboard shortcuts are only available in one app:
| Action |
Shortcut keys |
App used in |
| Add POL |
Alt+a |
Orders |
| Receive pieces/Quick receive |
Ctrl+Alt+r |
Receiving |
Viewing the keyboard shortcuts list
To view the list of available shortcut keys, follow these steps:
Click on the name of a FOLIO app from the top menu bar. The app opens and the app name displays at the top left of the window.
Click on the downward-facing caret, “v”, at the end of the app name.
Click Keyboard shortcuts to view the list of shortcut actions.
Alternatively, use the keyboard shortcut Ctrl+Alt+k after opening the app (this works in all listed apps except for eUsage).
List of apps displaying the shortcut list
The following apps display the list of keyboard shortcuts which can be viewed by following the steps described above.
- Agreements
- Courses
- Dashboard
- eHoldings
- ERM comparisons
- eUsage
- Finance
- Inventory
- Invoices
- Licenses
- Local KB admin
- MARC Authority
- Orders
- Organizations
- Receiving
- Requests
- Serials
- Users
3.4 - Permissions
FOLIO has a user permissions system that allows for granular control over what users can access in their FOLIO installation.
Each app defines its own permissions for the frontend and backend modules that it uses.
By default, a FOLIO installation does not provide roles or permission profiles for library staff. Instead, FOLIO administrators can build their own groups of permissions called permission sets that correspond to their local needs. They can then assign those permissions to users through the Users app.
What is a permission?
A permission is an object in FOLIO that can be used to control access to FOLIO apps, workflows, and data.
A permission can have a number of different attributes, depending on whether you are viewing the permission in FOLIO’s code or whether you are looking at permissions for a user on a FOLIO tenant. Attributes can include:
- permissionName. This represents the unique name of the permission.
- displayName. This is a human-readable name for the permission that usually corresponds to the name shown in the user interface.
Note that what appears in the FOLIO user interface is a translated label for the permissionName; translations are stored for supported languages with each FOLIO module. The displayName was used in earlier versions of FOLIO but no longer serves a purpose in the FOLIO user interface.
- id. The id is a tenant-level unique identifier for the permission, created when the relevant FOLIO module is installed.
- Description. A description of the permission as provided by the developer. This field is optional.
- subPermissions. Many permissions are actually a grouping of more specific permissions - if this is the case, subPermissions is where those more specific permissions are listed.
- childOf. If a permission is a subPermission for another permission, that “parent” permission is listed.
- grantedTo. If the permission has been granted to any FOLIO users, their permissions user ID is listed.
- mutable. A permission can be either mutable or immutable; permissions are immutable by default.
If a permission is defined as “mutable” : false, then it cannot be changed without modifying the associated module code and restarting the module. If a permission is defined as “mutable” : true, it can be changed in the UI without having to stop and restart the associated module.
- visible. A permission can be either visible or invisible. A permission is invisible by default.
If a permission is defined as ”visible” : true, then it is viewable in the FOLIO user interface. If a permission is defined as ”visible” : false, then it is not viewable by default in the FOLIO user interface.
deprecated
- moduleName and moduleVersion. These fields will only appear when looking at a FOLIO installation directly, they are not in the code. These fields tell you what module provided the permission definition, and what version of that module is running.
Naming Convention
Permissions are named to indicate what a FOLIO user with the permission can do within the app.
Permission names generally follow one of two formats:
[Appname]: [What the user can do]
Settings ([Area of Settings or Appname]): [What the user can do]
Examples:
- Agreements: Edit agreements
- This permission allows FOLIO users to edit agreement records in the agreement app.
- Settings (Inventory): Create, edit, delete material types
- This permission allows FOLIO users to access Inventory settings and add, change, or delete material types.
Key Terminology
- Permission set. A permission set in FOLIO is one permission that consists of one or more subpermissions.
- Permission sets can be created in the FOLIO system by a developer.
- Permission sets can also be created by individual libraries in Settings → Users
- CRUD. CRUD stands for “Create, Read, Update and Delete.” You may see it used as a shortcut terminology in permissions discussions. Most FOLIO permissions allow “CRUD” functionality - they give you the ability to create, read, update and/or delete FOLIO records.
- Note that a permission that allows for access to create, or update or delete a record will generally include the ability to view the record. For example, the permission “Users: Can edit user profile” includes a subpermission to allow viewing of user profiles. You do not need to grant a FOLIO user both permissions to allow them to view and edit user records.
- Visible permission. A visible permission is one that you can see in the list of permissions in the UI. They can be assigned to patrons directly, and/or you can add them to a permission set through Settings → Users → General → Permission Sets.
- Invisible Permission: An invisible permission is hidden from the FOLIO user interface, and is not usually assigned directly to a FOLIO user. Invisible permissions are commonly part of a backend module. They provide very specific, limited access to functionality in FOLIO.
Common Workflows
Common permissions workflows include:
Visible versus Invisible permissions
FOLIO permissions can be either “visible” or “invisible.”
Permissions that you see in the Users app or in Settings > Users > Permission sets are visible permissions. Developers create visible permissions by defining a group of very granular, specific permissions that when put together provide a specific function. They have a friendly display name that helps explain what the permission allows a FOLIO user to do.
Invisible permissions do not appear in the Users app by default. They are created by developers in a backend module and are not intended to be assigned directly to users. Usually, they are very granular, and control one particular action - such as the ability to view one specific type of record in an app. They have less friendly display names such as “addresstypes collection get.”
Why would I want to know about invisible permissions?
Ideally, when you’re working in FOLIO, you never have to consider invisible permissions, because the development process led to the creation of visible permissions that offer all the functionality you need.
However, occasionally bugs with permissions appear, or a feature may only be partially developed. When that happens, FOLIO administrators may need to assign an invisible permission directly to a user in order to enable a needed workflow.
How can I see invisible permissions in the FOLIO user interface?
The ability to see invisible permissions is determined user-by-user. The logged-in user must have access to Settings → Developer.
- Go to Settings > Developer > Configuration.
- Check the box for List ‘invisible’ permissions in add-perm menus?
- Save your changes.
It is not recommended to leave this setting on permanently; there are thousands of permissions in FOLIO when including visible and invisible permissions together, and displaying invisible permissions will significantly slow down permissions management workflows.
You should use permission sets.
The general approach is:
- Log in as a user with appropriate permissions and turn on listing invisible permissions in FOLIO.
- Go to Settings>Users> Permission sets and create a new permission set with only the invisible permissions that you need to be able to assign.
- Turn off the ability to see invisible permissions.
- Assign that permission set that you created to the users who need the invisible permission.
The reason to use this process rather than simply logging in as an appropriate administrator and assigning the invisible permission to staff is that other users could come in after you assign the invisible permission, edit the staff member’s account, and overwrite that administrator’s changes.
For example:
Suppose Jameca Jones, a FOLIO administrator, decides that Jeanne Dupont, a FOLIO user, needs the invisible permission “circulation-rules.storage.get” to help with troubleshooting delivery issues in FOLIO.
- Jameca logs into FOLIO and enables the invisible permission option in Setting > Developer.
- Jameca goes to the Users App and finds Jeanne’s record.
- Jameca assigns the invisible permission to Jeanne and saves her changes.
- Jameca disables the invisible permission option.
A few days later, Max Mustermann realizes that Jeanne needs the visible permission named “Courses: Read All”. Max is a manager, but not a FOLIO administrator.
- Max goes into Users and looks up Jeanne’s record.
- When Max views Jeanne’s account, he doesn’t see the permission “circulation-rules.storage.get” on Jeanne’s account because he doesn’t have that option turned on for his account in Settings.
- Max adds the permission “Courses: Read All” and saves his changes.
When Max saves Jeanne’s record, FOLIO saves a complete new copy of Jeanne’s permissions that contains only the permissions that Max could view, which overwrites the changes that Jameca made.
In contrast, suppose Jameca uses permission sets to give Jeanne access.
- Jameca goes to Settings > Developer and enables invisible permissions.
- She goes to Settings > Users > Permission Sets and creates a permission set named “Troubleshooting - Circulation Rules Permissions.”
- Jameca adds the invisible permission “circulation-rules.storage.get” to the permission set she has made, and saves her changes.
- Jameca goes into the Users app, looks up Jeanne’s record, and assigns the permission set “Troubleshooting - Circulation Rules Permissions” to Jeanne’s account.
A few days later, Max realizes that Jeanne also needs the permission “Courses: Read All.”
- Max goes to the Users app and looks up Jeanne’s record.
- Max doesn’t know what “Troubleshooting - Circulation Rules Permissions” is for, but knows that administrators have been using permission sets to debug issues, so he leaves it assigned to Jeanne.
- Max adds the permission “Courses: Read All” to Jeanne’s account and saves his changes.
When Max saves his changes, FOLIO saves a completely new copy of Jeanne’s permissions that still includes only the permissions Max could view. But because Max could see the permission set that Jameca created, it gets re-saved to Jeanne’s account, and she doesn’t lose the access that she needs.
4 - Users
This section of the documentation contains links to external sites. Please be advised that these sites are not maintained by the FOLIO Documentation Group and may not be aligned with the current release of FOLIO.
The Users app allows you to manage user information for patrons and library staff. Both patrons and library staff’s user records are stored in the Users app. There is no separate directory or app for library staff users. The difference between a library staff user and a patron is that the library staff user record has FOLIO permission(s), username, and password assigned to it.
Definition of terms related to the Users app:
- User. Any person who interacts with or performs tasks in FOLIO.
- User record. Contains contact information and identifiers for an individual user. User records exist for both patrons and library staff. For a list of all information contained within a user record, see View a user record.
- Permission. Value assigned to a user, which grants them access to FOLIO records and/or allows them to carry out job-related tasks in FOLIO.
- Permission set. A group of permissions that allows a user to perform a specific set of job-related tasks.
Permissions
The permissions listed below allow the user to interact with the Users app and determine what they can and cannot do within the app. If none of these permissions are assigned to a user, they are unable to see the User app or any related information. Permission sets are defined by your library in Settings > Users > Permission sets. For more information on permissions, see Platform Essentials > Permissions.
The following are all of the User permissions:
- User import - All permissions. This permission allows the user to import user records.
- User: Can override item blocks. This permission allows the user to override an item block in Check Out.
- User: Can override patron blocks. This permission allows the user to override a patron block for borrowing, requesting, or renewing an item in Check Out.
- Users: Can assign and unassign permissions to users. This permission allows the user to assign or unassign permissions to another user.
- Users: Can assign and unassign service points to users. This permission allows the user to view and edit service points assigned to users. The user can also view and edit basic user data elements.
- Users: Can check open transactions. This permission allows the user to check for open transactions on a user record. If there are no open transactions, the user record can be deleted.
- Users: Can create and edit users. This permission allows the user to create a new user record and edit the User information, Extended information, Profile picture, and Contact information in the user record.
- Users: Can create, edit and remove fees/fines. This permission allows the user to create, edit, remove, and view user fees/fines.
- Users: Can create, edit and remove patron blocks. This permission allows the user to see the patron blocks section on the user record, and view, edit, and create blocks.
- Users: Can create, edit and remove proxies. This permission allows the user to view and edit proxies assigned to a user. The user can also view and edit basic user data elements.
- Users: Can delete user profile if user does not have any open transactions. This permission allows a user profile to be deleted through the UI if the user has no open transactions. This permission must be used with Users: Can check open transactions.
- Users: Can edit user profile. This permission allows the user to edit and view the following sections in a user record: User information, Extended information, and Contact information.
- Users: Can process lost items requiring actual cost. This permission allows the user to use the Lost items requiring actual cost processing page to bill for lost items.
- Users: Can view fees/fines and loans. This permission allows users to view fees/fines and loans of a user.
- Users: Can view permissions assigned to users. This permission allows the user to view the permissions assigned to another user.
- Users: Can view profile pictures. This permission allows the user to view the profile picture on a user record.
- Users: Can view proxies assigned to users. This permission allows the user to see the Proxies section but not edit proxies assigned to a user. This permission also includes the ability to search and view user records (basic user fields only).
- Users: Can view service points assigned to users. This permission allows the user to see the Service points section but not edit service points assigned to a user. This permission also includes the ability to search and view user records (basic user fields only).
- Users: Can view user profile. This permission allows the user to search for user records and view the following sections in a user record: User information, Extended information, and Contact information.
- Users: Can view, edit, and delete profile pictures. This permission allows the user to view, edit, or delete a profile picture in a user record.
- Users: Create and download Cash drawer reconciliation report. This permission allows the user to create and download a Cash drawer reconciliation report.
- Users: Create and download Financial transaction detail report. This permission allows the user to create and download a Financial transaction detail report.
- Users: Create and download Refunds to process manually report. This permission allows the user to create and download a report of refunds to process manually.
- Users: Create/reset password. This permission allows the user to send a password reset email to a user or copy the password reset link to share with a user to use the reset password functionality.
- Users: User loans anonymize. This permission allows the user to remove all user details from a loan.
- Users: User loans change due date. This permission allows the user to change the due date of a loan on another user’s record.
- Users: User loans claim returned. This permission allows the user to change the status of loaned items to claim returned.
- Users: User loans declare lost. This permission allows the user to change the status of loaned items to Declared lost.
- Users: User loans mark claimed returned missing. This permission allows the user to change the status of loaned, claim returned items to Missing.
- Users: User loans renew. This permission allows the user to renew loans to the extent that is permitted by the loan policy.
- Users: User loans renew through override. This permission allows the user to override failed renewals.
- Users: User loans view. This permission allows the user to view the Loans section on a user record, view the loans page and loan details.
- Users: User loans view, change due date, renew. This permission allows the user to view the Loans section on a user record, to change a due date on a loan, and renew loans.
- Users: User loans: add patron information. This permission allows users to add patron-viewable information to the patron’s loan record. The information added can be viewed by both patron and staff.
- Users: User loans: add staff information. This permission allows users to add staff-viewable information to the patron’s loan record. The information added cannot be viewed by the patron.
- Users: View and remove patron notice print jobs. This permission allows the user to view Patron notice print jobs (PDF files) and to delete print jobs in the UI.
- Users: View patron notice print jobs. This permission allows the user to view Patron notice print jobs PDF files.
- Users: View requests. This permission allows the user to view the Requests section on a user record. This permission also includes the ability to search for and view the user information section in a user record.
Keyboard shortcuts
Keyboard shortcuts allow you to perform actions in this app using the keyboard. See Platform Essentials > Keyboard shortcuts for more information.
Creating a user record manually
- In the User Search Results pane, click Actions > New.
- In the Create User window, fill in the User information, Extended information, and Contact information sections. Fill in the Custom fields sections, if configured by your institution. For more information on the fields and actions available in these sections, see the section descriptions below.
- Once you have included all the information you want about the user, click Save & Close. The user record is saved.
- Last name (required). The surname of the user.
- First name. The given name of the user.
- Middle name. The middle name of the user.
- Preferred first name. The name by which the user prefers to be called. If a preferred first name is provided, it will display in the user record in place of the first name.
- Patron group (required). Select a patron group to assign to the user. Patron groups are classes of library users configured by your library in the Settings app. See Settings > Users > Patron Groups for more information about setting up Patron Groups.
- Status (required). Select a status for the user: Active or Inactive. A user’s status is tied to the expiration date set on their user record. When a Patron Group is selected, the Status automatically defaults to Active.
- Active status indicates current affiliation, employment, or enrollment within the library’s institution.
- Inactive status indicates that the expiration date on the user’s record has passed and the user is no longer affiliated, employed, or enrolled.
- Expiration date. The amount of time set before the user record becomes inactive and the user no longer has permissions to borrow items. The expiration date determines when a user’s status changes from Active to Inactive. Expiration date is optional and this field may be left blank. For information about editing an expiration date, see Edit an expiration date.
- Barcode. The barcode number for the user’s library card. The barcode number can be entered manually or created using the Number generator, depending on the configuration in the FOLIO tenant. See Settings > Users > Number generator for more information about the Number generator.
- To enter the barcode manually, type the barcode number in the Barcode field.
- To use the Number generator, click the Generate user barcode button under the Barcode field to open the Number generator. In the User barcode generator modal, click the blue Generate user barcode button. Check the boxes for Include sequences which have reached their maximum value and/or Exact code match as appropriate.
- User Type. Select the user type: Patron or Staff. This field is optional for a non-ECS-enabled tenant but required in an ECS-enabled tenant. For more information, see Consortium manager > Members.
- Patrons. Users who may borrow library materials but have no FOLIO permissions assigned to their User record and do not log in to FOLIO to manage their library accounts.
- Staff. Users who are employed by the library, have FOLIO permissions assigned to their User record for the purpose of performing their library work, and may borrow library materials.
- Profile picture. The purpose of the profile picture feature is to enable the secure storage, display, and management of profile photos in user records.
If profile pictures are enabled in the FOLIO tenant, the patron’s profile picture (100px x 100px) is displayed in the User information section of the user record. For more information about configuring Profile pictures, see Configuration setting for Profile-Picture Feature.
- Date enrolled. The date a user is enrolled at the institution. This field is auto-populated if it is included in source data provided by an external system.
- External system ID. The external system ID for the user. This field is auto-populated if it is included in source data provided by an external system.
- Birth date. The date of birth of the user in YYYY-MM-DD format.
- Folio number. A system-generated number for the user record.
- Request preferences. Hold Shelf is selected by default for all users. If Delivery is also checked, select Fulfillment preference.
- If Delivery is selected as the Fulfillment preference, select the Default delivery address. This field appears and is required only if Delivery is selected as a fulfillment preference. Addresses are stored in the Contact information section of the User record. See Users > Contact information for more information.
- If Hold Shelf is selected as the Fulfillment preference, select the Default pickup service point. All user records have at least one service point assigned to indicate the location for checking out or picking up requested items. Service points are configured by your library in the Settings app. See Settings > Tenant > Service points for more information.
- Department name. Name of the user’s department, if applicable. The Add Department button appears only if Departments are configured in Settings > Users > Departments.
- To associate the user with a department, click Add Department and select the department from the drop-down list.
- Delete Department from a user record by clicking the trash can icon.
- Username. If the User Type is set to Staff, the username is used by library staff to log into FOLIO to perform library work. If the User Type is set to Patron, the username is not required, but may be assigned for the purpose of connecting their library account in FOLIO with an external system, such as a discovery interface or a self-checkout system. However, patrons will not log into FOLIO to manage their library accounts.
- Password. Users can be sent a reset password link via email. This link expires after 24 hours. An institution may apply different password validation rules for their users.
The password must meet the following default validation rules:
    * Contain a minimum of 8 characters.
    * Contain both uppercase and lowercase letters.
    * Contain at least 1 numeric character.
    * Contain at least 1 special character.
    * Does not contain the username.
    * Does not contain a keyboard sequence.
    * Does not contain the same character.
    * Does not contain whitespace(s).
- Email (required). The email address of the user.
- Phone. The phone number of the user.
- Mobile phone. The mobile phone number of the user.
- Preferred contact (required). Select the user’s preferred method of contact: Email, Mail (Primary Address), or Text Message.
- Address. The address of the user. You can add multiple addresses. To add an address, click Add Address. If more than one address is entered, select Use as primary address for the user’s main address.
- Address Type. Select the appropriate address type for the user’s address. Address Types are configured by your library in the Settings app. See Settings > Users > Address Types for more information. Fill out the address information fields and click Add Address to save the address to the user’s record.
Custom fields
The Custom fields section appears only if it is configured in the Settings>Users app. For information on configuring the Custom fields section, see Settings > Users > Custom fields.
Search for user records
You can search for user records in the User search pane. To search for users, enter your search terms into the box and click Search. The user search box searches through these fields:
- Keyword (name, email, identifier)
- Username
- First Name
- Preferred First Name
- Last Name
- Middle Name
- Email
- Barcode
- User UUID
- External System Id
- Custom Fields with the “Text Field” or “Text Area” custom field types
- Barcode
- Last Name
- Username
You can also search for user records by selecting any of the filters in the User search pane or apply the filters after you perform a search to limit your results. To apply a filter, open the appropriate accordion and select an option for that filter. The filters available include:
View a user record
Once you search for a user record, the following information appears in the User search results pane:
- Name. Name of the user. Last Name, First Name or Last Name, Preferred first name (First name)
- Active. The status of the user.
- Barcode. The barcode number of the user.
- Patron group. The patron group to which the user belongs.
- Username. The username of the user.
- Email. The email address of the user.
In the User search results pane, click on a user record to view it. The User record pane displays additional information in the user record.
For information about the User information section, see Create a user record > User information.
Patron blocks
For more information on manual blocks, see Create a manual patron block.
For information about the Extended information section, see Create a user record > Extended information.
For information about the Contact information section, see Create a user record > Contact information.
Custom fields
Custom fields are configured by your institution and allow additional information in the user record. For more information about custom fields, see Settings > Users > Custom fields.
The Proxy/sponsor section displays any proxies or sponsors associated with the user record. See Add a sponsor or Add a proxy for more information.
Fees/fines
The Fees/fines section displays the number of open, closed, suspended claim returned, and refunded fees/fines.
- To view additional details about the user’s fees/fines, expand the Fees/fines accordion and click on open fees/fines or closed fees/fines.
- To view all fees/fines, click View all fees/fines.
Manual fees/fines can also be created in the Fees/fines section. For more information, see Creating a manual fee/fine.
For an overview on Fees/fines, see Additional Topics > Fees and fines.
Loans
The Loans section displays the number of open loans and closed loans on a user’s record. To view additional details about the user’s open loans or closed loans, expand the Loans accordion and click open loans or closed loans, accordingly.
Open loans
A patron has an open loan when they have borrowed an item and the item has not yet been returned. A loan is also considered open when the patron has returned the item but owes a fee/fine, or when a patron says they have returned an item and the library marks it as claim returned while they search the shelves.
Closed loans
Once an item is returned to the library and checked in, and any associated fee/fines are resolved, the loan is closed.
Loan anonymization
Once a loan is closed, it can be anonymized if loan anonymization is set up. For more information see Settings > Circulation > Loan anonymization.
To anonymize a user’s closed loan, follow these steps:
- Open the Loans accordion in the user’s record and click on Closed loans.
- Click the Anonymize all loans button. A confirmation modal appears with the message, All loans for this user will be anonymized. The loans will no longer appear in the user’s closed loans. Anonymizing loans cannot be reversed.
- Click Confirm to anonymize the loan or click Cancel to cancel loan anonymization.
Requests
The Requests section displays the number of open requests and closed requests on a user’s record. For more information about requests, see Requests.
Open requests
A request is open when a patron has not yet received the item they have requested. This can be the case when the user is waiting for another patron to return the item, or when the item is being pulled from a shelf (Open - Not yet filled, Open - Awaiting delivery, or Open - In transit). The request is also open if the item has been brought to the requested service point and the patron has been notified to pick it up (Open - Awaiting pickup).
Closed requests
A request is closed when the patron picks up the item (Closed - Filled). A request is also closed if the patron or library staff cancels their request prior to pickup (Closed - Cancelled), if the patron didn’t pick up the item before the hold expired (Closed - Pickup expired), or if the library was unable to fill the request before the request itself expired (Closed - Unfilled).
To view additional details about the user’s requests, expand the Requests accordion and click open requests or closed requests, accordingly.
Requests can be created for the user in the user record or in the Requests app. Click the Create request button in the Requests section of the user record or go to the Requests app by selecting Create request in the Actions menu.
User permissions
The User permissions section displays all permissions assigned to the user record. For more information, see Assign or unassign permissions.
For more information on permissions, see Platform Essentials > Permissions.
Service points
The Service points section displays all service points assigned to the user record, including the user’s service point preference, if applicable. For more information, see Add or remove a service point.
Notes
The Notes section displays any notes about the patron. For more information, see Add a note.
Edit a user record
To edit the User information, Extended information, or Contact information section in a user record:
- Find the user record you want to edit and select it.
- In the User record pane, click Actions > Edit.
- In the Edit window, edit the appropriate information in the User information, Extended information, or Contact information sections.
- Click Save & Close. The user record is updated.
Change a user’s status
A user’s status can be changed between Active or Inactive based on changes in their employment status or enrollment status.
- Find the user record you want to edit and select it.
- In the User record pane, click Edit.
- In the Edit window, in the User Information section, in the Status drop-down list, select Active or Inactive.
- Click Save & Close.
Edit an expiration date
To edit (or re-set) an Expiration date in an existing user record:
- Find the user record you want to edit and select it.
- Select the user record from the User search results list. Click Actions > Edit.
- Customize the expiration date by typing the new date in the Expiration date field using YYYY-MM-DD format. Or click on the Calendar icon in the Expiration date field to select a date.
- Reset the date to the default expiration date for the assigned patron group by clicking on the Re-set button. The Expiration date reverts to the default expiration date for the assigned Patron Group.
- Delete the expiration date by clicking on the x in the Expiration Date field.
- Click Save & Close.
Update a Profile picture
If Profile pictures are enabled in the FOLIO tenant, then library staff with appropriate permissions can upload, update, or delete profile pictures in a user record. Supported file formats include .jpg, .jpeg, and .png. For more information about configuring Profile pictures, see Configuration setting for Profile-Picture Feature.
To upload a Profile picture to a user record:
- Find the user record you want to edit and select it.
- In the User record pane, click Edit.
- Click the Update button under the profile picture placeholder.
- Local file: Choose this option to select an image file from your computer.
- In the Preview and Edit modal, use the Zoom or Rotate sliders to adjust the image, if necessary.
- Click Save to finish the upload. The Profile picture is now attached to the user record.
- External URL: Choose this option to link to an externally hosted image.
- In the Update profile picture modal, add the URL for the image in the External URL text box.
- Click Save to save the URL and link the image to the user record. Note that if the URL is not valid, a red error text displays below the External URL text box that reads “Invalid image URL” and the modal does not close.
To update or delete a Profile picture in a user record:
- Find the user record you want to edit and select it.
- In the User record pane, click Edit.
- Click the Update button under the profile picture placeholder.
- Local file: Choose this option to select an image file from your computer.
- In the Preview and Edit modal, use the Zoom or Rotate sliders to adjust the image, if necessary.
- Click Save to finish the upload. The Profile picture is now attached to the user record.
- External URL: Choose this option to link to an externally hosted image.
- In the Update profile picture modal, add the URL for the image in the External URL text box.
- Click Save to save the URL and link the image to the user record. Note that if the URL is not valid, a red error text displays below the External URL text box that reads “Invalid image URL” and the modal does not close.
- Delete: This option displays only if a Profile picture is currently attached to the user record. Choose this option if you wish to remove the Profile picture from the user record.
Send a password reset email
Once a user record is created, a reset password link can be emailed to the user. However, this feature should be used only with library staff accounts. Since patrons will not and should not log into FOLIO to manage their library accounts, they should not be sent a password reset email for their FOLIO username.
To send a password reset link:
- Find the user record for which you want to send a password reset email and select it.
- In the User record pane, click Edit.
- In the Edit window, in the Extended information, click the Send reset password email link under Folio password. The reset password email is sent to the email address listed in the user’s Contact information.
- Optional: In the Reset password email sent pop-up window, click Copy link to copy the password reset link and manually send the link to the user in a different email application.
- Click the X to close the pop-up window.
A sponsor is a user who authorizes another user to borrow library materials on their behalf. For example, if you are adding a sponsor to the user record of User One, then User One is the proxy and can borrow on behalf of User Two (the sponsor).
- Find the user record to which you want to add a sponsor and select it.
- In the User record pane, click Edit.
- In the Edit window, expand the Proxy/sponsor accordion and click Add in the Sponsors section.
- In the Select User pop-up window, search for the sponsor and select them. Optionally, additional information may be included:
- In the sponsor box, select the Relationship Status: Active or Inactive.
- Add an Expiration date by typing a date using the YYYY-MM-DD format or selecting a date from the calendar icon. The expiration date indicates the expiration of the proxy/sponsor relationship.
- Select whether the Proxy can request for the sponsor. If you select Yes, then the proxy can place requests for materials on behalf of the sponsor.
- Select to whom notifications from the library are sent in the Notifications sent to drop-down list: Proxy or Sponsor.
- Click Add.
- Click Save & Close. The sponsor is added to the user record.
Add a proxy
A proxy is a user who is authorized to borrow library materials on another user’s behalf. For example, if you are adding a proxy to the user record of User One, then User Two is the proxy and can borrow on the behalf of User One (the sponsor).
- Find the user record to which you want to add a proxy and select it.
- In the User record pane, click Edit.
- In the Edit window, expand the Proxy/sponsor accordion and click Add in the Proxies section.
- In the User search pop-up window, search for the proxy user and select them. Optionally, additional information may be included.
- In the proxy box, select the Relationship Status: Active or Inactive.
- Add an Expiration date by typing a date using the YYYY-MM-DD format or selecting a date from the calendar icon. The expiration date indicates the expiration of the proxy/sponsor relationship.
- Select whether the Proxy can request for the sponsor. If you select Yes, then the proxy can place requests for materials on behalf of the sponsor.
- Select to whom notifications from the library are sent in the Notifications sent to drop-down list: Proxy or Sponsor.
- Click Add.
- Click Save & Close. The proxy is added to the user record.
Assign or unassign permissions
Library staff must have permissions assigned to their user record in order to interact with the FOLIO user interface. Permissions are not and should not be assigned to patrons for library services such as borrowing books, requesting items, etc. For a list of permissions and their definitions, see the respective app’s Permissions section in the documentation. For information about viewing a list of all users who are assigned a specific permissions set, see Settings > Users > Permission sets.
To assign permissions to a user’s record:
- Find the user record to which you want to add permissions and select it.
- In the User record pane, click Edit.
- In the Edit window, expand the User permissions accordion if needed.
- Click Add permission.
- In the Select Permissions pop-up window, search for the permission(s) or permissions set(s) you want to assign to the user. You can also filter the search by Permission type or Permission assignment status in the Search & Filter pane.
- Select the checkbox(es) next to the permission(s) or permission set(s) you want to assign to the user.
- Click Save & close. The selected permission(s) and permission set(s) are assigned to the user record.
- Click Save & close. The user record is saved.
Permissions can be unassigned, or removed, from a user’s record either individually or all at once with one click.
To unassign permissions in a user’s record:
- Find the user record for which you want to unassign, or remove permissions and select it.
- In the User record pane, click Edit.
- In the Edit window, expand the User permissions accordion if needed.
- Click the “x” next to the individual permission(s) or permission set(s) to unassign, or remove, them from the user record.
- Click Save & close. The user record is saved.
Permissions can also be unassigned by following a modified version of the process for assigning them:
- Find the user record to which you want to unassign, or remove permissions and select it.
- In the User record pane, click Edit.
- In the Edit window, expand the User permissions accordion if needed.
- Click Add permission.
- In the Select Permissions pop-up window, search for the permission(s) or permissions set you want to unassign, or remove from the user’s record. Narrow your search by filtering by Permission type or Permission assignment status in the Search & Filter pane.
- Deselect the checkbox next to the permission(s) you want to unassign, or remove, from the user’s record.
- Click Save & close. The permission(s) are unassigned and removed from the user record.
- Click Save & close. The user record is saved.
To remove all assigned permissions or permission sets from the user’s record in one click:
- Find the user record to which you want to remove permissions and select it.
- In the User record pane, click Edit.
- In the Edit window, expand the User permissions accordion if needed.
- Click the Unassign all permissions button.
- In the Unassign all permissions pop-up window, click Yes to confirm that you want to unassign all permissions. All assigned permissions and permission sets will be unassigned and removed from the user’s record.
Add or remove a service point
A service point in FOLIO is a setting that libraries configure to support circulation functions. Every FOLIO item must have a location, and every location must have an attached service point. You must set up at least one service point to be able to check items in and out; allow patrons to request items; charge and collect fines; and put items in transit between locations at your library.
Staff who use the Check in, Check out, Users, or Requests apps must have at least one service point assigned to their user record. Service points are configured for your library in the Settings app. See Settings > Tenant > Service Points for more information.
To add one or more service points to a user record:
- Find the user record to which you want to add a service point and select it.
- In the User record pane, click Edit.
- In the Edit window, expand the Service points accordion if needed.
- Click Add service points.
- In the Add service points pop-up window, select the checkboxes next to the service point(s) you want to assign to the user record.
- Click Save & close. The service point(s) are assigned to the user record.
- Select a Service point preference from the drop-down list. This is optional but if left empty or None is selected, the user will have to select a service point every time they log in to FOLIO.
- Click Save & Close. The service point(s) are added to the user record.
To remove one or more service points from a user record:
- Find the user record to which you want to remove a service point and select it.
- In the User record pane, click Edit.
- In the Edit window, expand the Service points accordion if needed.
- Click the “x” next to the service point(s) to remove them from the user record.
- Click Save & close. The user record is saved.
Service points can also be removed by following a modified version of the process for adding them:
- Find the user record to which you want to remove a service point and select it.
- In the User record pane, click Edit.
- In the Edit window, expand the Service points accordion if needed.
- Click Add service points.
- In the Add service points pop-up window, deselect the checkboxes next to the service point(s) you want to remove from the user record.
- Click Save & Close. The service point(s) are removed from the user record.
Add or remove a tag
Tags must be enabled in your FOLIO tenant in order to use tags in the Users app. See Settings > Tags for more information.
To add a tag to a user record:
- Find the user record to which you want to add a tag and select it.
- In the User record pane, click the tag icon next to the Actions button.
- If you want to use an existing tag, select it from the drop-down list. If you want to create a new tag, type the tag into the box and select Add tag for the new tag name in the drop-down.
- Click the X on the Tags pane to close the pane and save the tag. The tag number updates to the number of tags applied to the user record.
To remove a tag from a user record:
- Find the user record to which you want to add a tag and select it.
- In the User record pane, click the tag icon next to the Actions button.
- Click the X next to the tag to be removed.
- Click the X on the Tags pane to close the pane. The tag number updates to the number of tags applied to the user record.
Create a manual patron block
Patron blocks allow libraries to manually prevent a patron from borrowing, renewing, and/or requesting materials until specified issues are resolved. Users with appropriate permissions can edit manual blocks on a patron’s record to update block information, actions, or remove the block. The block is displayed prominently on the user record so that staff members are aware that a patron is blocked and why. If an expiration date is provided on the patron block, the block is automatically removed on that date.
Patron block templates must be set up in your FOLIO tenant before using them to create a patron block. See Settings > Users > Patron Block Templates for more information.
To create a patron block using a patron block template:
- Find the user record of the patron you want to block and select it.
- Click on Actions > Create block or in the User record pane, expand the Patron blocks accordion if needed and click Create block.
- Select a patron block template from the Template name menu. Template values will be applied to the block.
- Add any additional information to the block and select an expiration date if needed.
- Click Save & close. The patron block is saved and added to the user record.
To create a patron block without a patron block template:
- Find the user record of the patron you want to block and select it.
- In the User record pane, expand the Patron blocks accordion.
- Click Create block.
- In the New Block window, expand the Block information accordion if needed. Enter a Display Description. This is the description that displays on the user record and in pop-up windows that appear when staff try to check out, renew, or request items on behalf of the patron, depending on their block.
- Optional: Enter Staff only information.
- Optional: Enter a Message to Patron.
- Optional: Enter an Expiration date on which the patron block expires.
- By default, all Block actions are selected. These are the actions that the user is barred from doing because of the block. To allow some of the actions, clear the checkbox(es) next to Borrowing, Renewals, or Requests as appropriate.
- Click Save & close. The patron block is saved and added to the user record.
Edit a patron block
- Find the user record of the patron with the block you want to edit and select it.
- In the User record pane, expand the Patron blocks accordion.
- In the block table, select the block you want to edit.
- In the user block window, make your changes.
- Click Save & Close. The patron block is updated.
Remove a patron block
Patron blocks with expiration dates are automatically removed from the user record on that date.
To remove a patron block with no assigned expiration date, follow these steps:
- Find the user record of the patron with the block you want to edit and select it.
- In the User record pane, expand the Patron blocks accordion.
- Select the block you want to remove
- In the user record window, click Delete.
- In the Delete patron block? pop-up window, click Deleteto confirm the action. The patron block is removed from the user record.
Create a request
Requests can be created in three ways: 1) In the Requests app; 2) in the user record in the Users app; or 3) in the item record in the Inventory app. For information on creating requests, see Creating a request.
Add a note
To add a note to a user record:
- Find the user record to which you want to add a note and select it.
- In the User record pane, expand the Notes accordion if needed.
- Click New.
- In the New note window, select the Note type from the drop-down list. Note types are created in the Settings app. For more information, see Settings > Notes > General.
- Enter a Note title in the box.
- Optional: Enter any Details about the note in the box.
- If this note should appear as a pop-up whenever the user record is opened in the Check Out and/or Users app, check the Check Out app box and/or the User app box under the Display note as a pop-up as appropriate.
- Click Save & close. The note is saved.
Deleting a user record in the UI
A user record can be deleted only if the user has no open transactions. To delete a user record, first check for open transactions. Once it’s confirmed that the user has no open transactions, the user record can be deleted.
Follow these steps to check for open transactions and delete a user record in the UI:
- Find the user record for which you want to check for open transactions and select it.
- In the Actions menu, select Check for open transactions/delete user.
- If there are no open transactions for this user, the message No open transactions for user (Last Name, First Name). Are you sure you want to delete this user? will appear in the Check for open transactions/delete user modal.
- Click Yes to delete the user record. A User (Last Name, First Name) deleted successfully message will confirm deletion of the user record.
- Or click No to cancel the deletion and return to the user record.
- If there are one or more open transactions for the user, the message User (Last Name, First Name) has the following open transactions. Please resolve the transactions to proceed to delete this user. Click OK to return to the user record.
If the deleted user had permissions to edit records, the Source on the metadata history becomes listed as “Unknown user”.
Create a report
Lost items requiring actual cost
The Lost items requiring actual cost report is a list that displays in the UI and contains information about open loan items with Aged to lost status. To use this report to manage billings for lost items, Actual cost must be set up in at least one Lost item fee policy. For more information about using actual cost for lost items, see Creating a lost item fee policy.
To view a Lost items requiring actual cost report:
- In the User search results pane, click Actions > Lost items requiring actual cost.
- In the Actions column of the report, click on the ellipse in the appropriate row to view the options for billing the patron:
- Bill actual cost: This option creates a bill for the patron. To bill for actual cost, a manual fee/fine is applied. If this option is selected, an Actual cost to bill [patron’s name] dialog displays with the Fee/fine type and Fee/fine owner information. Enter the actual cost of the item in the Actual cost to bill patron box. Add Additional information for staff or Additional information for patron as appropriate. Click Continue. An Confirm actual cost dialog appears to warn you that the patron will be billed. Click Confirm to proceed with billing.
- Do not bill: This option allows the library to waive the bill for the lost item. If this option is selected, a Do not bill dialog displays with the Fee/fine type and Fee/fine owner information. The Actual cost to bill patron is automatically assigned to zero. Library staff can add information in the Additional information for staff if desired. Click Continue to waive the bill.
- Patron details: This option opens the patron’s user record in a separate pane.
- Loan details: This option opens the Loan details in a separate window. Library staff can change the loan status of the item, add New patron info or New staff info as appropriate.
- Item details: This option displays the Item record in a new window.
View patron notice print jobs
If a library is required to send print overdue notices to their patrons, the View patron notice print jobs (PDF) provides a daily report of patron notices. This PDF file is automatically generated overnight every 24 hours using the assigned patron notice template(s). In Quesnalia, this option appears in the Action menu, but the PDF file is actually generated only for libraries that have set up reminder fees in their overdue fine policies. For more information about setting up reminder fees, see Settings > Circulation > Reminder fees.
To view patron notice print jobs (PDF):
- In the User search results pane, click Actions > View patron notice print jobs (PDF).
- In the Patron notice print jobs window, click on the link for the report you wish to view.
To delete a patron notice print job:
- In the Patron notice print jobs window, check the box next to the print job you wish to delete. To select all of the print jobs for deletion, check the box next to Created.
- Click Actions > Delete selected print jobs. Note that no warning or confirmation message appears before deleting the selected print job
Overdue loans report
The Overdue loans report is a comma-separated values (CSV) file that displays all users with overdue materials.
To create an Overdue loans report:
- In the User search results pane, click Actions > Overdue loans report (CSV).
- Depending on your browser and its configurations, an Export in progress message appears and the file automatically downloads or you are prompted to save it. If there are no overdue loans to report, a No items found message appears and no file is generated.
Claimed returned report
The Claimed returned report is a comma-separated values (CSV) file that displays all users with claimed returned materials.
To create a Claimed returned report:
- In the User search results pane, click Actions > Claimed returned report (CSV).
- Depending on your browser and its configurations, an Export in progress message appears and the file automatically downloads or you are prompted to save it. If there are no claimed return items to report, a No items found message will appear and no file is generated.
Cash drawer reconciliation report
The Cash drawer reconciliation report is used by library staff to balance their cash drawer at the end of a shift. The cash drawer reconciliation report shows forms of payments received (cash, check, credit card, and other forms of payment allowed by the library unit) for fees and fines and identifies the fee/fine owner so that the appropriate library unit receives payment. The cash drawer reconciliation report is available for download as a comma-separated values (CSV) file and/or printable document format (PDF).
To create a Cash drawer reconciliation report:
- In the User search results pane, click Actions > Cash drawer reconciliation report (CSV, PDF).
- In the Cash drawer reconciliation report modal, enter a *Start Date (required) and an End Date. Select Service Point (required) and Sources.
- Select Report format. You may select CSV, PDF (Read Only), or Both.
- Click Save & close.
- Depending on your browser and its configurations, an Export in progress message appears and the file automatically downloads or you are prompted to save it. If there are no transactions to report, a No items found message appears and no file is generated.
Financial transaction detail report
The Financial transaction detail report allows libraries to review transactions in a specified time period at the fee/fine owner level. Fee/fine owners must be set up in your FOLIO tenant in order to create a Financial transaction detail report. See Settings > Users > Owners for more information.
To create a Financial transaction detail report:
- In the User search results pane, click Actions > Financial transaction detail report (CSV).
- In the Financial transaction detail report modal, specify a date range by entering a Start date and an End date. Select the Fee/fine owner (required). Select the Associated service points.
- Click on Save & close.
- Depending on your browser and its configurations, an Export in progress message appears and the file automatically downloads or you are prompted to save it. If there are no transactions to report, a No items found message appears and no file is generated.
Refunds to process manually report
The Refunds to process manually report is a report that provides library administration with a list of patrons requiring refunds. It is available for download as a comma-separated values (CSV) file. Fee/fine owners must be set up in your FOLIO instance in order to create a Refunds to process manually report. See Settings > Users > Owners for more information.
To create a Refunds to process manually report:
- In the User search results pane, click Actions > Refunds to process manually report (CSV).
- In the Refunds to process manually modal, specify a date range by entering a Start Date and an End Date. Select the Fee/Fine Owner.
- Click Save & close.
- Depending on your browser and its configurations, an Export in progress message appears and the file automatically downloads or you are prompted to save it. If no there are no refunds to process manually, a No items found message appears and no file is generated.
Managing loans and fee/fines for patrons
From the loans section on a patron’s record, a FOLIO user with appropriate permissions can renew a loan for a patron, change the due date, mark the item claim returned, or declare the item lost. For more information, see Additional Topics > Loans.
FOLIO users with appropriate permissions can manage fee/fines on patron accounts. This includes viewing fee/fine information, creating manual charges, accepting payment, waiving a fine, refunding a fine, and canceling a fine. For more information, see Additional Topics > Fees and fines.
Renew a loan
To renew one or more loans for a patron:
- In the user record pane, expand the Loans accordion if needed.
- Click on Open loans.
- Use the check boxes on the left of the Loans window to select the appropriate loan(s).
- Click the Renew button located in the top right corner of the Loans window.
If the renewal is successful, a green success message appears in the bottom right corner. The new due date may be sooner than expected if the normal due date would be after a patron’s account has expired.
If the renewal is not successful, a pop-up message will appear. If you have the correct permissions, you can click Override from the pop-up window to override the error and renew the loan.
Mark an item claim returned
Occasionally, patrons may claim that they have returned items that are still listed as checked out to them. The library has the option to mark the item as “claim returned.” This will place any associated fines in a suspended state while libraries carry out workflows to search for the item on their shelves.
To mark an item claim returned:
- In the user record pane, expand the Loans accordion if needed.
- Use the check boxes on the left of the Loans window to select the appropriate loan(s).
- Click the Claim returned button located in the top right corner of the Loans window.
- In the Confirm claim returned modal, enter additional information about the patron’s claim (required).
- Click Confirm.
The loan will remain in the patron’s list of open loans, but the item status will change to Claim returned.
If the library cannot locate the claimed returned item, it will need to decide whether to bill the patron for the item or mark the item missing without charging fines. In FOLIO, this action is referred to as resolving a claim.
To resolve a claim on an item:
- Click the appropriate loan to open the Loan details window.
- Click the button marked Resolve claim on the top row.
- If you are going to bill the patron for the item, choose Declare lost. If you will not be billing the patron for the item, choose Mark as missing.
- In the pop-up window that appears, FOLIO will show a message to confirm the action you wish to take. Enter any additional information about the patron’s claim (required).
- Click Confirm.
If you choose to declare the item lost, FOLIO will check the associated lost item fee policy for the loan and charge fees/fines as configured in that policy.
Change a due date
To change the due date on one or more loans for a patron:
- In the user record pane, open the Loans accordion if needed.
- Click on open loans.
- Select the check boxes on the left of the Loans window to select the appropriate loan(s).
- Click the Change due date button located in the top right corner of the Loans window.
- In the Change due date modal, enter a new Date by using the MM/DD/YYYY format or select one from the calendar icon. Select a Time by clicking on the clock icon, choosing a time, and clicking on the Set time button.
- Click Save and close.
Note that if you have permissions to change a loan’s due date, you can change the due date/time to one in the past. FOLIO will give you a warning message but allow the change to go through.
Mark an item Declared lost
FOLIO has two options to show that an item has been borrowed and not returned - “aged to lost” and “declared lost.” Aged to lost is an automated status that FOLIO gives to an item when the item is not returned by the date specified in the lost item policy. Declared lost is a manual status that library staff can use when a patron tells the library that they cannot return the item because they can no longer find it or because it had been inadvertently damaged.
Library staff can only mark one loan declared lost at a time.
To mark a loan declared lost:
- Click the appropriate loan to open the Loan details window.
- Click Declare lost at the top of the window.
- In the Confirm item status: Declared lost modal, enter additional information about the circumstances of the loan (required)
- Click Confirm.
When an item is declared lost, FOLIO will check the associated lost item fee policy for the loan and charge fees/fines as configured in that policy.
Adding patron info to a loan
A note can be added to an open loan. This note can be set to display for the patron and staff. To add patron information to an open loan on a user’s record:
- Find the user record to which you want to add New patron info and select it.
- In the User record pane, expand the Loans accordion and click on Open loan(s).
- Click on the Loan you wish to add patron info to. The Loan details window appears.
- Click on the New patron info button.
- In the Add new patron information modal, type in the Additional information. Note that this new information will supersede any patron information added previously.
- Click Save & close to save the patron information in the open loan.
Adding staff info to a loan
A note can be added to an open loan. The note can be viewed by staff with proper assigned permissions only.
. To add staff information to an open loan on a user’s record:
- Find the user record to which you want to add New staff information and select it.
- In the User record pane, expand the Loans accordion and click on Open loan(s).
- Click on the Loan you wish to add staff info to. The Loan details window appears.
- Click on the New staff info button.
- In the Add new staff information modal, type in the Additional information.
- Click Save & close to save the staff information in the open loan.
When an open loan including staff info or patron info is checked in, the loan becomes closed and the staff info or patron info is retained in the loan details. To view patron info or staff info on a closed loan:
- Find the user record to which you want to view Staff info or Patron info and select it.
- In the User record pane, expand the Loans accordion and click on Closed loan(s).
- Click on the closed loan to select it. The Loan details window appears and displays Staff info only and Patron info only for the closed loan.
Creating a manual fee/fine
To create a manual fee/fine, Fee/fine types and other fee/fine settings must be configured in the FOLIO tenant. See Settings > Users > Manual Charges for more information.
- Find the user record to which you want to add a fee/fine and select it.
- In the User record pane, expand the Fees/fines accordion if needed.
- Click Create fee/fine.
- In the New fee/fine window, select the Fee/fine owner.
- Select the Fee/fine type.
- In the Fee/fine amount box, you can do one of three things:
- Keep the default fee/fine amount, if one is populated for the fee/fine type.
- Adjust the default fee/fine amount, if it is populated for the fee/fine type.
- Provide a fee/fine amount, if one did not populate. See Lost items requiring actual cost.
- Optional: To associate the fee/fine with an item, scan or enter the item barcode into the Item information box and click Enter.
- Optional: Enter any Additional information for staff in the box.
- Click Charge only to apply the charge to the patron record. FOLIO users with appropriate permissions may be able to create the fine and immediately accept payment by clicking Charge & pay now.
- Click either Charge & pay now to charge the patron and process the payment or Charge Only to only apply the charge to the user record.
Accepting payment for a fee/fine
To accept payment for a fee/fine, Fee/fine owner and other fee/fine settings must be configured in the FOLIO tenant. For more information, see Settings > Users > Payment Methods.
To accept payment for a fee/fine:
- Find the user record to which you want to accept payment for a fee/fine and select it.
- In the User record pane, expand the Fees/fines accordion if needed.
- Select (number of) open fee/fine to view the patron’s open fines.
- The Fees/fines modal will open. Click the fee/fine you wish to accept payment for.
- The Fee/fine details modal will open. Click **Actions > Pay **.
- The Pay fee/fine modal opens. Enter the Payment amount (required). FOLIO can handle full and partial payment. If you are accepting partial payment, the modal will calculate the remaining amount.
- Select Payment method (required).
- Input Transaction information and Additional information for staff. The Additional information for staff box may be required if your library has configured that option.
- Click Pay, then Confirm.
The modal will close and the Fee/fine details page will update with the payment transaction.
Waiving a fee/fine
Staff with appropriate permissions can apply a partial or full waive to a fee/fine. To waive fines, Fee/fine: Waive reasons and other fee/fine settings must be configured in the FOLIO tenant. For more information, see Settings /> Users /> Waive reasons.
- Find the user record to which you want to accept payment for a fee/fine and select it.
- In the User record pane, expand the Fees/fines accordion if needed.
- Select (number of) open fee/fine to view the patron’s open fines.
- The Fees/fines modal will open. Click the fee/fine you wish to waive.
- The Fee/fine details modal will open. Click Actions > Waive.
- The Waive fee/fine modal will open. Enter the amount to waive (required). You can waive some or all of the fine amount. If you are only waiving part of the fine, FOLIO will automatically calculate the remaining amount.
- Select the Waive reason (required) and enter Additional information for staff. The Additional information for staff box may be required if your library has configured that option.
- Click Waive, then Confirm.
The modal will close, and the Fee/fine details page will update with the payment transaction.
Refund a fee/fine
Staff with appropriate permissions can partially or fully refund a fee/fine. The payment method must allow refunds and Fee/fine: Refund reasons must be configured in the FOLIO tenant. See Settings /> Users /> Fee/fine: Refund reasons.
- Find the user record to which you want to refund a payment and click it.
- In the User record pane, expand the Fees/fines accordion if needed.
- Select View all fees/fines to view the patron’s fines.
- The Fees/fines modal will open. Click the fee/fine you wish to refund a payment for. It may be Open or Closed.
- The Fee/fine details modal will open. Click Actions >Refund.
- The Refund fee/fine modal will open. Enter the amount to refund (required). You can refund some or all of the fine amount. If you are only refunding part of the fine, FOLIO will automatically calculate the remaining amount.
- Select the Refund reason (required) and enter Additional information for staff. The Additional information for staff box may be required if your library has configured that option.
- Click Refund, then Confirm.
The modal will close, and the Fee/fine details page will update with the payment transaction.
Mark a fee/fine as error (Cancel fee/fine)
Staff with appropriate permissions can mark a fee/fine as an error; this has the effect of canceling the fee/fine.
Note that an error can only be applied to a fine in an Outstanding payment status. Marking a fine as an error is intended to be used when the fine is charged as a result of a staff or system/error and as such none of it should be paid.
- Find the user record to which you want to refund a payment and click it.
- In the User record pane, expand the Fees/fines accordion if needed.
- Select View all fees/fines to view the patron’s fines.
- The Fees/fines modal will open. Click the fee/fine you wish to refund a payment for. It may be Open or Closed.
- The Fee/fine details modal will open. Click Actions > Error.
- The Confirm fee/fine cancellation modal will open. Enter Additional information for staff (required).
- Click Confirm.
The modal will close, and the Fee/fine details page will update with the cancellation transaction.
Processing lost items requiring actual cost
Libraries may choose to use Actual cost for some or all of the fines that they charge patrons. With the actual cost model, libraries review each loan after it ages to lost in order to charge the patron a specific amount for the item, rather than a flat amount based on the associated loan policy. For more information, see Lost items - charging set cost versus actual cost.
View Lost items requiring actual cost
In the Users app, select Actions > Lost items requiring actual cost. A new full-window pane will open.
Search & filter for lost items
You can search for lost item charges by patron name or instance title and filter your search results by:
- Loss type. You can filter by Aged to lostloans or Declared lost loans.
- Date of loss range. You can specify a start date or end date for when the item became lost.
- Fee/fine owner. You can filter on one or more fee/fine owners to see their specific actual cost items.
- Status. You can filter by loan status: Open, Billed, Cancelled, or Expired.
Applying a bill for an actual cost list item
In order to bill a patron the actual cost for a lost item, you first search for the loss record. Once you have located the record you want to apply the bill for:
- Find the loss record for the item you wish to bill. Click Actions > Bill actual cost.
- On the Actual cost to bill modal, input the amount to bill. Include Additional information for staff and Additional information for patron if desired. Click Continue.
- A confirmation modal will appear. If you wish to change anything, click Keep editing to return to the previous modal. To proceed and bill the patron, click Confirm.
Once you confirm billing the patron, you will see Billed appear in the actions column with the amount charged. If you refresh the page or close your browser tab, the next time you open the Lost items regarding actual cost modal, the lost item record will no longer appear in the list of items to review.
Processing an actual cost item without billing the patron
There will be cases when libraries will decide not to bill a patron for the lost item, but still need to process and close the charge.
To mark a lost item record as “Do not bill”:
- Find the loss record for the item you wish to mark “Do not bill.” Click Actions > Do not bill.
- On the Do not bill modal, input Additional information for staff if desired. Click Continue.
- A confirmation modal will appear. Review the information. If you wish to change anything, click Keep editing to return to the previous modal. To proceed with not billing the patron, click Confirm.
If you proceed with not billing the patron, you will see Not billed appear in the Actions column for that record. If you refresh the page or close your browser tab, the next time you open the Lost items regarding actual cost modal, the charge that you decided not to bill will no longer be visible in the Users app.
Note that if you choose Do not bill and the patron did not also have a lost item processing fee, that marking the lost item record as Do not bill will close the loan and change the item status to Lost and paid. FOLIO does not currently differentiate item statuses to indicate if an item was lost and the patron paid for it, or if the item was lost and the patron did not pay for it.
5 - Resource Access (Circulation)
In FOLIO, resource access includes essential circulation functions. These functions include:
- Checking out and discharging library materials
- Checking in materials
- Managing hold requests
- Managing course reserves
- Managing circulation logs
Circulation Settings
The circulation of library materials is governed by a set of rules and policies. These rules and policies are defined by the library and implemented in the Circulation and the Courses areas of the FOLIO Settings app.
5.1 - Check in
The Check in app allows you to process items at a service point, including items a patron returns to the library, items requested by a patron, or in process items. You can also use the Check in app to record in-house usage.
To configure any of the staff slips you encounter when checking in an item, like the Hold slip, see Staff slips for more information.
Permissions
The permission listed below allows you to interact with the Check in app. You can assign permissions to users in the Users app. If this permission is not assigned to a user, then they will be unable to see the Check in app or any related information.
- Check in: all permissions. This permission allows the user to scan items in the Check in app and backdate Check in. However, this permission does not include being able to see details for items or patrons.
Checking in an item
Once a patron returns an item, check it in to remove it from the patron’s account and charge any applicable fees/fines. An item checked in at its effective location is marked as available if no patron has requested it.
To check in an item, either scan the barcode of the item, or enter the barcode and click Enter. The item appears in the Scanned Items table and its status changes. Fees/fines owed are noted in the Time returned column, if applicable.
Pop-ups that can occur when checking in an item
While checking in an item, you may encounter one of the following pop-ups:
- Item status
- Check in notes
- Multiple and/or missing pieces
There is no option to turn off pop-ups.
Columns in the Scanned Items table
Once you check in an item, the following columns appear in the Scanned Items table:
- Time returned. The “processed as” time the item was returned. Click the information icon to view the actual (non-backdated) check in time, if backdating the item. Additionally, if any fees/fines are owed, they are noted here.
- Title. The title of the item.
- Barcode. The barcode of the item.
- Effective call number string. The full call number of the item, which includes the call number prefix, suffix, and copy number, as configured in the Inventory app.
- Location. The permanent location of the item.
- In-house use. If you are recording in-house use of an item, a house icon appears here. Otherwise, it appears blank. See Recording in-house use of an item for more information.
- Status. The item status once checked in.
- Actions. Click … to view additional item information or see the actions you can take on the item. See Getting additional item information for more information.
If you have appropriate permissions, you can learn more information about the item or loan through the Actions column:
- Click …> Print transit slip to print an item transit slip if needed. If the item did not go in transit when checked in, this option does not appear.
- Click … > Loan details to open the Users app and view the loan details.
- Click … > Patron details to open the Users app and view the patron’s user account.
- Click … > Item details to open the Inventory app and get additional item details.
- Click … > Fee/fine details to open fee/fine details in the Users app. In fee/fine details you can pay, waive, refund, transfer, cancel as an error, or export fees/fines. If there are no fees/fines associated with the checked in item, this option does not appear.
- Click … > New Fee/Fine to open the Users app and create a new fee/fine associated with the item.
- Click … > Check in Notes to view the check in notes. If there are no check in notes associated with the checked in item, this option does not appear.
Checking in an item on route to another service point
There are two scenarios in which an item may need to be routed to another service point:
- a patron returns an item and the service point used at check in is not assigned to its effective location.
- an item is requested by another patron to be picked up at a different service point.
- Either scan the barcode of the item, or enter the barcode and click Enter. If the item needs to be sent to another location, an In transit dialog appears noting the item is in transit and needs to be routed to a different service point.
- If you do not want to print a routing slip, clear the Print slip checkbox if it is checked.
- Click Close to exit and print a routing slip, if selected. The item appears in the Scanned Items table and its status changes to In transit.
Checking in an item with a request (hold shelf fulfillment)
When a patron requests an item, checking the item in at its requested pickup service point triggers the hold.
- Either scan the barcode of the item, or enter the barcode and click Enter. An Awaiting pickup for a request dialog appears noting the item is awaiting pickup and lists its pickup service point.
- If you do not want to print a hold slip, clear the Print slip checkbox if it is checked.
- Click Close to exit and print a hold slip, if selected. The item appears in the Scanned Items table and its status changes to Awaiting pickup. FOLIO automatically sets the hold shelf expiration date/time on the request record, following the settings for date management for the pickup service point. If configured in the notice policy, a pickup notice is sent to the patron once the check in session ends.
Checking in an item with a request (delivery fulfillment)
Delivery requests are not treated any differently from items being routed to the hold shelf. The delivery request is triggered once the item is checked in at any location. See Processing delivery requests for more information.
When checking in a delivery request, you have two options: check the item out to the patron or wait to process the request.
To check the item out to the patron:
- Either scan the barcode of the item, or enter the barcode and click Enter.
- In the Route for delivery request dialog, if you do not want to print a request delivery slip, clear the Print slip checkbox if it is checked.
- To check out the item to the patron, click Close and check out. The check out window appears and the item is automatically checked out to the patron.
- To end the check out session, click End Session.
To wait to process the request:
- Either scan the barcode of the item, or enter the barcode and click Enter.
- In the Route for delivery request dialog, if you do not want to print a hold slip, clear the Print slip checkbox if it is checked.
- Click Close. The Route for delivery request dialog closes, and the Item status changes to Awaiting delivery.
Checking in and backdating an item
You may need to backdate a returned item if your library was closed on the date the patron returned the item and you do not want to have any fees/fines charged to the patron’s user record.
For example, if your library was closed because of an emergency, you can mark all items returned the day your library was closed with the previous day’s date so that fees/fines will not accrue on patrons’ user records.
- Click the pencil icon under Date Returned or Time returned.
- Change the date and/or time.
- Either scan the barcode of the item, or enter the barcode and click Enter. The item appears in the Scanned Items table and the backdated time is listed in the Time returned column. To view the actual check in time, click the information icon in the Time returned column.
Anonymizing a loan that has been checked in
A library can configure FOLIO to anonymize loans after they have been checked in. Anonymizing removes the link between the loan record and the user record of the patron who borrowed the item. Your library can configure anonymization options in Settings > Circulation > Loan anonymization.
If you select Anonymize closed loans immediately after loan closes, anonymization will occur after the check in session ends. The anonymization process is scheduled by your system administrator or hosting provider.
Recording in-house use of an item
If you find an available item (not on loan) in the library away from its shelving location, you can check it in to mark the item as used. For example, you may want to use this feature for items in your reference collection or items on reserve if you’d like to track that the items were used even though they were not checked out.
In order to record in-house usage, the item must be checked in at a service point assigned to its effective location. Additionally, the item must be available and have no open requests.
To mark an item as used, either scan the barcode of the item, or enter the barcode and click Enter. A house icon appears in the In-house use column to indicate the statistic has been recorded.
Printing a transit slip
If you forget to print a transit slip, you can print a transit slip after checking in an item. Transit slips are configured in the Settings app.
- Check in the item.
- In the Actions column, click … > Print transit slip.
Creating a new fee/fine
You can manually create a new fee/fine for an item after checking it in.
- Check in the item.
- In the Actions column, click … > New Fee/Fine.
- In the New fee/fine screen, select a Fee/fine owner.
- Select a Fee/fine type.
- Enter a Fee/fine amount in the box.
- Optional: Enter Additional information for staff in the box.
- Optional: If you do not want to notify the patron about the fee/fine, clear the Notify patron checkbox.
- To submit the fee/fine, click Charge only.
Ending a check in session
Once you are done checking in items, you can end your check in session manually. To end your session and clear the Scanned Items table, click End session. Once you end the session, any applicable notices are sent to patrons.
By default, the Check in session is configured to end automatically after a 3 minute period of inactivity. You can turn this setting off or edit the number of minutes of inactivity the session will end after in the Settings app.
5.2 - Check out
The Check Out app allows you to check out items to patrons. To check out an item, first locate a patron in the system and then scan/enter an item to borrow.
Permissions
The permissions listed below allow you to interact with the Check out app and determine what you can or cannot do within the app. You can assign permissions to users in the Users app. If none of these permissions are assigned to a user, then they will be unable to see the Check out app or any related information.
- Check out: All permissions. This permission allows the user to check out items to patrons (create new loans). However, this permission does not include seeing open loans or requests or seeing the entirety of the user record.
- Check out: Check out circulating items. This permission allows the user to check out items, but they cannot override non-circulating loan policies.
- Check out: View fees/fines. This permission allows users to click the fee in the Scan patron card pane to view the patron’s fees/fines in the Users app. The user must have permission to view fees/fines in the Users app for the link to work – for example the permission Users: Can view fees/fines and loans (see Users > Permissions).
A user who has Check out: all permissions but does not have Check out: View fees/fines will see a patron’s fee/fine amount in the Scan patron card pane as text (not a link).
- Check out: View loans. This permission allows users to click the number of open loans in the Scan patron card pane to view the patron’s current loans in the Users app. The user must have permission to view loans in the Users app in order for the link to work – for example the permission Users: User loans view (see Users > Permissions).
A user who has Check out: all permissions but does not have Check out: View loans will see how many loans a patron has in the Scan patron card pane as text (not a link).
- Check out: View requests. This permission allows users to be able to click the number of open requests in the Scan patron card pane to view the patron’s current requests in the Requests app. The user must have permission to view requests in the Requests app in order for the link to work – for example the permission Requests: View (see Requests > Permissions).
A user who has Check out: all permissions but does not have Check out: View requests will see how many requests a patron has in the Scan patron card pane as text (not a link).
Locating a patron in the system
You can find the patron by either:
- Scanning / entering the barcode provided by the patron.
- Using the Patron Look-up function.
Locate the patron using a barcode:
- Either scan the barcode on the patron’s library card, or enter the patron barcode number.
- Click Enter. Patron details are displayed.
Locate the patron using the Patron Look-up function:
- In the Scan patron card pane, click Patron look-up.
- In the Select User dialog, in the User search box, enter part or all of the patron’s name, email, or username.
- Optional: Filter results by Status (active/inactive), or by Patron group.
- Click Search.
- Click the patron to use. The Select User dialog closes, the barcode appears in the Scan patron card pane, and the patron details are displayed.
If a patron has a note on their record that is checked to display in the Check out app, the note will appear as a pop-up window after the patron details are displayed.
Assessing the patron’s data
Within the patron details area, note that you can access additional information related to the user. Clicking on any linked information opens the appropriate app and displays the associated information. For example, if the FOLIO user has the appropriate permissions, clicking the number beneath Open requests will open a list of the patron’s open requests in the Requests app.
Review the available information to determine if you can continue with check out. For example, fees or fines may be owed, and may need to be handled before proceeding.
Checking out to a proxy borrower
Proxy borrowers are patrons who are checking out items on the behalf of another patron. For example, a graduate assistant may act as a proxy for a professor.
Note: A patron must first be assigned as a proxy for the borrower in their user record in the Users app.
- Locate the proxy borrower in the system.
- In the Who are you acting as? dialog, select the name of the user they will be acting as a proxy for and click Continue. The Who are you acting as? dialog closes and patron and proxy details are displayed.
Scanning the item to check out
Make sure you have looked up the user record prior to scanning items.
To select the item for check out, scan or enter the barcode of the item and click Enter. The item is displayed in the Scan Items area with the Due date and Time and the total number of items scanned is incremented.
If the item is going to be due sooner than expected, a flag icon will appear next to the item due date after checkout. This can happen if a service point is going to be closed when the item would normally be due, if there is a recall on the item, or if the patron’s account is set to expire sooner than the expected due date/time.
Pop-ups that can occur when checking out an item
While checking an item out to a patron, you may encounter one of the following pop-ups:
- Item status
- Check out notes
- Multiple and/or missing pieces
- Patron block
- Item block
- Override circulation policy
To access more information about each item:
- Click … > Item details to open the Inventory app and get additional item details.
- Click … > Loan details to open the Users app and access options including renewals, claiming the item was returned, changing the due date, and declaring the item lost. You can also view or add patron info or staff info comments.
- Click … > Loan policy to open the Settings app for more loan policy information.
Changing the due date of an item
To change the due date:
- Click … > Change due date.
- In the Change Due Date dialog, enter the date and/or time for the new due date.
- Click Save and Close. The new due date is saved.
Loan comments can be used to store ILL transaction numbers, record a reason why a due date was changed, or track how many times a claimed returned item was searched for. Patron info comments can be included as a token in patron notices (only the most recent comment is included in the token). You need to have the appropriate permissions to be able to add patron or staff info loan comments – see Users > Permissions.
To add a patron info loan comment:
- Click … > Add patron info to add a patron info note.
- In the Add patron information dialog, enter a comment in the box.
- Click Save and Close. The new comment is saved and any previous patron loan comment is superseded. The comment will appear in the Comment column in Loan details in the checkout app, and will also be recorded in the Circulation Log.
- Patron info loan comments can also be added in Loan details – see Getting additional item information.
To add a staff info loan comment:
- Click … > Add staff info to add a staff info note.
- In the Add staff information dialog, enter a comment in the box.
- Click Save and Close. The new comment is saved. The comment will appear in the Comment column in Loan details in the checkout app, and will also be recorded in the Circulation Log. Old staff info comments cannot be edited; add a new staff info comment instead.
- Staff info loan comments can also be added in Loan details – see Getting additional item information.
Ending the check out session
Once you have completed checking out items for a patron, you can end the session manually. To end your session and clear the Scanned Items table, click End session. Once you end the session, any applicable notices are sent to patrons.
By default, the Check out session is configured to end automatically after a 3 minute period of inactivity. You can turn this setting off or edit the number of minutes of inactivity the session will end after in the Settings app.
5.3 - Circulation log
The Circulation log app allows you to view and search for some circulation actions. Circulation actions are actions performed by the system or a user within the following Circulation apps: Check in, Check out, and Requests. Notices and fee/fine actions are also included.
Permissions
You can assign permissions to users in the Users app. The permissions described below allow you to interact with the Circulation log app and determine what you can and cannot do within the app. If you don’t assign any of these permissions to a user, the user will be unable to see the Circulation log app or any related information.
The following are all the Circulation log permissions:
- Circulation log: All. This permission allows the user all circulation log functions.
- Circulation log: View. This permission allows the user to search and filter the circulation log, but does not allow exporting the circulation log or using the … menu items in the Action column.
Generating a circulation log
You can generate a log based on any of the query parameters or filters you select.
Note: Panes are resizable throughout FOLIO and in the Circulation log. Resize the Search & filter pane to see more or less of the circulation log at once.
Generating circulation actions associated with a user barcode
In the Search & filter pane, type or paste a User barcode into the box.
If you don’t know the user’s barcode, click Patron look-up to open the user search box and search for that user’s record.
Generating circulation actions associated with an item barcode
In the Search & filter pane, type or paste an Item barcode into the box.
Generating circulation actions by description
In the Search & filter pane, enter your search terms into the Description box.
Generating circulation actions by date
-
In the Search & filter pane, under Date, enter a start date in the From box and an end date in the To box.
-
Click Apply. Your results appear in the Circulation log.
Generating circulation actions by service point
In the Search & filter pane, type or select the Service point from the box. You are able to apply more than one Service point to your search, if needed.
Loan filter options
In the Search & filter pane, click Loan and select any applicable filters:
- Changed due date. Include manual due date change actions.
- Patron info added. Include patron info loan comment added actions.
- Staff info added. Include staff info loan comment added actions.
- Checked out. Include checked out actions.
- Checked out through override. Include checked out using an override actions.
- Checked in. Include checked in actions. The checked in items may or may not have been out on loan.
- Anonymized. Include anonymized loan actions.
- Claimed returned. Include claimed returned actions.
- Closed loan. Include closed loan actions. Closed loan actions include: Item is returned and checked in; Item is lost and paid; Claimed returned item is resolved by marking as missing (via loan detail).
- Declared lost. Include declared lost actions.
- Marked as missing. Include marked as missing actions.
- Recall requested. Include requested as recall actions.
- Renewed. Include renewed actions.
- Renewed through override. Include renewed using an override actions.
- Aged to lost. Include aged to lost actions. The time in which an overdue item ages to lost is set up in the Settings > Circulation > Lost item fee policies.
The Circulation log app records some user block functionality, but it is not available through filters. To find when manual user blocks were created or deleted, search the description field for “Block” and apply other search/filter options as needed.
Notice filter options
In the Search & filter pane, click Notice and select any applicable filters:
- Send. Include send notice actions.
- Send error. Include send notice actions that generated an error message.
Fee/fine filter options
In the Search & filter pane, click Fee/fine and select any applicable filters:
- Billed. Include billed fee/fine actions.
- Credited fully. Include fully credited fee/fine actions.
- Paid fully. Include fully paid fee/fine actions.
- Paid partially. Include partially paid fee/fine actions.
- Refunded fully. Include fully refunded fee/fine actions.
- Refunded partially. Include partially refunded fee/fine actions.
- Staff information only added. Include fee/fine actions that had staff information added.
- Transferred fully. Include fully transferred fee/fine actions.
- Transferred partially. Include partially transferred fee/fine actions.
- Waived fully. Include fully waived fee/fine actions.
- Waived partially. Include partially waived fee/fine actions.
- Cancelled as error. Include cancelled as error fee/fine actions.
Request filter options
In the Search & filter pane, click Request and select any applicable filters:
Columns in the circulation log
Once you generate a circulation log, these columns appear:
- User barcode. The user barcode associated with the action.
- Item barcode. The item barcode associated with the action.
- Object. The object associated with the action: Fee/fine, Loan, Manual block, Notice, or Request.
- Circ action. The action that occurred.
- Date. The date and time the action occurred.
- Service point. The service point where the action occurred.
- Source. The source of the action: System, user, or none (blank).
- Description. A description of the action.
- Action. Click … to see more information about the action. See Getting additional circulation action information for more information.
Clicking the … in the Action column displays a menu that enables access to additional information. The menu options that appear differ depending upon the Object (Fee/fine, Loan, Manual block, Notice, or Request). For example, clicking … > Item details opens the Inventory app for more information. In some cases the … may not appear, e.g., when a loan has been anonymized.
Exporting circulation log search results
If your search for circulation log records returns results, you can export those results to a CSV file.
- Click the Actions menu.
- Select Export results (CSV).
A green success toast message informs you that you have generated the export file. Once generated, the file downloads automatically.
If you do not receive the download file, check that your browser did not block the pop-up window. If the pop-up was blocked, change your browser to allow pop-ups, and export your circulation log search results again. You may also be able to access your download through the Export Manager app if you have permission to view that app.
5.4 - Courses
This section of the documentation contains links to external sites. Please be advised that these sites are not maintained by the FOLIO Documentation Group and may be aligned with a different FOLIO release.
The Courses app allows you to create and manage course reserves.
Note: To enable library patrons to discover the courses you create in the Courses app you need an external interface or discovery layer set up and capable of interacting with FOLIO.
Permissions
You can assign permissions to users in the Users app. The permissions described below allow you to interact with the Courses app and determine what you can and cannot do within the app. If you don’t assign any of these permissions to a user, the user will be unable to see the Courses app or any related information.
The following are all the Courses permissions:
- Courses: All permissions. This permission allows users to maintain (view, add, edit, and delete) courses, items, instructors, cross-listed courses and all course settings.
- Courses: Read, add, edit, and delete courses. This permission allows users to view, add, edit and delete a course.
- Courses: Read, add, and edit courses. This permission allows users to view, add, and edit a course. They cannot delete a course.
- Courses: Add and edit courses’ reserved items. This permission allows users to add and edit items associated with a course. They cannot remove items from a course.
- Courses: Add, edit, and remove courses’ reserved items. This permission allows users to view, add, edit, and remove items associated with a course.
- Courses: Read All. This permission allows users to see all courses and item information.
- Settings (Courses): Can create, edit and delete course settings. This permission allows users to maintain (view, add, edit, and delete) all course settings.
- Settings (Courses): Can view course settings. This permission allows users to view course settings. They cannot add, edit or delete course settings.
Keyboard shortcuts
Keyboard shortcuts allow you to perform actions in this app using the keyboard. See Platform essentials > Keyboard shortcuts for more information.
Implementation considerations
Before you implement the Courses app, make sure you have completed the following:
If you are configuring the Courses app for the first time, you need first to set up the following features in the Settings app, if applicable:
Once you configure the above settings, you can:
Integrations
You can choose to integrate the Courses app with these applications:
- EBSCO Discovery Service (EDS)
- VuFind
In addition, you can connect the Courses app to your learning management system using the Learning Tools Interoperability (LTI) protocol. There is a separate module to install for LTI support. For more information, see Course Reserves - LTI connectivity.
Each of these integrations has specific features to consider in regards to the migration of courses, sections, cross-listings, and separate courses and how they interact with FOLIO.
Searching for courses
You can search for courses in the Search & filter pane. All courses are shown and selected by default. To search for courses, enter your search terms into the box. Select the All fields drop-down list to search through one of the following fields: Course name, Course code, Section, Instructor, Registrar ID, and External ID. All fields is the default search.
You can also search for courses by selecting any of the filters in the Search & filter pane: Department, Course type, Term, and Location. Additionally, you can apply the filters after you perform a search to limit your results.
You can choose which columns appear in your search results by clicking on the Actions menu. Under Show columns, check or uncheck columns to change what you see in the results pane.
Searching for reserves
You can search for items on reserve in the Search & filter pane. Click Reserves to start your search. All reserves are shown and selected by default. To search for reserves, enter your search terms into the box. Select the All fields drop-down list to search through one of the following fields: Title, Barcode, or Call Number. All fields is the default search.
You can also search for reserves by selecting any of the filters in the Search & filter pane: Processing status, Copyright status, Permanent location, Temporary location, and Term. Additionally, you can apply the filters after you perform a search to limit your results.
You can choose which columns appear in your search results by clicking on the Actions menu. Under Show columns, check or uncheck columns to change what you see in the results pane.
Use the Search & filter pane to find items on reserve for a specific course. Find the course you wish to view reserves for and click on it in the Courses list. Then scroll down to the Items section to see all the items on reserve for that course.
Creating a course
To create a course, you must have the Courses window open. Then:
- Click Actions > New.
- In the Create course window, enter a Course Name and select a Term. All other fields are optional.
- Click Save & close.
Creating a course - reminders
- Once a course is created, it can only be deleted if all reserve items are removed.
- Department, Course Type, and Term are configured in Settings. See Settings > Courses for more information.
- If you are adding one or more cross-listed courses to a course, the information you enter into Course listing information also applies to each cross-listed course.
- Reserve items added to the course are automatically assigned with the Start Date and End Date of the Term you selected, as specified in the Term settings. If needed, you can edit the dates by editing the reserve item.
- Any item assigned to a Course automatically has its temporary location set to the value specified in the Location field. If needed, you can change the temporary location by editing the reserve item.
- When completing the course information, make sure you understand how the fields correspond to your discovery interface.
Editing a course
- Find the course you want to edit and click on it in the Courses list.
- In the course details window, click Actions > Edit.
- Make your desired changes to the course and click Save & close.
Deleting a course
To delete a course, you must first remove all items from the course.
- Find the course you want to delete and click on it in the Courses list.
- In the course details window, click Actions > Edit.
- Click Delete.
- Click Really delete to delete the course. The course is deleted and removed from the Courses list.
Adding a cross-listed course
Cross-listed courses share instructors, course listing information, and reserve items. Once a course is created, you can add cross-listed courses to it. When you cross-list a course, the information you have in the original course’s Course listing information section also applies to the cross-listed course.
- Find the course you want to add a cross-listed course to and click on it in the Courses list.
- In the course details window, click Actions > Crosslist.
- In the New course within listing window, enter a Course name and optionally fill in the other boxes under Basic course information. The Cross listing information section is populated with information from the original course.
- Click Save & close. The course is saved and appears in the Cross-listed courses section of the original course. It also appears in the main course list.
Editing a cross-listed course
See Editing a course.
Deleting a cross-listed course
You are able to delete a cross-listed course with items as long as one course remains.
- Find the cross-listed course you want to delete and click on it in the Courses list.
- In the course details window, click Actions > Edit.
- Click Delete.
- Click Really delete to delete the course. The course is deleted and removed from the Courses list.
Duplicating a course
- Find the course you want to duplicate and click on it in the Courses list.
- In the course details window, click Actions > Duplicate. A pop-up window will appear.
- In the pop-up window, select the term for the duplicate course.
- If the course has cross-listings, and you want the cross-listed courses to be duplicated also, check Duplicate all cross-listed courses.
- Click Create duplicate course(s).
The new duplicated course will appear, with “- Duplicate” added to the end of the course name. Click Actions > Edit to edit the course to update the name and other information.
Adding an instructor to a course
Instructors can only be added once a course is created. The instructor does not need a user record in FOLIO, but adding an instructor with a user record facilitates reports.
Add an instructor that has a FOLIO user record:
- Find the course and click on it in the Courses list.
- Under Instructors, click Add instructor.
- In the Add instructor window, click Look up user.
- In the Select User dialog, find the instructor you want to add, and click on them in the User Search Results list. The instructor’s name and barcode appears in the Name and Barcode boxes.
- Click Save & close. The instructor appears in the Instructors section.
Add an instructor that does not have a FOLIO user record:
- Find the course and click on it in the Courses list.
- Under Instructors, click Add instructor.
- In the Name box, enter the instructor’s name.
- Click Save & close. The instructor appears in the Instructors section.
Editing an instructor
Note: If an instructor has a FOLIO user record, you cannot edit that instructor’s information.
- Find the course and click on it in the Courses list.
- Under Instructors, find the instructor you want to edit.
- Click the pencil icon.
- In the Add instructor for [course] window, edit the Name or Barcode of the instructor.
- Click Save & close.
Deleting an instructor
- Find the course and click on it in the Courses list.
- Under Instructors, find the instructor you want to delete.
- Click the trash icon. The instructor is removed from the course.
Adding and removing notes
You can add and assign notes to courses. Assigning a note means you are reusing a previously created note. To be able to add or assign notes, you need the appropriate Notes permissions.
Adding a new note to a course
- Find the course and click on it in the Courses list.
- In the Notes pane, click New.
- In the New note window, select the Note type from the drop-down list.
- Enter a Note title in the box.
- (Optional) Enter any Details about the note in the box.
- Click Save & close.
Assigning an existing note to a course
- Find the course and click on it in the Courses list.
- In the Notes pane, click Assign/Unassign.
- In the Assign / Unassign note dialog, search for the note(s) you wish to assign to the course.
- You can search by title or description in the box.
- You can filter by Note type.
- The Note assignment status refers to whether the note is assigned or unassigned to the course you have open.
- Select the checkbox for the note(s) you wish to assign to the course and click Save.
Editing an existing note on a course.
- Find the course and click on it in the Courses list.
- In the Notes pane, find the note you wish to edit and click Edit.
- Make your desired changes to the note.
- Click Save & close.
If the note is assigned to multiple courses, any edits will apply to the note for all of its assigned courses. If you want to make a note with edits that apply just to the open course, you would need to make a new note with the desired text.
Unassign a note from a course.
- Find the course and click on it in the Courses list.
- Under Notes, click Assign / Unassign.
- In the Assign / Unassign note modal, select assigned in the Note assignment status filter.
- Uncheck the box(es) for the note(s) you wish to unassign.
- Click Save.
You cannot unassign a note that is assigned to only one course - delete the note instead.
Deleting a note
- Find the course and click on it in the Courses list.
- Under Notes, click the note you wish to delete.
- In the Note window, click Actions > Delete.
- In the Delete note dialog, click Delete. The note is deleted and removed from any records to which it was attached.
Adding a reserve item to a course when the item exists in Inventory
- Find the course and click on it in the Courses list.
- In the Items section, either scan the item barcode into the box, or enter the barcode and click Add item. The item is added to the course and appears in the Items section.
Note that when you put an item on reserve for a course, FOLIO copies information from Inventory into the reserve record in order to support searching within the Courses app.
This means that if any information about that reserve item changes in Inventory after it was put on Reserve, you may need to remove and re-add the item record to bring over the information into the Courses app.
Information that is copied to support searching includes:
- Title and contributor from the instance record
- Barcode, permanent location, call number, volume, copy, enumeration, and electronic access link from the item record
A reserve item’s start date and end date are maintained in the Reserve app. FOLIO will update the item’s temporary location in inventory when you first add it on reserve, based on the location listed on the course record.
Adding a reserve item to a course using Fast Add
If you have the Fast add: Create permission, you can use Fast Add to create an item in the Courses app and put it on reserve. The Fast Add option prompts you to create an instance, holding, and item in one pane with fewer fields. When you create the item, the Courses app creates the instance, holding, and item in Inventory for you, and then adds the item to the course.
The Fast Add workflow is meant to support putting personal copies, scanned articles, or other items on reserve that are not part of the library’s general circulating collection.
- From the associated course, scroll to the bottom and click Add Fast Add item.
- From the New fast add record, fill in the Instance, Holdings, and Item sections with the appropriate values.
- Once you have included all of the information needed for the item, click Save and close to create your inventory records and add the item on reserve for the course.
Note that Fast Add is not usually appropriate for re-adding an item to a course since it will create duplication of records in Inventory. If you need to re-add an item, you should use the function to add an item by barcode.
Editing a reserve item
Note: If you add an item to a course and later make a change to that item via the item record (in the Inventory app), the change will not be reflected in the reserve record. To update the course reserve record, you need to delete the item and then re-add the item to the course.
Editing a reserve item allows you to change or add information to the following fields:
- Temporary location. If you change the reserve item’s temporary location, once you save the changes, the selected Temporary location is added to the Item record in the Inventory app.
- Temporary loan type. If you change the reserve item’s temporary loan type, once you save the changes, the selected Temporary loan type is added to the Item record in the Inventory app.
- Processing status. This field only applies to the Courses app and is available as a Reserves search filter.
- Start Date and End Date. When an item is placed on reserve, the start and end dates are inherited from the selected Term.
- Copyright information. This section facilitates copyright tracking.
- Find the course with the item you want to edit and click on it in the Courses list.
- In the Items section, find the reserve item and click the pencil icon.
- In the Item title window, make your changes.
- Click Save & close. The item is updated.
Each reserve item contains a section to track copyright information. This allows libraries that need to track this information to keep it as part of the reserve for later reporting and payment purposes.
The most common use case for these fields is when an electronic item is put on reserve, but there is no built-in restriction on using it for other items. There are no automated workflows that use these fields. They are all optional.
- Copyright status. This is a drop-down. Your library can configure the drop-down values in Settings > Courses.
- Total number of pages in item. Since most copyright tracking is on scans of physical items, you can track the pages for the entire item here.
- Total number of pages used. With this field, you can track the number of scanned pages as part of the reserve.
- Total % of pages used. This number must be calculated by the library staff member. Libraries that owe copyright payment can in some cases determine what they owe based off of the percentage of the work used.
- Payment based on. This is a free-text field. Most libraries will put one of two values - Usage or Enrollment.
- Additional sections of this item used. For some items, libraries will put multiple scans from the same book on reserve - for example, a book with ten scholarly articles, of which three articles are scanned and put on reserve as distinct items. In those cases, libraries can check this box to indicate that the items should be linked together in order to facilitate proper copyright payment calculation.
Removing a reserve item from a course
Note: Removing an item from a course does not remove it from the Inventory app. If the item on reserve had a temporary location inherited from the course, removing the item from the course will remove the temporary location from the item in inventory. If the item had a temporary loan type inherited from the course, removing the item from the course will not remove the temporary loan type from the item in inventory.
- Find the course with the item you want to remove and click on it in the Courses list.
- In the Items section, find the reserve item and click the trash icon. The item is removed.
- If you added a temporary loan type, remove the temporary loan type in the inventory app. Alternatively, use Bulk Edit to clear temporary loan types at the end of the semester.
5.5 - Requests
The Requests app allows you to create and manage requests.
FOLIO supports two kinds of requests - item level, and title level.
Item level requests are the default type of request for FOLIO and are made on an individual item record.
Title level requests are made on the instance level. FOLIO chooses the item from the holdings on that instance to fill the request, whether the item is available immediately or becomes available when the item is returned.
Libraries can turn on title-level requests in Settings > Circulation > Title level requests.
Libraries that want to use title level requests should consider:
- You will not be able to turn off title level requesting while there are any open title level requests.
- To avoid issues with queue ordering, you should first close open item level requests before turning on title level requesting.
- Check Settings > Circulation > Title level requests > Fail to create title level hold when request is blocked by circulation rule if you want title level hold requests to follow circulation rules. If you do not choose this option, then title level hold requests will go through even when hold requests are blocked by the circulation rule. The title level hold request will remain Open - not yet filled as the circulation rule will prevent the request from being associated with an item.
- Title level requests are not yet supported for multi-volume sets - e.g., “any copy of volume D of the Longman Anthology of World Literature.” Those requests must continue to be handled as item-level requests.
- Items newly added to FOLIO via the Receiving app, Inventory, or Data Import must be checked in in order to be made available to fill open title level requests.
Permissions
You can assign permissions to users in the Users app. The permissions described below allow you to interact with the Requests app and determine what you can and cannot do within the app. If you don’t assign any of these permissions to a user, the user will be unable to see the Requests app or any related information.
The following are all the Requests permissions:
- Requests: All permissions. This permission allows the user all request functions.
- Requests: Move to new item, reorder queue. This permission allows the user to move requests from one item to another (subject to request policies).
- Requests, Reorder queue. This permission allows the user to access the dedicated request queue page with reorder capabilities. It is only needed for users who need to reorder the queue. You do not need this permission to view the queue.
- Requests: View. This permission allows the user to search and view requests.
- Requests: View, create. This permission allows the user to create new requests and view existing requests.
- Requests: View, edit, cancel. This permission allows the user to view, edit and cancel requests.
Keyboard shortcuts
Keyboard shortcuts allow you to perform actions in this app using the keyboard. See Platform essentials > Keyboard shortcuts for more information.
Request Types and Statuses
Requests are assigned one of three Request Types:
- Hold. Items currently not available but wanted when available.
- Page. Items available to be pulled off the shelf.
- Recall. Items currently not available, but needed immediately.
Note that FOLIO allows items in some statuses to be recalled even if they are not on loan to a patron, but there is currently no difference in FOLIO workflows between a recall and a page when that occurs. If a loan is recalled, the original loan period may be shortened.
After a request has been created, requests are set in progress by checking the item in with the Check in app.
Open requests have one of the following statuses:
- Open - Awaiting delivery: The request is a Delivery request, and the requested item has been checked in, but the item has not yet been checked out to the requester.
- Open - Awaiting pickup: The requested item has been checked in at the requested pickup point, waiting for the requester to pick it up.
- Open - In transit: The request has been set in progress and the item is being delivered to the patron’s requested pickup service point.
- Open - Not yet filled: The request has not yet been set in progress, and the Request expiration date, if it exists, is in the future.
Closed requests have one of the following statuses:
- Closed - Cancelled: The request was cancelled either prior to an item being available for pickup, or after the item became available for pickup, but before the pickup expired.
- Closed - Filled: The item was placed on hold for the patron, and the patron checked the item out. This also includes Delivery requests where the item was checked in and the Close and check out option was selected.
- Closed - Pickup expired: The item was placed on hold for the patron, but the patron did not pick up the item before the Hold shelf expiration date passed.
- Closed - Unfilled: The request was still open when the Request expiration date passed. If the Request expiration date field is empty, the request will never be moved to this status. Exception: Open - Awaiting pickup requests remain open until the Hold shelf expiration date is passed.
Searching for requests
To search for requests, enter your search terms into the box on the Search & filter pane. You can keyword search by title, or “starts with” search by item barcode, requester barcode, or item call number.
You can also use the Request type, Request status, Request level, Tags, and Pickup service point filters to find requests or further limit your search.
You can choose which columns appear in your search results by clicking on the Actions menu. Under Show columns, you can check or uncheck columns to change what you see in the results pane.
Exporting your search results to CSV
After you perform a search for requests, you can save your results to a comma-separated values (CSV) file. The fields visible in the Requests results list appear in the CSV file, along with additional request and item information.
- Search for requests.
- In the Requests pane, select Actions > Export search results to CSV. Depending on your browser and its configurations, the file either automatically downloads or you are prompted to save it.
Item level requesting
Creating a request
Library staff create requests in the Requests app. They also can start the request process from a user record in Users, or an item record in Inventory; those apps will route you into the Requests app to create the request. Note: You must have permission to create requests in the Requests app in order to see the option to create a request from Inventory. You can request items lacking a barcode by starting in the Inventory app – see Inventory > Creating a new request.
Requesting is controlled by circulation rules and item statuses. You cannot request some item statuses and some only allow holds and recalls. See Platform Essentials > Item Status for more information.
- In the Requests pane, select Actions > New.
- If you have title level requesting turned on, make sure Create title level request is not checked.
- In the Item barcode box, either scan the barcode of the requested item or enter the barcode and click Enter. The item is added to the request and its item information appears.
- In the Requester barcode box, either scan the requester’s barcode or enter the barcode and click Enter.
- If you do not have the requester’s barcode, click Requester look-up to search for the patron:
- Use the Select User dialog to find the requester.
- Once found, select the requester from the User Search Results list. The requester’s information will then appear on the request.
- Select a Request type. The options that appear depend on the Item status of the item you are requesting.
- Optional: Enter a Request expiration date. If the request is still open by the selected date, it closes and its status changes to Closed - Unfilled.
- Optional: Enter any Patron comments. For example, if the patron needs the item immediately, you can note it here. Patron comments show up in the CSV report and can be included in pick slips.
- Select the Fulfillment preference.
- Select the Pickup service point or Delivery address, depending on your selection in the previous step.
- Click Save & close. The request is saved and the Request Detail pane appears. The patron receives an email notification saying their request was received by the library, if you have this notification configured.
Editing an item level request
You can only edit open requests. Once a request is closed, it cannot be edited.
- Find the request you want to edit.
- In the Request Detail pane, select Actions > Edit.
- Edit the request.
- Click Save & close. The request is updated.
Duplicating an item level request
You can duplicate open requests but you will need to change either the requester or the item in order to save the request, as there cannot be two requests on the same item by the same requester. Closed requests can be duplicated, but you will need to enter a requester barcode.
-
Find the request you want to duplicate.
-
In the Request Detail pane, select Actions > Duplicate. A New request window appears with the same Item information, Requester information, and Request information as the request you chose to duplicate.
-
Edit any of the request information before submitting the request.
-
Select a Pickup service point.
-
Click Save & close. The new request appears in the Request Detail pane.
Moving an item-level request to another item on the same instance
You can move a request from one item to another on the same instance. You may want to do this if a request item goes missing or if you need to balance request queues.
Note: If a recall request is moved to a loan item that wasn’t previously recalled, the loan will be recalled–the patron gets a recall notice, if configured, and the loan’s due date may be truncated or extended, depending on the associated loan policy.
- Find the request you want to move.
- In the Request Detail pane, select Actions > Move request.
- In the Select item window, select the item you want to move the request to.
- If the current request type is not allowed you will need to choose an allowed type in the Select request type dialog and click Confirm to allow the request to be converted.
Reordering the request queue for an item
You can change a patron’s location in the request queue for an item by reordering the queue.
- Find the request with the queue you want to reorder.
- In the Request Detail pane, select Actions > Reorder queue.
- In the Request queue window, reorder the requests by dragging them into their new positions. Requests cannot be moved above Page requests, even if fulfillment has not begun.
- Once you are done moving the requests, click the X to exit the Request queue window. The revised queue order is saved.
Canceling an item level request
You can only cancel open requests. Once a request is closed, it cannot be cancelled.
Note: When cancelling a request, you should consider the following:
- When you cancel a page request and there are no other requests in the queue, the item’s status changes back to Available.
- If you cancel a request that has begun fulfillment (it has a Request status of Open - In transit or Open - Awaiting pickup), the Request status changes to Closed - Cancelled, but the Item status will not change until the item is checked in.
- If you cancel a requested item that is awaiting pickup, it appears on the Hold shelf clearance report.
- Find the request you want to cancel.
- In the Request Detail pane, select Actions > Cancel request.
- In the Confirm request cancellation dialog, select the Reason for cancellation.
- Optional: Enter any additional notes on the cancellation in the Additional information for patron box. If you selected Other as the reason, then you must supply additional information.
- Click Confirm. The dialog closes and the request is cancelled. The Request status is updated to Closed - Cancelled and the patron receives a cancellation notification email, if you have this notification configured.
Title level requesting
Creating a title-level request
Although library staff create requests in the Requests app, they can initiate the request process from a user record in Users, or an item record in Inventory. Those apps will route the user to the Requests app to create the request.
Note: You must have permission to create requests in the Requests app in order to see the option to create a request from Inventory. If you do not have the Settings > Circulation option Fail to create title level hold when request is blocked by circulation rule selected, then an item record is not required to create the request, but it is required to fill the request.
- In the Requests pane, select Actions > New.
- To create a title level request, make sure Create title level request is checked.
- Title information may already be filled in (if you started your request from the Inventory app). If not, you need to search for the title:
- Click Title look-up.
- In the modal that appears, search for the title you wish to place the request on.
- Click the title to select it; the modal will close, and the title information will populate in the request form.
- In the Requester barcode box, either scan the requester’s barcode or enter the barcode and click Enter.
- If you do not have the requester’s barcode, click Requester look-up to search for the patron:
- Use the Select User dialog to find the requester.
- Once found, select the requester from the User Search Results list. The requester’s information will then appear on the request.
- Select a Request type. The options that appear depend on the Item status of the item you are requesting.
- Optional: Enter a Request expiration date. If the request is still open by the selected date, it closes and its status changes to Closed - Unfilled.
- Optional: Enter any Patron comments. For example, if the patron needs the item immediately, you can note it here. Patron comments show up in the CSV report and can be included in pick slips.
- Select the Fulfillment preference.
- Select the Pickup service point or Delivery address, depending on your selection in the previous step.
- Click Save & close. The request is saved and the Request Detail pane appears. The patron receives an email notification saying their request was received by the library, if you have this notification configured.
How FOLIO decides which item will fill a title-level request
FOLIO first checks for an available item on the instance. If an item is available, FOLIO then looks at the circulation rules to decide what to do next.
If an item is available, and the FOLIO circulation rule allows paging, then the title-level request becomes a page for the item.
If several items are available, FOLIO will first choose an item that has the effective location at the chosen pickup service point. If there is no available item at an effective location associated with the pickup service point, FOLIO will attempt to choose one from another location associated with that service point.
If there is no matching item at an effective location with a primary service point that corresponds to the requester’s pick-up service point, then FOLIO looks for items in the next closest location.
If the instance has no available items when the request is created, the request will become either a Hold or a Recall, depending on the choice made in the requests app.
If the request is a hold, it will remain in the request queue for the title, but it will not be associated with an item until the request is first in the queue and an item is returned.
If the request is a recall, the recall will apply to the loan with the earliest due date. When the item is returned, it goes to the first open request, regardless of whether that request is the recall that triggered the item’s return.
Viewing Title Level Requests
When you view a title level request, the request view displays Title information in the top accordion, including the number of open title level requests on that instance.
Once a title level request becomes a page or a recall, the Item information accordion will also display, including the number of the open requests on the item.
For recalls, the item information indicates the item that was recalled, but when that item is returned, it will fill the first request in the queue, even if it was not associated with that particular request.
Editing a title-level request
You can only edit open requests. Once a request is closed, it cannot be edited.
- Find the request you want to edit.
- In the Request Detail pane, select Actions > Edit.
- Edit the request.
- Click Save & close. The request is updated.
Duplicating a title level request
You can duplicate any open title level request. When you duplicate the request, you will need to change the instance or the requester, because a patron cannot have more than one open title level request on the same instance.
-
Find the request you wish to duplicate.
-
In the Request Detail pane, select Actions > Duplicate. A New request window appears with the same Item information, Requester information, and Request information as the request you chose to duplicate.
-
Edit any of the request information before submitting the request.
-
Select a Pickup service point.
-
Click Save & close. The new request appears in the Request Detail pane.
Reordering Request Queues with Title Level Requests
To view a request queue from the instance record in Inventory, select Actions > View requests & reorder.
To view a request queue from the request record, search for the request in the Requests app, and then select Actions > Reorder queue.
Fulfillment in progress shows requests that are in progress and have an assigned item. These requests include:
- Page requests, regardless of the request status. That means that you will see page requests in this section with a status of Open - Not yet filled.
- Requests that are Open - Awaiting pickup.
- Requests that are Open - Awaiting delivery.
- Requests that are Open - In transit.
Open - Not yet filled shows hold and recall requests that are not yet being processed. These requests can be reordered using drag-and-drop. These requests all have a status of Open - Not yet filled.
In this section, the Item barcode column may contain item information, or it may be blank.
- Item level request - you will see the barcode of the requested item.
- Title level recall - you will see the barcode of the item that was recalled. Note that if the item is returned and it could fill a request that is higher in the queue, it will fill that request, not the request that triggered the recall.
- Title level hold request - the Item barcode column will be empty.
Canceling a title level request
You can only cancel open requests.
Before you cancel a request, consider:
- When a page request is canceled and there are no other requests in the queue, the item’s status changes back to Available.
- If you cancel a request that has begun fulfillment (it has a Request status of Open - In transit or Open - Awaiting pickup), the Request status changes to Closed - Canceled, but the Item status will not change until the item is checked in.
- If a requested item is awaiting pickup and its request is canceled, it appears on the Hold shelf clearance report.
- If there are other open title level requests on the instance that are not in progress, the item needs to be checked in to fulfill the next request in the queue.
- Find the request you want to cancel.
- In the Request Detail pane, select Actions > Cancel request.
- In the Confirm request cancellation dialog, select the Reason for cancellation.
- Optional: Enter any additional notes on the cancellation in the Additional information for patron box. If you selected Other as the reason, then you must supply additional information.
- Click Confirm. The dialog closes and the request is canceled. The Request status is updated to Closed - Canceled and the patron receives a cancellation notification email, if that option is configured.
Exporting a hold shelf clearance report
The hold shelf clearance report contains Awaiting pickup items where the item did not get checked out to the requester before the hold shelf expiration period expired. Check in these items to clear them from the hold shelf.
Hold shelf clearance reports are specific to individual service points. Therefore, you must be signed in to the service point you want to generate the report for.
The Hold shelf expiration period for a service point is set in Settings > Tenants > Service points.
Awaiting pickup items whose requests were cancelled are also included in the hold shelf clearance report.
To export a hold shelf clearance report, in the Requests pane, select Actions > Export hold shelf clearance report for [your service point].
The hold shelf clearance report includes requests that simultaneously meet all the following conditions:
- the associated item has a status of Awaiting pickup;
- the request has a status of Closed - Cancelled or Closed - Pickup expired;
- the item’s request queue is empty OR the top request in the queue does NOT have the status “Open - Awaiting pickup”.
The third condition covers the case where an Awaiting pickup item has the hold shelf expiration period expired, but there is another request for the item. The item will appear on the hold shelf clearance report, but if the item is then checked in at its pickup service point for the second request, then the first two conditions are satisfied (with regards to the first request) but the item will not be on the report.
Collecting page requests
Page requests are requests for items currently available at the library. In order to fulfill the request, you need to find the item in your library and check it in using the Check in app. This begins the request process in FOLIO. Depending on your library’s workflow, you can identify the page requests that need to be collected using one of two reports: CSV export or pick slips.
Generating a page requests CSV export
The CSV export report can be used as a pick report. A pick report shows all paged items that need to be pulled from the shelves. The CSV export report includes, and can be sorted by, effective call number.
To create a pick report, follow these steps:
- In the Search & filter pane, select Request type > Pages and Request status > Open - Not yet filled to filter the items down to open page requests.
- In the Requests pane, select Actions > Export search results to CSV.
- Open the file in a spreadsheet application.
- Optional: Filter the report by Effective location to see available items within your area of responsibility.
Printing pick slips
The pick slips report generates a single slip for every paged item that needs to be pulled from the shelf. Because this report automatically prints only those items whose Effective location is associated with the currently selected service point, you must be signed in to the service point you want to generate the slips for. If no items match the report’s criteria, the option is grayed out.
You can configure the information that appears on the pick slips in the Settings app.
To print pick slips, in the Requests pane, select Actions > Print pick slips for [your service point]. A print dialog appears.
Printing Hold request search slips
Libraries can choose to use search slips if they have many copies of a title (instance), but not all copies have been cataloged. When a patron requests an item from that instance, a search slip can be printed so a staff member can look for the item. Libraries must enable Allow print hold requests (Open - Not yet filled) in Settings > Circulation > Print hold requests in order to use this feature.
The search slips report generates a single slip for every item level hold request with request status Open - Not yet filled. The report only prints hold requests for items that are shelved nearest the currently selected service point (i.e., those items whose Effective location is associated with the currently selected service point). You must be signed in to the service point you want to generate the search slips for. If no items match the report’s criteria, the option is grayed out.
You can configure the information that appears on the pick slips in the Settings app.
To print search slips, in the Requests pane, select Actions > Print search slips for [your service point]. A print dialog appears.
Adding a tag to a request
You can add a tag to any open request. Tags are included in the CSV export report, in case you want to use them for your workflow. For example, you can tag requests that were not found.
- Find the request you want to tag.
- In the Request Detail pane, click the tag icon.
- In the Tag pane, either select a tag from the box or enter a tag.
- Click the X on the Tag window to close the pane and save the tag. The tag number updates to the number of tags applied to the request.
Requesting items from remote storage
Some libraries store items at a remote, off-campus storage facility. These facilities often have their own inventory system in addition to FOLIO to manage high-capacity storage and facilitate requests of items to be brought back to campus. FOLIO supports connections to two types of remote storage systems: CAIASoft and Dematic.
If your library integrates FOLIO with a remote storage system, you will be able to request items from remote storage through the FOLIO Requests app. The basic workflows in the Requests app will be the same as for on-campus items.
For more information on FOLIO’s remote storage functionality, see the Settings documentation for Remote Storage.
Processing delivery requests
You may want to set up delivery requests if your library delivers items to certain patrons. For example, if your library sends items requested by faculty to their office, delivery requests will provide you with the patron’s address and the option to check the item out to the patron upon fulfillment.
Delivery must first be turned on in a patron’s user record, and they must have a default delivery address listed in their account. You can configure this setting manually or through a batch load. The steps below detail how to manually turn on delivery and process a delivery request.
Manually turning on delivery in a patron’s user record
- Find the patron in the Users app.
- Click Edit.
- In the User record window, select Delivery under Request preferences to turn on delivery.
- Select a default Fulfillment preference for the patron.
- Select a Default delivery address that will be used when the patron has a delivery request. If the patron does not have an address in their user record you need to add one.
- Click Save & close.
Creating a delivery request
- Create a request.
- If the patron does not have delivery as their default Fulfillment preference, select Delivery.
- Select a Delivery address.
- Click Save & close to start the request process.
Checking in a delivery request
Delivery requests are not treated any differently from items being routed to the hold shelf. The delivery request will trigger once the item is checked in at any location.
When checking in a delivery request, you have two options: check the item out to the patron or wait to process the request.
To check the item out to the patron, follow these steps:
- Check in the item with the Check in app.
- Optional: In the Route for delivery request dialog, if you do not want to print a request delivery slip, clear the Print slip checkbox.
- To check out the item to the patron, click Close and check out. The check out window appears and the item is automatically checked out to the patron.
- To end the check out session, click End Session.
To wait to process the request, follow these steps:
- Check in the item with the Check in app.
- Optional: In the Route for delivery request dialog, if you do not want to print a hold slip, clear the Print slip checkbox.
- Click Close. The Route for delivery request dialog closes, and the Item status changes to Awaiting delivery.
5.6 - Additional topics (Resource Access)
In addition to workflows that take place in a single app, library staff will also want to know about workflows that cross multiple apps, such as managing fees and fines, and managing loans and circulation rules together.
5.6.1 - Fees and fines
FOLIO allows libraries to charge fees and fines to patron library accounts. Charges can be for various reasons like room rentals; overdue return of a book; or replacing an item that the patron never returned. In FOLIO these are generally categorized together as Fees and fines or Fees/fines.
Libraries can charge fees/fines manually or automatically.
Automatic fines fall in three categories:
- Lost item fee
- Lost item processing fee
- Overdue fine
They are charged automatically by FOLIO when items are loaned and not returned on time, according to the loan’s overdue policy and lost item policy.
Manual fees/fines, by contrast, are set up as categories in Settings > Users. They can be used for a wide variety of library charges, such as replacing a damaged item, renting a facility, or paying for a borrower card. Manual charges are always connected to a specific patron; they may be connected to a library item, but they are not connected to a library loan.
Fee/fine data structures
In FOLIO, fee/fine information is stored in two related objects: accounts and actions.
An account is the parent object. When a fee/fine is charged, an account object is always created.
An action is the child object where a transaction on an account is stored.
One account will have one or more actions associated with it.
Example: A patron does not return a book
Suppose Julia Smith is a patron at Normal University Library. She borrows a book and fails to return it to the library before it ages to lost.
When the item ages to lost, Julia is charged $100 as a set cost lost item fee, and $25 as a lost item processing fee.
The $100 replacement fee and $25 processing fee are each separate accounts charged to Julia.
Suppose that Julia can’t return the book and decides to pay for the item. She comes into the library and pays $50 in cash. For the $100 replacement fee, the library elects to waive $75 and accept $25 in payment. They apply the other $25 to pay her processing fee.
In FOLIO, the underlying account and action data would appear as follows.
Account #1: This represents the $100 charge to Julia as the set cost lost item fee. There would be three associated actions:
- Action 1 represents the initial charge to Julia, with an action type in the underlying data of “Outstanding.” The action type in the user interface displays as “Lost item fee.” At this point, the account has a status of “Open.”
- Action 2 represents Julia paying $25, with an action type of “Paid partially.”
- Action 3 represents the library waiving the remaining $75, with an action type of “Waived partially.” When Action 3 is applied, the status of the account becomes Closed.
The Library could choose to waive the $75 first and then mark $25 as paid, in which case action 2 and action 3 would flip in order, but the result would still be the same - paying and closing the account, closing the loan, and changing the item status to Lost and paid.
Account #2: This represents the $25 processing fee, and it has two associated actions.
- Action 1 represents the $25 processing fee charge, with an action type of “Outstanding” in the underlying data. The action type in the User Interface would display as “Lost item processing fee.”
- Action 2 represents the library accepting $25 in cash to pay the fee, with an action type of “Paid fully.” When Action 2 is applied, the status of the account would become Closed.
Fee/fine owners
In FOLIO, a fee/fine owner represents the agent or office that manages fines for FOLIO transactions.
If you plan to charge any fines, you need to set up at least one fee/fine owner. FOLIO does not require that a fee/fine owner represent a specific office or part of a library system. A fee/fine owner could represent an individual, a specific office, or a specific library.
Fee/fine owners are configured in Settings > Users > Fee/fine > Owners
FOLIO libraries should configure a fee/fine owner for every service point in their FOLIO tenant, even if they don’t expect items attached to a particular service point to be loaned and generate fines. This is because if such a loan does occur, and no fee/fine owner is attached to the service point, the fine transaction will fail. Libraries may wish to create one fee/fine owner to attach to those service points as a backup in case fine transactions occur.
How are fee/fine owners connected to locations?
Most libraries want to collect overdue and lost fines according to an item’s owning location, so FOLIO uses the item’s location to determine which fee/fine owner to link to the fine. FOLIO does this by looking up the primary service point for the item location, and then looking up the fee/fine owner for that service point.
For an overdue fine, FOLIO uses an item’s effective location to determine the fee/fine owner.
For a lost item fee or lost item processing fee, FOLIO uses the item permanent location to determine the fee/fine owner. If the item permanent location is not set, FOLIO uses the permanent holdings location instead.
Fines always accrue this way even if an item’s location is not part of the circulation rule that was used for the loan that accrued a fine.
Example: accruing lost item fines to fee/fine owners
Julia Smith wants to borrow a book that is on the shelf at the Science Library, for pickup at the Law Library.
The book’s location information looks like this:
- Item temporary location: empty
- Item permanent location: empty
- Holdings temporary location: empty
- Holdings permanent location: “Science Library Stacks”
- Item effective location: “Science Library Stacks”
Julie borrows the book from the Law Library service point and doesn’t return it. The item ages to lost, with a $100 set cost lost item fee and a $25 lost item processing fee.
When the item is aged to lost:
- FOLIO first checks the item record for an item permanent location.
- Since that value isn’t set, FOLIO next checks the holdings permanent location and finds the value “Science Library Stacks.”
- FOLIO then checks the location record for “Science Library Stacks” and finds that the location has a primary service point of “Science Library Desk”.
- Finally, FOLIO checks the fee/fine owner records for the service point “Science Library Desk” and finds it connected to the fee/fine owner “Science and Engineering Business Office”.
FOLIO charges both the $100 lost item fee and the $25 lost item processing fee and associates them to “Science and Engineering Business Office” as the owner.
Fee/fine notices
Notices function differently for fees/fines that are charged manually, versus fees/fines that are charged automatically.
Manual fee/fine notices
For a manual fee/fine, you have two types of notices that you can use - the charge notice and the action notice.
You can create templates for both types of notices in Settings>Circulation>Patron Notices>Patron notice templates. For a charge notice, choose the notice category “Manual fee/fine charge.” For an action notice, choose “Manual fee/fine action (pay, waive, refund, transfer, or cancel/error)”.
In Settings>Users>Fee/fine>Manual charges, you can select the appropriate fee/fine owner, and associate a charge notice and an action notice to that manual charge. You can select default charge and/or action notice templates for the owner, or specify different charge notice templates for individual fee/fine types.
When you create a manual charge on a patron’s account, or apply an action to an existing charge, if there is an associated notice template, a checkbox option will allow you to choose if the patron should be notified.
Automatic fee/fine notices
Notices for automatic fees/fines are determined by the associated circulation rule.
The notice policy of an item determines whether patrons will be sent fee/fine notices for overdue or lost item charges..
Overdue fine, returned and Overdue fine, renewed notices always bundle multiple fees/fines. In both cases, the associated template must include the {{#feeCharges}} {{/feeCharges}} token for multiple loans.
- Overdue fine, returned: if you choose the Send after option, every patron notice will include all open overdue fines.
- Overdue fine, renewed: if you choose the Send after option, each renew action will send separate patron notices.
You can send Lost item fee(s) charged notices throughout the day (typically processed every five minutes, with a separate notice for each fee/fine charged). You can also choose to bunch and send them overnight in one email (processed at 11:59pm). See Settings > Circulation > Fee/ fine notices triggering events.
Send overnight is good for long-term loans, while Send throughout the day is a good option for short-term loans. If you choose Send overnight then the associated template must include the {{#feeCharges}} {{/feeCharges}} token for multiple loans. If you choose Send throughout the day then the associated template must not include the {{#feeCharges}} {{/feeCharges}} token for multiple loans. Lost item fee(s) charged notices will be sent for both set cost and actual cost fees/fines and any applicable processing fees.
Lost item returned - fee(s) adjusted notices are always sent when the event is triggered, i.e. when the lost item is checked in. Lost item returned - fee(s) adjusted notices will be sent for both set cost and actual cost fees/fines, and any applicable processing fees.
How are overdue and overdue recall fees/fines calculated?
FOLIO’s fee/fine system is very dynamic and allows for many different configuration options of loan length and fee/fine settings. It can be helpful to know how the underlying logic works when FOLIO computes an overdue or overdue recall fine amount.
The factors that are used when calculating overdue fines are
- The loaning service point calendar
- Whether there is a grace period for a late returned, as defined in the loan policy
- The stated overdue charge, as defined in the overdue policy
- Whether overdue fines should be charged when the service desk is closed, as defined in the overdue policy
Because you can define fine rates and loan lengths in different intervals - minutes, hours, days, weeks or months - FOLIO’s approach is to take the length of time an item was overdue, convert it to minutes, and then compare that date/time to the fine interval - also in minutes - to determine how much to charge. This is fairly simple when a library charges fines for all hours, but can become much more complicated when charging fines only when an associated service point is open.
Note that FOLIO does not do calculations for overdue fees until the overdue or overdue recalled item is returned. Use reminder fees to have overdue items billed, and overdue notices sent, when an item becomes overdue.
Example: A patron returns an overdue item at a 24/7 service point
Suppose a patron borrows an item that has a three hour loan period, with an overdue charge of $3/day. They borrow the item at 2 PM on September 1. The item is due back at 5 PM on September 1, but they don’t return it until 6 PM on September 2nd.
The factors that are used in the overdue fine calculation include:
- The loaning service point calendar - in this example, suppose the service point is open 24/7
- The stated overdue charge, defined in the overdue policy - in this example, $3/day
- Whether there is a grace period for a late return, defined in the loan policy - in this example, suppose there is no grace period
- Whether they should charge the overdue fine during closed hours, defined in the overdue policy - in this example, suppose it is Yes
So, once the item is returned, FOLIO computes the overdue fine like this:
- The item was overdue by one day and one hour - 25 hours - which it then converts to minutes - 1500 minutes
- The fee/fine rate is $3/day. There are 1440 minutes in a day, so it’s $3/1440 minutes.
- FOLIO computes the number of time “units” that the item was overdue for - in this case, dividing 1500/1440 = ~1.07 “units” of overdue time.
- FOLIO rounds the number of overdue time “units” up to the next integer - in this case, 2.
- FOLIO multiplies the number of overdue time “units” by the amount of the fine per interval - 3 - to get a total fine of $6.00
Example: A patron returns an overdue item at a service point that closes overnight
Suppose a patron borrows an item that has a seven day loan period, with an overdue fine of $3/day. They borrow the item at 2 PM on May 1st. The item is due back at 11:59:59 PM on May 8th. The patron returns the item at 2 PM on May 11th.
The factors that are used in the overdue fine calculation include:
- The loaning service point calendar - in this example, suppose the service point is open 8 AM to midnight from May 1st to May 11th.
- The stated overdue charge, defined in the overdue policy - in this example, $3/day
- Whether there is a grace period for a late return, defined in the loan policy - in this example, a grace period of one day.
- Whether they should charge the overdue fine during closed hours, defined in the overdue policy - in this example, that option is set to No.
So, once the item is returned, FOLIO computes the overdue fine like this:
- The item was overdue by 2 days and 14 hours strictly looking at the calendar. That is 62 hours, which is 3720 minutes.
- There is a grace period, but because the grace period is one day / 1440 minutes, and the item was returned after the grace period, the grace period does not factor into the calculation.
- FOLIO sees that the overdue policy says to not charge overdue fines during closed hours. The associated loaning service point calendar shows it closed from midnight to 8 AM on three relevant days - the morning of the 9th, 10th, and 11th. The closed period is 8 hours each day - so 24 hours total, or 1440 minutes.
- FOLIO subtracts the closed minutes from the total overdue period - 3720 - 1440 = 2280 minutes. That is the amount of overdue time FOLIO will charge for.
- The fine rate is $3/day, or $3/1440 minutes. FOLIO computes the number of time “units” the item was overdue for - 2280/1440 = ~1.58 “units” of overdue time.
- FOLIO rounds that up to the next integer - 2 - and charges for 2 intervals. So it would be 2 * 3 = 6, for a $6 fine.
It is important to notice that the patron was charged for 2 days even though the item was returned on the 3rd day after it became overdue.
There is development planned to better handle calculating fines for closed periods, but it is not currently scheduled.
Reminder fees
Reminder fees differ from overdue fines in that reminder fees are billed when an item becomes overdue, whereas overdue fines are billed when the item is returned.
A Reminder fee example
| Sequence |
Interval |
Frequency |
After |
Fee |
Notice method |
Notice template |
Block template |
| 1 |
0 |
Day(s) |
Overdue |
3 |
Email |
1st reminder |
noblock |
| 2 |
3 |
Day(s) |
Previous reminder |
3 |
Email |
2nd reminder |
noblock |
| 3 |
3 |
Day(s) |
Previous reminder |
6 |
Email |
3rd reminder |
noblock |
Preconditions:
- Notices are sent out once per day (shortly after midnight).
- An item with the associated reminder fee policy in the above example becomes overdue at 11:59 PM on Monday.
- The item is not returned to the library and the loan is not renewed.
Reminder process:
- The first sequence will create a first reminder with an email using the selected notice template. The email is sent out shortly after midnight on the first day after the overdue date (12:05 AM on Tuesday in the example). A 3.00 fee is charged.
- The second sequence will create a second reminder with an email using the selected notice template. The email is sent out three plus one equals four days after the previous reminder (Saturday in the example). A 3.00 fee is charged.
- The third sequence will create a third reminder with an email using the selected notice template. The email is sent out three plus one equals four days after the previous reminder (Wednesday in the example). A 6.00 fee is charged.
Reminder fee examples with closed days
Create on closed days set to Yes
A reminder fee policy has Create on closed days set to Yes, and the following schedule of fees:
| Sequence |
Interval |
Frequency |
After |
Fee |
Notice method |
Notice template |
Block template |
| 1 |
0 |
Day(s) |
Overdue |
3 |
Email |
1st reminder |
noblock |
Preconditions:
- Notices are sent out once per day (shortly after midnight).
- The calendar of the service point where the item is checked out is open on Monday, closed all day Tuesday, and open on Wednesday, Thursday and Friday.
- An item with the associated reminder fee policy in the above example becomes overdue at 11:59 PM on Tuesday.
- The item is not returned to the library and the loan is not renewed.
Reminder process:
- The sequence will create a reminder with an email using the “1st reminder” notice template. The email is sent out shortly after midnight on Wednesday. A 3.00 fee is charged.
Create on closed days set to No
A reminder fee policy has Create on closed days set to No, and the following schedule of fees:
| Sequence |
Interval |
Frequency |
After |
Fee |
Notice method |
Notice template |
Block template |
| 1 |
0 |
Day(s) |
Overdue |
3 |
Email |
1st reminder |
noblock |
Preconditions:
- Notices are sent out once per day (shortly after midnight).
- The calendar of the service point where the item is checked out is open on Monday, closed all day Tuesday, and open on Wednesday, Thursday and Friday.
- An item with the associated reminder fee policy in the above example becomes overdue at 11:59 PM on Tuesday.
- The item is not returned to the library and the loan is not renewed.
Reminder process:
- Because the service point is closed on Tuesday, no reminder fee is created on Tuesday. The 1st reminder email is sent out shortly after midnight on Thursday. A 3.00 fee is charged.
What happens to a loan when the fine is resolved?
When an item is declared lost, or an item ages to lost, the associated loan remains open, whether it is a set cost or actual cost fee/fine.
If the item is returned, and all associated fees/fines are removed, the loan is closed and the item’s status changes to either “Available” or “In Transit”, depending on where it was returned.
If the library resolves all fees/fines via payment, cancellation, or waiving, FOLIO automatically closes the fee/fine, closes the loan, and changes the item’s status to Lost and paid, even if no money is actually accepted by the library.
Some libraries have guidelines where they want items to age to lost, but they don’t want to assess a monetary penalty - for example, if they are not able to charge faculty, but they still want faculty borrowing to be blocked because lost items were not returned.
If you want FOLIO to age items to lost but not charge a fine, the recommendation is to use a lost item policy that charges Actual cost and does not charge a lost item processing fee.
When the item ages to lost, the loan remains open, the item has a status of Aged to lost, and no fines are charged. The loan can remain in this state for as long as your library defines it in the setting For lost items not charged a fee/fine, close the loan after in the lost item policy.
If you wish to resolve the loan without charging the patron a fine, go to the Lost items requiring actual cost pane in the Users app. Locate the fine transaction, and choose Do not bill in the actions menu. That will close the loan and move the item to a status of Lost and paid without charging the patron.
What happens to a fine if the item record is deleted?
An item can be deleted even if an unpaid fee/fine is attached to the item record. This is a known issue, but development to address this has not yet been scheduled.
If an item is deleted, the underlying account record will remain. Deleting an item does not delete a fee/fine, and the fine record includes some item information stored directly, such as title, barcode, and item effective location. However, you will not be able to see the fine in the FOLIO user interface; instead you will see an error message.
Because of this issue, we recommend that libraries do not delete items with attached fees/fines. Checking for attached records can be done with a reporting or API query tool.
If you are using an API tool like Postman, a query like this will work, sent to your tenant instance of Okapi:
GET /accounts?query=itemId=="[Insert item UUID]"&limit=1000
Lost items - charging set cost versus actual cost
FOLIO defines two types of automated fine charging: Set cost and Actual cost.
For Set cost charges, libraries specify a standard charge for a lost item in the associated lost item policy, and FOLIO charges the patron that amount when the item is declared lost or ages to lost.
For Actual cost charges, the item ages to lost automatically, but the library must specify the amount to charge the patron manually. In the Users app, there is a reporting view that lists items that have aged to lost and need to have a charge applied. Libraries can also choose to not charge the patron for the lost item by choosing “Do not bill” when processing the actual cost charge.
Note that if the lost policy has an associated processing fee, the processing fee will be charged when the item ages to lost, regardless of whether the policy uses set cost or actual cost.
Timing considerations for when an item ages to lost
FOLIO uses a system-managed process to age an item to a lost status and apply any associated charges. The process has two pieces to it. The first is a process that moves the item status from Checked out to Aged to lost. The second process applies any associated fees/fines
By default, FOLIO runs the Aged to lost process every thirty minutes, and the fines process five minutes later. Hosting providers may choose to change this schedule to meet a specific library’s needs.
Here is how aging an item to lost might look in practice. Note that this example also works for actual cost, but if the lost item policy is set to actual cost, the only charge that is automatically applied is the processing fee.
Example: A long-term loan ages to lost
Consider the following scenario:
- A patron borrowed a book and never returned it.
- The loan had a due date of May 1, 2022. Because the item has a fixed due date, the actual due date/time is May 1, 2022 at 11:59 PM.
- The associated lost item policy says that the item ages to lost after 28 days. When that happens, the patron is charged a $100 set lost item fee, with no lost processing fee.
The “aged to lost” time counter would begin on May 2nd. The 28-day overdue period would end on May 29th at 11:59 PM
- After 5/29 at 11:59 PM has passed, the next run of the Aged to lost process will change the item status to Aged to lost.
- After the item status changes to Aged to lost, the next run of the fine process will charge any associated fines.
The timing might look something like this:
- May 29th 11:59 PM - the age of the loan goes past the overdue time frame and becomes eligible to be aged to lost
- May 30th 12:00 AM - the Aged to lost process begins and changes the item status to Aged to lost
- May 30th 12:05 AM - the Aged to lost fee charging process begins, takes in the aged-to-lost loan information, and applies the $100 charge to the borrower’s library account
Both steps of this process can take time to run, so if you have a large number of loans waiting to be aged to lost, the timing on this may not be exact, and it may take longer to see all of the loans be processed. Delays depend on the number of loans your library has to process.
Example: A short-term loan goes lost
Suppose a patron borrows a laptop charger with a four hour loan time. They borrow the item at 2:05 PM, and it’s due at 6:05 PM. The library has a lost loan policy for chargers that says that you must bring it back within three hours of the due date/time or it will be declared lost, and the borrower will be charged $75.
If the patron doesn’t return the charger, it would be eligible to be aged to lost at 9:05 PM. The timing might look something like this:
- 9:00 PM - the Aged to lost begins, but there are no loans to process.
- 9:05 PM - the charger goes past the lost time frame and is able to be aged to lost
- 9:05 PM - the Aged to lost fee charging process begins, but there are no loans to process
- 9:30 PM - the Aged to lost process begins and changes the item status to aged to lost
- 9:35 PM - the Aged to lost fee charging process begins, takes in the aged to lost loan information, and applies the $75 charge.
So functionally that means that there is a time period between 9:05 PM and 9:35 PM (at the earliest) where an item may be past the expected time frame but still look like it is only overdue, or look like it has aged to lost but without the expected lost item fee.
5.6.2 - Loans
This section of the documentation contains links to external sites. Please be advised that these sites are not maintained by the FOLIO Documentation Group and may be aligned with a different FOLIO release.
Library staff manage patron loans in FOLIO through three primary apps - Check in, Check out, and Users. Staff also can view information about loans in the Circulation log and Inventory apps.
The terms of a loan - who can borrow, how long they can borrow the item for, whether it can be renewed, what notices patrons receive, and whether any charges are accrued if the item is late - are determined by the circulation rule that is applied when the item is loaned, renewed, or has a due date change.
Loans data structure
In FOLIO, a loan object contains specific information that supports circulation functions and reporting.
- userId: The UUID of the patron who borrowed the item. If the loan is closed and anonymized, the userId is removed from the loan record.
- proxyUserId: If the item is borrowed by someone on behalf of another borrower using FOLIO’s proxy function, the proxy’s UUID is stored.
- itemId: The inventory UUID of the item that was loaned.
- itemEffectiveLocationIdAtCheckOut: The effective location of the item when it was checked out.
- status: The status of the loan - usually open or closed.
- loanDate: The date/time the item was loaned.
- dueDate: The date/time that the item is due back. This date can change if the item is successfully renewed, recalled, or if a FOLIO user changes the loan due date.
- returnDate: If the item has been returned, this is the return date/time. Returning the item may or may not change the loan status to closed - it depends on whether a fee/fine was charged.
- systemReturnDate: If the return was backdated, the return date is the backdated date/time, and the systemReturnDate is the actual date/time the item was returned in the Check in app.
- action: The last action performed on a loan - values include declaredLost, renewed, renewedThroughOverride, checkedin, checkedout, checkedOutThroughOverride, recallrequested, holdrequested, claimedReturned, markedMissing, closedLoan.itemAgedToLost, dueDateChanged, checkedInReturnedByPatron, checkedInFoundByLibrary.
- itemStatus: The last item status in relation to this loan. This may or may not be the item’s current status in Inventory. For example, if a loan has been checked back in and put in transit back to its home location, the loan itemStatus field is In transit, but the item in Inventory may be Checked out if the item has since been loaned to another patron.
- renewalCount: The number of times the loan has been renewed.
- loanPolicyId: The UUID for the applicable loan policy.
- checkoutServicePointId: The UUID of the service point where the FOLIO user was logged in when the item was loaned to the patron.
- checkinServicePointId: If the item has been returned, this is the UUID of the service point where the FOLIO user who returned the item was logged in.
- patronGroupIdAtCheckout: The UUID of the patron’s patron group at the time of checkout.
- dueDateChangedByRecall: This is a true/false value indicating if the item’s due date has been changed by a recall for another patron.
- declaredLostDate: If the loan is declared lost, the date of that declaration is stored in this attribute.
- claimedReturnedDate: If the loan has been marked claimed returned, the date it was marked claimed returned is stored in this attribute.
- overdueFinePolicyId: The UUID for the associated overdue fine policy, assigned when the loan is created. It is not updated when the loan is renewed.
- lostItemPolicyId: The UUID for the associated lost item policy, assigned when the loan is created. It is not updated when the loan is renewed.
- agedToLostDelayedBilling: FOLIO declares an item lost, and then bills the patron, in separate processes. These attributes on the loan object support that process.
What does FOLIO consider a short-term loan? What is considered a long-term loan?
FOLIO treats loan activity differently depending on whether it is a short-term or a long-term loan. The distinction depends on the time interval of the loan.
- If an item is loaned for minutes or hours, the loan is a short-term loan.
- If an item is loaned for days, weeks, or months, the loan is a long-term loan.
Differences between the two types of loans include:
- The time a loan is due. A short-term loan sets its due date based on the loan date/time and the loan policy; a long-term loan sets its due date based on the loan policy and the loan date, but the due time is always 11:59 PM.
- For example: suppose a patron borrows an item from a service point open 9 AM to 10 PM seven days a week. If they borrow the item at 11 AM on April 1st, and the loan policy says they can borrow it for 48 hours, it will be due at 11 AM on April 3rd. But, if the loan policy said they could borrow the item for 2 days, it would instead be due at 11:59 PM on April 3rd, even though the service point is closed.
When a loan is renewed, or a loan due date is changed, what circulation rule applies and what policies are used?
When a patron or FOLIO user requests to renew a loan, or a FOLIO user changes a loan’s due date, FOLIO reviews the circulation rule file and may do several things, depending on what it finds (and not necessarily in the order listed below).
- FOLIO checks to see if the patron is blocked from renewal (either manually or automatically). If they are not blocked, the process can continue.
- FOLIO checks the patron record to make sure the record is not inactive or expired. If the record is not inactive or expired, the process can continue.
- FOLIO will find the loan policy that applies and use that policy to determine if or how the loan can be changed. If the circulation rule file hasn’t changed, and the patron and item information hasn’t changed, FOLIO will retrieve and apply the same loan policy used the last time the loan was created or updated.
- No request policy updates occur, because request policies aren’t stored on the loan. Since request policies only apply before the loan is created, there is no reason to keep a reference on the loan record.
- FOLIO will not update the associated overdue policy and lost item policy, because it could cause the patron to be liable for more money than they had expected when they first borrowed the item.
- FOLIO will update scheduled notices. The notice policy UUID is not stored on the loan. Instead, FOLIO reads the applicable notice policy from the circulation rule, removes the previous notices, and then creates the appropriate notices to run on the new dates.
- FOLIO will create an entry in the circulation log to show that the item was renewed, or that the due date changed.
Example: An undergraduate becomes a graduate student
Suppose Sofia Cruz is an undergraduate at Main University.
Main University has a circulation rule file that has different rules for patron groups. Main allows undergraduates to borrow books for 28 days with unlimited renewals, and allows graduate students to borrow books for 90 days with unlimited renewals. Two circulation rules in FOLIO make that happen:
g undergrad: l 28-day-loan r hold-only n standard-notice o standard-overdue i standard-lost
g grad-student: l 90-day-loan r allow-all n standard-notice o standard-overdue i standard-lost
Sofia’s FOLIO account has a user group of ‘undergrad’, so the first line in this rule applies. They are able to borrow books for a 28 day rolling loan with unlimited renewals.
Suppose Sofia borrows several books in February and continues to use them, so they continue renewing their loans. Over the summer, they start a graduate program at Main University, and the patron group on their FOLIO record changes from ‘undergrad’ to ‘grad-student’.
The next time Sofia renews their books, the second line of the circulation rule file applies:
g grad-student: l 90-day-loan r allow-all n standard-notice o standard-overdue i standard-lost
This is what FOLIO does when renewing Sofia’s items:
- FOLIO checks the circulation rule file and determines that it should use the circ rule line that begins
g grad-student ….
- FOLIO updates the loan policy UUID stored on Sofia’s loans to the UUID for the policy
90-day-loan and gives Sofia the new, 90-day rolling loan period.
- There is no request policy stored on the loan record, so nothing changes there.
- The overdue policy ID and lost item policy ID are stored on the loan record, but they are not updated when the loan is renewed or has the due date changed. That’s because a new overdue or lost item policy could potentially mean the patron owed more money than they were expecting if the item became overdue or aged to lost.
- FOLIO reads in the notice policy from the circ rule. FOLIO then creates the scheduled notices in the notice database according to the policy and deletes previously scheduled notices that now don’t need to be sent.
If you change information about an item that is currently on loan, nothing happens to the loan record. The loan may change if the item is renewed or if the loan due date is changed, and the change in the item information means a different circulation rule applies. See When a loan is renewed, or a loan due date is changed, what circulation rule applies and what policies are used?
What happens in FOLIO when an item is checked in?
When an item is checked in in FOLIO, the following steps happen (not necessarily in this order).
- FOLIO checks the item status.
- If an item has a status of Available and is checked in at a service point assigned to its effective location, FOLIO will count it as in-house use.
- If an item has a status of In transit, FOLIO will check the logged-in service point to see if it is the primary service point for the item’s effective location. If the logged-in service point does not match, the item status remains In transit. If the logged-in service point does match, FOLIO changes the item status to Available.
- FOLIO checks the loan policy, overdue policy and lost item policy to determine if any actions need to be taken.
- If the item is determined to be overdue but has not been recalled, FOLIO calculates overdue fines based on the associated policy, and applies them to the patron’s account if the fine is greater than zero.
- If the item is recalled and overdue, FOLIO calculates overdue recall fines based on the associated policy, and applies them to the patron’s account if the fine is greater than zero.
- If an item status is Declared lost or Aged to lost, FOLIO presents a warning message, and staff must select from the prompt to continue check in.
- When check in proceeds, FOLIO then references the lost item policy to determine if any fees should be credited back to the patron, and applies them to the patron’s account.
- If the associated notice policy to the loan says that any fee/fine notices should be sent, those notices are generated and sent.
How is in-house use tracked in FOLIO data?
FOLIO does not track an explicit data attribute for in-house use of an item. Instead, FOLIO considers an item to be used “in-house” based on how the item status changes when it is checked in. If the item has a status of “Available” and is checked in at a service point assigned to its effective location, FOLIO considers that to be in-house use.
There is currently no way to generate a report of in-house use with an in-app report. One way to get at in-house use data is to use a tool like Postman to query the FOLIO API to return check-in records. Sending a GET request to your FOLIO instance like this:
/check-in-storage/check-ins?query=itemStatusPriorToCheckIn==“Available”
will return check-in records for in-house use.
What happens if/when you delete a circulation policy?
Loan policy
You are prevented from deleting a loan policy through Settings > Circulation > Loan Policies if there are open loans associated with the loan policy.
Request policy
You cannot delete a request policy through Settings > Circulation > Request policies that is part of circulation rules.
Request policies are only referenced when a request is placed, and are not stored on a subsequent loan, so they are fairly simple to delete, with the recommendation that you review your circ rules first.
For example, suppose you need to delete the request policy allow-all. The recommendation is to review your existing circulation rules and replace any references to allow-all with another request policy. Once you’ve done that, you can delete ‘allow-all’ from Settings > Circulation > Request Policies.
Notice policy
You cannot delete a notice policy through Settings > Circulation > Patron notice policies that is part of circulation rules.
Notice policies are only referenced when a loan is created, renewed, or a due-date is changed. They are fairly simple to delete, with the recommendation that you remove references to them in your circulation rules first.
For example, suppose you need to delete the notice policy faculty-semester-notice. First, you would review your circulation rules and update any references to faculty-semester-notice with another notice policy. Once you’ve done that, you can delete faculty-semester-notice from Settings > Circulation > Patron notice policies.
Overdue policy
You are prevented from deleting an overdue fine policy through Settings > Circulation > Fee/Fine if there are open loans associated with the policy.
Lost item policy
You are prevented from deleting a lost item policy through Settings > Circulation > Fee/Fine if there are open loans associated with the policy.
What happens if/when you delete a circulation rule?
If you remove a circulation rule from your circulation rule file, nothing happens to existing loans that used that circulation rule.
If a user tries to renew a loan that would have been renewed with the circulation rule that was removed from the file, FOLIO will review the circ rules for another matching rule. If it does not find at least one other matching rule remaining in the file, it will use the fallback rule.
How does FOLIO work with self-check stations?
FOLIO supports SIP2, an industry standard protocol for connecting self-service stations to library systems.
Patron self-service systems can connect to FOLIO with SIP2 using FOLIO’s SIP2 edge module. Setting this up generally requires working with your FOLIO administrator and/or hosting provider.
More information on SIP2 configuration can be found in the edge module documentation in Github - https://github.com/folio-org/edge-sip2.
Common errors when loaning items
When an item is loaned, FOLIO needs to be able to calculate the item’s due date. It uses information from the patron record, the loan policy, and the calendar for the service point where the library staff member is logged in.
The error message “Calendar timetable is absent for requested date” means that FOLIO can’t find calendar information up to and including the calculated due date of the item.
The first troubleshooting step is to review the calendar for the service point in Settings > Calendar to ensure that you have provided a calendar for the length of time necessary.
This error message can be confusing when you consider how due dates are truncated to a user’s expiration date. Suppose you have the following scenario:
- A patron comes to the desk on July 1 and wants to borrow an item;
- According to the circulation rules, the patron should get a due date of December 15th. However, the patron’s user account is set to expire on August 15th, so they can only borrow the book until August 14th.
- The calendar for the service point where the check out is occurring has dates inputted until September 1.
The calculated due date of August 14th is inclusive of the calendar information stored in FOLIO. However, the checkout will still fail with “Calendar timetable is absent for requested date.”
That is because FOLIO first calculates the due date without considering the patron expiration, and then checks the patron expiration date to see if the item should be due sooner. So because there is no calendar information extending out to December 15th, FOLIO can’t do the full calculation and presents an error.
6 - Resource Management (Acquisitions)
In FOLIO, acquisitions includes essential functions. These functions include:
- Creating fund structures and managing money
- Creating and managing purchase orders
- Receiving materials ordered by the library
- Tracking and managing the payment of materials
- Creating and managing organizations and vendors
Acquisitions Settings
The acquisition of library materials is governed by a set of rules and policies. These rules and policies are defined by the library and implemented in the Finance, Invoices, Orders, and Organizations areas of the FOLIO Settings app.
6.1 - Finance
The Finance app allows you to create fund structures and manage money.
Definitions of terms used in the Finance app:
- Acquisition units. An additional layer you can add to acquisitions records that restricts a user’s ability to interact with those records unless they have been assigned to that unit. For example, you may create acquisition units to represent the different libraries within your library system. Units are defined and determined by your library in the Settings app. See Settings > Acquisition units for more information.
- Amount allocated. The amount of money assigned to a fund at the start of a fiscal year. Additional money can also be allocated during the year.
- Budget. A finance record that describes the amount of money available for a fiscal year within a fund that includes a definition of the allowed expenditure percentage and allowed encumbrance percentage. Transfer and allocation transactions are performed against a budget. Expense classes can be assigned to a budget.
- Encumbrance. An amount of money that the library commits to pay to a vendor from a fund’s budget for ordered materials that are invoiced in the future.
- Expense class. A fiscal entity used to track transactions against a specific purpose or function within a Fund. Optional, tenant-defined, and can be assigned to one or more funds. Applied to order lines and invoice lines during fund distribution. Each fund can support multiple expense classes.
- Fiscal year. The twelve-month period your library uses to manage its finances.
- Fund. A fiscal entity used to track transactions against a general purpose or function within a ledger. Funds are associated with only one ledger. Fund information persists from year to year as new budgets are created for the fund each year.
- Group. A collection of one or more funds grouped together.
- Ledger. A collection of funds that need to be kept fiscally separate from another ledger’s collection of funds. All funds within a ledger share future fiscal year rollover behavior.
- Net transfers. Money transferred between funds during a fiscal year.
Permissions
The permissions listed below allow you to interact with the Finance app and determine what you can or cannot do within the app. You can assign permissions to users in the Users app. If none of these permissions are assigned to a user, they are unable to see the Finance app or any related information.
Finance permissions:
- Finance: Assign acquisition units to new record. This permission allows the user to assign acquisition units to the record when creating a new record.
- Finance: Create allocations. This permission allows users to create allocation transactions against budgets. Must include view and edit fund and budget permissions.
- Finance: Create transfers. This permission allows users to create transfer transactions against budgets. Must include view and edit fund and budget.
- Finance: Execute fiscal year rollover. This permission allows the user to execute fiscal year rollover.
- Finance: Export finance records. This permission allows the user to run an export of finance records for a ledger.
- Finance: Manage acquisition units. This permission allows users to change the assignment of acquisition units for the record when editing a record.
- Finance: Manually release encumbrance. This permission allows the user to release an encumbrance from a fund using the Release encumbrance action on the budget transaction log.
- Finance: View fiscal year. This permission allows searching and viewing of fiscal year records.
- Finance: View fund and budget. This permission allows the user to search and view funds and budgets.
- Finance: View group. This permission allows the user to search and view groups.
- Finance: View ledger. This permission allows the user to search and view ledgers.
- Finance: View, edit fiscal year. This permission allows the user to view and edit fiscal years.
- Finance: View, edit fund and budget. This permission allows the user to view and edit funds and budgets.
- Finance: View, edit group. This permission allows the user to view and edit groups.
- Finance: View, edit ledger. This permission allows the user to view and edit ledgers.
- Finance: View, edit, create fiscal year. This permission allows the user to view, edit, and create fiscal years.
- Finance: View, edit, create fund and budget. This permission allows the user to view, edit, and create funds and budgets.
- Finance: View, edit, create group. This permission allows the user to view, edit, and create groups.
- Finance: View, edit, create ledger. This permission allows the user to view, edit, and create ledgers.
- Finance: View, edit, delete fiscal year. This permission allows the user to view, edit, and delete fiscal year.
- Finance: View, edit, delete fund and budget. This permission allows the user to view, edit, and delete funds and budgets.
- Finance: View, edit, delete group. This permission allows the user to view, edit, and delete groups.
- Finance: View, edit, delete ledger. This permission allows the user to view, edit, and delete ledgers.
Keyboard shortcuts
Keyboard shortcuts allow you to perform actions in this app using the keyboard. See Platform essentials > Keyboard shortcuts for more information.
Creating a fiscal year
A fiscal year is the twelve-month period your library uses for accounting and budgetary purposes. In FOLIO, a fiscal year serves as the basis for the entire fund structure and its parts. Note: Before creating a new fiscal year, be sure to check the Primary currency value specified in your Settings > Tenant > Language and localization. The currency on a budget is set to the Tenant currency value at the time the fiscal year record is created; therefore, if the Tenant currency value is updated, any budgets created prior to the update will still operate based on the Tenant currency that existed when the Fiscal year associated with the budget was created.
- In the Search & filter pane, click Fiscal year.
- In the Fiscal year pane, click New.
- In the Create fiscal year window, enter all required information for the fiscal year. For more information on the fields and actions available in this section, see the descriptions below.
- Click Save & Close. The fiscal year is saved.
- Name (required). The name of the fiscal year. A suggested naming convention is the term “Fiscal Year” followed by the numeric year. For example, Fiscal Year 2021.
- Code (required). The code must be an alpha followed by a four-digit number. It can be based on name and year; for example, FY2021. The code that you establish for your fiscal year one will determine the code structure moving forward. In this example, FY2021 would be followed in succession by FY2022, FY2023, etc. Adherence to this code structure is essential to the success of fiscal year rollover. A single FOLIO tenant may have multiple fiscal years running in parallel. For example, an academic library with a July 1 - June 30 fiscal year may share a tenant with a government library operating on an October 1 - September 30 fiscal year. The academic library may configure FYA2021 with the government library configuring FYG2021 to allow rollover at different points in the calendar year.
- Acquisition units. If you only want particular users within certain acquisition units to be able to edit the fiscal year, enter or select the Acquisition units from the drop-down list. You can select multiple units. If blank, any users with the appropriate permissions are allowed to edit the fiscal year information. For more information, see Settings > Acquisition units
- Period Begin Date (UTC) (required). The date when the fiscal year begins.
- Period End Date (UTC) (required). The date when the fiscal year ends.
- Description. A description of the fiscal year.
Note about Currency: The currency value does not display on the Fiscal year detail pane after creation, but the system does associate a currency with the Fiscal year based on the currency value from Settings > Tenant > Language and localization. See Viewing fund details > Fund information for a description of expected system behavior for budget transaction when the Tenant currency value is changed.
Creating a ledger
A ledger is a collection of funds that need to be kept fiscally separate from another ledger’s collection of funds. Multiple ledgers can be associated with a fiscal year and each ledger can persist in future fiscal years. A fund can be associated with only one ledger.
- In the Search & filter pane, click Ledger.
- In the Ledger pane, click New.
- In the Create ledger window, enter all required information for the ledger. For more information on the fields and actions available in this section, see the descriptions below.
- Click Save & Close. The ledger is saved.
- Name (required). Name of the ledger. For example, Law Library.
- Code (required). User-created, based on name.
- Fiscal year one (required). The first fiscal year for the ledger. Ledgers can continue to be used for multiple fiscal years. If the fiscal year does not appear in the list, you can click New fiscal year to create a new one.
- Status (required). Select the status of the ledger: Active, Frozen, or Inactive. Active means the ledger is ongoing, Frozen means the ledger has been put on pause, and Inactive means the ledger is no longer in use.
- Acquisition Units. If you only want particular users within certain acquisition units to be able to edit the ledger, enter or select the Acquisition units from the drop-down list. You can select multiple units. If blank, any users with the appropriate permissions are allowed to edit the ledger’s information. For more information, see Settings > Acquisition units.
- Enforce all budget encumbrance limits. This box is checked by default. Leave this box checked if you want the system to reject any encumbrances against funds related to this ledger that would exceed the available amount of the current budget. Uncheck this box to allow encumbrance amounts on the current year budget without restrictions.
- Enforce all budget expenditure limits. This box is checked by default. Leave this box checked if you want the system to reject any expenditures against funds related to this ledger that would exceed the available amount of the current budget. Uncheck this box to allow expenditure amounts on the current year budget without restrictions.
- Description. A description of the ledger.
Creating a group
Groups categorize funds and bring multiple funds together as a single group regardless of fiscal year or ledger. This enables the total amount available or allocated across multiple funds to be summarized by group, ledger, or fiscal year.
- In the Search & filter pane, click Group.
- In the Group pane, click New.
- In the Create group window, enter all required information for the group. For more information on the fields and actions available in this section, see the descriptions below.
- Click Save & Close. The group is saved.
- Name (required). Name of the group. For example, History.
- Code (required). User-created, based on name.
- Status (required). Select the status of the group: Active, Frozen, or Inactive. Active means the group is ongoing, Frozen means the group has been put on pause, and Inactive means the group is no longer in use.
- Acquisition units. If you only want particular users within certain acquisition units to be able to edit the group, enter or select the Acquisition units from the drop-down list. You can select multiple units. If blank, any users with the appropriate permissions are allowed to edit the group’s information. For more information, see Settings > Acquisition units.
- Description. A description of the group. For example, you may want to include why the group was created and the relation between the different funds.
Creating a fund
Funds show information regarding an ongoing ledger with a budget for the current fiscal year. There can be many funds in a ledger, but each fund may only be associated with a single ledger. Many funds can be placed in a group and a fund can be assigned to multiple groups.
- In the Search & filter pane, click Fund.
- In the Fund pane, click New.
- In the Create fund window, enter all required information for the fund. For more information on the fields and actions available in this section, see the descriptions below.
- Click Save & Close. The fund is saved.
- Name (required). Name of the fund.
- Code (required). User-created, based on name. The code must be unique. It is recommended to use alphanumeric and intuitive codes.
- Ledger (required). Select the ledger associated with the fund. A fund may only be associated with a single ledger.
- Status (required). Select the status of the fund: Active, Frozen, or Inactive. Active means the fund is ongoing, Frozen means the fund has been put on pause, and Inactive means the fund is no longer in use. Note: The fund must be active to successfully open an order or for an invoice to be fully paid.
- Type. A category to describe the fund. Fiscal year rollover of funds is often defined by fund type, so definition of the type values should consider fiscal year rollover requirements. For example, endowment, or restricted. For more information about creating fund types, see Settings > Finance > Fund types. Funds that are not assigned a fund type will be grouped under No fund type at fiscal year rollover.
- Acquisition units. If you only want particular users within certain acquisition units to be able to edit the fund, enter or select the Acquisition units from the drop-down list. You can select multiple units. If blank, any users with the appropriate permissions are allowed to edit the fund’s information. For more information, see Settings > Acquisition units. PLease note: if the assigned acquisition unit restricts view, the fund will be filtered out of the selection list that appears in Fund distribution accordions on purchase order lines and invoices. Users will only be able to apply funds that are “public” or with which they share an acquisition unit.
- Group. To associate this fund with a group, select the group from the drop-down list. You can assign multiple groups. See Creating a group for more information.
- Transfer from. To allow transfers to this fund from any other fund, leave this field blank. To restrict transfers to this fund, enter or select the allowed funds from the drop-down list. You can select multiple funds.
- Transfer to. To allow transfers from this fund to any other fund, leave this field blank. To restrict transfers from this fund, enter or select the allowed funds from the drop-down list. You can select multiple funds.
- External account (required). The identifier for this account in an external financial system. If no integration with a financial system is desired, a library may use a hyphen (-) or other special character to satisfy the field requirement.
- Description. A description of the fund. For example, you may want to include the purpose of the fund.
Creating a new budget
A budget is a finance record that describes the amount of money available for a fiscal year within a fund. You can create a current or planned budget for a fund from the fund details pane. To create a planned budget, one or more upcoming fiscal years must already be set up in the fiscal year series associated with the Ledger. See Creating a fiscal year for more information. Previous budgets for past fiscal years will also appear on the fund details pane.
- In the Search & filter pane, click Fund.
- Find the fund to which you want to add a budget and select it.
- In the fund details pane, in the Current budget or Planned budget section, click New.
- In the Current budget or Planned budget dialog, enter all the required information for the budget. For more information on the fields and actions available in this window, see the descriptions below.
- Click Save. The budget is saved.
- Fiscal year (required). For a current budget, this value is defaulted to the current fiscal year value. For a planned budget, select a future fiscal year from the drop-down list.
- Status (required). Select the status of the budget: Active, Closed, Frozen, Inactive, Planned. Active means the budget is open, Closed means the budget is closed, Frozen means the budget has been put on pause, Inactive means the fund is no longer in use, and Planned means the budget is assigned to a future fiscal year. Note: The budget must be active to successfully open an order or for an invoice to be approved and paid.
- Allowable expenditure percentage. The percentage of the budget balance allowed for expenditures. Leave this field blank to allow unrestricted expenditures. A value of 100 restricts expenditures to the available balance. A value greater than 100 allows expenditures beyond the available balance. A value of 0 restricts expenditures to 0.
- Allowable encumbrance percentage. The percentage of the budget balance allowed for encumbrances. Leave this field blank to allow unrestricted encumbrances. A value of 100 restricts encumbrances to the available balance. A value greater than 100 allows encumbrances beyond the available balance. A value of 0 restricts encumbrances to 0.
- Allocated (required). Enter a numeric value of money to initially allocate to the budget. Values with or without decimals are accepted (100 or 100.00). To create a budget without allocated money, enter a value of 0. Inputting a value of 0 doesn’t generate an allocation transaction. An initial allocation can be made after creating the budget. For more information, see Allocating money to a budget.
Adding expense classes to a budget
- Find the fund to which you want to add an expense class and select it.
- Click on the budget to access the Budget details window.
- In the Budget details window, click Actions > Edit.
- In the Expense classes section, click Add expense class.
- Select an expense class from the drop-down list. See Settings > Finance > Expense classes for more information about creating expense classes.
- Repeat steps 4 & 5 for all expense classes you wish to add.
- Click Save & close. A confirmation message appears and the expense class is saved.
Searching for a fiscal year, ledger, group or fund
You can search for fiscal years, ledgers, groups, or funds by clicking on either Fiscal year, Ledger, Group, or Fund in the Search & filter pane. To search for a fiscal year, ledger, group, or fund, enter your search terms into the box when you are in the Fiscal year, Ledger, Group, or Fund pane. Select the All drop-down list to search through one of the following fields:
- All. Searches through names, codes, and descriptions. For funds, this will also search the external account field. This is the default search.
- Name. The name of the fiscal year, ledger, group, or fund.
- Code. A unique identifier for the fiscal year, ledger, group, or fund.
- External account number. The identifier for this account in an external financial system. Appears only on the fund pane.
You can also search for fiscal year, ledger, group, or fund by selecting any of the filters in the Search & filter pane when in the appropriate Finance pane. The filters available vary depending on whether you are searching for a fiscal year, ledger, group, or fund. The following instructions are for searches in the Fund tab.
Ledger
To search for funds belonging to a certain ledger, follow these steps:
- In the Search & filter pane, click Ledger.
- Select the ledger from the drop-down list. The funds are listed in the results pane.
Status
To filter ledgers, groups, or funds by their status, select one of the following:
- Active. Ledger, group, or fund currently used by your library.
- Inactive. Ledger, group, or fund previously used by your library.
- Frozen. Ledger, group, or fund that is paused.
Type
To search for funds by type, follow these steps:
- In the Search & filter pane, click Type.
- Select the fund type from the drop-down list. The funds are listed in the result pane.
Group
To search for funds assigned to a group, follow these steps:
- In the Search & filter pane, click Group.
- Select the group from the drop-down list. The funds are listed in the result pane.
Acquisition units
To search for fiscal years, ledgers, groups, or funds assigned with a specific acquisition unit, follow these steps:
- In the Search & filter pane, click Acquisition units.
- Select the acquisition unit from the drop-down list. The search results appear in the Fiscal year, Ledger, Group, or Fund pane.
To search for funds assigned with specific tags, follow these steps:
- In the Search & filter pane, click Tags.
- Select the tag(s) from the drop-down list. Your results appear in the Fund pane.
Viewing fiscal year, ledger, group, fund, and budget details
The type of information displayed in your search results depends upon the type of search performed (fiscal year, ledger, group, or fund). That information can include:
- Name. The name of the fiscal year, ledger, group, or fund record.
- Code. A unique identifier for the fiscal year, ledger, group, or fund record.
- Description. The purpose of the fiscal year record.
- Status. Whether the fund is Active, Inactive, or Frozen.
- Ledger. The ledger associated with the fund.
In the search results, click any result to view it. The fiscal year, ledger, group, or fund details pane each display additional information, including financial summaries. Funds that have a budget for the fiscal year appear on the fiscal year details pane. Funds that have a budget for the current fiscal year appear on the ledger, or group details panes. Funds without any budgets created only appear in the fund search results pane.
Viewing fiscal year details
The fiscal year details pane contains fiscal year financial summary information and all ledgers, groups, and funds associated with a fiscal year.
- To view fiscal year details, find the fiscal year you want to view and select it. The fiscal year details pane appears.
The Fiscal year information section contains the following fields:
- Record last updated. Date and time when the record was last updated. Click Record last updated to see the next three fields.
- Source. Name of the user who last updated the record.
- Record created. Date and time when the record was created.
- Source. Name of the user who created the record.
- Name. Name of the fiscal year.
- Code. Code for the fiscal year.
- Period begin date. Date when the fiscal year begins.
- Period end date. Date when the fiscal year ends.
- Acquisition units. All acquisition units assigned to the fiscal year.
- Description. Description of the fiscal year.
Financial Summary
This section displays a table containing summary financial information for all fund budgets associated with the fiscal year.
Funding Information
- Initial allocation. The amount of the first allocation made to a budget, summarized for all fund budgets for the fiscal year.
- Total allocated. The sum of all allocation amounts across all fund budgets for the fiscal year (initial allocation plus increase in allocation minus decrease in allocation)
- Total funding. The Total allocated amount plus the Net transfers amount. Note: For the fiscal year summary, the net transfers amount is not displayed since the system only allows transfers between budgets within the same fiscal year. Net transfer amounts will only appear on the Ledger, Group, and Budget summary tables.
- Cash Balance. The Total funding amount minus the Expended amount.
Financial activity and overages
- Encumbered. The sum of all encumbrance transaction amounts against all fund budgets for the fiscal year.
- Awaiting Payment. The sum of all pending payment transaction amounts against all fund budgets for the fiscal year.
- Expended. The sum of all payment transaction amounts minus credit transaction amounts, against all fund budgets for the fiscal year.
- Unavailable. The total amount unavailable across all fund budgets for the fiscal year, calculated as the sum of the encumbered, awaiting payment, and expended amounts.
- Over encumbrance. The total amount encumbered minus the total funding amount for all fund budgets for the fiscal year.
- Over expended. The total amount expended minus the total funding amount for all fund budgets for the fiscal year.
- Available balance. Total amount available across all fund budgets for the fiscal year, calculated as Total funding amount minus the Unavailable amount.
Ledger
This section displays a table of all ledgers associated with the fiscal year. To sort by a column, click the column name. To view details about a ledger in the table, click anywhere in the ledger’s row.
The ledger table contains the following columns:
- Name. Name of the ledger.
- Code. Code for the ledger.
- Allocated. Total amount allocated across all funds with a budget for the fiscal year that are associated with the ledger.
- Unavailable. Total amount unavailable across all funds with a budget for the fiscal year that are associated with the ledger.
- Available. Total amount available across all funds with a budget for the fiscal year that are associated with the ledger.
Group
This section displays a table of all groups associated with the fiscal year. The table contains the same columns as the Ledger table.
Fund
This section displays a table of all funds associated with the fiscal year. The table contains the same columns as the Ledger table.
Viewing ledger details
The ledger details pane contains ledger financial summary information and all groups and funds associated with the ledger.
- To view ledger details, find the ledger you want to view and select it. The ledger details pane appears.
The Ledger information section contains the following fields:
- Record last updated. Date and time when the record was last updated. Click Record last updated to see the next three fields.
- Source. Name of the user who last updated the record.
- Record created. Date and time when the record was created.
- Source. Name of the user who created the record.
- Name. Name of the ledger.
- Code. Code for the ledger.
- Current fiscal year. The current fiscal year name. The system determines which fiscal year is current based on the current date and the period start and end dates for the fiscal year.
- Status. Status of the ledger: Active, Inactive, Frozen.
- Acquisition units. All acquisition units assigned to the ledger.
- Enforce all budget encumbrance limits. When checked, the system rejects any encumbrances against funds related to this ledger that would exceed the available amount of the current budget.
- Enforce all budget expenditure limits. When checked, the system rejects any expenditures against funds related to this ledger that would exceed the available amount of the current budget.
- Description. Description of the ledger.
Financial Summary
Funding Information
- Initial allocation. The amount of the first allocation made to a budget, summarized for all fund budgets for the ledger.
- Increase in allocation. The sum of all allocation transaction amounts, not including the initial allocations, made to all fund budgets for the ledger.
- Decrease in allocation. The sum of all allocation transaction amounts, not including the initial allocations, made from all fund budgets for the ledger.
- Total allocated. The sum of all allocation amounts across all fund budgets for the current fiscal year that are associated with the ledger (initial allocation plus increase in allocation minus decrease in allocation).
- Net transfers. Total net transfer amount for all fund budgets for the current fiscal year that are associated with the ledger.
- Total funding. The Total allocated amount plus the Net transfers amount.
- Cash Balance. The Total funding amount minus the Expended amount.
Financial activity and overages
- Encumbered. The sum of all encumbrance transaction amounts against all fund budgets for the ledger during the current fiscal year.
- Awaiting Payment. The sum of all pending payment transaction amounts against all fund budgets for the ledger during the current fiscal year.
- Expended. The sum of all payment transaction amounts minus credit transaction amounts against all fund budgets for the ledger during the current fiscal year.
- Unavailable. The total amount unavailable across all fund budgets for the ledger during the current fiscal year, calculated as the sum of the encumbered, awaiting payment, and expended amounts.
- Over encumbrance. The total amount encumbered minus the total funding amount for all fund budgets for the ledger during the current fiscal year.
- Over expended. The total amount expended minus the total funding amount for all fund budgets for the ledger during the current fiscal year.
- Available balance. Total amount available across all fund budgets for the ledger during the current fiscal year, calculated as Total funding amount minus the Unavailable amount.
Group
This section displays a table of all groups associated with the ledger. To sort by a column, click the column name. To view details about a group in the table, click anywhere in the group’s row.
The Group table contains the following columns:
- Name. Name of the group.
- Code. Code for the group.
- Allocated. Total amount allocated across all funds with a budget for the fiscal year that are associated with the group.
- Unavailable Total amount unavailable across all funds with a budget for the fiscal year that are associated with the group.
- Available. Total amount available across all funds with a budget for the fiscal year that are associated with the group.
Fund
This section displays a table of all funds associated with the ledger. The table contains the same columns as the Group table.
Fiscal year rollover error log
This section displays the list of rollover error logs. Click on the .csv file name to download the error log.
Exporting ledger funds and budgets
To export a file of budget information for funds associated with a ledger in comma-separated values (.csv) format, follow these steps:
In the Search & filter pane, use the search and filter options to select a ledger. Click on the ledger in the result table list.
In the ledger detail pane, click Actions and select,Export budget information (CSV).
In the Export settings dialog, the following message will display: “This export could take a few minutes. If you reload or close the page the export will not be completed. Once the file is ready it could take another minute for your browser to finish downloading the file. You can continue to work with finance records in a different browser tab if needed.”
Select the Fiscal year to export from the drop-down list.
Select the Expense classes to export from the drop-down list: All, Active, Inactive, None.
Click Export. The file downloads to your local download location and contains the following fields:
Ledger fund budgets export file fields list:
- Name (Fund)
- Code (Fund)
- Status (Fund)
- Type
- Group (Code)
- Acquisition unit
- Transfer from
- Transfer to
- External account number
- Description
- Name (Budget)
- Status (Budget)
- Allowable encumbrance
- Allowable expenditure
- Date created (Budget)
- Initial allocation
- Increase
- Decrease
- Total allocation
- Transfers
- Total Funding
- Encumbered (Budget)
- Awaiting payment (Budget)
- Expended (Budget)
- Unavailable
- Over encumbered
- Over expended
- Cash balance
- Available
- Name (Exp Class)
- Code (Exp Class)
- Status (Exp Class)
- Encumbered (Exp Class)
- Awaiting payment (Exp Class)
- Expended (Exp Class)
- Percentage of total expended
Viewing group details
The group details pane contains group financial summary information and lists all funds and expense classes associated with the group.
- To view group details, find the group you want to view and select it. The group details pane appears.
- Record last updated. Date and time when the record was last updated. Click Record last updated to see the next three fields.
- Source. Name of the user who last updated the record.
- Record created. Date and time when the record was created.
- Source. Name of the user who created the record.
- Name. Name of the group.
- Code. Code for the group.
- Fiscal year. Name of the twelve-month period your library uses to manage its finances. The current fiscal year displays as the default. Use the drop down list to select a different fiscal year. The financial summary information displays for the fiscal year selected.
- Status. Status of the group: Active, Inactive, Frozen.
- Acquisition units. All acquisition units assigned to the group.
- Description. Description of the group.
Financial Summary
Funding Information
- Initial allocation. The amount of the first allocation made to a budget, summarized for all fund budgets for the group.
- Increase in allocation. The sum of all allocation transaction amounts, not including the initial allocations, made to all fund budgets for the group.
- Decrease in allocation. The sum of all allocation transaction amounts, not including the initial allocations, made from all fund budgets for the group.
- Total Allocated. The sum of all allocated amounts across all fund budgets for the fiscal year selected that are associated with the group (initial allocation plus increase in allocation minus decrease in allocation).
- Net transfers. Total net transfer amount for all fund budgets for the fiscal year selected that are associated with the group.
- Total funding. The Total allocated amount plus the Net transfers amount.
- Cash Balance. The Total funding amount minus the Expended amount.
Financial activity and overages
- Encumbered. The sum of encumbrance transaction amounts against all fund budgets for the group during the fiscal year selected.
- Awaiting Payment. The sum of pending payment transaction amounts against all fund budgets for the group during the fiscal year selected.
- Expended. The sum of payment transaction amounts minus credit transaction amounts against all fund budgets for the group during the fiscal year selected.
- Unavailable Total amount unavailable across all fund budgets for the group during the fiscal year selected, calculated as the sum of the encumbered, awaiting payment, and expended amounts.
- Over encumbrance. The total amount encumbered minus the total funding amount for all fund budgets for the group during the current fiscal year.
- Over expended. The total amount expended minus the total funding amount for all fund budgets for the group during the current fiscal year.
- Available balance. Total amount available across all fund budgets for the group during the fiscal year selected, calculated as Total funding amount minus the Unavailable amount.
Fund
This section lists all funds assigned to the group. To assign the group to a fund that is not yet assigned to the group, follow these steps:
- Click Add to group in the fund accordion section.
- In the Select funds dialog, find the fund or multiple funds using the search box and/or filters.
- Click the fund(s) to select.
- Click Save. The funds are added to the group. The funds will display only if they have a budget allocated for the selected fiscal year.
To remove a fund from the group, click on the X at the end of the fund row in the Fund accordion table list.
The Fund table contains the following columns:
- Name. Name of the fund.
- Code. Code for the fund.
- Allocated. Total amount allocated across all funds with a budget for the fiscal year that are associated with the group.
- Unavailable. Total amount unavailable across all funds with a budget for the fiscal year that are associated with the group.
- Available. Total amount available across all funds with a budget for the fiscal year that are associated with the group.
Expense classes
This section lists all expense classes associated with funds assigned to the group. The Expense classes table contains the following columns:
- Expense class. Name of the expense class, a fiscal entity used to track transactions against a specific purpose or function within a fund.
- Encumbered. Total amount encumbered for the expense class.
- Awaiting payment. Total amount awaiting payment for the expense class.
- Expended. Total amount expended for the expense class.
- Percent of total expended. Total amount expended for the expense class as a percentage of total expended from across all expense classes for funds in the group.
Viewing fund details
The fund details pane contains fund information and all current, planned, and previous budgets as well as expense classes associated with a fund. The budget sections in the pane display total allocated, net transfers, unavailable, and available for the budget. The expense class detail is further broken down by encumbered, awaiting payment, expnded, and percent of total expended. To view a list of transactions for the current budget of a fund, click Actions > View transactions for current budget. See Viewing budget transactions for more information.
- To view fund details, find the fund you want to view and select it. The fund details pane appears.
The Fund information section contains details about the fund. For descriptions of each field in this section, see Fund information. In addition to the fields that are available during fund creation, the fund detail pane displays the fund Currency. The fund currency value is set to the currency value from Settings > Tenant > Language and localization. Note that when an order is opened, the system creates an encumbrance transaction on the current budget for the fund selected in the fund distribution section of the order. If the currency of the PO line is different than the budget currency, the encumbrance will display on the budget as a converted amount. The budget currency is set to the Tenant currency value at the time the Finance > Fiscal year record is created; therefore, if the Tenant currency value is updated, any budgets created prior to the update will still operate based on the Tenant currency that existed when the Fiscal year associated with the budget was created.
Current budget
This section contains a table of information about the current budget, if one exists. The current year is based on the fiscal year period and the current date/time.
Current expense classes
This section contains a table of information about expenses classes assigned to the current budget, if applicable.
Planned budget
This section contains a table of any future budgets, if any exist. An upcoming fiscal year must be created prior to creating a planned budget. See Creating a fiscal year. To create a new planned budget, click New. See Creating a new budget for more information.
Previous budget
This section contains a table of all budgets from fiscal years prior to the current fiscal year, if any exist.
Viewing budget details
The budget details window contains a summary of the budget, including funding information and financial activity and overages, and budget information.
To view budget details, follow these steps:
- Find the fund with the budget you want to view and select it.
- In the fund details pane, in the Current budget, Planned budget, or Previous budget sections, click the budget Name. The budget details window appears.
Budget summary
The Budget summary section contains the following fields:
- Record last updated. Date and time when the record was last updated. Click Record last updated to see the next three fields.
- Source. Name of the user who last updated the record.
- Record created. Date and time when the record was created.
- Source. Name of the user who created the record.
Funding Information
- Initial Allocation. The amount of the first allocation made to the budget.
- Increase in allocation. The sum of all allocation transaction amounts, not including the initial allocations, made to the budget.
- Decrease in allocation. The sum of all allocation transaction amounts, not including the initial allocations, made from the budget.
- Total Allocated. The sum of all allocated amounts for the budget (initial allocation plus increase in allocation minus decrease in allocation).
- Net transfers. Total net transfer amount for the budget.
- Total funding. The Total allocated amount plus the Net transfers amount.
- Cash Balance. The Total funding amount minus the Expended amount.
Financial activity and overages
- Encumbered. The sum of all encumbrance transaction amounts against the budget.
- Awaiting Payment. The sum of pending payment transaction amounts against the budget.
- Expended. The sum of payment transaction amounts minus credit transaction amounts against the budget.
- Unavailable The total amount unavailable for the budget, calculated as the sum of the encumbered, awaiting payment, and expended amounts.
- Available balance. Total amount available for the budget, calculated as Total funding amount minus the Unavailable amount.
The Budget information section contains the following fields:
- Name. Budget name. The structure of this name is the fund code, followed by a hyphen and the fiscal year code, e.g. ACCOUNTING-FY2021.
- Status. Status of the ledger: Active, Closed, Frozen, Inactive, or Planned.
- Fiscal start. Fiscal year start date.
- Fiscal end. Fiscal year end date.
- Allowable expenditure. Expenditure allowed, expressed as a percentage.
- Allowable encumbrance. Encumbrance allowed, expressed as a percentage.
- Transactions. Click View transactions to view budget transactions. See Viewing budget transactions for more information.
Editing a budget
- Find the budget you want to edit and select it.
- In the Budget details window, click Actions > Edit.
- Edit the budget.
- Click Save & close. A confirmation message appears and the budget is updated.
Allocating money to a budget
Use the Actions menu to allocate money to a budget. You can Increase allocation, Decrease allocation, or Move allocation.
Increasing allocation to a fund budget
- Find the budget to which you want to allocate money and select it.
- In the Budget details window, click Actions > Increase allocation.
- In the Increase allocation dialog, enter the following information:
- Fund. The name of the fund to which you want to increase an allocation of money. This field displays the fund name and code for the budget you selected and is not editable. The display format is Fund name (fund code).
- Amount (required). Enter an amount as a numeric value. Values with or without decimals are accepted (100 or 100.00). The amount must be a positive number.
- Tags. Enter or select any tags from the drop-down list to apply to the allocation transaction.
- Description. Enter a description of the allocation increase.
- Click Confirm. A confirmation message appears and the increase allocation transaction is complete.
Decreasing allocation to a fund budget
- Find the budget to which you want to submit a decreased allocation and select it.
- In the Budget details window, click Actions > Decrease allocation.
- In the Decrease allocation dialog, enter the following information:
- Fund. The name of the fund to which you want to submit a decreased allocation of money. This field displays the fund name and code for the budget you selected and is not editable. The display format is Fund name (fund code).
- Amount (required). Enter an amount as a numeric value. Values with or without decimals are accepted (100 or 100.00). The amount must be a positive number.
- Tags. Enter or select any tags from the drop-down list to apply to the decrease allocation transaction.
- Description. Enter a description of the allocation decrease.
- Click Confirm. A confirmation message appears and the decrease allocation transaction is complete.
Moving allocation to another fund budget
Use the Move allocation action to move money between current fiscal year budgets as allocation transactions. Allocated amounts can be included in the next fiscal year allocation amount for a fund, depending on your fiscal year rollover settings . See Transferring money between funds for information about transfers to determine whether you want to move money using Move allocation or Transfer.
- Find the budget to which you want to move an allocation and select it.
- In the Budget details window, click Actions > Move allocation.
- In the Move allocation dialog, enter the following information:
- From (required). Select the fund from which you want to allocate money. The display format is Fund name (fund code).
- To (required). Select the name of the fund to which you want to allocate money. This field displays the fund name (code) with which this budget is associated. You must populate either From or To with the fund for the budget you are currently viewing.
- Amount (required). Enter an amount as a numeric value. Values with or without decimals are accepted (100 or 100.00). The amount must be a positive number.
- Tags. Enter or select any tags from the drop-down list to apply to the decrease allocation transaction.
- Description. Enter a description of the allocation move.
- Click Confirm. A confirmation message appears and the decrease allocation transaction is complete.
Transferring money between funds
You can transfer money between the current fiscal year budgets of two funds. This action is only allowed if both the From and To funds have current fiscal year budgets. Transfers are a one-time movement of money within a fiscal year. Fiscal year rollover will not consider transfer amounts in the initial allocation amounts for new budgets.
- Find the budget to which you want to transfer money and select it.
- In the budget details window, click Actions > Transfer.
- In the Transfer dialog, enter the following information:
- From (required). Select the fund from which you want to transfer money.
- To (required). Select the fund to which you want to transfer money. This field displays the fund name (code) with which this budget is associated. You must populate either From or To with the fund for the budget you are currently viewing.
- Amount (required). Enter an amount as a numeric value. Values with or without decimals are accepted (100 or 100.00). Negative values are accepted.
- Tags. Enter or select any tags from the drop-down list you would like to apply to the transfer transaction.
- Description. Enter a description of the transfer.
- Click Confirm. A confirmation message appears and the transfer transaction is complete.
Deleting a budget
Note: Financial structure records cannot be deleted if they have other records assigned to them. Budgets cannot be deleted once they have any type of transaction other than allocation transactions against them.
- Find the budget you want to delete and select it.
- In the Budget details window, click Actions > Delete.
- Click Delete in the confirmation window. A confirmation message appears and the budget is deleted.
Viewing transactions for a current budget
There are two methods to view a list of all transactions for a budget:
- From a fund: Find the fund for which you want to view transactions and select it to open the fund details pane. Click Actions > View transactions for current budget.
- From a budget: Find the budget for which you want to view transactions and select it. In the Budget details window, under Transactions, click View transactions. The budget transactions window opens listing all transactions.
Searching for budget transactions
To search budget transactions, follow these steps:
- To search budget transactions by amount, in the Transactions window Search & Filter pane, enter a numeric value into the search box and click Search. A list of transactions containing the amount value entered is returned.
- You may filter results by Type, Source, Source POL number, Source invoice number, Tags, or Expense class. See below for more information on the filters. Your results display in the Transactions pane.
Type
To filter transactions by Type, select one or more of the following:
- Allocation. Filter transactions by type of Allocation. This includes initial allocations, as well as increases, decreases, and movements of allocations to the budget.
- Credit. Filter transactions by type of Credit. Credit transactions are produced by paid invoices with negative totals.
- Encumbrance. Filter transactions by type of Encumbrance. Encumbrance transactions are created on open orders based on the fund distribution(s) on the corresponding purchase order line (POL).
- Payment. Filter transactions by type of Payment. Payment transactions are produced by paid invoices with positive totals.
- Pending payment. Filter transactions by type of Pending payment. Pending payment transactions are produced by approved invoices.
- Rollover transfer. Filter transactions by type of Rollover transfer. Rollover transfer transactions are the result of fiscal year rollover operations when a previous fiscal year’s surplus funds are rolled over to the new fiscal year budget as a transfer.
- Transfer. Filter transactions by type of Transfer. Transfer transactions result from the transfer of funds between budgets in a given fiscal year.
Source
To filter transactions by Source, select one of the following:
- Fiscal year. Transactions generated during the fiscal year rollover process. For example, automated allocations during fiscal year rollover, as defined in Rollover fiscal year settings.
- Invoice. Transactions generated through invoicing, specifically transaction types of Credit, Payment, and Pending payment.
- PO line Transactions generated from a PO line, specifically Encumbrance transaction types.
- User. Transactions created by a user through the fund action menu, specifically Allocation and Transfer transaction types.
Source POL number
To filter transactions by the Source POL number, follow these steps:
- In the Search & filter pane, click Source POL number.
- Begin typing the POL number and select from the drop-down list. Your result appears in the Transactions pane.
Source invoice number
To filter transactions by the Source invoice number, follow these steps:
- In the Search & filter pane, click Source invoice number.
- Begin typing the invoice number and select from the drop-down list. Your result appears in the Transactions pane.
To filter for transactions assigned with specific tags, follow these steps:
- In the Search & filter pane, click Tags.
- Select the tag(s) from the drop-down list. Your results appear in the Transactions pane.
Expense class
To filter transactions by expense class, follow these steps:
- In the Search & filter pane, click Expense class.
- Select an expense class from the drop-down list. Your results appear in the Transactions pane.
Once you view budget transactions, the following columns appear in the Transactions pane search results table. Click the column name to sort by that column.
- Transaction date. Date of the transaction.
- Type. Transaction type: Allocation, Credit, Encumbrance, Payment, Pending Payment, Rollover transfer, or Transfer.
- Amount. Amount for the transaction. Negative values are in parentheses.
- From. Fund code of the fund from which a transfer was made into the budget.
- To. Fund code of the fund to which a transfer was made from the budget.
- Source. Fiscal year, Invoice, PO Line, or User.
- Tags. Any tags associated with the transaction.
To view additional information about a transaction, click the transaction row in the table to open a detail pane. Each transaction type displays a different set of fields relevant to that type. See information below about the fields that display for each type.
Viewing allocation transactions
- Record last updated. Date and time when the record was last updated. Click Record last updated to see the next three fields.
- Source. Name of the user who last updated the record.
- Record created. Date and time when the record was created.
- Source. Name of the user who created the record.
- Transaction date. Date and time of the transaction.
- Fiscal year. The fiscal year for the budget.
- Amount. Amount of the transaction. Negative values are in parentheses.
- Source. Fiscal year or User.
- Type. Transaction type: Allocation.
- From. Fund name and fund code from which the allocation was made into this budget, if applicable. See Allocating money to a budget for more information.
- To. Fund name and fund code of this budget to which the allocation was made.
- Expense class. This field will be blank for allocation transactions since expense class designations for allocations aren’t supported by the system.
- Tags. Any tags associated with the transaction.
- Description. A description entered by the user when Allocating money to a budget.
Viewing credit transactions
The credit transaction detail pane contains many of the same fields as the allocation detail pane. Some fields are populated differently for credit transactions:
- Source. Invoice number or identifier that generated this credit transaction. Click on the invoice identifier to open the Invoices app invoice detail pane for that invoice.
- Type. Transaction type: Credit.
- From. This field will be blank for credit transactions.
- To. Fund name and fund code of this budget to which the credit was made.
- Description. This field is blank for credit transactions.
Viewing encumbrance transactions
When an order containing a PO Line with a fund distribution is opened, an Encumbrance transaction against the current fiscal year budget for the fund is created. The encumbrance transaction detail pane contains many of the same fields as the allocation detail pane. Some fields are populated differently for encumbrance transactions:
- Source. Purchase order line (PO Line) number that generated this encumbrance transaction. Click on the POL number to open the Orders app PO Line detail pane for that order line.
- Type. Transaction type: Encumbrance.
- From. Fund name and code for this budget to which this encumbrance was applied.
- To. This field will be blank for encumbrance transactions.
- Expense class. The expense class assigned to this encumbrance transaction.
- Initial encumbrance. The amount originally encumbered by the related PO Line; the estimated price value.
- Awaiting payment. The amount awaiting payment. This amount is populated after an invoice for the related PO Line is approved.
- Expended. The amount expended. This amount is populated after an invoice for the related PO Line is paid.
- Status. The status of this encumbrance: Unreleased or Released. The encumbrance can be released manually by the user or automatically by the system upon payment of an invoice.
- Description. This field will be blank for encumbrance transactions.
Releasing encumbrances manually
If you need to unencumber an order, this action is available from the transaction detail on the encumbered budget. This may be needed to manage charges related to ongoing orders. To release an encumbrance the user must have the Finance: Manually release encumbrance permission assigned.
To release an encumbrance, follow these steps:
- Find the transaction list for the encumbered budget. See Viewing transactions for a current budget for more information.
- Select the encumbrance transaction from the result list.
- On the encumbrance detail pane, click Release encumbrance.
- In the confirmation window, click Confirm for the message “Are you sure you want to release this encumbrance?” Any remaining amount will be added back to the budget.
- The encumbrance is released. The amount is restored to the budget and the status value on the encumbrance detail pane changes from Unreleased to Released.
Viewing payment transactions
When an invoice is paid, the existing Pending payment transaction record type value is updated from type Pending payment to type Payment. The payment transaction detail pane contains many of the same fields as the allocation detail pane. Some fields are populated differently for payment transactions:
- Source. Invoice number or identifier that generated this payment transaction. Click on the invoice identifier to open the Invoices app invoice detail pane for that invoice.
- Type. Transaction type: Payment.
- From. Fund name and code for this budget to which this payment was applied.
- To. This field will be blank for payment transactions.
- Description. This field will be blank for payment transactions.
Viewing pending payment transactions
When an invoice is approved, a Pending payment type transaction record is created for the fund’s current fiscal year budget. The original encumbrance transaction record for a related PO Line will persist on the transaction list for the budget. The amount value of the encumbrance transaction is updated when an invoice is approved since approval of the invoice releases the pending payment amount of the encumbrance. Once an invoice is paid, the transaction’s type value is changed from Pending payment to Payment. The pending payment transaction detail pane the same fields as the payment transaction detail pane.
Viewing rollover transfer transactions
The fiscal year rollover process creates transfer transactions if the rollover settings are defined to create transfers to new fiscal year budgets.
Viewing transfer transactions
When a transfer of money is made between two funds, a Transfer transaction is created. The transfer transaction detail pane contains many of the same fields as the allocation detail pane. Some fields are populated differently for transfer transactions:
- Source. Set to User for transfer transactions.
- Type. Transaction type: Transfer.
- From. Fund name and fund code from which the transfer was made into this budget.
- To. Fund name and fund code of this budget to which the transfer was made.
- Description. A description added by the user during the transfer.
Editing a fiscal year, ledger, group, fund, or budget records
- In the Search & filter pane, click the appropriate option: Fiscal year, Ledger, Group, or Fund.
- In the corresponding pane, select the record you want to edit.
- In the corresponding details pane, click Actions > Edit.
- Make your desired changes.
- Click Save & close. The record is saved and updated. Note: if another user edited and saved the same record while you were editing, the following message appears: “This record cannot be saved because it is not the most recent version. View latest version.” Click on the hyperlink text “View latest version” to refresh the record and repeat steps 3-5 above to successfully edit.
Deleting a fiscal year, ledger, group, or fund
Note: Financial structure records cannot be deleted if they have other records assigned to them.
- In the Search & filter pane, click the appropriate option: Fiscal year, Ledger, Group, or Fund.
- In the corresponding pane, select the record you want to edit.
- In the corresponding details pane, click Actions > Delete.
- In the Delete record dialog, click Delete. A confirmation message appears and the record is deleted.
Rollover fiscal year
Fiscal year rollover is initiated from the ledger detail pane. This process can close current fiscal year budgets, create upcoming fiscal year budgets with or without allocated funds based on fund type, and roll encumbrances onto new fiscal year budgets based on order type (one-time, ongoing, and ongoing subscription). This action is applied only to the funds associated with the ledger, so rollover must be run separately for each ledger.
Note: Prior to running the fiscal year rollover process, it is recommended to do the following:
- Review open orders to determine if the Re-encumber check box is selected where desired.
- Review and resolve approved invoices.
- Run at least one test of rollover to identify any remaining unpaid invoices and to view the rollover log prior to running the actual rollover.
To run a test of fiscal year rollover, follow these steps:
- In the Search & filter pane, click Ledger.
- Use the search and filter tools, if needed, to find the ledger to rollover.
- In the ledger results pane, select the name of the ledger to rollover.
- The ledger detail pane will open. Open the Action menu and select Rollover.
- In the Rollover window, complete the form to indicate your preferences for rollover settings. For more information on the fields on the rollover screen, see the descriptions below.
- Click the Test rollover button to initiate a test of fiscal year rollover for this ledger.
- If any unpaid invoices exist, a dialog window displays, “FOLIO has found invoices that are not yet paid or canceled. If you are sure you want to continue with rollover click continue.” A table list of invoices displays the following information:
- Vendor invoice number.
- Vendor.
- Invoice date.
- Status.
- Total amount (system)
- Click Cancel to exit the dialog list without proceeding with the rollover test, click Export list to download a .csv file list unpaid invoices, or click Continue to proceed with the rollover test.
9 After continuing, a dialog displays “Please confirm that you have completed the necessary details and are ready to proceed with your rollover TEST. This process may take several minutes to complete. A link to the results will be sent to [user email address] when the process is complete.”
- Click Confirm. A green toast message indicates that the rollover test started successfully and focus returns to the three pane layout for the ledger. A confirmation email is sent to the user’s email address.
- To view the test rollover results in the log, open the Actions menu and select Rollover logs.
To run fiscal year rollover, follow these steps:
- In the Search & filter pane, click Ledger.
- Use the search and filter tools, if needed, to find the ledger to rollover.
- In the ledger results pane, select the name of the ledger to rollover.
- The ledger detail pane will open. Open the Action menu and select Rollover.
- In the Rollover window, complete the form to indicate your preferences for rollover settings. For more information on the fields on the rollover screen, see the descriptions below.
- Click the Rollover button to initiate a test of fiscal year rollover for this ledger.
- If any unpaid invoices exist, a dialog window displays, “FOLIO has found invoices that are not yet paid or canceled. If you are sure you want to continue with rollover click continue.” A table list of invoices displays the following information:
- Vendor invoice number.
- Vendor.
- Invoice date.
- Status.
- Total amount (system)
- Click Cancel to exit the dialog list without proceeding with the rollover test, click Export list to download a .csv file list unpaid invoices, or click Continue to proceed with the rollover.
9 After continuing, a dialog displays “Please confirm that you have completed the necessary details and are ready to proceed with your rollover. This process may take several minutes to complete. A link to the results will be sent to [user email address] when the process is complete.”
- Click Confirm. A green toast message indicates that the rollover started successfully and focus returns to the three pane layout for the ledger. A confirmation email is sent to the user’s email address.
- To view the rollover results in the log, open the Actions menu and select Rollover logs.
When you select the Rollover action, the system displays the current year for the ledger at the top left of the rollover form. The current year is based on the fiscal year period and the current date/time.
If your institution runs rollover before or after the fiscal year end date, you’ll need to return to the fiscal year tab and adjust the dates of both the fiscal year you are rolling from and the upcoming fiscal year such that the current date now fits into the fiscal year you are rolling from. Remember to readjust the fiscal year dates back to the actual fiscal year dates after rollover is complete. See Editing a fiscal year, ledger, group, fund, or budget records for more information.
- Period begin date. The fiscal year begin date for the Fiscal year selected. See Creating a fiscal year for more information about period dates.
- Period end date. The Fiscal Year end date for the Fiscal year selected. Note: The Period end date must be greater than the current date to initiate rollover from the current year to an upcoming year.
- Fiscal year. Select the next fiscal year. If the next fiscal year has not yet been set up, click New fiscal year to create one. See Creating a fiscal year for more information.
- Enforce all budget encumbrance limits. This box is checked by default. Leave this box checked if you want the system to reject any encumbrances that would exceed the available amount. For example, if your institution typically doesn’t rollover allocations and adds initial allocation amounts manually after rollover, you might want to uncheck this box to allow current year encumbrances to be applied to the upcoming year budgets that are awaiting initial allocations.
- Enforce all budget expenditure limits. This box is checked by default. Uncheck this box to allow expenditures to rollover even if the new budget has insufficient funds allocated.
- Close all current budgets. This checkbox is selected by default and indicates that you want to close all the current fiscal year budgets as part of this rollover. Uncheck this box if you wish to leave the budget active if you must pay future invoices against past fiscal years.
Rollover budgets
The information in this section defines rollover behavior for budgets by fund type. For more information about creating fund types, see Settings > Finance > Fund types. For each fund type listed, select the appropriate settings for each of the fields defined below. These settings will be applied to all upcoming fiscal year budgets of that fund type. If a fund does not have a fund type assigned, it will be listed under No fund type.
- Rollover allocation. Check this box if you want the upcoming fiscal year budget initial allocation amount to equal the current fiscal year budget total allocation amount.
- Adjust allocation, %. The percentage amount to be applied to the current fiscal year budget total allocation amount to set the upcoming fiscal year’s budget initial allocation amount. For example, if the current budget total allocation is $1000 and you enter two percent, the upcoming budget initial allocation value is set to $1020.
- Rollover budget value. Select which value from the current fiscal year budget to roll over to the new fiscal year budget, if your library allows the rollover of surplus funds: Select None to ignore the current fiscal year budget values, Available to use the available amount, and Cash balance to use the remaining cash balance which is the total funding amount minus the total expended amount. See Viewing budget details for a full description of the Available and Cash balance values.
- Rollover value as. Indicates whether any available amounts that are rolled over should be categorized as a Transfer or an Allocation.
- Set allowances. Check this box to activate the Allowed encumbrance, %. and Allowed expenditure, %. fields.
- Allowed encumbrance, %. The percentage amount to be applied to the upcoming fiscal year’s budget allocated amount to calculate allowed encumbrances against funds of this fund type. To allow all encumbrances with no limit, leave this field blank. For example, if the budget’s total allocated amount is $1000 and you set an Allowed encumbrance, % of 110 percent, the system will allow payment of invoices up to $1100. Similarly, a value of 90 percent will limit expenditures to $900. Note: You can only enter a value in this field if the Set allowances checkbox is checked.
- Allowed expenditure, %. The percentage amount to be applied to the upcoming budget’s allocated amount to calculate allowed expenditures against funds of this fund type. To allow all expenditures with no limit, leave this field blank. For example, if the budget’s total allocated amount is $1000 and you set an Allowed expenditure, % of 110 percent, the system will allow payment of invoices up to $1100. Similarly, a value of 90 percent will limit expenditures to $900. Note: You can only enter a value in this field if the Set allowances checkbox is checked.
Rollover encumbrances
The information in this section defines rollover behavior for encumbrances by order type: one-time, ongoing, or ongoing-subscription. An order is considered an ongoing-subscription if the order type is Ongoing and the Subscription checkbox is checked. See Orders > Creating an ongoing order > Ongoing order information for more information about the subscription checkbox. An open order must have the Re-encumber checkbox activated to be eligible for fiscal year rollover. For each order type listed, select the appropriate settings for each of the fields defined below:
- Rollover. Check this box if you want encumbrances for open orders of this type of order to rollover to the upcoming fiscal year budget associated with each order. Checking this box will activate the Based on and Increase by, % fields.
- Based on. From the drop down list, select Expended to encumber the total amount that was expended during the current fiscal year. Select Initial encumbrance to encumber the purchase order line estimated price. Select Remaining to encumber the amount that has not yet been paid.
- Increase by, %. Enter a value if you want to increase the encumbrance amount by a defined percentage.
Viewing rollover log results
Rollover logs and results are available for each rollover event. To view rollover log results, follow these steps:
- In the Search & filter pane, click Ledger.
- Use the search and filter tools, if needed, to find the ledger for which to view rollover log results.
- In the ledger results pane, select the name of the ledger.
- The ledger detail pane will open. Open the Action menu and select Rollover logs.
- The rollover log window opens containing a search and filter pane on the left and a table list of rollover logs on the right that displays the following information:
- Start time. Date and time at which rollover or rollover test was initiated.
- End time. Date and time at which rollover or rollover test was completed.
- Status. Status of the rollover or rollover test: In progress, Successful, Failed.
- Errors. If errors exist, a file name in format ‘mm/dd/yyyyy-error’ displays. Click on the file name to download a .csv file containing error information.
- Results. If rollover completes successfully, a file name in format ‘mm/dd/yyyyy-result’ displays. Click on the file name to download a .csv file containing results information. See Rollover log results file below for the list of fields in the file.
- Settings. A file name in format ‘mm/dd/yyyyy-settings’ displays. Click on the file name to download view a screen capture of the settings in place for the rollover or rollover test.
- Source. The name of the process that created the rollover log: Rollover or Rollover test.
Rollover log results file
The following fields are included in the downloadable rollover log results file:
- Name (Fund)
- Code (Fund)
- Status (Fund)
- Type
- Group (Code)
- Acquisition unit
- Transfer from
- Transfer to
- External account number
- Description
- Name (Budget)
- Status (Budget)
- Allowable encumbrance
- Allowable expenditure
- Initial allocation
- Increase
- Decrease
- Total allocation
- Transfers
- Total Funding
- Encumbered (Budget)
- Awaiting payment (Budget)
- Expended (Budget)
- Unavailable
- Over encumbered
- Over expended
- Cash balance
- Available
- Name (Exp Class)
- Code (Exp Class)
- Status (Exp Class)
- Encumbered (Exp Class)
- Awaiting payment (Exp Class)
- Expended (Exp Class)
- Percentage of total expended
Filtering the rollover log table list
To filter the rollover log table list using the Search & filter pane, apply one of the following filters:
- Start time. Date and time at which rollover or rollover test was initiated. Enter a start from and to date/times and click Apply to filter log results to a start date/time range.
- End time. Date and time at which rollover or rollover test was completed. Enter from and to date/times and click Apply to filter log results to an end date/time range.
- Status. Status of the rollover or rollover test: In progress, Successful, Failed.
- Source. The name of the process that created the rollover log: Rollover or Rollover test.
6.2 - Invoices
The Invoices app allows you to manage payments and credits for the materials that your library has acquired. You can also search for and edit existing invoices as needed.
Definitions of terms used in the Invoices app:
- Accounting code. The code used by your library in your payment system in reference to an organization.
- Acquisition unit. An additional layer you can add to acquisitions records that restricts a user’s ability to interact with those records unless they have been assigned to that unit. Units are defined and determined by your library in the Settings app. See Settings > Acquisition units for more information.
- Adjustments. Charges added to an invoice in addition to the materials ordered. Shipping costs and taxes represent common adjustments.
- Batch group. Groups that process their invoices together. Invoices from the same library are generally processed together.
- Funds. A fiscal entity used to track transactions against a general purpose or function within a ledger.
- Invoice lines. The individual line items being paid for within each invoice. Each line consists of a description of the materials being paid for, the costs incurred, the fund responsible for payment, and a vendor reference number. Invoices are primarily a sum of the information from these lines.
- Organizations. Any institution with which your library interacts. An organization may or may not be an institution from which you purchase materials.
- Vendor. Any institution from which your library purchases materials.
- Vendor invoice number. The number provided by the vendor for this invoice.
- Voucher number. A number generated by the system to identify the payment request, which may be exported from FOLIO to an external financial system.
Permissions
The permissions listed below allow you to interact with the Invoices app and determine what you can and cannot do within the app. You can assign permissions to users in the Users app. If none of these permissions are assigned to a user, they are unable to see the Invoices app or any related information.
The following are all the Invoices permissions:
- Invoice: Approve invoices. This permission allows the user to approve invoices.
- Invoice: Assign acquisition units to new record. This permission allows the user to assign acquisition units to new invoices.
- Invoice: Can view and edit invoices and invoice lines. This permission allows the user to view and edit invoices and invoice lines.
- Invoice: Can view invoices and invoice lines. This permission allows the user to view invoices and invoice lines.
- Invoice: Can view, edit and create new invoices and invoice lines. This permission allows the user to view, edit, and create new invoices and invoice lines.
- Invoice: Can view, edit and delete invoices and invoice lines. This permission allows the user to view, edit, and delete invoices and invoice lines.
- Invoice: Cancel invoices. This permission allows users to cancel invoices.
- Invoice: Download batch file from invoice record. This permission allows users to download the batch voucher file from an invoice record.
- Invoice: Export search results. This permission allows the user to export a file containing invoice information for a set of invoices.
- Invoice: Manage acquisition units. This permission allows the user to change the assignment of acquisition units for an invoice.
- Invoice: Pay Invoices. This permission allows the user to approve invoices for payment.
- Invoice: Pay invoices in a different fiscal year. This permission allows the user to view a dropdown menu on the invoice record and select a current or previous fiscal year code to apply to the invoice record.
- Invoice: Voucher export. This permission allows the user to run the voucher export from the Invoices app Actions menu.
Keyboard shortcuts
Keyboard shortcuts allow you to perform actions using the keyboard in this app. See Platform essentials > Keyboard shortcuts for more information.
Creating an invoice
Invoices contain a list of the payments due for materials acquired by your library from vendors.
- In the Invoices pane, click Actions > New.
- In the Create vendor invoice window, fill in the Invoice information, Adjustments, Vendor information, Extended information, and Links & documents sections. For more information on the fields and actions available in these sections, see the section descriptions below.
- Once you have included all of the information you want about the invoice, click Save & close. Note: If the user has entered an invoice number for a vendor that matches an already existing invoice number with the same invoice date and vendor assigned, a popup window will appear with the message, “This appears to be a duplicate invoice.” The popup window will include information about and a link to the other invoice. Click Submit to continue to create the invoice or Cancel to return to the Create invoice pane.
- The invoice is saved and added to the Invoices pane.
This section contains invoice header information. Invoice date, Status, and Batch group are the only required fields in this section.
- Invoice date (required). The vendor invoice date.
- Fiscal year. A dropdown menu containing all past and current fiscal year codes, in descending order by fiscal year begin date. This field will only appear to users with the permission, Invoice: Pay invoices in a different fiscal year. Otherwise the current fiscal year will be the default selection. When attempting to process an invoice against a previous fiscal year, the invoice must fall within the current transaction restrictions of the budget, e.g the budget must be active and have sufficient funds to complete the transaction.
- Status (required). The status of the invoice. The default status for a new invoice is “Open.” “Reviewed” is also available in the drop down list. An invoice can be approved and paid from either status.
- Payment due. The date when invoice payment is due.
- Terms. The additional terms associated with the invoice, such as business or contractual terms.
- Approval date. The date a user approved the invoice for payment. This date will be generated by the system after the invoice is created and approved.
- Approved by. The user who approved the invoice. The user name will display after the invoice is created and approved.
- Acquisition units. The acquisition unit(s) assigned to the invoice. For more information see Settings > Acquisition units.
- Bill to. In the Bill to drop-down list, select the billing address for the invoice. Once you select an address, the billing address appears under Address. Addresses are configured in the Settings app. For more information, see Settings > Tenant > Addresses.
- Batch group (required). The batch group with which the invoice voucher will be grouped for voucher export. Invoices from the same library are generally processed together. Batch groups are configured in Settings > Invoices > Batch groups. For more information about batch voucher exports, see Exporting vouchers.
- Sub-total. The sub-total of the invoice calculated as the sum of the sub-total values of all invoice lines. The system will generate this amount after the invoice is created and invoice lines are assigned.
- Total adjustments. The total adjustments to the invoice calculated as the sum of all adjustments on the invoice and all invoice lines. The system will generate this amount after the invoice is created.
- Calculated total amount. The total amount of the invoice calculated as the sum of the Sub-total value and the Total adjustments value. The system will generate this amount after the invoice is created. If this value is negative, a credit transaction will be recorded.
- Lock total Check this box to indicate that you want to enter a total amount. Leave this box unchecked if you want the system to calculate the total amount based on the invoice line amounts.
- Lock total amount. The total expenditure for the invoice. This field is editable only if the Lock total checkbox is checked. If you enter a lock total amount, all invoice lines and adjustment values must equal this lock total amount before a user can approve the invoice.
- Note. Any additional comments relevant to the invoice.
Adjustments
Adjustments are optional and defined costs attached to an invoice beyond the items acquired. Shipping rates, taxes, and exchange rates represent common adjustments. You can either select one or more preset adjustments from the drop-down menu or create new adjustments.
To create preset adjustments, see Settings > Invoices > Adjustments for more information.
Selecting a preset adjustment
Select a preset adjustment from the drop down list and click Add adjustment.
- Description (required). Describes the adjustment.
- Value (required). The amount of the adjustment. A hyphen preceding the amount renders this a negative value and may be used to credit that amount to the specified fund(s).
- Type. Select a currency or a percentage. Note: This choice applies to the amount you entered in Amount.
- Pro rate (required). Select the method by which the adjustment should be proportionally distributed: By line, By amount, By quantity, or Not prorated. By line will distribute the adjustment equally across all lines regardless of the quantity on each line; By amount will distribute the adjustment across all line proportionally based on each line amount; By quantity will distribute based on quantity. For example, if there are two invoice lines and the first has a quantity of “1” and the second line has a quantity of “2”, a By quantity adjustment of $3.00 will apply $1.00 to line one and $2.00 to line two. Not Prorated will apply the adjustment at the invoice level rather than to each line. If this option is selected, an “Add fund distribution” button will appear. Click “Add fund distribution” to define the fund to which this adjustment should be applied.
- Relation to total (required). Defines how this adjustment should be applied in relation to the invoice total. Select one: In addition to, Included in, or Separate from. Note: Adjustments that are created with a Relation to total value of Separate from are not included in the Total adjustments amount or Calculated total amount for the invoice.
- Export to accounting. Select this checkbox to send the adjustment detail in the voucher export to your external payment system for this invoice.
Creating an adjustment
If creating a new adjustment that doesn’t exist as a preset adjustment, click Add adjustment without making a selection in the Preset adjustment dropdown. Enter the adjustment details in the fields described above in Selecting a preset adjustment.
The vendor information section is required.
- Enter the Vendor invoice number provided to you by the vendor.
- To select the vendor, click Organization look-up. In the Select Organization dialog, find the organization record for the vendor using the search box and/or filters. Click the organization to select it. Note: The organization selected for payment on an invoice must be an active vendor. The system will allow you to select a non-vendor organization, but you will be prevented from Approving an invoice associated with a non-vendor organization. See Organizations > Creating a vendor for more information. Note: After selecting a vendor, the address marked as the primary address on the corresponding organization record will appear on the invoice.
- The vendor’s Accounting code from their Organization record summary section will display automatically once you select the vendor and save the invoice. If the vendor has multiple accounts with different accounting codes, select the appropriate accounting code from the drop-down list. Note: This field is required if Export to accounting is selected in the invoice’s Extended information section or on any adjustments applied to the invoice. For more information about Organization accounting codes, see Organizations > Creating an Organization.
- Select a Payment method from the drop-down menu: Cash, Credit card, EFT, Deposit account, Physical check, Bank draft, Internal transfer, or Other. This field will be auto-populated if a payment method is selected on the organization record.
- If you want to check for existing subscriptions, select the Check subscription overlap checkbox. Note: System logic is not currently implemented, so the system doesn’t check for overlapping subscriptions.
- If you want to send a voucher to an external financial system, click the Export to accounting checkbox. The setting of the Export to accounting checkbox on the vendor’s Organization record determines the default value setting of this checkbox on invoices for the vendor. Note: If this checkbox is set to true, then the Accounting code in the Vendor information section is a required field.
- If you want to indicate to an external accounting system that an enclosure is needed with this invoice, click the Enclosure needed checkbox. If the Export to accounting checkbox is set to true and a voucher is created for this invoice, the export voucher file will contain a value of true in the Enclosure needed data element.
- Select a Currency from the drop-down list. The default value is stored in Tenant settings as the primary currency. For more information, see Settings > Tenant > Language and localization. If you select a currency other than the default, the system will display the Current exchange rate.
- If you want to enter an exchange rate value to override the Current exchange rate value, select the Use set exchange rate checkbox and enter the rate in the Set exchange rate box.
Links and documents
This section allows you to attach documents to an invoice record, such as digitized physical invoices or emails from vendors. You can either upload files directly or add URL links to files stored in an external file management system. You can also attach documents to accompany an invoice, such as pictures of physical invoices or emails from a vendor.
Add a link
-
Click Add link.
-
Enter a Link name to identify the file link.
-
Optional: Enter an External URL for an active website.
If you want to delete a link, click the trash can icon.
Add a document
There are two ways to add a document:
- Drag and drop a file into the box provided, or
- Click Choose file to add a document from your local files.
If you want to delete a document, click the trash can icon.
This is the end of the Create new invoice screen. Click Save & close to save the invoice.
You must add or create new invoice lines before the invoice can be approved or paid.
- To link an existing open order purchase order line to the invoice, follow the steps to add an invoice line to an invoice. Information from the purchase order line populates fields on the invoice line, such as Subscription start date, Subscription end date, and quantity. The account number and accounting code are derived from the vendor’s organization record account section. See Organizations > Accounts for more information about vendor accounts.
- To create a new invoice line that is not associated with a purchase order, follow the steps to create a new invoice line.
Adding an invoice line to an invoice
- In the Invoice lines section of the invoice record, click Actions > Add line from POL.
- In the Select order lines window, in the Search & filter box, use the search and filter options to locate the purchase order line (POL).
- To select one or more order lines, select the checkboxes to the left of the POL number.
- Click Save.
The order lines appear in the Invoice lines table. To view an invoice line, click on a row in the Invoice lines table. See Viewing invoice lines for more information. If you select a purchase order line that contains a vendor that doesn’t match the organization for the invoice, a Confirmation dialog appears. Click Confirm to continue with the purchase order line selection or Cancel to choose a different purchase order line.
If the selected purchase order line has a payment status of Fully paid, a red banner will display at the top of the invoice header and a red exclamation mark icon will display beside the relevant invoice line to alert you that the purchase order selected is already fully paid.
Creating a new invoice line
To create an invoice line that is not associated with an existing purchase order line, follow these steps:
- In the Invoice lines section of the invoice record, click Actions > New blank line.
- In the Create vendor invoice line window, fill in the Invoice line information, Fund distribution, and Adjustments sections. For more information on the fields and actions available in these sections, see the section descriptions below.
- Click Save & close. A confirmation message appears and the invoice line appears in the Invoice lines table.
Linking an invoice line to a purchase order line
When vendor EDIFACT format invoices are loaded to the system through data import, invoice lines are created based on information provided from the vendor included in the EDIFACT file. FOLIO will attempt to match invoice lines on incoming EDIFACT files to existing purchase order lines (POLs) in FOLIO, based on at least one match point: purchase order line (POL) number and vendor reference number (VRN). The system may be unable to automatically match some invoice lines to an existing purchase order line. To manually link an invoice line to a purchase order line, follow these steps:
- From the vendor invoice pane, review the Invoice lines accordion to determine whether the system has automatically created a purchase order link. A successfully linked invoice line contains a POL number value in the Invoice line table list. If the POL number is blank, the system was unable to match to an existing purchase order.
- To manually link the invoice line, click on the link icon to invoke a POL lookup.
- The Select order lines window opens. In the Search & filter box, use the search and filter options to locate the purchase order line (POL).
- Click on the one order you want to link to the invoice line. The POL number value is populated and the link is created.
- Description. The description or title for the invoice line. This may contain the materials, service, or fee being invoiced. This information will be pre-populated if creating the invoice line from a purchase order line (POL).
- Invoice line number. The invoice line number for the invoice line which will be created after you save this new invoice line.
- Status. The status of the invoice: Open, Reviewed, Approved, Paid, Cancelled.
- Vendor reference numbers. Click Add reference number to add vendor reference numbers for the invoice line. For more information about vendor reference numbers, see Orders > Adding an order line to an order > Vendor ref number. This information may be pre-populated if creating the invoice line from a purchase order line (POL).
- Vendor reference type A type to define the vendor reference number. Vendor continuation reference number, Vendor internal number, Vendor order reference number, Vendor subscription reference number, or Vendor title number. This information may be pre-populated if creating the invoice line from a purchase order line (POL).
- Subscription info. Subscription information for this invoice line, such as which volumes are being invoiced.
- Subscription start date. The date the subscription starts. This information may be pre-populated if creating the invoice line from a purchase order line (POL).
- Subscription end date. The date the subscription ends. This information may be pre-populated if creating the invoice line from a purchase order line (POL).
- Comment. Any additional comments for the invoice line.
- Accounting code. The accounting code for the invoice line. If you select an account number from the drop-down list, the associated accounting code will display here. Note: If the Export to accounting checkbox is active, the Accounting code is required. This information may be pre-populated if creating the invoice line from a purchase order line (POL).
- Account number. The account number for the invoice line. This drop-down list contains vendor account numbers for the vendor selected on the invoice if any exist on the vendor’s Organization record. If one or more vendor accounts exist in the Organization record for the vendor, the first account appears in this field as the default value. This information may be pre-populated if creating the invoice line from a purchase order line (POL).
- Quantity. The number of items in the invoice line. This information will be pre-populated if creating the invoice line from a purchase order line (POL).
- Sub-total. The amount of this invoice line. A hyphen may be added before the numeric value to denote a negative amount for credit invoices. Note: The subtotal amount must be distributed to one or more funds and is expressed in the currency defined in Settings > Tenant > Language and localization. This information will be pre-populated if creating the invoice line from a purchase order line (POL).
- Release encumbrance. Check this box to release the remaining value of the related encumbrance(s) from the fund to which it was assigned when the invoice transitions to Approved status. If this box is unchecked, any related encumbrance value that remains will persist after the invoice is Approved and the order payment status of any related Purchase Order Lines (POL) will not transition to Fully Paid until the encumbrances are released. For example, if the POL cost was $50, but the invoice amount is $40 and Release encumbrance is unchecked, the $10 difference will persist as an encumbrance on the fund indicated in the fund distribution.
Fund distribution
The Remaining amount to be distributed is calculated based on the Sub-total value entered above. This value should be listed as $0.00 when funds are fully distributed, which is a prerequisite for approval and payment.
- Click Add fund distribution
- Add fund information in the fields described below. You can add multiple fund distributions. To remove a fund distribution click the trash can icon beside the relevant line.
- Fund ID. The fund to which you are distributing the amount. Note: The use of acquisition units may restrict which funds appear in this list. If an acquisition unit is set up to restrict view permissions, then only funds that are assigned to the same acquisition unit as the user will display in the drop-down list. For more information, see Settings > Acquisition units.
- Expense class. The expense class within the fund, to which you are distributing the amount. This field will only display if the selected Fund ID has any associated active Expense classes.
- Value. The monetary value to apply to the fund, expressed as a percentage or currency value.
- Type. Select whether the Value should be expressed as a percentage or currency value.
- Amount. The amount of money committed to the fund. This is calculated by the system based on the Value and Type fields.
Adjustments
To use a preset adjustment, select from the Preset adjustment dropdown list. Preset adjustments are created in Settings > Invoices > Adjustments. If a new adjustment is needed that doesn’t exist as a preset, click Add adjustment.
- Description. A description of the adjustment.
- Value. The cost of the adjustment, expressed as a percentage or currency value. A hyphen preceding the amount renders this a negative value and may be used to credit that amount to the specified fund(s).
- Type. Select whether the Value should be expressed as a percentage or currency value.
- Relation to total. Specifies whether the adjustment is included in, in addition to, or separate from the total amount of the invoice. Note: Adjustments that are created with a Relation to total value of Separate from are not included in the Total adjustments amount or Calculated total amount for the invoice.
- Export to accounting. Select this checkbox to send the adjustment detail in the voucher export to your external payment system for this invoice.
Click Save & Close to save the new invoice line and return to the detail pane view of the invoice. The new invoice line now appears in the Invoice lines accordion of the invoice record.
Searching for an invoice
You can search for invoices in the Search & filter pane. To search for invoices, enter your search terms into the box. Select the All drop-down list to search through one of the following fields:
- All. Searches through all fields in the drop-down list. This is the default search.
- Voucher number. The voucher number for the invoice.
- Vendor invoice number. The vendor invoice number for the invoice.
- PO number. The purchase order number associated with the invoice.
- Accounting code. The accounting code for the invoice.
You can also search for invoices by selecting any of the filters in the Search & filter pane. Additionally, you can apply the filters after you perform a search to limit your results. See the sections below for more information on the filters.
Status
In the Search & filter pane, click Status and select any applicable filters:
- Open. Invoices currently open for your library. This is the default status for new invoices.
- Reviewed. Invoices that have been reviewed by your library. To set an invoice as “Reviewed”, you can select the “Reviewed” status from the drop-down list on the “Create vendor invoice” screen or the “Edit vendor invoice” screen.
- Approved. Invoices that have been approved by your library. Use the Action menu to Approve an invoice.
- Paid. Invoices that have been paid for by your library. Use the Action menu to Pay an invoice.
- Cancelled. Invoices that have been cancelled by your library.
Vendor name
To search for invoices created for a specific vendor, follow these steps:
- In the Search & filter pane, click Vendor name.
- Click Organization look-up.
- In the Select Organization dialog, search for the vendor.
- Click the vendor to populate the Vendor name field. The search results appear in the Invoices pane.
For information on searching for organizations, see Organizations > Searching for an organization.
Date created
To search for invoices based on the date they were created, follow these steps:
- In the Search & filter pane, click Date created.
- Enter a start date in the From box and an end date in the To box.
- Click Apply. The search results appear in the Invoices pane.
Invoice date
To search for invoices based on their invoice date, follow these steps:
- In the Search & filter pane, click Invoice date.
- Enter a start date in the From box and an end date in the To box.
- Click Apply. The search results appear in the Invoices pane.
Acquisition unit
To search for invoices assigned to a specific acquisition unit, follow these steps:
- In the Search & filter pane, click Acquisition unit.
- Select the acquisition unit you want from the drop-down list. The search results appear in the Invoices pane.
To search for invoices assigned with specific tags, follow these steps:
- In the Search & filter pane, click Tags.
- Select the tag(s) from the drop-down list. The search results appear in the Invoices pane.
Payment due
To search for invoices by payment due date, follow these steps:
- In the Search & filter pane, click Payment due.
- Enter a start date in the From box and an end date in the To box.
- Click Apply. The search results appear in the Invoices pane.
Payment method
In the Search & filter pane, click Payment method and select any applicable filters:
- Cash. Invoices paid by cash.
- Credit Card. Invoices paid by credit card.
- EFT. Invoices paid by electronic funds transfer.
- Deposit account. Invoices paid by direct deposit.
- Physical check. Invoices paid by physical check.
- Bank draft. Invoices paid by bank draft.
- Internal transfer. Invoices paid by internal transfer.
- Other. Invoices paid with a different method than those listed above.
Approval date
To search for invoices by approval date, follow these steps:
- In the Search & filter pane, click Approval date.
- Enter a start date in the From box and an end date in the To box.
- Click Apply. The search results appear in the Invoices pane.
Source
To filter for invoices by their source, select one or more of the following:
- User. Invoices created by a FOLIO user.
- API. Invoices created through an Application Programming Interface.
- EDI. Invoices created through Electronic Data Interchange. These invoices are typically created using the Data import app.
- MARC. Invoices imported through MAchine-Readable Cataloging format record import.
Export to accounting
To filter for invoices based on the Export to accounting checkbox, select:
- Yes. Invoices that have the Export to accounting checkbox selected.
- No. Invoices that do not have the Export to accounting checkbox selected.
Payment date
To search for invoices by payment date, follow these steps:
- In the Search & filter pane, click Payment date.
- Enter a start date in the From box and an end date in the To box.
- Click Apply. The search results appear in the Invoices pane.
Batch group
To search for invoices by batch group assignment, follow these steps:
- In the Search & filter pane, click Batch group.
- Select the batch group name from the drop-down list. The search results appear in the Invoices pane.
Fund code
To search for invoices by fund code, follow these steps:
- In the Search & filter pane, click Fund code.
- Select the fund code name from the drop-down list. The search results appear in the Invoices pane.
Expense class
To search for invoices by expense class, follow these steps:
- In the Search & filter pane, click Expense class.
- Select the expense class name from the drop-down list. The search results appear in the Invoices pane.
Lock total
To search for invoices by lock total amount, follow these steps:
- Enter a numeric amount, with or without decimals, in the From box and a numeric amount in the To box. To find all invoices where the lock total amount falls within a range of values, enter the low and high ends of the range in the From and To boxes. To find invoices matching a specific amount value, enter the same amount value in the From and To boxes.
- Click Apply. The search results appear in the Invoices pane.
Fiscal year
To search for invoices by the fiscal year assigned to the record, follow these steps:
- In the Search & filter pane, click Fiscal year.
- Select the fiscal year code from the drop-down list. The search results appear in the Invoices pane.
Exporting search results
To export a file of invoice information in comma-separated values (.csv) format, follow these steps:
- In the Search & filter pane, use the search and filter options to select a set of invoice records.
- In the search results pane, click Actions and select,Export results (CSV).
- In the Export settings dialog, the following message will display: “This export could take a few minutes. If you reload or close the page the export will not be completed. Once the file is ready it could take another minute for your browser to finish downloading the file. You can continue to work with invoices and invoice lines in a different browser tab if needed.”
- To export all fields from the title and piece leave the Invoice fields to export and Invoice line fields to export default values set to All. To select specific fields to export, click on the radio button below “All” and use the drop-down list to select the specific fields to export.
- Click Export. The file downloads to your local download location.
Invoice fields to export
- Vendor invoice number
- Vendor code
- Status
- Invoice date
- Fiscal year
- Payment due
- Approved date
- ApprovedBy
- Terms
- Acquisitions units
- Note
- Bill to
- Batch group
- Payment date
- Total units
- Sub total
- Total adjustments
- Total amount
- Lock total amount
- Invoice fund distributions
- Invoice adjustments
- Accounting code
- Vendor address
- Payment method
- Check subscription overlap
- Export to accounting
- Enclosure needed
- Currency
- Exchange rate
- Invoice tags
Invoice line fields to export
- Invoice line number
- Description (Title)
- POLine number
- Subscription info
- Subscription start
- Subscription end
- Comment
- Account number
- Accounting code
- Quantity
- Sub total
- Invoice line adjustments
- Total
- Invoice line fund distributions
- External account number (includes external account number from fund and expense class external account number extension, if applicable)
- Vendor reference number, reference type
- Invoice line tags
- Voucher number
- Voucher status
- Voucher date
- Disbursement number
- Disbursement date
Viewing invoice details
Once you search for an invoice, the following information appears in the Invoices search results pane:
- Vendor invoice number. The number provided by the vendor for this invoice.
- Vendor. The vendor code.
- Invoice date. The vendor invoice date.
- Status. The status of the invoice: Open, Reviewed, Approved, Paid, Cancelled.
- Total amount (system). The combined cost of the items ordered and adjustments for the invoice.
In the search results, click on an invoice to view more information. The Vendor invoice number pane displays with additional information about the invoice.
For information about most of the fields in the Invoice information section, see Creating an invoice > Invoice information. Once an invoice line is created, the following fields are populated by the system and are included in the Invoice information section:
- Source. The method by which this invoice was created: User, API, EDI, or MARC.
- Total units. The total units for the invoice calculated as the sum of the quantity values on all invoice lines.
- Payment date. The date on which the invoice status transitioned to Paid.
Viewing invoice lines
Invoice lines may link an invoice to purchase order lines or may be created without a link to an existing order. Each line consists of the title, payment information, cost details, and adjustments.
The invoice lines section lists all invoice lines for the order. The invoice lines table list displays the following:
- # The invoice line number. System generated.
- POL number. The purchase order line number.
- Description. The ordered title from the purchase order line.
- Fund code. The code for the fund from which payment is made for the invoice line.
- PO status. The purchase order workflow status from the purchase order line: Open, Pending, Closed.
- Receipt status. The receipt status of the purchase order line.
- Payment status. The payment status of the purchase order line.
- Vendor reference number. A unique identifier for the material being acquired that is specific to the vendor. Different types of identifiers are provided by vendors for different types of material. All associated vendor reference numbers are listed.
- Quantity. The quantity ordered.
- Sub-total. The price of the invoice before adding adjustments.
- Adjustments. The adjustments associated with the invoice.
- Total. The total amount of the invoice line calculated as the Sub-total plus Adjustments.
To view more information about the invoice line, click on the row in the invoice lines list. A detail pane opens containing information about the invoice line. See Creating a new invoice line for descriptions of the fields in the invoice line detail pane.
The View invoice line detail pane includes an accordion section to list Other related invoice lines. This table lists any invoices that are related to the same purchase order line. The Other related invoice lines section lists the following information:
- Vendor invoice number. The number provided by the vendor for this invoice. Click on the clipboard icon beside the vendor invoice number to copy the value to your clipboard.
- Invoice line #. The system-generated invoice line number.
- Invoice date. The vendor invoice date.
- Vendor name. The vendor name.
- Status. The status of the invoice: Open, Reviewed, Approved, Paid, cancelled.
- Quantity. The quantity ordered.
- Amount. The combined cost of the items ordered and adjustments for the invoice.
- Comment. Comments from the invoice line.
Click on a related invoice line # value to view more information. The View invoice line pane displays with additional information about the related invoice line.
Invoice level fund distribution
The Invoice level fund distribution section of the invoice detail displays only if invoice contains an adjustment that is not prorated and for which a fund distribution has been selected. For more information, see Creating an invoice > Adjustments > Adding a preset adjustment. The Invoice level fund distribution section lists the following information:
- Adjustment. Description of the adjustment.
- Fund. The fund to which you are distributing the amount elephant
- Expense class. The expense class within the fund, to which you are distributing the amount. This field will only display information if the selected Fund ID has any associated active Expense classes.
- Value. The monetary value to apply to the fund, expressed as a percentage or currency value.
- Amount. The amount of money committed to the fund.
- Initial encumbrance. The initial amount committed to the fund.
- Current encumbrance. The current amount committed to the fund. When an invoice transitions to Approved status and the Release encumbrances checkbox on an invoice line is checked, the Current encumbrance value becomes zero.
Invoice level adjustments
The Invoice level adjustments section of the invoice detail displays only if the invoice contains an adjustment that is not prorated. Adjustments with a Pro rate method of By amount, By line, or By quantity display the adjustment information on the invoice line. For more information, see Creating an invoice > Adjustments > Adding a preset adjustment. The Invoice level adjustments section lists the following information:
- Description. A description of the adjustment.
- Value. The cost of the adjustment.
- Pro rate. The method by which the adjustment should be proportionally distributed: By line, By amount, By quantity, or Not prorated
- Relation to total. Defines how the adjustment is applied in relation to the invoice total: In addition to, Included in, or Separate from.
Vendor details
- Vendor invoice number. The vendor invoice number for the invoice. Click on the clipboard icon beside the vendor invoice number to copy the value to your clipboard.
- Vendor name. The name of the vendor.
- Accounting code. The accounting code for the invoice, if applicable.
- Address, Primary. The vendor’s primary address information. This address is included on the invoice voucher and voucher export.
Links and documents
This area includes all the links and documents attached to the invoice. Click the External URL or Document name to open the documents.
Editing an invoice
- Find the invoice you want to edit and select it.
- Click Actions > Edit.
- Edit the invoice. Note: The Status of the invoice impacts which fields are editable. Many fields are locked for editing after the invoice is approved.
- Click Save & close. A confirmation message appears and the invoice is updated.
Deleting an invoice
Deleting an invoice is possible while in an Open, Reviewed, or Cancelled status. Once an invoice has transitioned to Approved or Paid, it cannot be deleted.
- Find the invoice you want to delete and select it.
- In the Vendor invoice number pane, click Actions > Delete.
- In the Delete invoice dialog, click Delete. A confirmation message appears and the invoice is deleted.
Approving an invoice
Invoices require approval before the payment amounts are considered to be awaiting payment and in order for vouchers to be created. Approving an invoice is possible when:
- The invoice status is Open or Reviewed.
- One or more invoice lines are added to the invoice.
- The user account includes the Approve invoice permission.
- If you enter a Lock total value, all invoice lines and adjustment values must equal this lock total amount. See Invoice information > Lock total for information about lock total.
- All funds on the invoice have been distributed.
Approving an invoice triggers the following system actions:
- Once one or more invoices connected to a purchase order line have been “Approved,” the purchase order Payment status is changed to “Partially paid.”
- Voucher and pending payment transactions are created. Vouchers are a mechanism for providing the information necessary to make invoice payments and can be exported to an external payment system. Each invoice generates a single unique voucher on which all fund charges are grouped by the fund external account number. For more information on exporting vouchers, see Exporting vouchers.
To approve an invoice, follow these steps:
- Find the invoice you want to approve and select it.
- In the Vendor invoice number pane, click Actions > Approve.
- In the Approve invoice dialog, click Approve. A confirmation message appears and the invoice is approved.
Viewing a voucher
Once an invoice is approved, an invoice voucher is created and is added to the invoice record. To view an invoice voucher, follow these steps:
- Using the Search and Filter pane, find the invoice you want to view and select it.
- In the Vendor invoice number pane, scroll down to the Voucher information section. Key information about the invoice payment voucher is displayed in this section.
- To view all voucher information on a full screen window, click View voucher.
- Status. The status of the invoice voucher: Awaiting Payment or Paid.
- Voucher number. System-assigned number for this voucher.
- Voucher date. Date the invoice was approved and the voucher was created.
- Total. Total amount of all voucher lines.
- Exchange rate. Currency exchange rate used to generate the transaction.
- Disbursement number. The identifier from an external system corresponding to a payment. This may be added to the voucher by clicking Actions > Edit.
- Disbursement date. The date from an external system corresponding to a payment. This may be added to the voucher by clicking Actions > Edit.
- Disbursement amount. The amount from an external system corresponding to a payment. This may be added to the voucher by clicking Actions > Edit.
- Account number. The number of the vendor organization account for the payment method indicated on the invoice. This value is only populated if the organization record for the vendor contains an account number in the Accounts section for the payment method being used for this invoice.
- Accounting code. Vendor accounting code to identify the vendor organization in an external accounts payable system.
- Enclosure needed. If true and payment method is “Check,” this indicates to an external accounting system that an enclosure is needed with this invoice. If the Export to accounting checkbox is set to true and a voucher is created for this invoice, the export voucher file will contain a value of true in the enclosure needed data element.
- Vendor. Vendor name.
- Address 1. Vendor address 1. This is the vendor’s primary address from the Organization app. See Organizations> Adding an address for more information.
- Address 2. Vendor address 2.
- City. Vendor city.
- State/Prov./Region. Vendor State, Province, or Region code.
- Zip code. Vendor zip code.
- Country. Vendor country.
Voucher lines
The voucher lines are grouped by fund external account number. For example, if there are multiple invoice lines on an invoice that contain the same fund external account number, only one voucher line will be generated containing the total amount across those invoice lines.
- External account number. The fund’s external account number.
- Total. The total amount for all voucher lines, displayed at the bottom of the voucher line table.
The Voucher lines table contains this information for each voucher line:
- Line number.
- Group.
- Fund code.
- External account number.
- Amount.
To add information about the invoice voucher disbursement from an external accounts payable system, use the Action menu to edit the invoice voucher.
- Using the Search and Filter pane, find the invoice for which you want to update disbursement information and select it.
- Scroll down to the Voucher information section and click the View voucher button
- From the View voucher full-screen window, open the Action menu and select Edit.
- Enter the disbursement information in the fields described below.
- Click Save and close.
The only fields that are editable on the voucher are:
- Disbursement number. Enter an identifier from an external system corresponding to a payment, such as a check number.
- Disbursement date. Enter the date of the disbursement transaction in the external system.
- Disbursement amount. Enter the amount of the disbursement, with or without decimal.
Exporting vouchers
To export a file of voucher information in JSON or XML format, follow these steps:
- In the search results pane, click Actions > Voucher export.
- On the voucher export screen, choose a batch group from the drop-down menu.
- All previous voucher exports run for the batch group are listed in a table containing Date, Status, and Message columns. There are also links to download past files at the end of each row where export was successful.
- To run a new voucher export for a batch group, click Run manual export. A message appears, “All vouchers created since last export for the batch group FOLIO will be exported and this process cannot be reversed.”
- Click Continue to proceed or Cancel.
- When the export is complete, a new table row is created containing a message to indicate whether the file uploaded successfully to FTP location or vouchers for batch voucher export were not found.
- To download one of the voucher export files, click on the downward arrow at the end of the table row. Note: The file will download in the format configured on the batch group configuration. For more information see Settings > Invoices > Batch group configuration.
Voucher export details
The voucher export details section appears on invoices that have the Export to accounting checkbox activated, where the export has been performed. It includes the following fields:
- Batch group. The name of the batch group selected for the invoice.
- Batch file name. The name of the file generated by the voucher export process, expressed as date-time.
- Batch file status. The status of the voucher export batch file: Uploaded or Error.
After exporting vouchers, you can view details about the export and download the full voucher export file by finding an invoice that was included in the export job. To view voucher export details and download the file to your local download folder, follow these steps:
- Using the Search and Filter pane, find the invoice you want to view and select it.
- In the Vendor invoice number pane, scroll down to the Voucher export details section.
- To download the full voucher export file, click the downward arrow download icon next to the Batch file name. This file will contain all vouchers that were in an Approved status that had not yet been exported at the time of job execution.
Voucher export file
The voucher export file contains the following data elements:
- accountingCode
- accountNumber
- amount
- batchedVoucherLines/0/amount
- batchedVoucherLines/0/fundCodes/
- batchedVoucherLines/0/externalAccountNumber
- disbursementAmount
- enclosureNeeded
- exchangeRate
- folioInvoiceNo
- invoiceCurrency
- invoiceDate
- invoiceTerms
- status
- systemCurrency
- type
- vendorInvoiceNo
- vendorName
- voucherDate
- voucherNumber
- vendorAddress/addressLine1
- vendorAddress/addressLine2
- vendorAddress/city
- vendorAddress/stateRegion
- vendorAddress/zipCode
- vendorAddress/country
Printing a voucher
To print an invoice voucher, follow these steps:
- Follow the instructions in Viewing a voucher to find the voucher you want to print.
- In the Voucher invoice full screen display, select Actions > Print.
- The print preview dialog box opens. For descriptions of each field included in the voucher print view, see Voucher information.
- Click on the Destination drop-down to select whether to print the voucher or save to a PDF file.
- Click Save or Print as indicated by your destination selection.
Paying an invoice
Use the Pay action to update the invoice to the status of Paid. The Pay action is available in the Action menu if the Settings > Invoices > Approvals Approve and pay in one click setting is turned off. This enables a library to use separate actions to Approve invoices and Pay invoices. If that setting is off, the invoice must be approved before the Pay action will be available.
Moving the invoice to paid status will trigger an update of the purchase order status to Closed once the order is fully received. See Settings > Invoices > Approvals for more information about the “Approve and pay in one click” setting.
To pay an invoice, follow these steps:
- Using the Search and Filter pane, find the approved invoice that you want to pay and select it.
- In the Voucher invoice number pane, select Actions > Pay.
- Click Submit.
Cancelling an invoice
Cancelling an invoice is possible while in an Approved or Paid status and when the user account includes the Invoice: Cancel invoices permission. Cancelling an invoice triggers the following system actions:
- All transactions against funds related to the invoice are voided.
- The invoice voucher status is set to Cancelled.
- Users are unable to Open, Approve, or Pay the invoice after cancelling.
To cancel an invoice, follow these steps:
- Find the invoice you want to cancel and select it.
- In the Vendor invoice number pane, click Actions > Cancel.
- In the Cancel invoice dialog, optionally enter a Cancellation note. The Cancellation note displays in the Invoice information accordion.
6.3 - Orders
The Orders app allows you to create and manage purchase orders.
Definition of terms related to the Orders app:
- Acquisition units. An additional layer you can add to acquisitions records that restricts a user’s ability to interact with those records unless they have been assigned to that unit. For example, you may create acquisition units to represent the different libraries within your library system. Units are defined and determined by your library in the Settings app. See Settings > Acquisition units for more information.
- Order. A purchase order featuring a list of titles or packages (physical or electronic) being ordered by the library from a vendor.
- Order line. A purchase order line contains one of the titles or packages being ordered by the library. Order lines make up an order. Orders can contain multiple order lines.
Permissions
The permissions listed below allow you to interact with the Orders app and determine what you can or cannot do within the app. You can assign permissions to users in the Users app. If none of these permissions are assigned to a user, they are unable to see the Orders app or any related information.
Note: The below permissions only pertain to the Orders app. Within the app, orders and order lines may link to records in other apps, like Inventory and Receiving, and the ability to interact with those records could require separate permissions.
Orders permissions:
- Orders: Approve purchase orders. This permission allows the user to approve purchase orders.
- Orders: Assign acquisition units to new order. This permission allows the user to assign acquisition units to orders when creating a new order.
- Orders: Can create new Orders and Order lines. This permission allows the user to create new orders and order lines.
- Orders: Can delete Orders and Order lines. This permission allows the user to delete orders and order lines.
- Orders: Can edit Orders and Order lines. This permission allows the user to view and edit orders and order lines.
- Orders: Can view Orders and Order lines. This permission allows the user to view orders and order lines.
- Orders: Cancel order lines. This permission allows the user to cancel order lines.
- Orders: Cancel purchase orders. This permission allows the user to cancel order lines.
- Orders: Export search results. This permission allows the user to export search results in .csv format.
- Orders: Manage acquisition units. This permission allows the user to change the assignment of acquisition units for an order or order line.
- Orders: Reopen purchase orders. This permission allows the user to reopen an order.
- Orders: Show all hidden fields. This permission allows the user to view all fields on a purchase order that were hidden by creation from an order template.
- Orders: Unopen purchase orders. This permission allows the user to unopen an order.
- Orders: Update encumbrances. This permission allows the user to update encumbrances for an open order.
Keyboard shortcuts
Keyboard shortcuts allow you to perform actions in this app using the keyboard. See Platform essentials > Keyboard shortcuts for more information.
Creating an order
Orders contain a list of titles or packages (physical or electronic) being ordered by your library from a vendor.
In FOLIO, you can create either one-time orders or ongoing orders. One-time orders should be used for items fulfilled within the year, like monographs. Ongoing orders generally span multiple years, and you usually pay as you receive each item. You would want to create an ongoing order for a journal subscription, for example.
Once you create an order, you need to add at least one order line to the order so the order can be opened and the acquisitions process can begin. You can also initiate order creation from the Inventory app by searching for an instance and clicking Inventory > Actions > Create new order for more information.
Creating a one-time order
-
In the Search & filter pane, click Orders.
-
In the Orders pane, click New.
-
In the Create purchase order window, select a template from the Template name drop-down list, if using. The order is populated with the information configured in the template. Templates are created in the Settings app. See Settings > Orders > Order templates for more information.
-
Select One-time from the Order type drop-down list.
-
Fill in the rest of the fields under Purchase order and PO summary. For more information on the fields and actions available in these sections, see the section descriptions below.
-
Optional: Select Approved to approve the order. Note: You only need to approve the order if your library has the Approval required setting turned on. For more information, see Settings > Orders > Approvals.
-
Click Save & close. A confirmation message appears and the order appears in the Orders pane.
Purchase order
- Prefix. If applicable, select a Prefix for the purchase order number from the drop-down list. Prefixes are configured by your library in the Settings app. See Settings > Orders > Prefixes for more information.
- PO number. Purchase order number for the order. Whether you can edit the PO number depends on your library’s settings in the PO number Edit setting. See Settings > Orders > Edit for more information.
- Suffix. If applicable, select a Suffix for the purchase order number from the drop-down list. Suffixes are configured by your library in the Settings app. See Settings > Orders > Suffixes for more information.
- Vendor. The vendor associated with this purchase order. Click Organization look-up to select a vendor. In the Select Organization dialog, find the organization using the search box and/or filters. Click the organization to select it. The organization is added to the Vendor field.
- Order type. Select the type of order you are placing: One-time or Ongoing.
- Acquisitions units. If you want the order to be available to particular users within certain acquisitions units, enter or select the Acquisition units from the drop-down list. You can select multiple units. For more information on acquisition units, see Settings > Acquisition units.
- Assigned to. To assign the order to a user, click the +. In the Select User dialog, find the user using the search box and/or the filters. Click the user to select them. The user appears in the Assigned to box. If you need to remove the user, click the x. If you need to assign the order to a different user, click the + and repeat the above steps.
- Bill to. In the Bill to drop-down list, select the billing address for the order. Once you select an address, the billing address appears. Addresses are configured in the Settings app. For more information, see Settings > Tenant > Addresses.
- Ship to. In the Ship to drop-down list, select the address the order items will be shipped to. Once you select an address, the shipping address appears. Addresses are configured in the Settings app. For more information, see Settings > Tenant > Addresses.
- Manual. If the Manual checkbox is selected, EDI integration settings for this vendor will be ignored and nothing on this order will be exported to the vendor.. For example, select this checkbox if EDI order integration is set up
- Re-encumber. The Re-encumber checkbox is selected by default. If the checkbox is cleared, you are indicating that the order shouldn’t re-encumber during the fiscal year rollover even if it meets the criteria to re-encumber. However, if the checkbox is selected and the rollover settings indicate that this order doesn’t meet the criteria to re-encumber, money will not be committed to the next fiscal year for this order. The re-encumber toggle is only considered when the order meets the rollover criteria. If the checkbox is selected and the rollover settings indicate that this order meets the criteria to re-encumber, then money is committed to the next fiscal year for the order.
- Tags. Enter or select any tags from the drop-down list you would like to apply to the order.
PO summary
- Approved. To approve the order, select the Approved checkbox. Note: You only need to approve the order if your library has the Approval required setting turned on. An order is automatically approved when opened. For more information, see Settings > Orders > Approvals.
Creating an ongoing order
-
In the Search & filter pane, click Orders.
-
In the Orders pane, click New.
-
In the Create purchase order window, select a template from the Template name drop-down list, if using. The order is populated with the information configured in the template. Templates are created in the Settings app. See Settings > Orders > Order templates for more information.
-
Select Ongoing from the Order type drop-down list.
-
Fill in the rest of the fields under Purchase order, Ongoing order information, and PO summary. For more information on the fields and actions available in these sections, see the section descriptions below.
-
Optional: Select Approved to approve the order. Note: You only need to approve the order if your library has the Approval required setting turned on. An order is automatically approved when opened. For more information, see Settings > Orders > Approvals.
-
Click Save & close. A confirmation message appears and the order appears in the Orders pane.
Purchase order
See Purchase order, above.
- Subscription. If the ongoing order is for a subscription, select the Subscription checkbox.
- Renewal interval. The interval for renewal, in days. This is the term, in days, during which the library has access to this material, after which the library will need to renew for another term.This field can only be edited, and is required, if Subscription is selected.
- Renewal date. The date by which the library must decide to renew or not, which is sometimes referred to as the cancellation deadline. This field can only be edited, and is required, if Subscription is selected.
- Review period. The period prior to the renewal date when you can decide whether you would like to purchase the subscription again. This field can only be edited if Subscription is selected.
- Manual renewal. Select the Manual renewal checkbox to indicate that you need to contact the vendor to renew the subscription for another term (the vendor does not automatically assume a renewal). This field can only be edited if Subscription is selected.
- Review date. The date for review. This field can only be edited if Subscription is not selected.
- Notes. Any notes about the ongoing order.
PO summary
See PO summary, above.
Searching for an order
You can search for orders in the Search & filter pane. Click Orders to start your search. The Order lines search is selected by default and you can toggle between the Order lines search and Orders search at the top of the search and filter pane. To search for orders, enter your search terms into the box. Select the Keyword drop-down list to search through one of the following fields:
- Keyword. Searches through all fields in the drop-down list. This is the default search.
- Date created. Date the order was created.
- Date opened. Date the order was opened, which is when funds are encumbered and interactions with the Inventory app occur.
- PO number. The purchase order number.
You can also search for orders by selecting any of the filters in the Search & filter pane. Additionally, you can apply the filters after you perform a search to limit your results. See the sections below for more information on the filters.
Status
In the Search & filter pane, click Status and select any applicable filters:
- Closed. Orders that are closed.
- Open. Orders that are open.
- Pending. Orders that are pending.
Prefix
To search for orders by purchase order number prefix, follow these steps. For more information about creating Prefix values, see Settings > Orders > Prefixes.
-
In the Search & filter pane, click Prefix.
-
Select the prefix from the drop-down list. The search results appear in the Order lines pane.
Suffix
To search for orders purchase order number suffix, follow these steps. For more information about creating Suffix values, see Settings > Orders > Suffixes
-
In the Search & filter pane, click Suffix.
-
Select the suffix from the drop-down list. The search results appear in the Order lines pane.
Approved
In the Search & filter pane, click Approved and select any applicable filters:
- Yes. Approved orders.
- No. Orders not yet approved.
Acquisitions unit
To search for orders assigned to a specific acquisitions unit, follow these steps:
-
In the Search & filter pane, click Acquisitions unit.
-
Select the acquisitions unit from the drop-down list. The search results appear in the Orders pane.
Assigned to
To search for orders assigned to a specific user, follow these steps:
-
In the Search & filter pane, click Assigned to.
-
Click Find User.
-
In the Select User dialog, search for the user.
-
Select the user you want to filter by. The search results appear in the Orders pane.
Created by
To search for orders created by a specific user, follow these steps:
-
In the Search & filter pane, click Created by.
-
Click Find User.
-
In the Select User dialog, search for the user.
-
Select the vendor you want to filter by. The search results appear in the Orders pane.
Date created
To search for orders based on the date they were created, follow these steps:
-
In the Search & filter pane, click Date created.
-
Enter a start date in the From box and an end date in the To box.
-
Click Apply. The search results appear in the Orders pane.
Date opened
To search for orders based on the date the order was opened, follow these steps:
-
In the Search & filter pane, click Date opened.
-
Enter a start date in the From box and an end date in the To box.
-
Click Apply. The search results appear in the Orders pane.
Order type
In the Search & filter pane, click Order type and select any applicable filters:
- One-time. One-time orders.
- Ongoing. Ongoing orders.
Vendor
To search for orders placed with a specific vendor, follow these steps:
-
In the Search & filter pane, click Vendor.
-
Click Organization look-up.
-
In the Select Organization dialog, search for the vendor.
-
Select the vendor you want to filter by. The search results appear in the Orders pane.
To search for orders assigned with specific tags, follow these steps:
-
In the Search & filter pane, click Tags.
-
Select the tag(s) from the drop-down list. The search results appear in the Orders pane.
Reason for closure
To search for orders based on their reason for closure, follow these steps:
-
In the Search & filter pane, click Reason for closure.
-
Select the reason for closure from the drop-down list. The search results appear in the Orders pane.
Re-encumber
In the Search & filter pane, click Re-encumber and select any applicable filters:
- Yes. Orders with the Re-encumber checkbox selected.
- No. Orders with the Re-encumber checkbox cleared.
Subscription
To search for subscription orders follow these steps:
-
In the Search & filter pane, click Subscription.
-
Choose the appropriate filter:
- Yes. Subscription orders.
- No. Non-subscription orders.
Renewal date
To search for orders based on their renewal date, follow these steps:
-
In the Search & filter pane, click Renewal date.
-
Enter a start date in the From box and an end date in the To box.
-
Click Apply. The search results appear in the Orders pane.
Manual renewal
In the Search & filter pane, click Manual renewal and select any applicable filters:
- Yes. Orders with the Manual renewal checkbox selected.
- No. Orders with the Manual renewal checkbox cleared.
Review period
To search for orders within a review period, in days, follow these steps:
-
In the Search & filter pane, click Review period.
-
Enter or select the review period, in days. The search results appear in the Orders pane.
Bill to
To search for orders based on their bill to address, follow these steps. Addresses are created in Settings > Tenant > Addresses.
-
In the Search & filter pane, click Bill to.
-
Select the address name from the drop-down list. The search results appear in the Orders pane.
Ship to
To search for orders based on their ship to address, follow these steps. Addresses are created in Settings > Tenant > Addresses.
-
In the Search & filter pane, click Ship to.
-
Select the address name from the drop-down list. The search results appear in the Orders pane.
Exporting search results
To export a file of order information in comma-separated values (.csv) format, follow these steps:
In the Search & filter pane, open the action menu and select,Export results (CSV).
In the Export settings dialog, the following message will display: “This export could take a few minutes. If you reload or close the page the export will not be completed. Once the file is ready it could take another minute for your browser to finish downloading the file. You can continue to work with orders and order lines in a different browser tab if needed.”
To export all fields from the purchase order header, leave the PO fields to export default value set to All. To select specific fields to export, click on the radio button below “All” and use the drop-down list to select the specific fields to export:
- PO number prefix
- PO number
- PO number suffix
- Vendor
- Organization type
- Order type
- Acquisitions units
- Approval date
- Assigned to
- Bill to
- Ship to
- Manual
- Re-encumber
- Created by
- Created on
- Note
- Workflow status
- Approved
- Renewal interval
- Subscription
- Manual renewal
- Ongoing notes
- Review period
- Renewal date
- Review date
- PO tags
To export all fields from the purchase order line, leave the POL fields to export default value set to All. To select specific fields to export, click on the radio button below “All” and use the drop down list to select the specific fields to export:
- POLine number
- Title
- Instance UUID
- Subscription from
- Subscription to
- Subscription interval
- Receiving note
- Publisher
- Edition
- Linked package
- Contributor, Contributor type
- Product ID, Qualifier, Product ID type
- Internal note
- Acquisition method
- Order format
- Created on (PO line)
- Receipt date
- Receipt status
- Payment status
- Source
- Donor
- Selector
- Requester
- Cancellation restriction
- Cancellation description
- Rush
- Collection
- Line description
- Vendor reference number, reference type
- Instructions to vendor
- Account number
- Physical unit price
- Quantity physical
- Electronic unit price
- Quantity electronic
- Discount
- Estimated price
- Currency
- Fund code, Expense class, Value, Amount
- Location, Quantity P, Quantity E
- Material supplier
- Receipt due
- Expected receipt date
- Volumes
- Create inventory
- Material type
- Access provider
- Activation status
- Activation due
- Create inventory E
- Material type E
- Trial
- Expected activation
- User limit
- URL
- POLinetags
- PO number prefix
- Renewal note
- Once the export fields have been chosen, click Export button at the bottom of the dialog. A .csv file will be downloaded locally with the name “order-export-YYYY-MM-DD-HH_MM” containing one row for each purchase order filtered in the search pane selection list. If the user has chosen to export POL fields and an order contains multiple purchase order lines then the file will contain a row for each purchase order line.
Viewing order details
Once you search for an order, the following information appears in the Orders pane:
- PO number. The purchase order number.
- Vendor code. The vendor code.
- Status. The order status: Pending, Open, Closed.
- Order type. The type of order: One-time, Ongoing.
- Last updated. The date the order was last updated.
- Acquisition unit. The acquisition units assigned to the order.
- Assigned to. The user to which the order is assigned.
To customize the columns that appear in the results list, follow these steps:
-
In the Order pane, select the Actions button.
-
The listed columns are all selected by default under Show columns in the Actions list.
-
Deselect any columns that you want to remove from the Orders pane display.
-
Your selections persist until you logout of FOLIO.
In the search results, click on an order to view it. The purchase order details pane displays with additional information about the order:
Purchase order section
See Creating an order > Purchase order for more information on the fields displayed in this section of the purchase order.
- PO number. Purchase order number for the order. Note that when viewing the order, the prefix and suffix values are displayed within the order number rather than as distinct fields.
- Vendor. The vendor organization associated with this purchase order.
- Order type. The type of order: One-time or Ongoing.
- Acquisitions units. The acquisitions units assigned to the order.
- Approval date. Date on which the order status changed from Open to Approved.
- Assigned to. The user assigned to this order, if applicable.
- Bill to. The billing address selected for the order.
- Ship to. The ship to address selected for the order.
- Manual. If the Manual checkbox is selected, it excludes the order from automated processing. For example, this may be selected if you have EDI set up, but you submitted the order on the vendor’s site and do not want to resend it to them.
- Re-encumber. See Creating a purchase order for a full description of this field.
- Created by. Name of the user that created the purchase order.
- Created on. The date and time at which the purchase order was created.
- Date opened. The date and time at which the purchase order was opened.
This section only displays for orders with type Ongoing. If the subscription checkbox is checked for this order, the following information displays. See Creating an order for descriptions of each field. Descriptions are provided below for fields that aren’t described in Creating an order.
- Subscription.
- Renewal interval.
- Renewal date.
- Review period.
- Manual renewal.
- Notes.
If the subscription checkbox is unchecked, the following information displays:
- Subscription.
- Review date.
- Notes.
This section displays pricing and status information for the purchase order.
- Total units. Total quantity ordered across all purchase order lines.
- Approved. Indicates whether the order has been approved.
- Workflow status. The order status: Pending, Open, Closed.
- Total estimated price. The total of all PO line estimated price amounts.
- Total encumbered. The total of all PO line encumbered amounts.
- Total expended. The total expended amount for all PO lines. When an invoice line is created, it is linked to a PO line. The total amount of the invoice line is expended once the invoice is approved.
PO Lines
This section displays information about purchase order lines for this order. The PO lines table list displays the following columns. Click on the PO line row to open the detail pane for the PO line.
- POL number. Purchase order line number.
- Title or package name. Title or package name of the item ordered on the PO line.
- Product ID. Product ID of the item ordered on the PO line. Note: all associated product IDs will be listed here.
- Vendor reference number. The vendor reference number for this order line.
- Fund code. The fund code of the fund distribution for the PO line. Note: If more than one fund code is associated with the PO line, each code will be listed here.
- Estimated price. The calculated price based on the values you entered. Estimated price = list unit price(s) x quantities ordered + additional cost - discount.
This section displays information about invoices related to this order through a purchase order line link to an invoice line. The invoice table list displays the following columns. To sort the list by Invoice date, click on the column header.
- Invoice #. The vendor-provided identifier for the invoice related to this purchase order line.
- Invoice date. The vendor invoice date. Click on the column name to sort the list of related invoices by Invoice date.
- Vendor name. The name of the vendor associated with the related invoice.
- Vendor invoice number.
- Status. The status of the invoice: Open, Reviewed, Approved, Paid, or Cancelled.
- Expended amount. The total expended amount of the invoice.
Export details
This section displays information about order exports to vendors related to this order. The
- Job ID. Identification number of the export.
- Export date. Date that the export job was run.
- File name. Name of the export file.
- Export method. The Integration name on the associated Organization record’s Integration details.
See the Export Manager for more information about viewing export jobs.
Editing an order
-
Search for the order you want to edit and select it.
-
In the Purchase order pane, select Actions > Edit.
-
Edit the order.
-
Click Save & close. A confirmation message appears and the order is updated.
Approving an order
You only need to approve an order if you have the Approvals required setting turned on. For more information, see Settings > Orders > Approvals. If you have this setting turned on, you also need the applicable permission to be able to approve the order. You can open an order once it is approved.
There are two ways to approve an order. You can edit the order and select the Approved checkbox under PO summary, or you can follow these steps:
-
Search for the order you want to approve and select it.
-
In the Purchase order pane, select Actions > Approve. A confirmation message appears and the purchase order is marked as Approved.
Duplicating an order
-
Search for the order you want to duplicate and select it.
-
In the Purchase order pane, select Actions > Duplicate.
-
In the Duplicate order dialog, click Duplicate to confirm the duplication. A confirmation message appears and the order is duplicated and appears in the Orders pane.
Opening an order
After you create an order, it has the status of Pending until you open it. Once you open an order the following actions occur:
- Encumbrance transactions are created. Note: Encumbrances are only created if a fund distribution was added to an order line.
- Inventory records are created. If Create inventory on the purchase order line is set to “Instance/holdings/item”, an item is created with an item status of “On order.” For more information about item status see Platform essentials > Item Status. Inventory records are not created if Create inventory on the order line is set to None. For more information about Create inventory, see the E-resources details and Physical details sections below.
- Date opened is set to today’s date.
- Approval date is set to today’s date if the order hasn’t already been approved by a user.
- If possible duplicates are found, based on title and product ID values, a modal displays with a list of possible duplicate orders. Select continue or cancel. This duplicate check can be disabled in Settings. See Settings > Orders > Opening purchase orders.
- Order lines cannot be added after the order is opened unless you unopen the order.
- Fields such as Order type, Title, Acquisition method, and Order format are not editable once an order is opened. The order would need to be unopened to edit those fields. For more information, see Unopening an order.
-
Search for the order you want to open and select it.
-
In the Purchase order pane, select Actions > Open.
-
In the Open - purchase order dialog, click Submit. A confirmation message appears and the order workflow status changes to Open.
Unopening an order
Opening an order is not final and an order can be reverted back to a Pending status by unopening the order.
Note: Unopening an order removes any encumbrances and item records with an On Order status. However, items that were received, holdings, and instances aren’t removed.
-
Search for the open order you want to unopen and select it.
-
In the Purchase order pane, select Actions > Unopen.
-
In the Unopen - purchase order dialog, click Submit. A confirmation message appears and the order’s status changes to Open.
Cancelling an order
To cancel an open purchase order, follow the steps below. Cancelling a purchase order removes all encumbrances and updates all associated item records for all purchase order lines to an Item status of Order closed. To cancel individual order lines, see Cancelling an order line. You can [reopen an order[(#reopening-an-order) after performing the cancel action.
-
Search for the order you want to cancel and select it.
-
In the Purchase order pane, select Actions > Cancel. Note: Only orders in Open status display the cancel option in the Action menu.
-
In the Close - purchase order dialog, optionally add Notes text and click Submit. A confirmation message appears.
Upon cancellation, the order Workflow status changes to Closed, the Reason for closure is set to Cancelled, and any optionally added notes appear in the PO Summary Notes on closure field. All PO line fund distribution Current encumbrance amounts are set to $0.00. In the PO line search results pane and on the Purchase order detail pane PO lines section, a red circle with a diagonal line icon appears beside the cancelled order line.
Closing an order
The system will automatically close one-time orders that are fully received and fully paid, or those where receipt or payment is not required, as indicated by the purchase order line Receipt status and Payment status values. Only open orders can be closed. If you need to close an order manually, follow the steps below. Note about Item status: If Create inventory on the purchase order line is set to “Instance/holdings/item”, an item was created in Inventory when the order was opened. Closing an order when the item is not yet received will update the Item status of the item to “Order Closed.” For more information about item status see Platform essentials > Item Status.
-
Search for the order you want to close and select it.
-
In the Purchase order pane, select Actions > Close order.
-
In the Close - purchase order dialog, select a closing Reason from the drop-down list. Closing reasons are configured in the Settings app. For more information, see Settings > Orders > Closing purchase order reasons.
-
Optional: Enter any notes about why you are closing the order.
-
To close the order, click Submit. A confirmation message appears and the order’s status changes to Closed.
Reopening an order
Closing an order is not final and an order can be reverted back to an Open status by reopening the order.
-
Search for the order you want to reopen and select it.
-
In the Purchase order pane, select Actions > Reopen. A confirmation message appears and the order’s status changes to Open.
Receiving an order
You can only receive open orders.
-
Search for the order you want to receive and select it.
-
In the Purchase order pane, select Actions > Receive. The order line(s) open in the Receiving app.
-
Follow the steps as outlined in Receiving > Receiving an order.
Updating encumbrances for an order
You can update encumbrances for open orders. Use this action to reset encumbrances based on an order’s current price and fund distributions. If an order failed to encumber during rollover due to reasons such as insufficient budget funds or distribution to an inactive fund, make the appropriate edits to the budget or order and then select this Update encumbrances action to rerun the system encumbrance logic.
-
Search for the order for which you want to update encumbrances and select it.
-
In the Purchase order pane, select Actions > Update encumbrances.
-
A confirmation message appears and the order encumbrances are updated based on the order’s current price and fund distributions.
Creating a new invoice for an order
You can create an invoice for Open status orders from within the Orders app using the Action menu. Note: Purchase order lines containing payment status values of “Payment not required” or “Fully paid” are not linked to a new invoice created through the + New invoice action.
-
Search for the order for which you want to create an invoice and select it.
-
In the Purchase order pane, select Actions > + New invoice
-
In response to the Create invoice dialog prompt, “Do you want to create an invoice from this order?” click Submit. The Create invoice window opens.
-
Follow the steps in Creating an invoice to complete the Create invoice window and click Save and close.
-
If the order contains more than one purchase order line, the Edit sequence of invoice lines window opens containing a table list of all purchase order lines related to the order. You can optionally drag and drop order line rows to resequence them to match the vendor invoice sequence. When finished, click Save and close.
-
Two green toast messages display to indicate that the invoice and invoice line(s) have been saved. The invoice line(s) are automatically created and link to the purchase order line from which you initiated the + New invoice action.
Deleting an order
Note: When you delete an order, received items remain in the system, but the receiving history is removed.
-
Search for the order you want to delete and select it.
-
In the Purchase order pane, select Actions > Delete.
-
In the Delete order dialog, click Delete. A confirmation message appears and the order is deleted.
Printing an order
To print or save a PDF file containing a snapshot of key information about an order, follow these steps:
-
Search for the order you want to print and select it.
-
In the Purchase order pane, select Actions > Print. A print preview window will open.
-
To print the order, adjust the printer settings as needed and select Print.
-
To save the PDF file without printing, open the Destination drop-down list and select Save as pdf.
Showing hidden fields
To reveal fields that are hidden, as defined in Settings > Orders > Creating an order template, follow these steps. Note: The user permission Show all hidden fields must be assigned to the user.
-
From the detail pane of the order, select Actions > Show hidden fields. If any fields are hidden, they are added to the detail pane.
-
To hide the fields again, select Actions > hide fields.
Adding a tag to an order
-
Search for the order you want to tag and select it.
-
In the Purchase order details pane, click the tag icon.
-
In the Tags pane, either select a tag from the box or enter a tag.
-
Click the X on the Tags pane to close the pane and save the tag. The tag number updates to the number of tags applied to the order.
Viewing order version history
-
Search for the order you want to view and select it.
-
In the Purchase order details pane, click the clock icon which is to the right of the tag icon.
-
A fourth pane titled Version history opens. Versions are displayed in a card list sorted by date. The following information is displayed for each version:
- Source. The user who saved this version of the order line.
- Current Version, Original Version, or blank. Displays only for the current and original versions of the order line.
- Changes. Displays the list of fields that were edited in this version.
-
To view the order detail pane for a version, either click on the underlined version date mm/dd/yyyy, hh:mm or the clock icon for the version you want to open.
-
The order detail pane displays the order data for that version. Changes from the prior version are highlighted in yellow.
-
To close the version history view, click on the X in the top right of the Version history pane. The fourth pane closes and the order detail pane displays the current order version.
Adding an order line to an order
Follow these steps to add an order line to an order. You can also add an order line from the Inventory app by searching for an instance and clicking Inventory > Actions > Create new order.
-
Search for the order to which you want to add the PO line and select it.
-
In the Purchase order pane, in the PO lines section, click Add PO line.
-
In the Add PO line window, fill in the fields in the Item details, PO line details, Vendor, Cost details, and Fund distribution sections. For more information on the fields and actions available in these sections, see the section descriptions below.
-
Create another checkbox: If the Settings > Orders > Purchase orders line limit value is greater than one, click this checkbox at the bottom of the window to keep the Add PO line window open after saving the current order line.
-
Click Save, Save & close or Save & open order, if applicable. If possible duplicates are found, based on title and product ID values, a modal displays with a list of possible duplicate orders. Select continue or cancel. This duplicate check can be disabled in Settings. For more information on checking for duplicates and enabling saving and opening orders simultaneously, see Settings > Orders > Opening purchase orders.
-
Once the order line is created, you can add notes, See Adding a note to an order line for more information. If the order line is for a package, you can add package titles. See Adding package titles to an order line.
Item details
- Package. If you are adding a package, select the Package checkbox. If selected, Title becomes Package name. The Receiving workflow field will be automatically set to “Independent order and receipt quantity” once you select the Package checkbox. See the PO line details section below for more information about Receiving workflow.
- Title/Package name. Title of the item. If you already have the item in your Inventory app, you can use Title look-up to link the item to the Inventory record. This will automatically populate any applicable fields. To link to an inventory record, click Title look-up. In the Select instance dialog, find the title using the search box and/or the filters. Click the title to select it. The title appears in the Title box and relevant item fields are populated.
- Receiving note. Enter any notes about receiving the item. The notes display in the Receiving app for this order line.
- Must acknowledge receiving note. Check this box to enable the receiving note to popup in the Receving app when the user clicks to receive the title. See Receiving > Receive
- Subscription from. If the item is a subscription, select when the subscription starts. The date displays in the Invoices app when this order line is added to an invoice.
- Subscription to. If the item is a subscription, select when the subscription ends. The date displays in the Invoices app when this order line is added to an invoice.
- Subscription interval. If the item is a subscription, enter or select how many days the subscription lasts.
- Publication date. The date of publication of the item.
- Publisher. The publisher of the item.
- Edition. The edition of the item.
- Linked package. To link a package to the order line, click Lookup package POL. In the Select order lines dialog, find the package using the search box and/or the filters. Click the package to select it. The package appears in the Linked package field.
- Contributor. The item contributor.
- Product identifiers. The identifier of the item, like an ISBN.
- Internal note. Enter any internal notes about the item.
Adding a contributor
-
Click Add contributor.
-
Enter the Contributor in the box.
-
Select the Contributor type from the drop-down list: Corporate name, Meeting name, or Personal name. The Contributor saves once the order line is saved.
Deleting a contributor
-
Find the contributor you want to delete.
-
Click the trash can icon. The contributor is removed and is deleted once the order line is saved.
Adding a product ID and product ID type
-
Click Add product ID and product ID type.
-
Enter the Product ID in the box.
-
Optional: Enter a Qualifier in the box.
-
Select the Product ID type from the drop-down list. The product identifier saves once the order line is saved.
Deleting a product ID and product ID type
-
Find the product ID you want to delete.
-
Click the trash can icon. The product ID is removed and is deleted once the order line is saved.
PO line details
- Acquisition method. Select the method you are using to purchase the item: Approval plan, Demand driven acquisitions (DDA), Depository, Evidence based acquisitions (EBA), Exchange, Free, Gift, Internal transfer, Membership, Other, Purchase, Purchase at vendor system, Technical.
- Automatic export. Select this checkbox to include the order in automated EDI order export which is triggered when an order is opened if EDI is set up for the associated vendor. The account number selected in the Vendor section of the order will determine which EDI configuration is applied for the export. Leave the checkbox blank to prevent automatic export of the purchase order line when opened. See Organizations > Adding integration details to a vendor organization for more information about vendor organization integrations.
- Order format. Select the format of the item you are ordering: Electronic resource, Physical resource, P/E mix, or Other. The Order format determines which fields are required in the Cost details section and whether the Physical resource details or E-resources details sections are displayed.
- Receipt date. The receipt date of the item.
- Receipt status. Select the receipt status of the item: Pending or Receipt not required. For orders with type Ongoing, the receipt status is automatically set to Ongoing when the order is saved. If no selection is made, the order is created with a receipt status of Pending. Upon opening the order, the receipt status is automatically set to Awaiting receipt. Once an order is open, you can edit the Receipt status to Cancelled, Fully received, Partially received, or Receipt not required. The system will automatically close orders that have resolved both payment and receipt statuses either as “Payment not required” or “Receipt not required” or by reaching “Fully paid” and “Fully received” through actions taken in the Receiving app and the Invoices app. It is advisable to consider your library’s needs when defining how to set this field. For example, you may want to select “Receipt not required” for one-time e-resource orders so that the order will automatically close once invoice payment is complete. Otherwise, if your library doesn’t receive e-resources, a one-time e-resource order may be left open even after payment is complete which could impact your expected results during Fiscal Year rollover.
- Payment status. Select the payment status of the item: Payment not required or Pending. For orders with type Ongoing, the payment status is automatically set to Ongoing when the order is saved. If no selection is made, the order is created with a payment status of Pending. Upon opening the order, the payment status is automatically set to Awaiting payment. Once an order is open, you can edit the Payment status to Cancelled, Partially paid, Fully paid, or Payment not required. The Payment status is automatically set to Partially paid when a connected invoice line with the Release encumbrance checkbox unchecked/blank is set to an Approved status. The system will automatically close orders that have resolved both payment and receipt statuses either as Payment not required” or “Receipt not required” or by reaching “Fully paid” and “Fully received” through actions taken in the Receiving app and the Invoices app.
- Donor. The donor of the item.
- Selector. The person who chose the item.
- Requester. The person who requested the item.
- Cancellation restriction. If there is a cancellation restriction on the item, select the Cancellation restriction checkbox.
- Rush. If the item needs rush processing, select the Rush checkbox.
- Collection. If the item is part of a collection, select the Collection checkbox.
- Receiving workflow. Select a value from the drop down list to manage behavior in the Receiving app. Select Synchronized order and receipt quantity to keep the order quantity and the number of pieces to be received in sync. When the order is opened, the system will generate Receiving app pieces based on the quantity value on the purchase order line. Updating the quantity on the order will update the number of pieces to be received and updates in the Receiving app will update the order. Select Independent order and receipt quantity if you need to create an unpredictable quantity of Receiving pieces, such as for an ongoing order. Note: In prior system releases, this field was a checkbox named “Manually add pieces for receiving.”
- Cancellation description. A note about the cancellation.
- Line description. A description of the purchase order line.
- Tags. Select or enter any tags you want to assign to the order line in the box.
Vendor
- Vendor ref number. A reference number used by a vendor to identify the order or item being ordered. For example, for migrated open orders it may be helpful to store the original purchase order number here for use in matching to vendor invoices.
- Vendor ref type. Select the type of reference number entered in the previous box: Agent’s unique subscription reference number, Internal vendor number, Library’s continuation order number, Supplier’s continuation order, or Supplier’s unique order line reference number.
- Account number. The vendor account number. If one or more vendor accounts exist in the Organization record for the vendor selected in the Purchase order section of the Order, the first account appears in this field as the default value. To use a different account number for this vendor, select the Account number from the drop-down list, if applicable. Note: The list will display the Account name with the account number in parenthesis.
- Instructions to vendor. Enter any instructions you want to send to the vendor when the order is opened.
Cost details
This section contains purchase order line cost, quantity, currency, and discount information. Only certain fields will be editable depending on the Order format selected in the PO line details section. Some fields are required based on the Order format.
Note: If the Package checkbox is selected for the purchase order line, you will see Unit price and Quantity field labels rather than Physical unit price or Electronic unit price or quantity field labels.
- Physical unit price. The price of the physical unit. Required if the Order format is Physical, P/E mix, or Other.
- Quantity physical. The number of items you are ordering. Required if the Order format is Physical, P/E mix, or Other.
- Additional cost. Any additional costs for the item.
- Currency. Select the Currency of the item from the drop-down list. The default value is stored in Tenant settings as the primary currency. For more information, see Settings > Tenant > Language and localization. Note: When an order is opened, the system creates an encumbrance transaction on the current budget for the fund selected in the fund distribution section of the order. If the currency of the PO line is different than the budget currency, the encumbrance will display on the budget as a converted amount. The budget currency is set to the Tenant currency value at the time the Finance > Fiscal year record is created; therefore, if the Tenant currency value is updated, any budgets created prior to the update will still operate based on the Tenant currency that existed when the Fiscal year associated with the budget was created.
- Current exchange rate. This value will display after the POL is saved. The system automatically retrieves the current currency exchange rate using the Java Money API that retrieves and convert currencies using the European Central Bank (ECB) as the source.
- Use set exchange rate. Check this box if you want to input an exchange rate value to be used for order instead of current rate.
- Set exchange rate. The exchange rate value to be used for this order instead of the current rate. This field is locked, as indicated by the lock icon beside the field label, unless the Use set exchange rate checkbox is selected.
- Electronic unit price. The price of the electronic item. Required if the Order format is Physical or P/E mix.
- Quantity electronic. The number of electronic items you are ordering. Required if the Order format is Electronic or P/E mix.
- Discount. The discount percentage or price.
- Type. Select the % or $ to indicate the type of discount.
- Estimated price. The calculated price based on the values you entered. Estimated price = list unit price(s) x quantities ordered + additional cost - discount.
Fund distribution
If you want to encumber money to certain funds, enter your fund distributions in this section. You can encumber money to more than one fund. The encumbrance(s) apply to the current fiscal year budget for the selected fund(s).
Adding a fund distribution
-
Click Add fund distribution.
-
Select the Fund ID from the drop-down list. Only Active funds appear in the list. Note: The use of acquisitions units may restrict which funds appear in this list. If an acquisition unit is set up to restrict view permissions, then only funds that are assigned to the same acquisition unit as the user will display in the drop-down list. For more information, see See Settings > Acquisition units.
-
Select the Expense class from the list.
-
Enter the Value of the fund to be distributed.
-
Select the % or $ to indicate whether the value is a percentage or price. The fund distribution saves once you save the order line.
Deleting a fund distribution
-
Find the fund distribution you want to delete.
-
Click the trash can icon next to the fund. The fund distribution is removed and is deleted once the order line is saved.
Location
Location determines the effective location of the item once received. If you are ordering multiple items, you can assign them to different locations.
Adding a location
This field is required if the value of the Create inventory field includes Holdings. You can select from an existing holding for this title instance or add a new holding location for this title instance. See E-resources details > Create inventory for more information about the Create inventory field.
To add a location, follow these steps:
-
Click Add location.
-
If the Create inventory field for this purchase order line includes Holdings and this title instance already has holdings, the Select holdings drop-down list contains the list of existing holdings. Select a Name (code) from the drop-down list.
-
If this title instance doesn’t already have holdings or you need to create a new holding location, click Create new holdings for location.
-
Enter a Quantity physical in the box.
-
Enter a Quantity electronic in the box.
6 Repeat as needed. The location saves and any new holdings are created once the order line is saved.
Deleting a location
-
Find the location you want to delete.
-
Click the trash can icon next to the location. The location is removed and is deleted once the order line is saved.
Physical resource details
This section only appears if you select Physical resource or P/E mix under Order format.
- Material supplier. The supplier of the item. The field defaults to the name of the vendor associated with the vendor code selected for the order. For more information, see Purchase order. To change the supplier, click Organization look-up to select an organization. In the Select Organization dialog, find the organization using the search box and/or filters. Click the organization to select it. The organization is added to the Material supplier field.
- Receipt due. The date that receipt of the material is due, or the date by which the material should be received.
- Expected receipt date. The date the material is expected to be received. This date could fall before or after the Receipt due date.
- Create inventory. Select the types of records you want to create in the Inventory app once the order is opened: Instance, holdings, items; Instance; Instance, holdings; None. For information on configuring the default setting for this field, see Settings > Orders > Inventory interactions.
- Material type. The type of material. If an item is created for the order, this material type value will appear on the item record in the Inventory app. Note: If the item material type is edited from the Inventory app, the order record material type value will not be updated.
- Volume. A number to identify the specific volume being ordered within a series, set or collection. Currently, this information is stored only on the order.
E-resources details
This section only appears if you select Electronic resource or P/E mix under Order format.
- Access provider. The e-resource provider. The default value is set to the vendor organization. To change the provider organization, click Organization look-up to select a different organization. In the Select Organization dialog, find the organization using the search box and/or filters. Click the organization to add it as the access provider.
- Activation status. If the e-resource is activated, select the Activation status checkbox.
- Activation due. The date the activation is due. Note: If you have entered an interval in the Expected activation interval field in the Vendor information section of the vendor record, the activation due date is populated based on the number of days you entered as the interval. For example, if you set the interval to 365, the Activation due field is populated with the date that falls one year from the date of order line creation.
- Create inventory. Select the types of records you want to create in the Inventory app once the order is opened. For information on configuring the default setting for this field based on Order format, see Settings > Orders > Inventory interactions.
- Material type. The type of material.
- Trial. If the e-resource is part of a trial, select the Trial checkbox.
- Expected activation. The date activation of the e-resource is expected.
- User limit. The number of users that can use the e-resource at once.
- URL. A link to the e-resource.
Adding a volume
To add a volume, click Add volume and enter the volume number. The volume saves once the order line is saved.
Deleting a volume
To delete a volume, find the volume you want to delete and click the trash can icon. The volume is removed and is deleted once the order line is saved.
Other resource details
This section only appears if you select Other under Order format.
- Material supplier. The supplier of the item. The default value is the vendor selected on the order. To change the supplier, click Organization look-up to select a vendor. In the Select Organization dialog, find the organization using the search box and/or filters. Click the organization to add it as the Material supplier.
- Receipt due. The date the receipt is due.
- Expected receipt date. The date the item is expected to be received.
- Create inventory. Select the types of records you want to create in the Inventory app once the order is opened. For information on configuring the default setting for this field, see Settings > Orders > Inventory interactions.
- Material type. The type of material.
Adding package titles to an order line
The package titles section of the purchase order line display appears only if the package title checkbox was selected during order creation.
-
Find the order line to which you want to add package titles and select it.
-
In the Package titles section, click Add.
-
In the Select instance dialog, use the Search & Filter pane to find the package title. Find the title using the search box and/or the filters. Click the title to select it. The title appears in the Package titles table list.
Adding a note to an order line
-
Find the order line to which you want to add a note and select it.
-
In the PO Line details pane, under Notes, click New.
-
In the New note window, select the Note type from the drop-down list. Note types are created in the Settings app.
-
Enter a Note title in the box.
-
Optional: Enter any Details about the note in the box.
-
Click Save & close. The note is saved and appears in the Notes section in the PO Line details pane.
Adding a tag to an order line
-
Find the order line you want to tag and select it.
-
In the PO Line details pane, click the tag icon.
-
In the Tags pane, either select a tag from the box or enter a tag.
-
Click the X on the Tags pane to close the pane and save the tag. The tag number updates to the number of tags applied to the order line.
Searching for order lines
You can search for order lines in the Search & filter pane. Order lines is selected by default. To search for order lines, enter your search terms into the box. Select the Keyword drop-down list to search through one of the following fields:
- Keyword. Searches through all fields in the drop-down list. This is the default search.
- Contributor. The contributor to the item.
- PO line number. The number for the purchase order line.
- Requester. The requester of the item.
- Title or package name. The title or package name of the item.
- Publisher. The publisher of the item.
- Vendor account. The vendor account your library is using to purchase the item.
- Vendor reference number. The vendor reference number for this order line.
- Donor. The donor of the item.
- Selector. The selector of the item.
- Volumes. The volume number ordered.
- Product ID. The Product ID of the item.
- Product ID ISBN. The ISBN of the item.
You can also search for order lines by selecting any of the filters in the Search & filter pane. Additionally, you can apply the filters after you perform a search to limit your results. See the sections below for more information.
Receipt status
In the Search & filter pane, click Receipt status and select any applicable filters:
- Awaiting receipt. Order lines waiting to be received.
- Cancelled. Order lines that were cancelled.
- Fully received. Order lines that were fully received.
- Ongoing. Order lines for an ongoing order.
- Partially received. Order lines that were partially received.
- Pending. Order lines that are pending.
- Receipt not required. Order lines that do not require a receiving record.
Payment status
In the Search & filter pane, click Payment status and select any applicable filters:
- Awaiting payment. Order lines awaiting payment.
- Cancelled. Order lines with cancelled payment.
- Fully paid. Order lines that are fully paid.
- Ongoing. Order lines for an ongoing order.
- Partially paid. Order lines that are partially paid. Note: Once or more invoices connected to a purchase order line have been “Approved,” the Payment status on the purchase order is changed to “Partially paid.” See Invoices > Approving an invoice.
- Payment not required. Order lines that do not require payment.
- Pending. Order lines with pending payment.
Prefix
To search for order lines by purchase order number prefix, follow these steps. For more information about creating Prefix values, see Settings > Orders > Prefixes
-
In the Search & filter pane, click Prefix.
-
Select the prefix from the drop-down list. The search results appear in the Order lines pane.
Suffix
To search for order lines by purchase order number suffix, follow these steps. For more information about creating Suffix values, see Settings > Orders > Suffixes.
-
In the Search & filter pane, click Suffix.
-
Select the suffix from the drop-down list. The search results appear in the Order lines pane.
Acquisitions unit
To search for order lines assigned to a specific acquisitions unit, follow these steps:
-
In the Search & filter pane, click Acquisitions unit.
-
Select the acquisitions unit from the drop-down list. The search results appear in the Orders pane.
Acquisition method
In the Search & filter pane, click Acquisition method and select any applicable filters:
- Approval plan. Order lines acquired through an approval plan.
- Demand driven acquisitions (DDA). Order lines acquired through DDA.
- Depository. Order lines acquired through a depository arrangement, such as for government publications.
- Evidence based acquisitions (EBA). Order lines acquired through EBA.
- Exchange. Order lines acquired through an exchange with another library or institution.
Free
- Gift. Order line for materials granted to the library as a gift.
- Internal transfer. Order lines acquired through internal transfer.
- Membership. Order lines acquired through membership.
- Other. Order lines acquired by some other method not listed.
- Purchase. Order lines purchased by methods such as email or EDI.
- Purchase at vendor system. Order lines purchased through an external vendor system, such as a website.
- Technical. Order lines to track payments for technical expenses such as service orders or vendor processing fees. This value could also be used for items that have migrated from an external system.
Location
To search for order lines in a specific permanent location, follow these steps:
-
In the Search & filter pane, click Location.
-
Click Location look-up.
-
In the Select permanent location dialog, select an Institution, Campus, Library, and Location using the drop-down lists.
-
Click Save and close. The search results appear in the Order lines pane.
Fund code
To search for order lines using a specific fund code, follow these steps:
-
In the Search & filter pane, click Fund code.
-
Select the fund code from the drop-down list. The search results appear in the Order lines pane.
Expense class
To search for order lines that have a fund distribution expense class assignment, follow these steps:
-
In the Search & filter pane, click Expense class.
-
Select the expense class from the drop-down list. The search results appear in the Order lines pane.
Linked package POL
To search for order lines that have been linked to a package POL:
-
In the Search & filter pane, click Linked package POL.
-
Click Linked package POL lookup.
-
In the Select order lines dialog, the search results will be pre-filtered to package POLs.
-
Click on the row representing the package POL you wish to select.
-
The search results will display all purchase order lines linked to the selected package POL.
In the Search & filter pane, click Order format and select any applicable filters:
- Electronic resource. Order lines containing an electronic resource.
- Physical resource. Order lines containing a physical resource.
- P/E mix. Order lines containing a physical and electronic mixed resource.
- Other. Order lines containing a different type of resource.
Material type, electronic
To search for order lines that have an Order format of Electronic resource or P/E mix based on their electronic material type in the e-resources details section, follow these steps:
-
In the Search & filter pane, click Material type, electronic.
-
Select the material type from the drop-down list. The search results appear in the Order lines pane.
Material type, physical
To search for order lines that have an Order format of Physical resource or P/E mix based on their physical material type in the physical details section, follow these steps:
-
In the Search & filter pane, click Material type, physical.
-
Select the material type from the drop-down list. The search results appear in the Order lines pane.
Date created
To search for order lines based on the date they were created, follow these steps:
-
In the Search & filter pane, click Date created.
-
Enter a start date in the From box and an end date in the To box.
-
Click Apply. The search results appear in the Order lines pane.
Vendor
To search for order lines from a specific vendor, follow these steps:
-
In the Search & filter pane, click Vendor.
-
Click Organization look-up.
-
In the Select Organization dialog, search for the vendor.
-
Select the vendor you want to filter by. The vendor filter is applied.
To search for order lines assigned specific tags, follow these steps:
-
In the Search & filter pane, click Tags.
-
Select the tag(s) from the drop-down list. The search results appear in the Order lines pane.
Source
In the Search & filter pane, click Source and select any applicable filters:
- User. Order lines created by a FOLIO user.
- API. Order lines created through an Application Programming Interface.
- EDI. Order lines created through Electronic Data Interchange..
- MARC. Order lines imported through MAchine-Readable Cataloging format record import.
Collection
In the Search & filter pane, click Collection and select any applicable filters:
- Yes. Order lines that are part of a collection.
- No. Order lines that are not part of a collection.
Rush
In the Search & filter pane, click Order format and select any applicable filters:
- Yes. Order lines that are flagged for rush processing.
- No. Order lines that do not require rush processing.
Access provider
To search for order lines from a specific access provider, follow these steps:
-
In the Search & filter pane, click Access provider.
-
Click Organization look-up.
-
In the Select Organization dialog, search for the vendor.
-
Select the vendor you want to filter by. The search results appear in the Order lines pane.
Activated
In the Search & filter pane, click Activated and select any applicable filters:
- Yes. Order lines that are activated.
- No. Order lines that are not activated.
Expected activation
To search for order lines based on their expected activation date, follow these steps:
-
In the Search & filter pane, click Expected activation.
-
Enter a start date in the From box and an end date in the To box.
-
Click Apply. The search results appear in the Order lines pane.
Trial
To search for order lines that have an Order format of Electronic resource or P/E mix and are flagged as a trial resource in the Electronic resource details section.
In the Search & filter pane, click Trial and select any applicable filters:
- Yes. Order lines for resources that are being evaluated on a trial basis.
- No. Order lines for resources that are not trials.
Subscription from
To search for order lines based on their subscription from date, follow these steps:
-
In the Search & filter pane, click Subscription from.
-
Enter a start date in the From box and an end date in the To box.
-
Click Apply. The search results appear in the Order lines pane.
Subscription to
To search for order lines based on their subscription to date, follow these steps:
-
In the Search & filter pane, click Subscription to.
-
Enter a start date in the From box and an end date in the To box.
-
Click Apply. The search results appear in the Order lines pane.
Actual receipt date
To search for order lines based on their actual receipt date (when the order line was fully received), follow these steps:
-
In the Search & filter pane, click Actual receipt date.
-
Enter a start date in the From box and an end date in the To box.
-
Click Apply. The search results appear in the Order lines pane.
Expected receipt date
To search for order lines based on their expected receipt date, follow these steps:
-
In the Search & filter pane, click Expected receipt date.
-
Enter a start date in the From box and an end date in the To box.
-
Click Apply. The search results appear in the Order lines pane.
Receipt due
To search for order lines based on their receipt due date, follow these steps:
-
In the Search & filter pane, click Receipt due.
-
Enter a start date in the From box and an end date in the To box.
-
Click Apply. The search results appear in the Order lines pane.
Export date
To search for order lines based on their export date, follow these steps:
-
In the Search & filter pane, click Export date.
-
Enter a start date in the From box and an end date in the To box.
-
Click Apply. The search results appear in the Order lines pane.
Viewing order line details
Once you search for an order line, the following information appears in the Order lines results pane:
- POL number. Purchase order line number.
- Updated date. The date the order line was last updated.
- Title or package name. The title or package name of the item.
- Product ID. The product ID of the item.
- Vendor reference number. The vendor reference number for this order line.
- Fund code. The fund code being used to purchase the item.
- Order status. The status of the order: Pending, Open, Closed.
In the search results, click on an order line to view it. The PO Line details pane displays with additional information about the order line:
Item details
See Adding an order line to an order > Item details for more information on the fields displayed in this section of the purchase order line.
Purchase order line
See Adding an order line to an order > PO line details for more information on the fields displayed in this section of the purchase order line.
Vendor
See Adding an order line to an order > Vendor for more information on the fields displayed in this section of the purchase order line.
Cost details
See Adding an order line to an order > Cost details for more information on the fields displayed in this section of the purchase order line.
Fund Distribution
- Fund. The fund to which you are distributing the amount elephant
- Expense class. The expense class within the fund, to which you are distributing the amount. This field will only display information if the selected Fund ID has any associated Expense classes.
- Value. The monetary value to apply to the fund, expressed as a percentage or currency value.
- Amount. The amount of money committed to the fund.
- Initial encumbrance. The initial amount committed to the fund.
- Current encumbrance. The current amount committed to the fund. When an invoice transitions to Approved status and the Release encumbrances checkbox on an invoice line is checked, the Current encumbrance value becomes $0. Click on the value to hyperlink to the fund budget transaction detail view for the encumbrance.
Location
This section displays information if the order line Create inventory setting is Instance, holdings or Instance, holdings, item. See Adding a location for more information.
- Name(code). Name and code of the location for this POL.
- Quantity physical. Quantity ordered for this location for this POL.
- Quantity electronic. Quantity ordered for this location for this POL.
Electronic resource details
This section displays information if the order includes a POL with an order format of Electronic or P/E mix. See Adding an order line to an order > E-resources details for more information on the fields displayed in this section of the purchase order line.
Physical resource details
This section displays information if the order includes a POL with an order format of Physical, P/E mix, or Other. See Adding an order line to an order > Physical resource details for more information on the fields displayed in this section of the purchase order line.
Notes
This section displays notes about the order. See Adding a note to an order line for more information about creating notes.
- Date. Last updated date of the note. Click on the column label Date to sort notes by ascending or descending order.
- Title and details. The note title and the details of the note. Click Edit to edit the note. Click Save & Close to save your changes and click X to close the notes window.
- Type. Note type. See Settings > Notes for more information about note types.
This section displays information about invoices and invoice lines that link to this POL. The invoice table list displays the following columns:
- Invoice line #. The invoice number for the invoice that has an invoice line linked to this POL. Click on the invoice number to open the Invoices app detail pane for the invoice. Note: The link is to the general invoice, not to the specific invoice line that links to this POL.
- Invoice date. The vendor invoice date.
- Vendor name. The name of the vendor associated with the related invoice.
- Vendor invoice number. The vendor-provided identifier for the invoice related to this purchase order line.
- Status. The status of the invoice: Open, Reviewed, Approved, Paid, or Cancelled.
- Quantity. The quantity invoiced. Note that the quantity shown is from the invoice line related to this order, not from the general invoice.
- Amount. The total amount of the invoice line calculated as the sub-total plus adjustments.
- Comment. The invoice line comment.
If the PO Line has been linked to an Agreement line in the Agreements app, a Linked Agreement Lines section will display in the PO Line details pane containing information about the linked Agreement Line. See Agreements > Adding a PO line to an agreement line for more information.
Linked instance
This section displays information about inventory instances that link to this POL. The linked instance table list displays the following columns:
- Title. Title of the instance.
- Contributors. Contributors of the instance.
- Publishers. Publishers of the instance.
- Relation.
Editing an order line
-
Find the order line you want to edit and select it.
-
In the PO Line details pane, click Actions > Edit.
-
Edit the order line.
-
Click Save & close. A confirmation message appears and the order line is updated.
Changing an instance connection
To change the Inventory instance connection for a purchase order line, follow these steps:
-
Find the order line you want to change and select it.
-
In the PO Line details pane, click Actions > Change instance connection. The Select instance search window opens.
-
Find the title using the search box and/or the filters. Click the title to select it. The Change title window opens, “You have changed the title information of this purchase order line from (old title name) to (new title name). All related item records will be moved to the new instance. How would you like to address the related Holdings?
-
Click the How to update holdings drop-down list and select Move, Find or create new, or Create new.
-
If you choose to create new holdings or find matching holdings based on the current location of items, FOLIO will ask you if you want to delete the abandoned Holdings where possible. A popup window will display, “This piece is connected to records in inventory. After this edit, there will be no other pieces OR items connected to the related Holdings record. After making this change, would you like FOLIO to delete the holdings?” Select Submit to complete the instance connection change. Select either Keep holdings or Delete holdings to continue.
-
The confirmation message, “Order instance connection has been successfully updated.” displays.
Receiving an order line
-
Find the order line you want to receive and select it.
-
In the PO Line details pane, click Actions > Receive. The order line opens in the Receiving app.
-
Follow the steps as outlined in the Receiving app documentation.
Cancelling an order line
To cancel a purchase order, follow the steps below. Cancelling an order line removes all encumbrances and item records associated with the order line. Note: Only order lines with an order status of Open will display the cancel option in the Action menu.To cancel an entire purchase order, see Cancelling an order. You can reopen an order after performing the cancel action.
-
Search for the order line you want to cancel and select it.
-
In the PO Line detail pane, select Actions > Cancel. A confirmation dialog asks, “Are you sure you want to cancel this purchase order line?”. Select Cancel order line to continue. A confirmation message appears.
Upon cancellation, the PO line Receipt status and Payment status values change to Cancelled. The fund distribution Current encumbrance amount is set to $0.00. If there is an associated item in Inventory, the Item status value is set to Order closed. The POL receipt status is set to Cancelled. In the PO line search results pane and on the Purchase order detail pane PO lines section, a red circle with a diagonal line icon appears beside the cancelled order line.
Deleting an order line
-
Find the order line you want to delete and select it.
-
In the PO Line details pane, click Actions > Delete.
-
In the Delete order line dialog, click Delete. A confirmation message appears and the order line is deleted.
Printing an order line
To print or save a PDF file containing a snapshot of key information about an order line, follow these steps:
-
Search for the order line you want to print and select it.
-
In the PO Line details pane, click Actions > Print order line. A print preview window will open.
-
To print the order line, adjust the printer settings as needed and select Print.
-
To save the PDF file without printing, open the Destination drop-down list and select Save as pdf.
Viewing order line version history
-
Search for the order line you want to view and select it.
-
In the PO Line details pane, click the clock icon which is to the right of the tag icon.
-
A fourth pane titled Version history opens. Versions are displayed in a card list sorted by date. The following information is displayed for each version:
- Source. The user who saved this version of the order line.
- Current Version, Original Version, or blank. This information displays only for the current and original versions of the order line.
- Changes. Displays the list of fields that were edited in this version.
-
To view the PO Line details pane for a version, either click on the underlined version date mm/dd/yyyy, hh:mm or the clock icon for the version you want to open.
-
The PO Line details pane displays the PO line data for that version. Changes from the prior version are highlighted in yellow.
-
To close the version history view, click on the X in the top right of the Version history pane. The fourth pane closes and the PO Line details pane displays the current order version.
6.4 - Organizations
The Organizations app allows you to manage information about organizations associated with your library. Organization records are a place where you can store information about an organization, including contact information, websites, interfaces, and accounts. The organizations you create are shared with the acquisitions and electronic resources management areas of FOLIO in the following apps: Orders, Invoices, Receiving, Agreements, Licenses, and eUsage.
Definition of terms related to the Organizations app:
- Acquisition units. An additional layer you can add to acquisitions records that restricts a user’s ability to interact with those records unless they have been assigned to that unit. For example, you may create acquisition units to represent the different libraries within your library system. Units are defined and determined by your library in the Settings app. See Settings > Acquisition units for more information.
- Organization. Any institution with which your library interacts. An organization may or may not be an institution from which you purchase materials.
- Vendor. Any institution from which your library purchases materials.
Permissions
The permissions listed below allow you to interact with the Organizations app and determine what you can or cannot do within the app. You can assign permissions to users in the Users app. If none of these permissions are assigned to a user, they are unable to see the Organizations app or any related information.
Organizations permissions:
- Organizations: Assign acquisition units to new organization. This permission allows the user to assign acquisition units to the organization when creating a new record.
- Organizations: Integration usernames and passwords: view. This permission allows the user to view the usernames and passwords that appear in the Integration details accordion FTP section.
- Organizations: Integration usernames and passwords: view, edit. This permission allows the user to view and edit the usernames and passwords that appear in the Integration details accordion FTP details section.
- Organizations: Interface usernames and passwords: view. This permission allows the user to view the usernames and passwords that appear in the Interface section.
- Organizations: Interface usernames and passwords: view, edit, create, delete. This permission allows the user to create, edit, and delete the usernames and passwords that appear in the Interface section. Note: This permission must always be assigned in conjunction with either the Organizations: View, edit, create or Organizations: View, edit, delete permissions.
- Organizations: Manage acquisition units. This permission allows the user to change the assignment of acquisition units for the organization when editing a record.
- Organizations: View. This permission allows the user to search and view organization records and settings. The user can also access Contacts and Interfaces but cannot access Interface usernames and passwords.
- Organizations: View, edit. This permission allows the user to edit and view organizations. The user can also access Contacts, but they cannot access Interface usernames and passwords.
- Organizations: View, edit, create. This permission allows the user to create, edit, and view organizations. The user can also access Contacts, but they cannot access Interface usernames and passwords.
- Organizations: View, edit, delete. This permission allows the user to view, edit, and delete organizations. The user can also access Contacts, but they cannot access Interface usernames and passwords.
Keyboard shortcuts
Keyboard shortcuts allow you to perform actions in this app using the keyboard. See Platform essentials > Keyboard shortcuts for more information.
Creating an organization
When creating an organization, you either create it as a general organization or specifically as a vendor. If you create the organization as a vendor, you can add additional vendor-related information. For more information on creating a vendor, see Creating a vendor.
-
In the Organizations pane, click New.
-
In the Create organization window, fill in the Summary, Contact information, Contact people, and Interface sections. For more information on the fields and actions available in these sections, see the section descriptions below.
-
Once you have included all of the information you want about the organization, click Save & close. The organization is saved and added to the Organizations pane.
Summary
- Name (required). The name of the organization.
- Code (required). A unique identifier for the organization. Note: You cannot have duplicate vendor codes. The codes for each organization must be different.
- Accounting code. The accounting code used by your library in your payment system in reference to the organization.
- Organization status (required). Select an organization status: Active, Inactive, or Pending. The status you select here is evaluated by the Orders and Invoices apps. Orders can only be opened and invoices can only be paid if the organization is a vendor with an Active status. You may want to use the Pending status to signify that the organization record is a draft.
- Type. Select one or more organization types. See Settings > Organizations > Creating a new type for more information.
- Default language. Select the organization’s default language.
- Vendor. If you are creating a vendor organization, select the Vendor checkbox . See Creating a vendor for more information.
- Acquisition units. Select the Acquisition units you want to apply to the organization record. See Settings > Acquisition units for more information.
- Description. Enter a description of the organization.
- Alternative names. Alternative names used by the organization, such as abbreviations or prior names.
Adding an alternative name
Note: Adding an alternative name is optional, but if you click Add alternative names, you must enter an Alias or delete the alternative name in order to save the organization record.
-
Click Add alternative names.
-
Enter the organization’s Alias in the box.
-
Optional: Enter a Description about the alias in the box.
-
Repeat as needed. The alternative name saves once you save the organization.
Deleting an alternative name
-
Find the Alternative name you want to delete.
-
Click the trash can icon. The alternative name is deleted and is removed from the record once you save the organization.
The Contact information section stores organizational contact information that is not specific to individual people at the organization. You can add contact information for specific individuals in the Contact people section, which is described below.
Categories for contact information are configured in the Settings app. If you assign a category to any type of contact information you enter in this section, the contact information is then sorted by that category when you view the organization.
- Address. The addresses associated with the organization. You can add multiple addresses.
- Phone numbers. The phone numbers associated with the organization. You can add multiple phone numbers.
- Email address. The email addresses associated with the organization. You can add multiple email addresses.
- URLs. The URLs associated with the organization. You can add multiple websites or FTP connections.
Adding an address
-
Click Add address.
-
Fill in the address information.
-
Repeat as needed. The address saves once you save the organization. Note: If you are adding multiple addresses, select the Use as primary address checkbox at the top of the organization’s primary address. The primary address is included in the invoice voucher extract. See Invoices > Voucher information for more information.
Deleting an address
-
Find the address you want to delete.
-
Click the trash can icon. The address is deleted and is removed from the record once you save the organization.
Adding a phone number
-
Click Add phone number.
-
Enter the Phone number in the box.
-
Optional: Select the Type of phone number from the drop-down list: Office, Mobile, Fax, or Other.
-
Optional: Select the Language spoken at that number from the drop-down list.
-
Optional: Select any Categories from the drop-down list that describe the email address.
-
Repeat steps 1-5 as needed. The phone number saves once you save the organization. Note: If you are adding multiple numbers, select the Use as primary phone checkbox at the top of the organization’s primary number.
Deleting a phone number
-
Find the phone number you want to delete.
-
Click the trash can icon. The phone number is removed and is deleted once you save the organization.
Adding an email address
-
Click Add email.
-
Enter the Email address in the box.
-
Optional: Enter a Description of the email in the box.
-
Optional: Select a Language from the drop-down list.
-
Optional: Select any Categories from the drop-down list that describe the email address.
-
Repeat steps 1-5 as needed.The email address saves once you save the organization. Note: If you are adding multiple email addresses, select the Use as primary email checkbox at the top of the organization’s primary email address.
Deleting an email address
-
Find the email address you want to delete.
-
Click the trash can icon. The email address is removed and is deleted once you save the organization.
Adding a URL
The URL can be a website or FTP link.
-
Click Add URL.
-
Enter the URL in the box.
-
Optional: Enter a Description of the URL in the box.
-
Optional: Select a Language from the drop-down list.
-
Optional: Select any Categories from the drop-down list that describe the URL.
-
Repeat steps 1-5 as needed. The URL saves once you save the organization. Note: If you are adding multiple URLs, select the Use as primary URL checkbox at the top of the organization’s primary URL.
Deleting a URL
-
Find the URL you want to delete.
-
Click the trash can icon. The URL is removed and is deleted once you save the organization.
If you need to create a new contact, see Creating a contact person.
-
Click Add contact.
-
In the Add contacts dialog, search for the contact you want to add.
-
In the Search results, select the checkbox next to the contact(s) you want to add. You can add multiple contacts at a time.
-
Click Save. The contact(s) appear under the Contact people section.
-
Find the contact you want to delete.
-
Click the x. The contact is deleted and is removed from the record once you save the organization.
Interface
An interface is a website, software, or portal that you use to manage orders or gather statistics from the organization.
Creating a new interface
For more information, see Creating an interface.
Adding an existing interface
-
Click Add interface.
-
In the Add interfaces dialog, search for the interface you want to add.
-
In the Search results, select the checkbox next to the interface(s) you want to add. You can add multiple interfaces at a time.
-
Click Save. The interface(s) appear under the Interface section.
Removing an interface from the organization record
-
Find the interface you want to delete.
-
Click the x. The interface is deleted and is removed from the record once you save the organization.
Creating a vendor
-
In the Organizations pane, click New.
-
In the Create organization window, in the Summary section, select the Vendor checkbox. Vendor sections appear.
-
Continue filling in the Summary section. Fill in the Contact information, Contact people, Interface, Vendor information, Vendor terms, and Accounts sections. For more information on the fields and actions available in these sections, see the section descriptions below.
-
Once you have included all of the information you want about the vendor, click Save & close. The vendor is saved and added to the Organizations pane.
-
In the newly created Organization record’s detail pane, see the accordion sections to add Notes and Integration details. For more information, see Adding a note to an organization and Adding integration details to a vendor organization.
Summary
For more information, see Summary.
For more information, see Contact information.
For more information, see Contact people.
Interface
For more information, see Interface.
The information that you enter under Vendor information sets some of the defaults that appear when you apply the vendor to an order or invoice.
- Payment method. The payment method that you want to appear as the default payment method for the vendor on an invoice. See Invoices > Extended information for more information.
- Vendor currencies. The currencies accepted by the vendor.
- Expected activation interval. The standard activation period for the vendor, in days. Note: The interval you enter here is used in the Activation due field in the E-resources details section of an order line associated with the vendor. For example, if you set the interval to 365, the Activation due field is populated with the date that falls one year from the date the order line is created.
- Expected invoice interval. The standard invoice interval for the vendor, in days. Currently, this information does not display on invoices.
- Claiming interval. The standard claim period for the vendor, in days.
- Expected receipt interval. The standard period during which ordered items are received from the vendor, in days.
- Discount percent. The discount negotiated with the vendor, as a percent value. When creating an order line for an order with the vendor, this value appears as the default in the discount field.
- Renewal activation interval. The standard renewal activation period for this vendor, in days.
- Subscription interval. The standard subscription period for the vendor, in days.
- Export to accounting. To indicate that invoices for the vendor should create voucher records for export to an external accounts payable system, select the Export to accounting checkbox. When creating an invoice for the vendor, the value on the Organization record sets the default value for the invoice Export to accounting field.
Tax
The information that you enter under Tax sets the defaults that appear when you apply the vendor to an order.
- Tax ID. The Federal Tax Identification Number for the vendor. This is also known as an Employer Identification Number (EIN) and is used to identify a business entity.
- Tax percentage. The standard tax rate for the vendor. For vendors liable for a value added tax (VAT), the percentage value can be stored here for reference.
- Liable for VAT. To indicate that the vendor is liable for value-added tax (VAT), select the Liable for VAT checkbox.
Vendor terms
Vendor terms are the summary of an agreement with the vendor. The agreements may be acquisitions/fulfillment-related or e-resource-related. The values entered here do not appear on orders or invoice records.
Note: Adding vendor terms is optional, but if you click Add, you must add a Name or delete the vendor term in order to save the organization record.
Adding a vendor term
-
Click Add.
-
Enter the Name of the term in the box.
-
Optional: Enter or select the Discount % in the box.
-
Optional: Enter a Reference URL in the box.
-
Optional: Enter any Notes about the agreement in the box.
-
Repeat steps 1-5 as needed. Terms are saved once you save the vendor.
Deleting a vendor term
-
Find the vendor term you want to delete.
-
Select the trash can icon. The term is removed and is deleted once you save the vendor.
Accounts
The account section describes your library accounts with a vendor used for ordering materials.
Note: Adding an account is optional, but if you click Add, you must fill in the required fields or delete the account in order to save the organization record.
Adding an account
-
Click Add.
-
Enter the account Name in the box.
-
Enter the Account number in the box. This number is usually assigned by the vendor. Note: The account number entered here appears as a default value on any orders or invoices for the vendor. If you have multiple accounts set up in this section, the first account number displays as the default on orders and invoices, but you can select the appropriate number from a drop-down list that contains all the account numbers associated with the vendor.
-
Optional: Enter a Description of the account in the box.
-
Optional: Enter the Accounting code in the box.
-
Optional: Select the Payment method from the drop-down list.
-
Select the Account status from the drop-down list.
-
Optional: Enter Contact info in the box.
-
Optional: Enter the Library code in the box. This is the library-supplied code for the account with the vendor.
-
Optional: Enter the Library EDI code in the box.
-
Optional: Enter any Notes about the account in the box.
-
Optional: Select any Acquisition units from the drop-down list. For more information on acquisition units, see Settings > Acquisition units.
-
Repeat steps 1-13 as needed. Accounts are saved once you save the vendor.
Deleting an account
-
Find the account you want to delete.
-
Click the trash can icon. The account is removed and is deleted once you save the vendor.
Searching for an organization
You can search for organizations in the Search & filter pane. To search for an organization, enter your search terms into the box. Select the All drop-down list to search through one of the following fields:
- All. All fields. This is the default search.
- Name. The name of the organization.
- Code. A unique identifier for the organization.
- Language. The default language of the organization. Enter the language code (ex: ‘eng’ or ‘fra’) to search for organizations with this default language. Entering the language name in this search box will not retrieve results.
- Alias. Alternative names used by the organization, such as abbreviations or prior names.
- Accounting code. The accounting code used by your library in your payment system in reference to the organization.
- Tax ID. Your library’s tax identifier number.
You can also search for organizations by selecting any of the filters in the Search & filter pane. Additionally, you can apply the filters after you perform a search to limit your results. See the sections below for more information.
Organization status
To filter organizations by their status, select one of the following:
- Active. Organizations currently used by your library.
- Inactive. Organizations previously used by your library.
- Pending. Organizations that are not yet available for use. Pending could indicate that the organization record is not yet complete.
Type
To search for organizations assigned with specific types, follow these steps:
-
In the Search & filter pane, click Type.
-
Select the type(s) from the drop-down list. Your results appear in the Organizations pane.
To search for organizations assigned with specific tags, follow these steps:
-
In the Search & filter pane, click Tags.
-
Select the tag(s) from the drop-down list. Your results appear in the Organizations pane.
Is vendor
To filter organizations by whether or not they are a vendor, select one of the following:
- Yes. Organizations that are vendors (have the Vendor checkbox selected).
- No. Organizations that are not vendors.
Country
To search for organizations with offices in a specific country, follow these steps:
-
In the Search & filter pane, click Country.
-
Select the country from the drop-down list. Your search results appear in the Organizations pane.
Languages
To search for organizations that communicate in a specific language, follow these steps:
-
In the Search & filter pane, click Languages.
-
Select the language from the drop-down list. Your search results appear in the Organizations pane. Note: This filter may not retrieve all expected records for organizations loaded to FOLIO through an API. This tool is filtering by language name rather than language code. For records created directly in FOLIO this filter does retrieve the expected records by language.
Payment method
To filter organizations by their default payment method, as indicated in the Vendor information section of a vendor record, select one of the following options:
- Cash. Default payment method of cash.
- Credit card. Default payment method of credit card.
- EFT. Default payment method of electronic funds transfer.
- Deposit account. Default payment method of deposit account.
- Physical check. Default payment method of physical check.
- Bank draft. Default payment method of bank draft.
- Internal transfer. Default payment method of internal transfer.
- Other. Default payment method of other.
Acquisitions unit
To search for organizations to which one or more acquisitions units have been assigned, follow these steps:
-
In the Search & filter pane, click Acquisitions unit.
-
Select the acquisitions unit from the drop-down list. The search results appear in the Organizations pane.
Viewing organization details
Once you search for an organization, the following information appears in the Organizations pane:
- Name. The name of the organization.
- Code. A unique identifier for the organization.
- Description. A description of the organization.
- Organization status. The status of the organization: Active, Inactive, or Pending.
- Vendor. Whether the organization is a vendor or not.
In the search results, click on an organization to view it. The Organization details pane displays with additional information about the organization in the following accordion sections:
Editing an organization
-
Find the organization you want to edit and select it.
-
In the Organization details pane, click Actions > Edit.
-
Edit the organization.
-
Click Save & close. The organization is saved and updated.
Changing a vendor to an organization
Note: Changing a vendor to an organization removes all Vendor information, Vendor terms, and Accounts from the record.
-
Find the organization you want to edit and select it.
-
In the Organization details pane, clear the Vendor checkbox.
-
In the Confirm vendor data deletion dialog, click Confirm. The Vendor information, Vendor terms, and Accounts sections are removed.
-
Make any additional changes to the organization.
-
Click Save & close. The organization is saved and updated.
Deleting an organization
The system allows you to delete a vendor organization even if there are orders or invoices associated with the vendor. If you try to take actions such as adding a PO line or paying an invoice associated with the deleted vendor you will see error messages explaining that that vendor has been deleted.
-
Find the organization you want to delete and select it.
-
In the Organization details pane, click Actions > Delete.
-
In the Delete organization dialog, click Delete. The organization is deleted and a confirmation message appears.
View export log
To view a log of orders exported to a vendor organization that is set up for EDI integration, follow these steps:
-
Find the organization for which you want to view an export log and select it.
-
In the Organization details pane, click Actions > View export log.
-
The Export Manager app opens with the Search & Filter pane set to view exports related to the selected vendor organization. See the Export Manager documentation for more information about viewing export jobs.
Adding a tag to an organization
-
Find the organization you want to tag and select it.
-
In the Organization details pane, click the tag icon.
-
In the Tags pane, either select a tag from the box or enter a tag.
-
Click the X on the Tags pane to close the pane and save the tag. The tag number updates to the number of tags applied to the organization.
Adding a note to an organization
-
Find the organization to which you want to add a note and select it.
-
In the Organization details pane, click Notes > New.
-
In the New note window, select the Note type from the drop-down list. Note types are created in the Settings app. For more information, see Settings > Notes.
-
Enter a Note title in the box.
-
Optional: Enter any Details about the note in the box.
-
Click Save & close. The note is saved and appears in the Notes section in the Organization details pane.
Adding integration details to a vendor organization
This section enables orders to be exported to vendors in EDIFACT format. To add information about one or more integrations for a vendor organization, follow these steps:
-
Find the organization to which you want to add an integration and select it.
-
In the Organization details pane, click on Integration details to expand the accordion section.
-
Click Add integration. The Create integration window opens.
-
Add information to the Integration information, EDI configuration, FTP details, and Scheduling sections. For more information on the fields and actions available in these sections, see the section descriptions below.
-
Click Save & close. The integration is saved and appears in the Integration details section in the Organization details pane.
- Integration name (required). The name for this integration.
- Description A description of this integration.
- Default integration. Select this checkbox if your organization doesn’t have any account numbers. This indicates that any order tagged for export that is not related to a specific account for this organization should follow this default configuration.
EDI configuration
-
Account numbers (required). All account numbers created in Vendor account section of the organization are listed. Click on all vendor account numbers to be included in this EDI configuration. To select multiple account numbers for this configuration, use shift+click. When you move your cursor to another field you will see the highlight persist on the selected account number(s).
-
Automate order export for acquisition methods. All order acquisition methods are listed. To automatically export orders for this vendor using specific order acquisitions methods, click on the acquisition method name. When creating orders, you can override this default behavior by checking the Manual checkbox on the purchase order. To select multiple acquisition methods to export automatically, use shift+click. When you move your cursor to another field you will see the highlight persist on the selected acquisition methods.
-
Vendor EDI code (required). The vendor identifier for EDI transactions
-
Vendor EDI type. Select one of the Vendor EDI types, which designates the type of identifier used as the vendor identifier: 014/EAN, 31B/US-SAN, 091/Vendor-assigned, or 092/Customer-assigned.
-
Library EDI code (required). The library identifier for EDI transactions
-
Library EDI type. Select one of the Library EDI types, which designates the type of identifier used as the library identifier: 014/EAN, 31B/US-SAN, 091/Vendor-assigned, or 092/Customer-assigned.
-
EDI naming convention. The naming convention that sets the expected structure to be used for outgoing FOLIO EDI files, such as the prefix or file extension. Example: .edu Note: When defining your naming convention you can use text or one of the following tokens. Tokens will be replace by the corresponding information from the export job. Possible tokens are organizationCode, integrationName, exportJobEndDate, jobID, numberSequence
-
Send account number. If you send your account number with orders or invoices, select this checkbox. If selected, the account number is required for the PO/POL and is included in the EDI order file.
-
What messages are expected for this vendor? If your library expects to send EDI orders to the vendor, select the Orders checkbox. If your library expects to receive EDI invoices from the vendor, select the Invoices checkbox.
-
Notes. Notes about the integration details for this vendor.
FTP details
- EDI FTP. Select FTP format in which the library expects to transact with the vendor: SFTP or FTP.
- FTP mode. Select the transmission mode the library expects to use with the vendor: ASCII or Binary.
- Server address. The address for the vendor’s FTP server.
- FTP connection mode. Select the connection mode: Active or Passive.
- Username. The username for the FTP, if a login username is required for this vendor. See Organizations permissions for more information about permissions related to viewing and editing integration credentials.
- Password. The password for the FTP, if a login password is required for this vendor. The password is automatically hidden. Click Show to display the password. Click Hide to stop displaying the password.
- FTP port (required). The FTP port number.
- Order directory. The subdirectory where orders should be placed, if different from the main FTP directory for this vendor. Ex: /directory.
- Invoice directory. The subdirectory where invoices should be retrieved, if different from the main FTP directory for this vendor. Ex: /directory.
- Notes. Notes about the FTP details for this vendor integration.
Scheduling
- Schedule EDI. If you want to schedule the EDI, select the Schedule EDI checkbox.
- Schedule period. The period between automated exports to the vendor. Choose from Daily or Weekly. This release of FOLIO does not include Hourly or Monthly period options due to a known issue to be resolved in the next release. If you applied either of those values to a vendor previously, the export may not run at the desired time when using hourly or monthly schedules.
- Date. If you choose a schedule period of Daily, the date field appears. Use the calendar function to select the start date for this schedule.
- Schedule frequency. If you choose a schedule period of Daily or Weekly, the schedule frequency field appears. Enter the numeric value for the hourly or daily frequency of this scheduled integration.
- Time. If you choose a schedule period of Daily or Weekly, the time field appears. Click on this field to view an hour and time select list. Choose the scheduled time for this automated export.
- S M T W Th F S. If you choose a schedule period of Weekly, the day of the week checkboxes appear. Choose the days for this weekly automated export.
Note: If you need to create a new contact, you should save your progress on the organization you are creating or wait until you have completed entering all organization information before you start the new contact process. Creating a new contact takes you out of the organization window.
-
Click Add contact.
-
In the Add contacts dialog, click New. If you have not saved your organization information, you are prompted to do so before continuing.
-
In the Create contact window, fill in the fields in the Name, Emails, Phone numbers, URLs, and Addresses sections. See below for more information.
-
Click Save & close. A confirmation message appears and the contact is saved.
-
A new accordion is added to the contact person detail pane containing the following information:
- Record last updated. Date and time of the last record update.
- Source. Name of the user who last updated the record.
- Record created. Date and time of record creation.
- Source. Name of the user who last created the record.
Name
- Prefix. Title of the contact.
- Last name. The surname of the contact.
- First name. The given name of the contact.
- Status. Select the status of the contact from the drop-down list: Active or Inactive.
- Language. The primary language spoken by the contact.
- Categories. Select any categories from the drop-down list that describe the contact. Categories are configured in the Settings app. See Settings > Organizations for more information.
- Notes. Any notes related to the contact.
Emails
Adding an email address
-
Click Add email.
-
Enter the Email address in the box.
-
Optional: Enter a Description of the email in the box.
-
Optional: Select a Language from the drop-down list.
-
Optional: Select any Categories from the drop-down list that describe the email address.
-
Repeat steps 1-5 as needed.The email address saves once you save the contact. Note: If you are adding multiple emails, click Primary to indicate the contact’s primary email address. The Primary email will display as the first result.
Deleting an email address
-
Find the email address you want to delete.
-
Click the trash can icon. The email address is removed and is deleted once you save the contact.
Phone numbers
Adding a phone number
-
Click Add phone number.
-
Enter the Phone number in the box.
-
Optional: Select the Type of number from the drop-down list: Office, Mobile, Fax, or Other.
-
Optional: Select the Language spoken at that number from the drop-down list.
-
Optional: Select any Categories from the drop-down list that describe the email address.
-
Repeat steps 1-5 as needed. The phone number saves once you save the contact. Note: If you are adding multiple phone numbers, click Primary to indicate the contact’s primary phone number. The Primary phone number will display as the first result.
Deleting a phone number
-
Find the phone number you want to delete.
-
Click the trash can icon. The phone number is removed and is deleted once you save the contact.
URLs
Adding a URL
The URL can be a website or FTP link.
-
Click Add URL.
-
Enter the URL in the box.
-
Optional: Enter a Description of the URL in the box.
-
Optional: Select a Language from the drop-down list.
-
Optional: Select any Categories from the drop-down list that describe the URL.
-
Repeat steps 1-5 as needed. The URL saves once you save the contact. Note: If you are adding multiple URLs, click Primary to indicate the contact’s primary URL. The Primary URL will display as the first result.
Deleting a URL
-
Find the URL you want to delete.
-
Click the trash can icon. The URL is removed and is deleted once you save the contact.
Addresses
Adding an address
-
Click Add address.
-
Fill in the address information.
-
Repeat steps 1-2 as needed. The address saves once you save the contact. Note: If you are adding multiple addresses, click Primary to indicate the contact’s primary address. The Primary address will display as the first result.
Deleting an address
-
Find the address you want to delete.
-
Click the trash can icon. The address is deleted and is removed from the record once you save the contact.
Note: If you need to edit a contact, you should save your progress on the organization you are creating or wait until you have completed entering all organization information before you start the new contact process. Editing contact takes you out of the organization window.
-
Add the contact you want to edit to Contact people if you have not already.
-
Click the contact you want to edit. If you have not saved your organization information, you are prompted to do so before continuing.
-
In the contact window, click Actions > Edit.
-
Edit the contact.
-
Click Save & close. A confirmation message appears and the contact is updated.
Although it appears in the user interface, copying a contact is not available.
See Deleting a contact for an alternate way to remove a contact from an organization.
-
Add the contact you want to unassign to Contact people if you have not already.
-
Click the contact you want to unassign. If you have not saved your organization information, you will be prompted to do so before continuing.
-
In the contact window, click Actions > Unassign.
-
In the Unassign from organization dialog, click Confirm. A confirmation message appears, the contact is removed from the organization, and the organization window appears.
Deleting a contact person removes that person from your library’s list of contacts. If you only need to remove a contact from an organization record, see Deleting a contact.
-
Add the contact you want to delete to Contact people if you have not already.
-
Click the contact you want to delete. If you have not saved your organization information, you will be prompted to do so before continuing.
-
In the contact window, click Actions > Delete.
-
In the Delete contact dialog, click Confirm. The contact is deleted and the organization window appears.
Creating an interface
Note: If you need to create a new interface, you should save your progress on the organization you are creating or wait until you have completed entering all organization information before you start the new interface process. Creating an interface takes you out of the organization window.
-
Click Add interface.
-
In the Add interfaces dialog, click New. If you have not saved your organization information, you will be prompted to do so before continuing.
-
In the Create interface window, fill in the fields. See below for more information.
-
Click Save. A confirmation message appears and the interface is saved.
Interface fields
- Type. The type of interface you are adding: Admin, End user, Reports, Orders, Invoices, or Other.
- Name. The name of the interface.
- URI. The URI of the interface.
- Username. The username needed to log into the interface. See Organizations permissions for more information about permissions related to viewing and editing interface credentials.
- Password. The password needed to log into the interface. Click Show to display the password. Click Hide to stop displaying the password.
- Notes. Any notes about the interface.
- Available. Select the Available checkbox to indicate whether statistics are available through this interface.
- Delivery method. Select the statistics’ Delivery method from the drop-down list: Online, FTP, Email, or Other.
- Statistics format. Select the statistics’ Statistics format from the drop-down list: Counter, Delimited, Excel, PDF, ASCII, HTML, or Other.
- Locally stored. The location of the statistics if they are locally stored.
- Online location. The online location of the statistics. For example, a vendor website.
- Statistics notes. Any notes about the statistics.
Editing an interface
Note: If you need to edit an interface, you should save your progress on the organization you are creating or wait until you have completed entering all organization information before you start the new interface process. Editing an interface takes you out of the organization window.
-
Add the interface you want to edit to the Interface section if you have not already.
-
Click the interface you want to edit. If you have not saved your organization information, you will be prompted to do so before continuing.
-
In the contact window, click Actions > Edit.
-
Edit the interface.
-
Click Save. A confirmation message appears and the interface is updated.
Copying an interface
Although it appears in the user interface, copying an interface is not available.
Unassigning an interface
See Deleting an interface for an alternate way to remove an interface from an organization.
-
Add the interface you want to unassign to the Interface section if you have not already.
-
Click the interface you want to unassign. If you have not saved your organization information, you will be prompted to do so before continuing.
-
In the contact window, click Actions > Unassign.
-
In the Unassign from organization dialog, click Confirm. A confirmation message appears, the contact is removed from the organization, and the organization window appears.
Deleting an interface
Deleting an interface removes it from your library’s list of interfaces. If you only need to remove an interface from an organization record, see Deleting an interface.
-
Add the interface you want to delete to the Interface section if you have not already.
-
Click the interface you want to delete. If you have not saved your organization information, you will be prompted to do so before continuing.
-
In the contact window, click Actions > Delete.
-
In the Delete interface dialog, click Confirm. The contact is deleted and the organization window appears.
6.5 - Receiving
The Receiving app allows you to indicate that materials ordered through the creation of purchase order lines in the Orders app have been received by the library. You can open the app directly from the FOLIO app bar or from the Orders app by clicking Receive on the action menu of an order that has an Open status.
Definition of terms related to the Receiving app:
- Package. A purchase order that represents the acquisition of multiple titles.
- Piece. A subsection of a receiving title that is expected to be received. For example, if the ordered title is a journal subscription, then a piece of that title could be volume one of the journal.
- Receive. To confirm that an all or part of an order has been delivered to the library.
- Receiving title. The title of the ordered material. There may be one or more pieces attached.
- Unreceive. To indicate that an order previously listed as “received” has not been delivered to the library.
Permissions
The permissions listed below allow you to interact with the Receiving app and determine what you can or cannot do within the app. You can assign permissions to users in the Users app. If none of these permissions are assigned to a user, they are unable to see the Receiving app or any related information.
- Receiving: Export search results. This permission allows the user to export receiving search results in .csv format.
- Receiving: View. This permission allows the user to view receiving information for orders.
- Receiving: View, edit. This permission allows the user to receive and edit pieces that are associated with a purchase order line.
- Receiving: View, edit, create. This permission allows the user to view, edit, and create piece records. Note: Users can only create pieces if the related purchase order line has the Receiving workflow set to “Independent order and receipt quantity.”
- Receiving: View, edit, delete. This permission allows the user to view, edit and delete pieces in the Receiving app.
Keyboard shortcuts
Keyboard shortcuts allow you to perform actions in this app using the keyboard. See Platform essentials > Keyboard shortcuts for more information.
Creating a receiving title
Usually, an order consists of a receiving title that may have one or more pieces attached. For example, if you order a journal, the receiving title would be the journal name and the attached pieces would include each issue of the journal.
Purchase order lines can also be used to represent Packages. A package order line is created in the Orders app as a single purchase order line, but it can’t be located or received in Receiving because it represents the acquisitions of multiple titles (for example, a monographic standing order). In order to receive the titles that are included in a package, you must create the receiving titles in the Receiving app and link them to the Package POL. In this version of FOLIO, receiving titles must be connected to an instance in the Inventory app and a POL.
The New action allows you to create the receiving titles that come in a package so that they can be received by the library. This action also allows you to link existing instances to a package POL if you want to create a relationship between the instance and the order. In this case, the receiving title is searchable by its related POL number.
- Click New.
- In the New title window, in the PO line details section, click POL number look-up.
- In the Select order lines dialog, in the Search & filter box, enter the Package POL number.
- Optional: Filter results using the filters in the Select order lines dialog.
- Click Search and select the Package from the Search results. The Package POL is linked to the new title.
- Enter a Title for the item in the Package.
- Fill in the rest of the fields under Item details and PO line details. For more information on the fields and actions available in these sections, see the section descriptions below.
- Click Save & close. A confirmation message appears, and the new receiving title is created and appears in the Receiving pane. It can now be edited, expected pieces can be added to it, and it can be received. You can locate the title by searching for the PO or POL number, the Package Name, the Title(s).
Item details
- Title. The title of the material to be received. Note: For non-package POLs the receiving title is created automatically. For Package POLs you use the look-up to link an inventory instance to the Package POL and successfully add a receiving title.
- Publisher. Publisher of the material.
- Publication date. Date the material was published.
- Edition. Edition of the material.
- Subscription from. Start date of subscription (if applicable).
- Subscription to. End date of subscription (if applicable).
- Subscription interval. Number of days the subscription lasts (if applicable).
- Contributor. The contributor of the material.
- Product ID. An identifying number, such as ISBN or DOI.
Adding a contributor
Note: Adding a contributor is optional, but if you click Add contributor, you must enter an Contributor and Contributor ID type or delete the contributor in order to save the title.
- Click Add contributor.
- Enter the Contributor.
- Select a Contributor ID type from the drop-down list. The Contributor is added once all changes are saved.
Deleting a contributor
- Find the contributor you want to delete.
- Click the trash can icon. The contributor is removed and is deleted once the changes are saved.
Adding a product ID and type
Note: Adding a product ID and type is optional, but if you click Add product ID and type, you must enter a Product ID and Product ID type or delete the product ID and type in order to save the title.
- Click Add product ID and type.
- Enter the Product ID.
- Optional: Enter a Qualifier. For example, you may want to add paperback as a Qualifier for an ISBN.
- Select the Product ID type from the drop-down list. The product ID is added once all changes are saved.
Deleting a product ID and type
- Find the product ID you want to delete.
- Click the trash can icon. The product ID is removed and is deleted once the changes are saved.
PO line details
- POL number. The purchase order line number. This can only be populated by using the POL number look-up. See Creating a receiving title for more information.
- Expected receipt date. The date the material is expected to be received. This is automatically populated with information from Orders and cannot be modified.
- Receiving note. Notes about receiving the material. This is automatically populated with information from Orders and cannot be modified.
- Must acknowledge receiving note. When this checkbox is selected, the Receiving note dialog appears when you attempt to receive the material. You must click Continue in order to receive the material.
Linking an existing receiving title
- Click New.
- In the New title window, click Title look-up.
- In the Select instance dialog, in the Search & filter box, enter the title you want to link to the package.
- Optional: Filter the results using the filters in the Select instance dialog.
- Click Search and select the Title from the search results. This populates all of the fields that have already been filled out for the existing title.
- Fill in the rest of the fields under Item details. See Item details above for more information.
- Click POL number look-up.
- In the Select order lines dialog, in the Search & filter box, enter the Package POL number.
- Optional: Filter the results using the filters in the Select order lines dialog.
- Click Search and select the Package from the search results.
- Click Save & close. The existing title is now linked to the Package POL. It can be located by searching for its Title, original POL number, Package POL number, or Package name.
Searching for a receiving title
You can search for orders to be received in the Search & filter pane. To search, enter your search terms into the box. Select the Keyword drop-down list to search through one of the following fields:
- Keyword. Searches through all fields in the drop-down list. This is the default search.
- Title. Title of the ordered material.
- Package. The name of the package to which a receiving title is attached.
- Product ID. Identifying number, typically assigned in Orders when the order was created.
- PO number. The purchase order number.
- POL number. The purchase order line number.
- Vendor reference number. The vendor reference number for the purchase order line associated with this receiving title.
You can also search for orders by selecting any of the filters in the Search & filter pane. Additionally, you can apply the filters after you perform a search to limit your results. See the sections below for more information.
Order status
In the Search & filter pane, click Order status and select any applicable filters:
- Closed. Orders that are closed.
- Open. Orders that are open.
- Pending. Orders that are pending.
Note: Receiving is only possible if an order is in “Open” or “Closed” status. If attempting to receive against a closed order, a pop-up window will appear that says “The order linked to this Title is closed. Are you sure you want to receive this piece(s)?”
Vendor
To search for orders from a specific vendor, follow these steps:
- In the Search & filter pane, click Vendor.
- Click Organization look-up.
- In the Select Organization dialog, search for the vendor.
- Select the vendor you want to filter by. The search results appear in the Receiving pane.
Order type
In the Search & filter pane, click Order type and select any applicable filters:
- One-time. One-time orders that are received within the year.
- Ongoing. Ongoing orders that span multiple years.
Material type
To search for orders of a specific material type, follow these steps:
- In the Search & filter pane, click Material type.
- Select the material type from the drop-down list. The search results appear in the Receiving pane.
In the Search & filter pane, click Order format and select any applicable filters:
- Electronic Resource. Order lines containing an electronic resource.
- Physical Resource. Order lines containing a physical resource.
- P/E Mix. Order lines containing a physical and electronic mixed resource.
- Other. Order lines containing a different type of resource.
To search for orders assigned specific tags, follow these steps:
- In the Search & filter pane, click Tags.
- Select the tag(s) from the drop-down list. The search results appear in the Receiving pane.
Location
To search for orders assigned to a specific permanent location, follow these steps:
- In the Search & filter pane, click Location.
- Click Location look-up.
- In the Select permanent location dialog, select an Institution, Campus, Library, and Location using the drop-down lists.
- Click Save and close. The search results appear in the Receiving pane.
Receiving status
In the Search & filter pane, click Receiving status and select any applicable filters:
- Expected. The order is expected to arrive.
- Received. The order has arrived and been received.
Acquisition units
To search for orders assigned to a specific acquisition unit, follow these steps:
- In the Search & filter pane, click Acquisition units.
- Select the acquisition unit(s) from the drop-down list. The search results appear in the Receiving pane.
Note: The Receiving app does not currently support restricting user permissions based on acquisition unit.
Rush
In the Search & filter pane, click Rush and select Yes or No.
Received date
To search by date received from received pieces, follow these steps:
- In the Search & filter pane, click Received date.
- Enter a start date in the From box and an end date in the To box.
- Click Apply. The search results appear in the Receiving pane.
Expected receipt date
To search by the expected receipt date from expected pieces, follow these steps:
- In the Search & filter pane, click Expected receipt date.
- Enter a start date in the From box and an end date in the To box.
- Click Apply. The search results appear in the Receiving pane.
Receipt due
To search by the receipt due date from the order purchase order line, follow these steps:
- In the Search & filter pane, click Receipt due.
- Enter a start date in the From box and an end date in the To box.
- Click Apply. The search results appear in the Receiving pane.
To clear all filters, go to the Search & filter pane and click Reset all.
Exporting search results
To export a file of title and/or piece information in comma-separated values (.csv) format, follow these steps:
In the Search & filter pane, use the search and filter options to select a set of receiving records.
In the search results pane, click Actions and select,Export results (CSV).
In the Export settings dialog, the following message will display: “This export could take a few minutes. If you reload or close the page the export will not be completed. Once the file is ready it could take another minute for your browser to finish downloading the file. You can continue to work with titles and pieces in a different browser tab if needed.”
To export all fields from the title and piece leave the Title fields and Piece fields default values set to All. To select specific fields to export, click on the radio button below “All” and use the drop-down list to select the specific fields to export.
Click Export. The file downloads to your local download location.
Title fields
- Title
- Publisher
- Published date
- Edition
- Subscription from
- Subscription to
- Contributors
- Product IDs
- Order type
- Vendor
- Requester
- Rush
Piece fields
- Caption
- Copy number
- Enumeration
- Chronology
- Barcode
- Call number
- Piece format
- Expected receipt date
- Comment
- Location
- Supplement
- Display on holding
- Item HRID
Viewing receiving titles details
Receiving title details can be viewed by any user with the permission Receiving: View.
Search results
Once you search for a receiving title, the following information appears in the Receiving pane:
- Title. The title of the material to be received.
- Expected receipt date. The date the material is expected to be received.
- Package. The name of the package the receiving title is associated with (if applicable).
- POL number. The purchase order line number. Click on this number to open the related POL in the Orders app.
- Receiving note. Notes about receiving the material.
- Locations. The location(s) to which the order is assigned.
- Order status. The status of the order, either open, closed, or pending.
In the search results, click on a receiving title to view it. The receiving title pane displays with additional information about the title.
This section displays the material details defined under Creating a receiving title.
POL details
This section displays the details of the purchase order lines.
- POL number. The purchase order line number.
- Expected receipt date. The date the piece is expected to be received.
- Receiving note. Notes about receiving the material.
- Order type. The type of order, either one-time or ongoing.
- Vendor. The organization from which the material was purchased.
- Access provider. The name of the access provider organization. This field only displays for orders with an order format set to Electronic resource or P/E Mix.
- Material supplier. The name of the material supplier organization. This field only displays for orders with an order format set to Physical resource or P/E Mix.
- Requester. The person who requested the item.
- Rush. This flag indicates whether rush handling should be applied to this order.
Expected
This section displays a table list of the pieces of the order that are still expected to be received. See Adding an expected piece for more information. To customize the columns that appear in the table list, follow these steps:
- In the Expected section of the receiving title, select the Actions button.
- The listed columns are all selected by default under Show columns in the Actions list.
- Deselect any columns that you want to remove from the Expected table list.
- Your selections persist until you logout of FOLIO.
Received
This section displays a table list of the pieces of the order that have been received. See Item details for more information. To customize the columns that appear in the table list, follow these steps:
- In the Received section of the receiving title, select the Actions button.
- The listed columns are all selected by default under Show columns in the Actions list.
- Deselect any columns that you want to remove from the Received table list.
- Your selections persist until you logout of FOLIO.
- Find the receiving title you want to edit and select it.
- In the receiving title pane, click Edit.
- In the receiving title window, you can modify Item details and PO line details. Note: The Title look-up and POL number look-up functions are different in editing mode. See details below.
- Fill out the desired fields.
- Click Save & close. A confirmation message appears and the receiving title is updated.
Title look-up
The Title look-up function replaces the current title with a title that already exists as an instance in Inventory. This doesn’t replace existing publishing or subscription details, but it does add any contributors or product IDs associated with the new title. Once you make this change, the material is longer searchable by the original title.
- Click Title look-up.
- In the Select instance dialog, in the Search & filter box, enter part or all of the title.
- Optional: Filter your results using the filters in the Select instance dialog.
- Click Search and select the title from your search results. The title updates once all changes are saved.
POL number look-up
The POL number look-up function replaces the current POL number with a POL number that already exists in Inventory. This doesn’t replace any item details, only the POL number. Once you make this change, the material is no longer searchable by the original POL number.
- Click POL number look-up.
- In the Select order lines dialog, in the Search & filter box, enter the POL number.
- Optional: Filter your results using the filters in the Select order lines dialog.
- Click Search and select the POL number from your search results. The POL number updates once all changes are saved.
Adding an expected piece
An expected piece is a part of an order you expect to receive. For example, if you order a magazine subscription, you might expect to receive 12 different pieces during the year. If you order a book that comes with supplemental materials such as a CD or map, you might expect to receive multiple pieces with the order. The order does not initially display each piece that comes with it. Adding expected pieces to an order allows you to track which pieces of the order have been received and which are still expected.
Expected pieces can be found in the Expected section of a Receiving app record. Expected pieces can also be received from this section. See Quick receive for more information.
Note: To add an expected piece in Receiving, the Receiving workflow on the order must be set to “Independent order and receipt quantity” when the order is opened.
- Find the receiving title to which you want to add a piece and select it.
- In the Expected section, click Action. In the action menu, select Add piece.
- Add information about the piece in the Add piece dialog. See below for more information about each field.
- To add another piece after saving or quick receiving this piece, click Create another. After you save & close or quick receive, the Add piece dialog form is populated with details from the previous piece form.
- To save and receive the piece, click Quick receive. The new piece is saved and listed in the Received section.
- To save without adding another piece, Click Save & close. The new piece is saved and listed in the Expected section.
Add piece
- Caption. A word, phrase or abbreviation indicating the parts into which the publisher has divided the serial, such as “volume,” “part,” or “band.”
- Copy number. The copy number of the piece.
- Enumeration. The enumeration of the piece which indicates the sequential numeric and/or alphabetic designation used by a publisher to identify the individual bibliographic or physical parts and to show the relationship of each part to the bibliographic unit as a whole.
- Chronology. The chronology of the piece, such as “year”, “month.”
- Piece format. The order format, as selected in Orders. This field is not editable.
- Expected receipt date. The date the piece is expected to be received.
- Comment. Comments or notes about the piece.
- Order line locations. A list of locations that were selected on the purchase order line.
- Select location. In the drop down list, select the location for this piece. You can change the location by clicking Create new holdings for location.
- Create item. Select the Create item checkbox to connect the new piece to an instance in Inventory. This option is only available for pieces linked to an order with the purchase order line Create inventory value set to “Instance/holding/item.” . Note: In order to create an item in Inventory, a default instance status, instance type, and loan type must already be set up in Settings. See Settings > Orders for more information.
- Supplement. Select the Supplement checkbox to indicate that the piece is a supplementary material such as a CD or a map.
- Display on holdings. Select the Display on holdings checkbox to indicate that information about this piece should be displayed in the Inventory app in the Acquisition section of the holding record. See Inventory > Acquisition for more information.
Create new holdings for location
Note: If the location is changed for a specific piece and no holding exists for that location already, a new holding is created.
- In the Add piece dialog, click Select holdings.
- In the Select permanent location dialog, select an Institution, Campus, Library, and Location.
- Click Save and close. The changes appear in the Select holdings field of the Add piece dialog. The location is confirmed once the piece is saved.
Editing an expected or received piece
To edit an expected or received piece, make sure the correct receiving title is displayed by using the Search & filter pane and look under the Expected and Received sections of the title.
Editing an expected piece
- Select the piece you want to edit.
- In the Edit piece dialog, the same fields as the Add piece dialog appear. See above for more information.
- Edit the contents of fields, as needed.
- To add another piece after saving or quick receiving this piece, click Create another. After you save & close or quick receive, the Add piece dialog form is populated with details from the previous piece form.
- To save and receive the piece, click Quick receive.
- To save without adding another piece, Click Save & close. A confirmation message appears and the piece is updated.
Editing a received piece
- Select the piece you want to edit.
- In the Edit piece dialog, the same fields as the Add piece dialog appear. See above for more information. Note: You cannot make changes to Piece format or Create item when editing a received piece. If the Create item checkbox was selected when the piece was created, the text Connected is displayed. If the checkbox was cleared, it still displays the Create item box, but the checkbox is not editable.
- Fill out the desired fields.
- Click Save & close. A confirmation message appears and the piece is updated.
Deleting an expected or received piece
To delete an expected or received piece, make sure the correct receiving title is displayed by using the Search & filter pane and look under the Expected and Received sections of the title.
Deleting an expected piece
- Select the piece you want to edit.
- In the Edit piece dialog, the same fields as the Add piece dialog appear. See above for more information.
- Click Delete. A confirmation message appears, click Confirm and the piece is deleted.
Deleting a received piece
- Select the piece you want to delete.
- In the Edit piece dialog, the same fields as the Add piece dialog appear. See above for more information.
- Click Delete. A confirmation message appears, click Confirm and the piece is deleted.
Receiving a piece
Receiving a piece confirms that the ordered material arrived at the library.
There are two ways to receive a piece:
Quick receive
Quick receive can be used when you want to receive one piece of an order at a time.
- Using the Search & filter pane, find the receiving title from which you want to receive pieces and select it.
- In the Expected section of the order, click on the piece you want to receive.
- In the Edit piece dialog, make any necessary edits to the piece.
- Click Quick receive. The piece is now displayed under the Received section.
Receive
The Receive function can be used to receive multiple pieces at once.
- Using the Search & filter pane, find the receiving title you want to receive and select it.
- In the Expected section of the receiving title, click the Action button and select Receive.
- A receiving note popup window will display if the purchase order line field Must acknowledge receiving note is checked. Click Continue to close the popup window.
- In the receiving title window, all of the expected pieces are displayed. Here, you can make changes to the pieces. See below for more information.
- Select the checkbox beside each piece you want to receive. Note: If you want to receive all of the pieces, click the top checkbox.
- Click Receive. The selected pieces are now displayed under the Received section.
Receive
- Order line locations. A list of locations that were selected on the purchase order line.
- Caption. A word, phrase or abbreviation indicating the parts into which the publisher has divided the serial, such as “volume,” “part,” or “band.”
- Enumeration. The enumeration of the piece which indicates the sequential numeric and/or alphabetic designation used by a publisher to identify the individual bibliographic or physical parts and to show the relationship of each part to the bibliographic unit as a whole.
- Copy number. The copy number of the piece.
- Barcode. A unique barcode for the piece. You can only add a barcode if the piece is already Connected to an instance in Inventory, or if the Create item checkbox is selected.
- Piece format. The order format, as selected in Orders. This field is not editable.
- Request. Information from the Requests app about this ordered material. A value of “Yes” indicates that a request is open for the piece.
- Comment. Comments or notes about the piece.
- Select location. The location, as selected in Orders. You can change the location by clicking Create new holdings for location.
- Item status. This field is populated with the item status that will appear in Inventory after the item is received. The item status will change from “On order” to “In process.”
- Call number. Enter the call number for the piece. You can only add a call number if the piece is already Connected to an instance in Inventory, or if the Create item checkbox is selected.
- Create item. Selecting the Create item checkbox links the new piece to an instance in Inventory. This option is only available for pieces linked to an order with the purchase order line Create inventory value set to “Instance/holding/item.” Note: In order to create an item in Inventory, a default instance status, instance type, and loan type must already be set up in Settings. See Settings > Orders for more information.
Unreceiving an order
- In the Received section of the receiving title, click Actions. In the action menu, select Unreceive.
- In the receiving title window, all of the received pieces are displayed in a table list containing barcode, caption, enumeration, piece format, request, comment, select location, and call number.
- Optional: Make changes to the Comment field.
- Select the checkbox beside each piece you want to unreceive. Note: If you want to unreceive all of the received pieces, select the top checkbox.
- Click Unreceive. The selected pieces are now displayed under the Expected section.
7 - Electronic Resource Managment (ERM)
In FOLIO, ERM includes essential functions. These functions include:
- Creating and managing agreements
- Creating and managing licenses
- Managing an external or internal knowledge base
- Managing your library’s electronic resources
ERM Settings
Parts of the ERM apps are customizable by your library. These configurations are defined by the library and implemented in the Agreements, eHoldings, and Licenses areas of the FOLIO Settings app.
7.1 - Agreements
The Agreements app allows you to create and manage your library’s agreements. The agreements you create here can link to licenses in the Licenses app.
Definition of terms related to the Agreements app:
- Agreement. An agreement is a place where you can manage the content your library can access (based on resources described in a knowledge base) and link that content to licensing and acquisitions information.
- External knowledge base. A knowledge base (see definition in this list) that is outside of the FOLIO system. For example, the EBSCO knowledge base.
- Internal knowledge base. Managing your library’s knowledge base from within FOLIO.
- Knowledge base (KB). A knowledge base is an extensive database maintained by a knowledge base supplier that contains information about electronic resources such as title lists and coverage dates etc. Knowledge bases typically organize the resources provided by a content provider into collections or databases that reflect specific content provider offerings, for example packages of e-journals, e-books, or other materials.
- License. A license explains what you can do with the content your library can access. The license is the contract or Terms of Use.
Library’s utilizing FOLIO can employ an external knowledge base, like EBSCO, or use FOLIO’s internal knowledge base. Note: Some instructions differ depending on your library’s use of an external or internal knowledge base.
Permissions
The permissions listed below allow you to interact with the Agreements app and determine what you can or cannot do within the app. You can assign permissions to users in the Users app. If none of these permissions are assigned to a user, they are unable to see the Agreements app or any related information.
The following permissions are applicable to all libraries using the Agreements app:
- Agreements: Search & view agreements. This permission allows the user to search and view existing agreements. It also allows the user to see and access the Agreement app in the FOLIO interface.
- Agreements: Edit agreements. This permission allows the user to edit agreements, including the ability to add and edit agreement lines; to add and edit documents; and to view, add and edit tags on an agreement. It also grants all permissions included in “Agreements: Search & view agreements.”
- Agreements: Delete agreements. This permission allows the user to delete agreements. (This does not include the ability to edit agreements, only to delete them.) It also grants all permissions included in “Agreements: Search & view agreements.”
- Agreements: File download. (ui-agreements.agreements.file.download) This permission grants permission for document downloads, as separate from document uploads.
The following permissions are only applicable if your library is using the internal KB:
- Agreements: Search & view e-resources. This permission allows the user to search and view e-resources (packages and titles in those packages) in the internal KB. This includes the permission to see and access the Agreements app in the FOLIO interface.
- Agreements: Edit e-resources. This permission allows the user to edit the e-resources. It also grants all permissions included in “Agreements: Search & view e-resources.”
- Agreements: Search & view platforms. This permission allows the user to search and view platforms in the internal KB. This includes the permission to see and access the Agreement app in the FOLIO interface.
- Agreements: Edit platforms. This permission allows the user to edit platform properties. It also grants all permissions included in “Agreements: Search & view e-resources.”
If you want to eUsage data in an agreement record, you also need to have the following eUsage permission:
- eUsage reports: charts may be viewed. This permission adds an accordion to the Agreement record in the Agreement app that displays charts and graphs of eUsage data for the titles related to an agreement.
##Keyboard shortcuts
Keyboard shortcuts allow you to perform actions in this app using the keyboard. See Platform essentials > Keyboard shortcuts for more information.
Creating an agreement
- In the Agreements pane, click Actions and select New.
- In the New agreement window, fill in the Primary fields, Agreement periods, Internal contacts, Agreement lines, License information, Organizations, Supplementary properties, Supplementary documents, Usage data, and Related agreements sections. For more information on the fields and actions available in these sections, see the section descriptions below.
- Once you have included all of the information you want about the agreement, click Save & close. The agreement is saved and added to the Agreements pane.
Primary fields
- Name (required). The title of the agreement record.
- Description. Enter a description of the agreement.
- Status (required). Select from the drop-down list the state of the agreement. For example, Active or Closed. You can configure the labels that appear in the drop-down list in Settings > Agreements > Pick list values.
- Reason for closure. This option only becomes available if Closed is selected from the Status drop-down list. Select from the drop-down list why the agreement was closed. You can configure the values that appear in the drop-down list in Settings > Agreements > Pick list values.
- Renewal priority. Select from the drop-down list the level of interest in renewing the agreement. You can configure the values that appear in the drop-down list in Settings > Agreements > Pick list values.
- Is perpetual. If the agreement provides perpetual access to the purchased materials, select Yes. You can configure the labels that appear in the drop-down list in Settings > Agreements > Pick list values.
- Content type. If the agreement represents a particular content type or types, add one or more content type field and select a type from the drop-down list. You can configure the values that appear in the drop-down list in Settings > Agreements > Pick list values.
- Alternative names. Alternative names for the agreement record.
Adding a content type
Note: Adding a content type is optional, but if you click Add content type, you must enter a content type or delete the content type in order to save the agreement record.
- Click Add content type.
- Select the agreement record’s content type from the drop-down list. You can configure the values that appear in the drop-down list in Settings > Agreements > Pick list values.
- Repeat as needed. The Content type saves once you save the agreement.
Deleting a content type
- Find the Content type you want to delete.
- Click the trash can icon. The Content type is deleted and is removed from the record once you save the agreement.
Adding an alternative name
Note: Adding an alternative name is optional, but if you click Add alternative names, you must enter an alternative name or delete the alternative name in order to save the agreement record.
- Click Add alternative name.
- Enter the agreement record’s Alternative name in the box.
- Repeat as needed. The Alternative name saves once you save the agreement.
Deleting an alternative name
- Find the Alternative name you want to delete.
- Click the trash can icon. The Alternative name is deleted and is removed from the record once you save the agreement.
Agreement periods
Agreement periods allow you to record and manage the ranges of time for which the agreement is active.
When adding agreement periods, you should consider the following:
- Every record must have at least one agreement period.
- If only a single agreement period is used, no other information is displayed in relation to periods.
- If you add multiple periods to the record, their dates cannot overlap.
- Each period must have a start date.
- The earliest period start date is treated as the agreement start date.
- End dates are optional, but only one period in a set can be left without an end date. This is referred to as an open-ended period, which has a start date but is assumed to continue for an indefinite amount of time.
- The latest period end date is treated as the agreement end date, or if there is a blank period end date the agreement is treated as having no end date.
- You can navigate between past, present, and future periods by clicking on the Previous, Current, or Next buttons.
Adding an agreement period
- Enter the agreement period’s Start date.
- Fill in the rest of the fields. See below for more information. The agreement period saves once you save the agreement.
- To enter multiple agreement periods, click Add agreement period and repeat steps 1-2.
- Start date (required). The date when the agreement begins.
- End date. The date when the agreement terminates.
- Cancellation deadline. The date by which you need to cancel the agreement if you do not want to renew the material covered by the agreement.
- Period note. Any additional information about the agreement period that you want to include.
Deleting an agreement period
- Find the Agreement period you want to delete.
- Click the trash can icon. The Agreement period is deleted and is removed from the record once you save the agreement.
Internal contacts are generally the people within your library that you need to contact if you have questions about the agreement. For example, you may want to add the ERM librarian responsible for renewals, the authorized signatory for an agreement, or the subject matter expert responsible for reviewing content ahead of renewals. Multiple contacts can be assigned to a record, but each contact you add must have a user record in the Users app.
- Click Add internal contact.
- Click Link user.
- In the Select User dialog, enter the user’s name or portion of a name into the search box in the User Search pane, and click Search. User Search Results appear.
- (Optional) Filter results by Status or by Patron group.
- Click the user to select. The user is added to the agreement record as an internal contact.
- Select the internal contact’s Role from the drop-down list. You can configure the values that appear in the drop-down list in Settings > Agreements > Pick list values.
- Repeat steps 1-6 as needed. The internal contacts are saved once you save the agreement.
- Identify the Internal contact you want to remove.
- Click the trash can icon. The Internal contact is removed from the record once you save the agreement.
Agreement lines
An agreement line represents the material covered by the agreement, for example, a package or title. If you want to add agreement lines, you should save your progress on the agreement record you are creating or wait until you have completed and saved all agreement information before you start the agreement line process. For instructions on adding agreement lines to a record, see Adding an agreement line.
In the License information section, you can link your agreement record to a license record. There are two types of licenses you can add in this section: license records created in the Licenses app or external license records (for example, licenses maintained by a consortium).
Note: You can add multiple license records to an agreement record, but only one can be the Controlling license. All other licenses must be designated as Historical or Future. For more information, see step 6 under Adding a license created in the Licenses app to an agreement.
Adding general notes about the license
- At the top of the License information section, you can add General notes about the agreement’s license into the box.
Adding a license created in the Licenses app to an agreement
Note: If the license you link to the agreement has amendments present, once you link the license the amendments also display. They also need to have a status in relation to the agreement set. This is important as it is the combination of the applicable (controlling) licenses and amendments that dictate the terms that apply to the agreement.
- Click Add license.
- Click Link license.
- In the Select license dialog, enter the license’s name or a portion of the name into the search box in the Search & filter pane, and click Search. Search results appear in the Licenses pane.
- (Optional) Filter results using the filters in the Search & filter pane.
- Click the license to select. The license is added to the agreement record.
- Select the Status (this agreement) from the drop-down list: Controlling, Future, or Historical. Note: Only one license can have the status Controlling in relation to the agreement at one time. Controlling means the terms in the license are applied to the agreements right now. It is the terms from the Controlling license that are displayed as the agreement license terms in the agreement details pane. Future means that the license becomes controlling at some point in the future. Historical means that the license was the controlling license at some point in the past.
- (Optional) Enter any notes about the license in the Note box.
- Repeat steps 1-7 as needed. The license saves once you save the agreement.
Adding an external license to an agreement
External licenses are any license not available through the Licenses app.
- Click Add external license.
- Enter a Name in the box.
- (Optional): Enter a Note about the license.
- You must complete at least one of the following:
- Upload a file into the license record by dragging and dropping the file in the Drag & drop to upload box, or click or choose file.
- Enter the Physical location of the license in the box.
- Enter the URL of the license in the box.
- Repeat steps 1-4 as needed. The external license saves once you save the agreement record.
Removing a license
- Find the license you want to remove.
- Click the trash can icon. The license is removed from the record once you save the license.
Replacing a license
- Find the license you want to replace.
- Click Replace license.
- Repeat steps 3-7 under Adding a license created in the Licenses app to an agreement.
Organizations
Organizations are any institution with which your library interacts. For example, you may want to add a vendor or consortium associated with the agreement. Multiple organizations can be added to a record, but the organizations must first be created in the Organizations app. To set one organization as the primary organization, check the Set as primary organization box.
Adding an organization
- Click Add organization.
- In the Organization box, click Link organization.
- In the Select Organization dialog, in the Search & filter pane search box, enter the organization’s name or use the All drop-down list to search through specific organization parameters, and click Search. Search results appear in the Organizations pane.
- (Optional) Filter results using the filters in the Search & filter pane.
- Click the organization to select. The organization is added to the agreement record.
- Select the organization’s Role from the drop-down list. You can configure the values that appear in the drop-down list in Settings > Agreements > Pick list values.
- (Optional) Enter any notes about the organization in the Note box.
- Repeat steps 1-7 as needed. The organization saves once you save the agreement.
Removing an organization
- Find the Organization you want to remove.
- Click the trash can icon. The Organization is removed from the record once you save the agreement.
Replacing an organization
- Find the Organization you want to replace.
- Click Replace organization.
- Repeat steps 3-7 under Adding an organization.
Supplementary properties
Supplementary properties are an optional way to record additional information about the agreement not captured anywhere else in the record. For example, the authentication method used to access the material covered by the agreement.
Note: This section only appears if you have configured supplementary properties in the Settings app. For more information on setting up properties, see Settings > Agreements > Supplementary properties.
Filling out a primary property
If a property is defined as primary in the Settings app, then it always appears as an option in an agreement record. You can leave the Value of a primary term blank or select Not set, but primary terms cannot be removed from the agreement record.
- Complete the Value field either by inputting text, using the up and down arrows to set an integer, or selecting an option from the drop-down list. The value is the definition of, or answer to, the property.
- (Optional) Enter an Internal note in the box. Any text you enter here displays internally to FOLIO users.
- Select the property’s Visibility from the drop-down list. Visibility indicates whether the property should display internally (only within FOLIO), or externally to the public through, for example, your catalog.
- (Optional) Enter a Public note in the box. Any text you enter here displays externally to the public.
- Repeat steps 1-4 for as many primary properties as desired. The properties save once you save the agreement.
Adding an optional property
A property is optional if it is not defined as primary in the Settings app. Optional properties do not automatically display in an agreement record.
- Click Add property.
- Select the property Name from the drop-down list.
- Follow steps 1-4 under Filling out a primary property.
- Add as many optional properties as needed. The properties save once you save the agreement.
Removing an optional property
- Find the optional term you want to remove.
- Click the trash can icon. The optional property is removed from the record once you save the agreement.
Supplementary documents
A supplementary document is any additional document relevant to the agreement record.
Adding a supplementary document
- Click Add supplementary document.
- Enter a Name in the box.
- Select a Category from the drop-down list. You can configure the values that appear in the drop-down list in Settings > Agreements > Pick list values.
- (Optional) Enter a Note about the supplementary document.
- You must complete at least one of the following:
- Upload a file into the agreement record by dragging and dropping the file in the Drag & drop to upload box, or click or choose file.
- Enter the Physical location of the document in the box.
- Enter the URL of the document in the box.
- Repeat steps 1-5 as needed. The supplementary document saves once you save the agreement.
If a supplementary document is present in an agreement record, then a copy icon will appear in the supplementary document accordion multi-column list under Reference. Clicking the copy icon will copy the text content of the Reference column to your clipboard.
Removing a supplementary document
- Find the supplementary document you want to remove.
- Click the trash can icon. The supplementary document is removed from the record once you save the agreement.
Usage data
A usage data provider is any organization that provides e-resource usage data to your library. Multiple usage data providers can be added to a record, but the usage data providers must first be created in the eUsage app.
Adding a usage data provider
- Click Add usage data provider.
- In the Usage data provider box, click Link usage data provider.
- In the Select usage data provider dialog, enter the provider’s name or a portion of the name into the search box in the Search & filter pane, and click Search. Search results appear in the Usage Data Providers pane.
- (Optional) Filter results using the filters in the Search & filter pane.
- Click the usage data provider to select. The provider is added to the agreement record.
- (Optional) Enter a Note about the usage data provider.
- Repeat steps 1-6 as needed. The Usage data provider saves once you save the agreement.
Removing a usage data provider
- Find the Usage data provider you want to remove.
- Click the trash can icon. The Usage data provider is removed from the record once you save the agreement.
Replacing a usage data provider
- Find the Usage data provider you want to replace.
- Click Replace usage data provider.
- Repeat steps 3-6 under Adding a usage data provider.
A related agreement is an agreement relevant to the current agreement. This section allows you to link agreements together to establish relationships among them. For example, you may want to add a post-cancellation agreement here.
- Click Add related agreement.
- In the Agreement box, click Link agreement.
- In the Select agreement dialog, enter the agreement’s name or a portion of the name into the search box in the Search & filter pane, and click Search. Search results appear in the Agreements pane.
- (Optional) Filter results using the filters in the Search & filter pane.
- Click the agreement to select. The agreement is added to the agreement record.
- Select the Linked agreement’s relationship to the agreement being edited from the drop-down list. Note: The relationships are directional. For example, if Agreement A “has backfile in” Agreement B, then automatically Agreement B “has frontfile in” Agreement A. You can set these from either end (i.e. you can start by linking Agreement A to B or B to A).
- (Optional) Enter a Note about the related agreement.
- Repeat steps 1-6 as needed. The related agreement saves once you save the main agreement.
- Find the Related agreement you want to remove.
- Click the trash can icon. The Related agreement is removed from the record once you save the agreement.
- Find the Related agreement you want to replace.
- Click Replace agreement.
- Repeat steps 3-6 under Adding a related agreement.
Searching for agreements
You can search for agreements in the Search & filter pane. To search for agreements, enter your search terms in the search box and click Search. The search box searches through the Name, Description, and Alternative names fields. In order to limit your search to specific fields, check one or more of the Name, Alternative name and/or Description check boxes below the search box, and the search will only search through the selected fields.
Note: When using the internal KB, click Agreements search in order to search for agreements.
You can also search for agreements by selecting any of the filters in the Search & filter pane: Status, Renewal priority, Is perpetual, Start date, End date, Organizations, Organization role, Internal contacts, Internal contacts role, Content type, Tags, Supplementary properties, Agreement content, and Documents. For more information on the filters, see the filter descriptions below.
Status
To filter agreements by their status, select one of the following:
- Active. Agreements currently in use by your library.
- Closed. Agreements no longer in use by your library.
- Draft. An agreement that is in draft form.
- In negotiation. An agreement that is being negotiated between your library and a provider.
- Requested. If your library has requested an agreement from a provider.
Reason for closure
To filter agreements by their reason for closure, select one of the listed options. Possible priorities may include:
- Canceled. Agreements you have canceled.
- Ceased. Agreements that have ended.
- Rejected. Agreements you have rejected.
- Superseded. Agreements that have been superseded by another agreement.
Renewal priority values are configured in Settings > Agreements > Pick list values.
Renewal priority
To filter agreements by their renewal priority, select one of the listed options. Possible priorities may include:
- Definitely renew. Agreements you want to renew.
- Definitely cancel. Agreements you do not want to renew.
Renewal priority values are configured in Settings > Agreements > Pick list values.
Is perpetual
To filter agreements by whether or not they are perpetual, select Yes or No.
Start date
To filter agreements by their start date, enter a date into the On or after and/or On or before search box, or click the calendar icon to select a date from the calendar.
End date
To filter agreements by their end date, enter a date into the On or after and/or On or before search box, or click the calendar icon to select a date from the calendar.
You can also check the box Include agreements with no end date set to locate agreements without end dates.
Cancellation deadline
To filter agreements by their cancellation deadline, enter a date into the On or after and/or On or before search box, or click the calendar icon to select a date from the calendar.
You can also check the box Include agreements with no cancellation deadline set to locate agreements without cancellation deadlines.
Organizations
To filter agreements associated with a specific organization, follow these steps:
- In the Search & filter pane, click Organizations.
- Click Select an organization.
- In the drop-down list, search for the organization.
- Select the organization by which you want to filter. The search results appear in the Agreements pane.
Organizations role
To filter agreements by their associated organizations’ roles, follow these steps:
- In the Search & filter pane, click Organization role.
- Click Select a role.
- In the drop-down list, search for the role.
- Select the role by which you want to filter. The search results appear in the Agreements pane.
To filter agreements by their associated internal contacts, follow these steps:
- In the Search & filter pane, click Internal contacts.
- Click Select an internal contact.
- In the drop-down list, search for the internal contact.
- Select the internal contact by which you want to filter. The search results appear in the Agreements pane.
To filter agreements by their associated internal contacts’ roles, follow these steps:
- In the Search & filter pane, click Internal contact role.
- In the drop-down list, search for the internal contact role.
- Select the internal contact role by which you want to filter. The search results appear in the Agreements pane.
Content type
To filter agreements by their content type, follow these steps:
- In the Search & filter pane, click Content type.
- Check the box next to the content type(s). The search results appear in the Agreements pane.
To search for agreements assigned specific tags, follow these steps:
- In the Search & filter pane, click Tags.
- Select the tag(s) from the drop-down list. Your results appear in the Agreements pane.
Supplementary properties
To filter agreements by their supplementary properties, follow these steps:
- In the Search & filter pane, click Supplementary properties.
- Click Edit supplementary property filters.
- In the Supplementary property filter builder dialog, select a Supplementary property from the drop-down list.
- Select a Comparator from the drop-down list. The comparator options depend on the term selected.
- If the Value box is available, select or enter a value. Whether the value box is available depends on which comparator is selected.
- (Optional) To continue to build the supplementary property filter, click Add rule.
- (Optional) To search for agreements using multiple supplementary property filters, click Add supplementary property filter. Note: To delete a rule or supplementary property filter in the Supplementary property filter builder, click on the trash can icon next to the rule or supplementary property filter.
- Click Apply. Your results appear in the Agreements pane.
Agreement content
To filter agreements by their content, follow these steps:
- In the Search & filter pane, click Agreement content.
- Select Has or Has not from the drop-down list.
- Select one or more agreement content options from the list. These may include Alternative names, Content types, Internal contacts, Organizations, Agreement lines, Linked licenses, External licenses, Supplementary documents, Usage data, Related agreements, and Tags. Note, if you select multiple agreement content options, they are combined with OR (rather than AND). For example, if you select Alternative names and Content types, the returned results will include agreement records with Alternative names OR Content types.
- To add another filter, click Add filter and select And or Or.
- Repeat the above steps as desired.
- Your results will appear in the Agreements pane.
Documents
To filter agreements by their documents, follow these steps:
- In the Search & filter pane, click Documents.
- Click Edit document filters.
- In the Document filter builder dialog, select a Attribute from the drop-down list. Attributes include Name, Note, Category, Physical location, URL, Content type, and File name.
- Select a Operator from the drop-down list. Operators include Is, Contains, and Does not contain.
- In the Value box, select or enter a value.
- (Optional) To continue to build the document filter, click Add rule. Note, multiple rules in a single document filter card will apply to a single document. I.e. If you have a document filter card with two rules, then to find an agreement, a single document on that agreement must fulfill both rules. Whereas when you add a new document filter card in the filter builder, then it can apply to either the same or a different document.
- (Optional) To search for agreements using multiple document filters, click Add filter. Note: To delete a rule or document filter in the Document filter builder, click on the trash can icon next to the rule or document filter.
- Click Save & close. Your results appear in the Agreements pane.
Viewing an agreement
Once you search for an agreement, the following information appears in the Agreement pane:
- Name. The name of the agreement.
- Status. The order status.
- Period start. The date the agreement period starts.
- Period end. The date the agreement period ends.
- Cancellation deadline. The date by which you need to cancel the agreement if you do not want to renew the material covered by the agreement.
- **Description: A description of the agreement.
In the search results, click an agreement to view it. The agreement details pane displays with additional information about the agreement. In the agreement display, any accordions not populated with data and not otherwise required are not displayed to the user.
Controlling which columns display in the Agreements multi-column list
- In the Agreements search display, click Actions.
- At the bottom of the Actions menu is the heading Show columns followed by a list of available columns with checkboxes to display or hide those columns. All columns are displayed by default. The columns available should be (in order): Name, Status, Start date, End date, Cancellation deadline, and Description.
- When you uncheck a box, that column is removed from the display of the multi-column list.
- When you check a box, that column is added to the display of the multi-column list.
- When you go to the agreement search and sort view in the same session, the selection of which columns display persists.
Editing an agreement
- Find the agreement you want to edit.
- In the agreement details pane, click Actions > Edit.
- Make your desired changes to the agreement.
- Click Save & close. The agreement is updated.
Deleting an agreement
Note: You cannot delete an agreement that is linked to a license, has agreement lines, or is related to another agreement.
- Find the agreement you want to delete.
- In the agreement details pane, click Actions > Delete.
- In the Delete agreement dialog, click Delete. A confirmation message appears and the agreement is deleted.
Adding an agreement line
An agreement line represents the material covered by the agreement, for example, a package or title. The steps for adding agreement lines vary depending on whether your library is using the internal KB or an external KB.
Note, adding an agreement line cannot be done in an agreement that is open for editing.
Adding an agreement line via the internal KB
When using the internal KB, you first have to add e-resources to a basket in the E-resources pane. Then you can apply those e-resources to agreement lines.
Adding e-resources to the basket
Before you can add e-resources to agreement lines in an existing or new agreement, you must first add them to a basket. The basket is a temporary container that holds any e-resources (titles or packages) with which you need to work. E-resources are added on a one-by-one basis to an agreement line, so you can add as many e-resources to the basket as you need.
- In the Search & filter pane, click E-resources.
- Search for the e-resource you want to add to the basket.
- In the E-resources pane, click on the e-resource to select it.
- In the e-resource details pane, click Options for acquiring e-resource.
- In the Options table, in the Actions column, click Add title or Add package to add that e-resource to the basket. The e-resource is added to the basket and the number of items in the basket updates.
- Repeat steps 2-5 for all e-resources you want to add to the basket.
Adding e-resources from the basket to an agreement
There are two ways to add an e-resource from the basket to agreement lines:
From the basket
- Click the View X item(s) button to open the basket.
- Select or unselect the items in the basket you wish to add to agreement lines using the checkboxes to the left of the resources in the basket.
- Select Create new agreement to add the selected resource(s) to a completely new agreement (one agreement line per resource selected), or select the appropriate agreement from the drop-down list of existing agreements and click Add to selected agreement to add the selected resource(s) to an existing agreement (one agreement line per resource selected).
- The agreement for which the agreement lines have been created (whether this is a new or existing agreement) is displayed in the agreement view screen.
From the Agreement Line Edit screen
- Find the agreement to which you want to add an agreement line and select it.
- In the Agreement details pane, click Agreement lines.
- In the Agreement lines section, click Actions and select New agreement line.
- In the New agreement line window, if not already selected, click Basket.
- In the E-resource drop-down select the resource from the Basket for which you want to create an agreement line.
- (Optional) Enter a Description of the agreement line in the box.
- (Optional) Enter a Note about the agreement line in the box.
- (Optional) Enter Active from and Active to dates to indicate when the material covered by this agreement line was or is active in your collection.
- (Optional) To hide this information from your discovery layer, select the Suppress from discovery checkbox. If you don’t want this checkbox to appear, or you would like the checkbox to display on agreement line records, see Settings > Agreements > Display settings for more information.
- (Optional) To link the agreement line to a PO line, click Add PO line. See Adding a PO line to an agreement line for more information.
- To add multiple agreement lines at once, check the Create another checkbox and repeat steps 1-10.
- Click Save & close. A confirmation message appears and the agreement line is saved.
Adding an agreement line via eHoldings
- Find the agreement to which you want to add an agreement line and select it.
- In the Agreement details pane, click Agreement lines.
- In the Agreement lines section, click Actions and select New agreement line.
- In the New agreement line window, if not already selected, click eHoldings.
- Click Link e-resource.
- In the Select package dialog, in the Search & filter pane, enter a Package name in the box, or click Titles and enter a Title name in the box. Click Search. Search results appear.
- (Optional) Use the filters in the Search & filter pane to narrow down your results.
- Click the Package or Title to select it. The package or title is added to the agreement line.
- (Optional) Enter a Description of the agreement line in the box.
- (Optional) Enter a Note about the agreement line in the box.
- (Optional) Enter Active from and Active to dates to indicate when the material covered by this agreement line was or is active in your collection.
- (Optional) To hide this information from your discovery layer, select the Suppress from discovery checkbox. If you don’t want this checkbox to appear, or you would like the checkbox to display on agreement line records, see Settings > Agreements > Display settings for more information.
- (Optional) To link the agreement line to a PO line, click Add PO line. See Adding a purchase order line to an agreement line for more information.
- To add multiple agreement lines at once, check the Create another checkbox and repeat steps 1-13.
- Click Save & close. A confirmation message appears and the agreement line is saved.
Adding a purchase order line to an agreement line
You have the option of adding a purchase order line (POL) to an agreement line. Linking the agreement line to a POL adds context to the agreement line. For example, it can show how you paid for, or the method by which you ordered, the material.
When an agreement line is linked to a POL that is linked to an Inventory instance, a link directly to the Inventory instance is displayed in the Agreement Line display.
Note: If you are already editing an agreement line, skip to step 5.
- Find the agreement with the agreement line to which you want to add a POL and select it.
- In the Agreement details pane, click Agreement lines.
- In the Agreement lines section, click the agreement line to which you want to add a POL.
- In the Agreement line pane, click Actions > Edit.
- In the Edit agreement line window, click Add PO line.
- Click Link PO line.
- In the Select order lines dialog, in the Search & filter box, enter part or all of the title or package’s name, and click Search.
- (Optional) Filter results using the filters in the Search & filter pane.
- In the Search results pane, click the POL to select it. The Select order lines dialog closes and the POL is added to the agreement line.
- Repeat steps 5-9 as needed. The POLs are saved when the agreement line is saved.
Replacing a purchase order line in an agreement line
- Find the agreement with the agreement line to which you want to replace a POL and select it.
- In the Agreement details pane, click Agreement lines.
- In the Agreement lines section, click the agreement line to which you want to replace a POL.
- In the Agreement line pane, click Actions > Edit.
- In the Edit agreement line window, click Replace PO line and
- Follow steps 7-9 under Adding a purchase order line to an agreement line.
Deleting a purchase order line from an agreement line
- Find the agreement with the agreement line with the POL you want to delete and select it.
- In the Agreement details pane, click Agreement lines.
- In the Agreement lines section, click the agreement line with the POL you want to delete and select it.
- In the Agreement line pane, click Actions > Edit.
- To remove the POL, click the trash can icon next to the PO line you want to delete.
- Click Save & close. A confirmation message appears and the agreement line is updated.
Adding an unlinked agreement line
Use this feature to add an agreement line that has no connection to a record from either the internal KB or eHoldings.
- Find the agreement to which you want to add an agreement line and select it.
- In the Agreement details pane, click Agreement lines.
- In the Agreement lines section, click Actions and select New agreement line.
- Enter a Description (required). You can also add a Note and/or Active from and Active to dates. The description will appear as the agreement line’s Name/Description in the agreement record.
- (Optional) To link the agreement line to a PO line, click Add PO line. See Adding a purchase order line to an agreement line for more information.
- To add multiple agreement lines at once, check the Create another checkbox and repeat steps 1-5.
- Click Save & close.
Editing an agreement line
- Find the agreement with the agreement line you want to edit and select it.
- In the Agreement details pane, click Agreement lines.
- In the Agreement lines table, select the agreement line you want to edit.
- In the Agreement line pane, click Actions > Edit.
- Make your desired changes.
- Click Save & close. A confirmation message appears and the agreement line is updated.
Deleting an agreement line
Note: Agreements can also be unlinked from packages and titles in the eHoldings app.
- Find the agreement with the agreement line you want to delete and select it.
- In the Agreement details pane, click Agreement lines.
- In the Agreement lines table, select the agreement line you want to delete.
- In the Agreement line pane, click Actions > Delete.
- In the Delete agreement line dialog, click Delete. A confirmation message appears and the agreement line is deleted.
Viewing agreement lines
In order to view all of the agreement lines associated with a particular agreement at once, you can enter the View in agreement lines search. To do so, follow these steps:
- Find the desired agreement.
- In the Agreement details pane, click Agreement lines.
- In the Agreement lines section, click Actions and select View in agreement lines search.
- The Agreement line search pane will open. Clicking on any agreement line will display the Agreement line details record from which you can edit or delete the agreement line.
Controlling which columns display in the agreement lines multi-column list
- Find the desired agreement.
- In the Agreement details pane, click Agreement lines.
- In the Agreement lines section, click Actions.
- At the bottom of the Actions menu is the heading Show columns followed by a list of available columns with checkboxes to display or hide those columns. All columns are displayed by default. The columns available should be (in order): Name / Description, Provider, Publication type, Count, Note, Coverage, Custom coverage indicator, Active from, Active to, and PO Line.
- When you uncheck a box, that column is removed from the display of the multi-column list.
- When you check a box, that column is added to the display of the multi-column list.
- When you go to the agreement lines multi-column list view for any agreement in the same session, the selection of which columns display persists.
Searching for agreement lines
You can search for agreement lines in the Search & filter pane. To search for agreement lines, click Agreement lines and enter your search terms in the search box and click Search. The search box searches through the Name (for resources from the internal KB), Reference number (for resources from eHoldings), Description, and Note fields.
Note: When using the internal KB, click Agreements search in order to search for agreement lines.
You can also search for agreement lines by selecting any of the filters in the Search & filter pane: Agreement, Agreement line type, Active from, Active to, PO line, and Tags. For more information on the filters, see the filter descriptions below.
Agreement
To filter agreement lines by an agreement record, click Select agreement. In the Select agreement window, use the Search & filter feature to locate the desired agreement and click on it. See Searching for agreements. Your agreement line search will be limited to that agreement record.
Agreement line type
To filter agreement lines by type, check the Unlinked, External, and/or Internal checkboxes. An unlinked agreement line is not linked to a resource in a knowledge base. An external agreement line is linked to a resource in an external knowledge base (like the eHoldings app), and an internal agreement line is linked to a resource in the internal knowledge base.
Active from
To filter agreement lines by their active from date, enter a date into the On or after and/or On or before search box, or click the calendar icon to select a date from the calendar. Click Apply.
You can also check the box Include lines with no active from date set to locate lines without start dates.
Active to
To filter agreement lines by their active to date, enter a date into the On or after and/or On or before search box, or click the calendar icon to select a date from the calendar. Click Apply.
You can also check the box Include lines with no active to date set to locate lines without end dates.
PO line
To filter agreement lines by PO line, click Select PO line. In the Select order lines window, use the Search & filter feature to locate the desired PO line and click on it.
To search for agreement lines assigned specific tags, follow these steps:
- In the Search & filter pane, click Tags.
- Select the tag(s) from the drop-down list. Your results appear in the Agreement lines pane.
Controlling which columns display in the Agreement lines multi-column list
- In the Agreement lines search display, click Actions.
- At the bottom of the Actions menu is the heading Show columns followed by a list of available columns with checkboxes to display or hide those columns. All columns are displayed by default. The columns available should be (in order): Name / Reference, Description, Parent agreement, Note, Active from, and Active to.
- When you uncheck a box, that column is removed from the display of the multi-column list.
- When you check a box, that column is added to the display of the multi-column list.
- When you go to the agreement lines search and sort view in the same session, the selection of which columns display persists.
Adding a tag to an agreement
- Find the agreement you want to tag and select it.
- In the Agreement details pane, click the tag icon.
- In the Tags pane, either select a tag from the box or enter a tag.
- Click the X on the Tags pane to close the pane and save the tag. The tag number updates to the number of tags applied to the agreement.
Duplicating an agreement
Note: Periods are not duplicated as part of the agreement, but a single period with the current date as the start date will be added automatically (because Agreements have to have at least one period with a start date).
- Find the agreement you want to duplicate and select it.
- In the Agreement details pane, click Actions > Duplicate.
- In the Duplicate agreement dialog, select which sections of the agreement to duplicate. See Creating an agreement for the fields that appear in each of the sections.
- Click Save & close.
- In the Copy of: [duplicated agreement’s name] window, make your desired changes.
- Click Save & close. A confirmation message appears and the duplicated agreement appears in the Agreements pane.
Exporting an agreement
Exporting an agreement generates a JSON file. Note: Resources are only included for agreement lines that are linked to resources in the internal KB.
- Find the agreement you want to export and select it.
- In the Agreement details pane, select Actions > Export. Depending on your browser and its configurations, the file automatically downloads or you are prompted to save it.
Exporting e-resources
Exporting e-resources covered by an agreement is only possible if using the internal KB, and if e-resources are linked to the agreement as agreement lines.
Note: E-resources can be filtered by Current, Future, or Dropped. These options indicate whether the e-resource is currently associated with the agreement, it will be in the future, or it is no longer associated with the agreement. Export options are only offered for e-resources that are current or all e-resources.
- Find the agreement from which you want to export the linked e-resources.
- In the Agreement details pane, click Agreement lines.
- Under E-resources covered by this agreement, click Current or All.
- Click Export as… > JSON or KBART. Depending on your browser and its configurations, the file automatically downloads or you are prompted to save it.
Viewing an e-resource
Viewing e-resources covered by agreements is only possible if using the internal KB.
You can view e-resources by clicking on Packages or Titles in the Search & filter pane.
In the Packages or Titles pane, click an e-resource to view it. The e-resource details pane displays with additional information about the e-resource. Publication type, Material type, First author, First editor, Publication date, Edition, Volume, ISBN, and Related title fields are populated from the internal KB. The following accordions also display:
Agreements for this e-resource. This accordion displays agreements that cover this e-resource. To add an e-resource from the internal KB to an agreement see Adding an agreement line via the internal KB.
Options for acquiring this e-resource. See Adding e-resources to the basket.
Notes. For information on Notes see Adding and removing notes.
Discovery settings. For information on Discovery settings see Editing e-resources.
Viewing an e-resource package
You can view packages in e-resources by clicking on Packages in the Search & filter pane.
In the Packages pane, click an e-resource package to view it. The e-resource package details pane displays with additional information about the e-resource package, depending on the data that has been added to the internal KB. All packages will have a Provider, Source and Reference. They will also display when the record was created and when it was last updated. In addition packages may have:
- A Status: For example, Current or Deleted.
- Content type: A list of content types in the package, for example, Serial, Monograph, or Video.
- Availability: The general availability of the package, for example, Global or Consortium, and any constraints on availability, such as the specific Consortia it is available to.
- Source created: The date and time the package was created in the external source the package data came from.
- Source last updated: The date and time the package was last updated in the external source the package data came from.
- One or more of the following package IDs: ISIL, ZDB, EZB, eBookPool, GOKb ID and GOKb. Note that ID fields will only display when an ID of that type is available for the package in the internal KB.
The following accordions also display:
Extended package information. This accordion displays additional metadata for this e-resource package including: a Description of the package; Package description URLs, which are links to descriptions of that package online (for example, in GOKb or on a publishers website); Alternative names for the package; and all package Identifiers stored (this will include any IDs displayed in the package details but may include additional IDs as well).
Agreements for this package. This accordion displays agreements that cover this e-resource package. To add an e-resource from the internal KB to an agreement see Adding an agreement line via the internal KB.
E-resources in package. This accordion displays all e-resources associated with the package. E-resources can be filtered by Current, Future, Dropped, and All.
Notes. For information on Notes see Adding and removing notes.
Viewing an e-resource title
You can view packages in e-resources by clicking on Titles in the Search & filter pane.
In the Titles pane, click an e-resource title to view it. The e-resource title details pane displays with additional information about the e-resource title, depending on the data that has been added to the internal KB. It will also display when the record was created and when it was last updated.
The following accordions also display:
Agreements for this e-resource. This accordion displays agreements that cover this e-resource title. To add an e-resource from the internal KB to an agreement see Adding an agreement line via the internal KB.
Options for acquiring e-resource. From here you can add a package or title to your basket.
Notes. For information on Notes see Adding and removing notes.
Discovery settings. Displays whether the title is suppressed from discovery.
Editing e-resources
- Find the e-resource you want to edit.
- In the e-resource details pane, click Edit.
- You can choose whether to suppress the e-resource from discovery by checking the Suppress from discovery box.
- Click Save & close. The e-resource is updated.
Move identifier(s) between titles
If a title instance is related to an incorrect identifier, you can transfer identifiers between title instances by:
- In the E-resources pane, click Actions > Move identifier(s).
- Under Source title, click Select title.
- Select a title from the Select e-resource window. In the Search & filter pane of the Select e-resource window, you can search e-resources by Name, ISBN and ISSN, and filter by Type.
- Select the Identifier(s) to be moved by checking the desired boxes.
- Under Destination title, click Select title.
- Repeat steps 3 and 4 for the Destination title.
- Click Preview.
- In the Preview window, click Update titles & close to complete the transaction, or Update titles & move more identifiers to continue moving identifiers. You can track the status of the job in the Local KB admin app.
Adding a tag to an e-resource
- Find the e-resource you want to tag and select it.
- In the e-resource details pane, click the tag icon.
- In the Tags pane, either select a tag from the box or enter a tag.
- Click the X on the Tags pane to close the pane and save the tag. The tag number updates to the number of tags applied to the e-resource.
Local KB search
You can search for packages, titles, and platforms in the local KB by clicking on the Local KB search tab.
Searching for packages
Searching for packages covered by an agreement is only possible if using the internal KB.
You can search for packages by clicking on the tab Local KB search and selecting Packages in the Search & filter pane. Enter your search terms in the search box and click Search. The search box searches the name field.
Packages can be further filtered by:
- External data source: Select an external data source from the drop-down list.
- Status
- Scope
- Availability
- Content type
- Tags: Select a tag(s) from the drop-down list, or search for one by typing the tag’s name.
The values for Status, Scope, Availability, and Content type can be configured in Settings > Agreements > Pick list values.
Searching for titles
Searching for titles covered by an agreement is only possible if using the internal KB.
You can search for titles by clicking on the tab Local KB search and selecting Titles in the Search & filter pane. Enter your search terms in the search box and click Search. The search box searches the name field.
Titles can be further filtered by:
The values for Type and Publication Type can be configured in Settings > Agreements > Pick list values.
Searching for platforms covered by an agreement is only possible if using the internal KB.
You can search for platforms by clicking on the tab Local KB search and selecting Platforms in the Search & filter pane. Enter your search terms in the search box and click Search. The search box searches the name field.
Viewing platforms covered by agreements is only possible if using the internal KB.
You can view platforms by clicking on the tab Local KB search and selecting Platforms in the Search & filter pane.
In the Platforms pane, click a platform to view it. The platform details pane displays with additional information about the platform. The Locators field is populated with the platform’s base URL from the internal KB. For the Local platform code, see Editing platforms. The following accordions also display:
Platform URL customization settings. See Adding URL customization.
Platform proxy server settings. In Settings > Local KB admin > Proxy server settings, you can add a proxy server setting and exclude platforms one by one. Every platform that is not listed in the array of excluded platforms will contain a generated list of proxy URLs.
- Find the platform you want to edit.
- In the platform details pane, click Actions > Edit.
- You can add a local platform code in the Local platform code box.
- Click Save & close. The platform is updated.
Adding URL customization
- Find the platform you want to edit.
- In the platform details pane under the Platform URL customization settings accordion, click Add URL Customization.
- In the New URL customization window, enter a Name for the URL.
- Enter a Customization code. The Customization code is the template that will be used to generate a proxied URL. Please refer to Proxy server configuration and URL customizations for further details about the available codes.
- Click Save & close.
Editing URL customization
- In the platform details pane under the Platform URL customization settings accordion, click on the URL customization.
- In the URL customization window, click Actions > Edit.
- Make the desired changes to the Name or Customization code.
- Click Save & close.
Deleting URL customization
- In the platform details pane under the Platform URL customization settings accordion, click on the URL customization.
- In the URL customization window, click Actions > Delete.
- In the Delete URL customization dialog box, click Delete.
Adding and removing notes
You can add and assign notes to agreement records, agreement lines, and e-resources (internal KB only). Assigning a note means you are reusing a previously created note.
Adding a new note to an agreement
- Find the agreement to which you want to add a note and select it.
- In the Agreement details pane, click Notes > New.
- In the New note window, select the Note type from the drop-down list. Note types are created in the Settings app. For more information, see Settings > Notes.
- Enter a Note title in the box.
- (Optional) Enter any Details about the note in the box.
- Click Save & close. The note is saved and appears in the Notes section in the agreement details pane.
Assigning an existing note to an agreement
- Find the agreement to which you want to add a note and select it.
- In the Agreement details pane, click Notes > Assign / Unassign.
- In the Assign / Unassign note dialog, search for a note using the search bar in the Search & filter pane, or select a Note type from the drop-down list. You can also filter by Note assignment status.
- Select the checkbox next to the note you want to assign to the agreement and click Save. The note is saved and appears in the Notes section in the agreement details pane.
Editing an agreement note
- Find the agreement with the note you want to edit and select it.
- In the Agreement details pane, click Notes.
- Find the note you want to edit, and click Edit at the bottom of the Title and details section of the note.
- In the Edit: note window, make your desired changes to the note.
- Click Save & close. The note is saved.
Removing a note on an agreement
- Find the agreement with the note you want to remove and select it.
- In the Agreement details pane, click Notes.
- Click the note you want to remove.
- In the Note window, click Actions > Delete.
- In the Delete note dialog, click Delete. The note is deleted and removed from any records to which it was attached.
Adding a note to an agreement line
- Find the agreement with the agreement line to which you want to add a note and select it.
- In the Agreement details pane, click Agreement lines.
- In the Agreement lines table, select the agreement line you want to edit.
- In the Agreement lines pane, under Notes, click New.
- Follow steps 3-6 under Adding a new note to an agreement.
Assigning an existing note to an agreement
- Find the agreement with the agreement line to which you want to add a note and select it.
- In the Agreement details pane, click Agreement lines.
- In the Agreement lines table, select the agreement line you want to edit.
- In the Agreement lines pane, under Notes, click Assign / Unassign.
- Follow steps 3-4 under Assigning an existing note to an agreement.
Editing an agreement line note
- Find the agreement with the agreement line with the note you want to edit and select it.
- In the Agreement details pane, click Agreement lines.
- In the Agreement lines table, select the agreement line you want to edit.
- In the Agreement lines pane, under Notes, find the note you want to edit, and click Edit at the bottom of the Title and details section of the note.
- In the Edit: note window, make your desired changes to the note.
- Click Save & close. The note is saved.
Removing a note from an agreement line
- Find the agreement with the agreement line with the note you want to remove and select it.
- In the Agreement details pane, click Agreement lines.
- In the Agreement lines table, select the agreement line you want to edit.
- In the Agreement lines pane, under Notes, find the note you want to remove and select it.
- In the Note window, click Actions > Delete.
- In the Delete note dialog, click Delete. The note is deleted and removed from any records to which it was attached.
The Dashboard app is designed to enable a personalized view of key information from across FOLIO apps at a glance. In its first release (included in the Juniper flower release), the Dashboard includes the ability to display information from the Agreements and Licenses applications.
In the Quesnelia release, the Agreements app comes with two dashboard widgets (“ERM Agreements” and “ERM Agreement Jobs”). There are examples of how you can use these two
widget definitions to achieve a wide range of outcomes in the Example widget configurations documentation.
7.2 - eHoldings
This section of the documentation contains links to external sites. Please be advised that these sites are not maintained by the FOLIO Documentation Group and may not be aligned with the current release of FOLIO.
The eHoldings app allows you to manage your library’s e-resources. You can link your e-resources to agreements created in the Agreements app to create a relationship between the two.
Definition of terms related to the eHoldings app:
- E-resource. An electronic resource. This generally refers to packages and titles.
- Knowledge base (KB) A knowledge base is an extensive database maintained by a knowledge base supplier that contains information about electronic resources such as title lists and coverage dates etc. Knowledge bases typically organize the resources provided by a content provider into collections or databases that reflect specific content provider offerings, for example packages of e-journals, e-books, or other materials.
- Providers. The provider of the e-resource, for example, the vendor or publisher.
- Packages. A collection of e-resource titles bundled together as a unit and distributed by a provider.
- Titles. The individual e-resources, for example a journal or e-book, contained within a package.
Permissions
The permissions listed below allow you to interact with the eHoldings app and determine what you can or cannot do within the app. You can assign permissions to users in the Users app. If none of these permissions are assigned to a user, they are unable to see the eHoldings app or any related information.
The following are all the eHoldings permissions:
- eHoldings: Can create and delete custom packages and titles. This permission allows the user to create and delete custom packages and titles.
- eHoldings: Can edit providers, packages, titles detail records. This permission allows the user to edit providers, packages, and titles detail records.
- eHoldings: Can select/unselect packages and titles to/from your holdings. This permission allows the user to select (or add) packages and titles to your library’s holdings, and unselect (or remove) them from your holdings.
- eHoldings: Can view Usage & analysis data for packages, titles and resources. This permission allows the user to view usage consolidation on the eHoldings app.
- Settings (eholdings): Create, edit, and view Usage Consolidation API credentials. This permission allows the user to update and view usage consolidation settings.
- Settings (eholdings): View Usage Consolidation API credentials. This permission allows the user to view usage consolidation settings.
- Settings (eHoldings): Can assign/unassign a user from a KB. This permission allows the user to assign and unassign a user from KB credentials.
- Export manager: All. This permission allows the user to export eHoldings package and title+package details via the Export manager app.
- Export manager: Download and re-send files. This permission allows the user to download and re-send files via the Export manager app.
Note: This permission should only be used by institutions that maintain multiple EBSCO KB configurations.
Keyboard shortcuts
Keyboard shortcuts allow you to perform actions in this app using the keyboard. See Platform essentials > Keyboard shortcuts for more information.
Implementing eHoldings
When you use eHoldings, the data is held in an external knowledge base (KB) and you’re interacting with that knowledge base through eHoldings using an API call. eHoldings is connected to an EBSCO knowledge base API called HoldingsIQ to get external KB data. You can make changes in FOLIO eHoldings or EBSCO Holdings Management and they are immediately reflected on the other interface. Currently EBSCO is the only supported external KB.
To setup eHoldings:
- Subscribe to EBSCO’s HoldingsIQ API.
- Request an API key.
- Go to FOLIO > Settings > eHoldings to enter API credentials and EBSCO customerID.
-
Click on the eHoldings app icon.
-
A menu appears with the following options:
- eHoldings app Search. This option will return you to the eHoldings app landing page.
- Keyboard shortcuts. This option will access the Keyboard shortcuts list.
- Submit a KB Content Inquiry. This option will open the EBSCO Knowledge Base Inquiry Form.
- EBSCO System status. This option will open the EBSCO system status site.
Searching for providers, packages, and titles
To search for the providers, packages, or titles available in your knowledge base, follow these steps:
- In the Search & filter pane, click Providers, Packages, or Titles.
- Optional: If you are searching Titles, you can click the Titles drop-down list to search through one of the following fields:
- ISSN/ISBN. International Standard Serial Number or International Standard Book Number of the title.
- Publisher. Publisher of the title.
- Subject. Subject of the title.
- Enter your search terms into the box and click Search. Your results appear in the Providers, Packages, or Titles pane.
You can also search for providers, packages, or titles by selecting any of the filters in the Search & filter pane. Additionally, you can apply the filters after you perform a search to limit your results. The filters available vary depending on whether you are searching for a provider, package, or title. See the sections below for more information on the filters.
To search for provider, packages, or titles assigned with specific tags, follow these steps:
- In the Search & filter pane, click Tags.
- Select the Search by tags only checkbox.
- Select the tag(s) from the drop-down list. Your results appear in the Providers, Packages, or Titles pane.
Sort options
Sort options determine the order in which your search results display. By default, Relevance is selected. If you select Provider, Package, or Title, your search results are sorted alphabetically.
To change the sort option:
- In the Search & filter pane, click Sort options.
- Select Relevance or Provider, Package, or Title. Results are sorted in the Providers, Packages, or Titles pane based on your selection.
Selection status
To filter packages or titles by selection status, in the Search & filter pane, click Selection status, and select one of the following options:
- All. All packages or titles, regardless of selection status. This is selected by default.
- Selected. Packages or titles selected in your knowledge base.
- Not selected. Packages or titles not selected in your knowledge base.
Content type
To filter packages by content type, in the Search & filter pane, click Content type, and select one of the following options:
- All. All packages, regardless of content type. This is selected by default.
- Aggregated Full Text. Aggregated full-text databases refer to products sold by companies that do not themselves publish journals but only distribute journal content, for example products sold by EBSCO and ProQuest.
- Abstract and Index. Reference sources which provide bibliographic information about journals including abstracts of the articles.
- E-Book. Electronic books.
- E-Journal. Electronic journals (full text and bibliographic).
- Mixed Content. Packages that include multiple types of content, like e-books and e-journals.
- Online Reference. For example, dictionaries, almanacs, and encyclopedias that are available in electronic format.
- Print. Materials in print (or paper) format.
- Streaming Media. Video or audio content sent in compressed form over the Internet and played immediately.
- Unknown. The content type is undefined.
Publication Type
To filter titles by publication type, in the Search & filter pane, click Publication Type, and select one of the following options:
- All. All titles, regardless of publication type. This is selected by default.
- Audiobook. A recording of a reading of a book, frequently on CD.
- Book. A written text that can be published in print or electronic format; a monograph.
- Book Series. A related set of books.
- Database. A structured set of data held in a computer.
- Journal. A newspaper or magazine that deals with a particular subject or professional activity.
- Newsletter. A printed or electronic document containing information about the recent activities of an organization or group sent regularly to members.
- Newspaper. A printed or electronic publication (usually issued daily or weekly) containing news, feature articles, advertisements, and correspondence.
- Proceedings. A complete written record of what is said or done during a meeting.
- Report. An official document made by someone who has examined a particular subject.
- Streaming Audio. Audio data transmitted over a computer network for immediate playback rather than for file download and later offline playback.
- Streaming Video. Video data transmitted over a computer network for immediate playback rather than for file download and later offline playback.
- Thesis & Dissertation. A long essay on a particular subject written as a requirement for an advanced degree.
- Website. A set of related web pages located under a single domain name.
- Unspecified. The publication type is undefined.
Packages
To filter titles by packages:
- In the Search & filter pane with the Titles toggle selected, enter a title in the Titles search box. You can also enter a ISSN/ISBN, Publisher, or Subject. Click Search.
- Click Packages.
- Select a package from the drop-down list.
- You can filter the list in the Filter options list box.
- The title in that package will appear in the title record window.
Viewing provider, package, and title records
The type of information displayed in your search results depends upon the type of search performed (provider, package, or title). That information can include:
- Name. The name of the provider, package, or title.
- Provider. The package provider.
- Selected. The number of packages your library has selected from the provider.
- Total packages. The number of packages available from the provider.
- Total titles. The number of titles available from the package.
- Hidden. Whether the package is hidden from view.
- Publication type. Material type of the title.
- Title information. Varies depending on the publication type of the title.
In the search results, click any result to view it. The provider, package, or title records each display additional information about your selection.
Viewing a provider record
The provider record contains detailed information about the selected provider.
- To view a provider record, find the provider you want to view and select it. The provider record window appears.
In the tags section of the provider record, you can manage any tags associated with the provider.
Adding a tag to a provider record
- Find the provider you want to tag and select it.
- In the Provider record window, in the Tags section, either select a tag from the box or enter a new tag.
- Optional: If you are adding a new tag, click Add tag for: [your tag name] to create the tag and add it to the record.
- Click the X on the provider record window to close the window and save the tag.
Removing a tag from a provider record
Note: Tags can be removed but not entirely deleted.
- Find the provider from which you want to remove a tag and select it.
- In the Provider record window, in the Tags section, click the X next to the tag you want to remove. The tag is removed from the record but still remains as an option in the drop-down list.
This Provider information section displays the following fields:
- Packages selected. Indicates the number of packages selected by your library. You can change the number of selected packages in the Packages section.
- Total packages. Indicates the total number of packages available from the provider.
Provider settings
The Provider settings section displays the provider’s proxy settings. Proxy settings can be changed by editing the provider record. See Editing provider records for more information.
Notes
In the Notes section, you can add and manage notes.
Adding a new note to a provider
- Find the provider to which you want to add a note and select it.
- In the Provider record window, in the Notes section, click New.
- In the New note window, select the Note type from the drop-down list. Note types are created in the Settings app. For more information, see Settings > Notes.
- Enter a Note title in the box.
- Optional: Enter any Details about the note in the box.
- Click Save & close. The note is saved and appears in the Notes section of the provider record.
Assigning an existing note to a provider
- Find the provider to which you want to assign a note and select it.
- In the Provider record window, in the Notes section, click Assign / Unassign.
- In the Assign / Unassign note dialog, search for a note using the search bar in the Search & filter pane, or select a Note type from the drop-down list. You can also filter by Note assignment status.
- Select the checkbox next to the note you want to assign to the package and click Save. The note is saved and appears in the Notes section of the provider record.
Editing a provider note
- Find the provider with the note you want to edit and select it.
- In the Provider record window, in the Notes section, find the note you want to edit, and click Edit at the bottom of the Title and details column of the note.
- In the Edit: note window, make your desired changes to the note.
- Click Save & close. The note is saved.
Deleting a provider note
- Find the provider with the note you want to remove and select it.
- In the Provider record window, in the Notes section, click the note you want to remove.
- In the Note window, click Actions > Delete.
- In the Delete note dialog, click Delete. The note is deleted and removed from any records to which it was attached.
Packages
The Packages section includes the total number of packages available from the provider displayed in alphabetical order. Not selected packages are indicated by a gray icon. Selected packages are indicated by a green icon.
Filtering packages
- To filter packages, click the magnifying glass icon.
- Optional: In the Filter packages dialog, search for a package title by entering the name or partial name of the package in the box.
- Optional: Select any filters (Tags, Sort options, Selection Status, or Content type) you want to apply to the packages.
- Click Search. The packages are filtered based on your selections.
Viewing a package record
The package record contains detailed information about the e-resource package.
- To view a package record, find the package you want to view and select it. The package record window appears.
In the tags section, you can add and manage tags applied to a package.
Adding a tag to a package record
- Find the package you want to tag and select it.
- In the Package record window, in the Tags section, either select a tag from the box or enter a new tag.
- Optional: If you are adding a new tag, click Add tag for: [your tag name] to create the tag and add it to the record.
- Click the X on the package record window to close the window and save the tag.
Removing a tag from a package record
Note: Tags can be removed but not entirely deleted.
- Find the package from which you want to remove a tag and select it.
- In the Package record window, in the Tags section, click the X next to the tag you want to remove. The tag is removed from the record but still remains as an option in the drop-down list.
Holding status
Holding status indicates whether the package is part of your library’s holdings.
Adding a package to holdings
If a package has not yet been selected by your library, you can add it to your holdings from this section of the package record.
Note: Performing this action adds all the titles in this package to your holdings.
- Find the package you want to update holdings on and select it.
- In the Package record window, in the Holding status section, click Add package to holdings.
- In the Add all titles in a package to holdings dialog, click Add package (all titles) to holdings. The titles are added to your holdings and the Holding status updates to Selected.
Removing a package from holdings
- Find the package from which you want to remove holdings and select it.
- In the Package record window, click the Actions > Remove package from holdings.
- In the Remove package from holdings? dialog, click Yes, remove. The titles are removed from your holdings and the Holding status updates to Not selected.
The Package information section contains the following information on the package:
- Provider. The package provider.
- Content type. Type of material contained in a package.
- Package type. Either Complete or Variable, indicating whether the package must be selected in its entirety, or whether individual titles can be chosen from within the package.
- Titles selected. The number of titles acquired by your library from within this package.
- Total titles. The total number of titles contained within the package.
Package settings
The Package settings section includes the options: Show titles in package to patrons, Automatically select new titles, the package’s Proxy setting, and Provider token. These settings can be changed by editing the package record.
Coverage settings
Coverage is the available years or version of a publication. For a journal this would be the publication years, volumes, or issues covered by the online resource. For a monograph it can contain publication year, edition, or volume. Coverage can be customized by editing the package record.
Agreements
Use the Agreements section to create agreements or link the package to agreements created in the Agreements app.
Linking an existing agreement
- Find the package to which you want to link an agreement and select it.
- In the Package record window, in the Agreements section, click Add.
- In the Select agreement dialog, enter the agreement’s name or a portion of the name into the search box in the Search & filter pane, and click Search. Search results appear in the Agreements pane.
- Optional: Filter results using the filters in the Search & filter pane.
- Click the agreement to select. The package is added to the agreement as an agreement line.
Creating a new agreement
- Find the package to which you want to link an agreement and select it.
- In the Package record window, in the Agreements section, click New.
- Fill in the fields. See Creating an agreement for more information.
- Click Save & close. A confirmation message appears and the package is added to the agreement as an agreement line..
Removing an agreement
- Find the package from which you want to remove an agreement and select it.
- In the Package record window, in the Agreements section, click the trash can icon next to the agreement you want to remove.
- In the Unassign an agreement from this record dialog, click Unassign. A confirmation message appears and the agreement line is removed from the package record, but not deleted from the Agreements app.
Usage & analysis
In the Usage & analysis section, you can access cost and usage information for the packages and titles that are a part of your library’s holdings.
- Select a year from the Year drop-down list.
- Select All platforms, Publisher platforms only, or Non-publisher platforms only from the Platform drop-down list.
- Click View. Cost and usage information for the packages and titles that are a part of your library’s holdings will display.
- From the Actions drop-down list, you can select View titles or Export titles to view or export the titles from a package for additional analysis.
Notes
In the Notes section, you can add and manage notes.
Adding a new note to a package
- Find the package to which you want to add a note and select it.
- In the Package record window, in the Notes section, click New.
- In the New note window, select the Note type from the drop-down list. Note types are created in the Settings app. For more information, see Settings > Notes.
- Enter a Note title in the box.
- Optional: Enter any Details about the note in the box.
- Click Save & close. The note is saved and appears in the Notes section of the package record.
Assigning an existing note to a package
- Find the package to which you want to assign a note and select it.
- In the Package record window, in the Notes section, click Assign / Unassign.
- In the Assign / Unassign note dialog, search for a note using the search bar in the Search & filter pane, or select a Note type from the drop-down list. You can also filter by Note assignment status.
- Select the checkbox next to the note you want to assign to the package and click Save. The note is saved and appears in the Notes section of the package record.
Editing a package note
- Find the package with the note you want to edit and select it.
- In the Package record window, in the Notes section, find the note you want to edit, and click Edit at the bottom of the Title and details column of the note.
- In the Edit: note window, make your desired changes to the note.
- Click Save & close. The note is saved
Deleting a package note
- Find the package with the note you want to remove and select it.
- In the Package record window, in the Notes section, click the note you want to remove.
- In the Note window, click Actions > Delete.
- In the Delete note dialog, click Delete. The note is deleted and removed from any records to which it was attached.
Titles
The Titles section includes the total number of titles available in the package displayed in alphabetical order. Not selected titles are indicated by a gray icon. Selected titles are indicated by a green icon.
Filtering titles
- To filter titles, click the magnifying glass icon.
- Optional: In the Filter titles dialog, search for a title by entering the name or partial name of the title in the box.
- Optional: Select any filters (Tags, Sort options, Selection Status, or Publication type) you want to apply to the titles.
- Click Search. The titles are filtered based on your selections.
Viewing a title record
The title record contains detailed information about the selected title.
- To view a title record, find the title you want to view and select it. The title record window appears.
The Title information section can contain Author, Alternate Title(s), Publisher, Publication type, ISSN (Print), ISSN (Online), ISBN (Print), ISBN (Online), Subjects, Peer reviewed, Title type, and Description.
Title information varies depending on the publication type.
Adding a title to a custom package
For information on creating a custom package, see Creating a custom package, below.
- Find the title you want to add to a custom package and select it.
- In the Title record window, in the Title information section, click Add to custom package.
- In the Add title to custom package dialog, select the Package to which you want to add the title from the drop-down list.
- Optional: Enter a Custom URL in the box.
- Click Submit. The title package details window appears.
Packages
The Packages section includes the packages that contain the title displayed in alphabetical order. Not selected packages are indicated by a gray icon. Selected packages are indicated by a green icon.
Filtering packages
- To filter packages, click the magnifying glass icon.
- In the Filter packages dialog, search for a package by entering the name or partial name of the title in the box.
- Select each package you want to filter by. You can select multiple packages.
- Click Search. The packages are filtered based on your selections.
Editing a provider record
Only proxy settings can be edited.
Note: If your library is an EBSCO KB API user, access EBSCOAdmin to setup and maintain proxies.
- Find the provider you want to edit and select it.
- In the Provider details window, click Edit.
- Select a new Proxy from the drop-down list.
- Click Save & close. A confirmation message appears and the provider is updated.
Creating a custom package
- In the Search & filter pane, click Packages.
- In the Packages pane, click New.
- In the New custom package window, enter a package Name.
- Optional: Select a Content type from the drop-down list.
- Optional: To provide a date range for Coverage settings, click Add date range. Enter a Start date and End date.
- Click Save & close. A confirmation message appears and the custom package details window appears.
Editing a package
- Find the package you want to edit and select it.
- In the Package record window, click Actions > Edit.
- Make your desired changes. See the sections below for more information.
- Click Save & close.
Editing holding status
Holdings can be added or removed from a package. See Holding status for instructions.
Editing package settings
- Show titles in a package to patrons. Indicates whether the titles display in your catalog. If you select No, you continue to be subscribed to the titles in eHoldings, but they are hidden from patrons in the catalog.
- Automatically select new titles. Whether your service provider will automatically select additional titles as they are added to the package by the provider. If you select No, then new titles are not selected if they become available in the package unless manually selected by your library.
- Proxy. Settings can be changed using the Proxy drop-down list.
Editing coverage settings
You can customize the package’s coverage dates to match your holdings by setting a new start and/or end date.
Exporting a package
Note: There will be a 10,000 title limit when exporting a package detail record. You will need to use the Titles accordion’s search within feature to filter to 10,000 titles maximum. The package detail export will honor your Filter titles search and filter selections.
- Find the package you want to export and select it.
- In the Package record window, click Actions > Export package (CSV).
- From the Package fields to export drop-down list, you can select the following eHoldings information for export: Access Status Type, Agreements, Automatically Select titles, Custom Coverage, Holdings status, Notes, Package Content Type, Package Id, Package Name, Package Type, Provider Id, Provider Name, Proxy, Show To Patrons, and Tags.
- From the Title fields to export drop-down list, you can select the following eHoldings information for export: Access Status Type, Agreements, Alternative title(s), Contributors, Coverage statement, Custom Coverage, Custom Embargo, Custom label, Description, Edition, Holdings status, ISBN_Online, ISBN_Print, Managed coverage dates, Managed Embargo, Notes, Peer reviewed, Proxy, Publication Type, Publisher, Show To Patrons, Subjects, Tags, Title ID, Title name, Title Type, and URL.
- Click Export.
- The export will appear in the Export manager app.
Deleting a custom package
- Find the package you want to delete and select it.
- In the Package record window, click Actions > Delete package.
- In the Delete custom package dialog, click Yes, delete. The package is deleted.
Adding a title to holdings
- Find the title you want to add to your holdings and select it.
- In the Title record window, under the Packages, select the package to which you want to add the title.
- In the Package title details window, in the Holding status section, click Add to holdings. The Holding status changes to Selected.
Removing a title from holdings
- Find the title you want to remove from your holdings.
- In the Title record window, in the Packages section, select the package within which the title appears that you want to remove from your holdings.
- In the Package title details window, click Actions > Remove title from holdings.
- In the Remove resource from holdings? dialog, click Yes, remove. The Holding status changes to Not Selected.
Editing a title record
- Find the title you want to edit.
- In the Title record window, in the Packages section, select the package within which the title appears that you want to edit.
- In the Package title details window, click Actions > Edit.
- Make your desired changes. See the sections below for more information.
- Click Save & close.
Editing custom labels
Custom labels are created in the Settings app. For more information, see Settings > eHoldings > Custom labels. If you are using custom labels, you can enter information into these fields.
Editing resource settings
This section includes the options:
- Show to patrons. Indicates whether the titles display in your catalog. If you select No, you continue to be subscribed to the titles in eHoldings, but they are hidden from patrons in the catalog.
- Proxy. Settings can be changed using the Proxy drop-down list.
Editing coverage settings
Coverage is the available years or version of a publication. For a journal this would be the publication years, volumes, or issues covered by the online resource. For a monograph it can contain publication year, edition, or volume.
- Managed coverage dates. Indicates the title’s coverage dates are managed by your library’s service provider.
- Custom coverage dates. Indicates that coverage dates are managed by your library. Click Add date range and enter a Start date and End date.
- Dates. If selected, the title’s coverage displays as dates in your catalog.
- Coverage statement. If selected, the title’s coverage displays as the statement you enter into the box.
- Embargo period. A period of time during which the title is not available.
Adding a custom embargo period
- Click Add custom embargo period
- In the first box, enter a number greater than 0.
- Select a time period from the drop-down list. The embargo period saves when you save and close the record.
Deleting a custom embargo period
- Find the embargo period you want to remove.
- Click the trash can icon next to the embargo period. The embargo period is removed and is deleted when you save the record.
Exporting a title record
- Find the title you want to export.
- In the Title record window, in the Packages section, select the package within which the title appears that you want to export.
- In the Package title details window, click Actions > Export title package (CSV).
- From the Package fields to export drop-down list, you can select the following eHoldings information for export: Access Status Type, Agreements, Automatically Select titles, Custom Coverage, Holdings status, Notes, Package Content Type, Package Id, Package Name, Package Type, Provider Id, Provider Name, Proxy, Show To Patrons, and Tags.
- From the Title fields to export drop-down list, you can select the following eHoldings information for export: Access Status Type, Agreements, Alternative title(s), Contributors, Coverage statement, Custom Coverage, Custom Embargo, Custom label, Description, Edition, Holdings status, ISBN_Online, ISBN_Print, Managed coverage dates, Managed Embargo, Notes, Peer reviewed, Proxy, Publication Type, Publisher, Show To Patrons, Subjects, Tags, Title ID, Title name, Title Type, and URL.
- Click Export.
- The export will appear in the Export manager app.
Adding a tag to a title record
Tags can only be added to title records when a package is selected and the title record is not open for editing.
- Find the title you want to tag and select it.
- In the Title record window, in the Packages section, select the package within which the title appears that you want to tag.
- In the Package title details window, in the Tags section, either select a tag from the box or enter a new tag.
- Optional: If you are adding a new tag, click Add tag for: [your tag name] to create the tag and add it to the record.
- Click the X on the provider details window to close the window and save the tag.
Removing a tag from a title record
Note: Tags can be removed but not entirely deleted.
- Find the title you want to tag and select it.
- In the Title record window, in the Packages section, select the package within which the title appears that you want to tag.
- In the Package title details window, in the Tags section, click the X next to the tag you want to remove. The tag is removed from the record but still remains as an option in the drop-down list.
Creating a custom title
- In the Search & filter pane, click Titles.
- In the Titles pane, click New.
- In the New custom title window, enter a title Name.
- Optional: To add a contributor, follow these steps:
- Click Add a contributor.
- Select Author, Editor, or Illustrator from the Type drop-down list.
- Enter the Name of the contributor in the box.
- Repeat as needed.
- Optional: Enter an Edition in the box.
- Optional: Enter a Publisher in the box.
- Optional: Select a Publication type from the drop-down list.
- Optional: To add an identifier, follow these steps:
- Click Add identifier.
- Select ISSN or ISBN, Print or Online, from the Type drop-down list.
- Enter the ID of the identifying number in the box.
- Repeat as needed.
- Optional: To indicate whether the title is peer reviewed, select the Peer reviewed checkbox.
- Select a Package from the drop-down list to which to add the title.
- Click Save & close. The custom title record appears.
Editing a custom title
- Find the custom title you want to edit and select it.
- In the Custom title window, click Edit.
- Make your desired changes. See Creating a custom title for information on the fields.
- Click Save & close.
Deleting a custom title
- Find the custom title you want to delete and select it.
- In the Custom title window, in the Packages section, select the package containing the title.
- Click Actions > Remove title from holdings.
- In the Remove resource from holdings dialog, click Yes, remove. The custom title is deleted.
Linking an existing agreement to a title record
Note: Agreements can only be added to title records when a package is selected and the title record is not open for editing.
- Find the title to which you want to link an agreement and select it.
- In the Title record window, in the Packages section, select the package within which the title appears to which you want to add an agreement.
- In the Package title details window, in the Agreements section, click Add.
- In the Select agreement dialog, enter the agreement’s name or a portion of the name into the search box in the Search & filter pane, and click Search. Search results appear in the Agreements pane.
- Optional: Filter results using the filters in the Search & filter pane.
- Click the agreement to select. The agreement is added to the title record.
Creating a new agreement from a title record
- Repeat steps 1-2 from Linking an existing agreement.
- In the Package title details window, in the Agreements section, click New.
- Fill in the fields. See Creating an agreement for more information.
- Click Save & close. A confirmation message appears and the agreement is added to the title record.
Removing an agreement from a title record
- Repeat steps 1-2 from Linking an existing agreement.
- In the Package title details window, in the Agreements section, click the trash can icon next to the agreement you want to remove.
- In the Unassign an agreement from this record dialog, click Unassign. A confirmation message appears and the agreement is removed from the package record, but not deleted from the Agreements app.
Usage & analysis
In the Usage & analysis section, you can access cost and usage information for the packages and titles that are a part of your library’s holdings.
- Select a year from the Year drop-down list.
- Select All platforms, Publisher platforms only, or Non-publisher platforms only from the Platform drop-down list.
- Click View. Cost and usage information for the packages and titles that are a part of your library’s holdings will display.
Adding a new note to a title
- Find the title to which you want to add a note and select it.
- In the Title record window, in the Packages section, select the package within which the title appears.
- In the Package title details window, in the Notes section, click New.
- In the New note window, select the Note type from the drop-down list. Note types are created in the Settings app. For more information, see Settings > Notes.
- Enter a Note title in the box.
- Optional: Enter any Details about the note in the box.
- Click Save & close. The note is saved and appears in the Notes section of the title record.
Assigning an existing note to a title
- Find the title to which you want to assign a note and select it.
- In the Title record window, in the Packages section, select the package within which the title appears.
- In the Package title details window, in the Notes section, click Assign / Unassign.
- In the Assign / Unassign note dialog, search for a note using the search bar in the Search & filter pane, or select a Note type from the drop-down list. You can also filter by Note assignment status.
- Select the checkbox next to the note you want to assign to the package and click Save. The note is saved and appears in the Notes section of the title record.
Editing a title note
- Find the title with the note you want to edit and select it.
- In the Title record window, in the Packages section, select the package within which the title appears.
- In the Package title details window, in the Notes section, find the note you want to edit, and click Edit at the bottom of the Title and details column of the note.
- In the Edit: note window, make your desired changes to the note.
- Click Save & close. The note is saved.
Deleting a title note
- Find the title with the note you want to delete and select it.
- In the Title record window, in the Packages section, select the package within which the title appears.
- In the Note window, click Actions > Delete.
- In the Delete note dialog, click Delete. The note is deleted and removed from any records to which it was attached.
7.3 - eUsage
The eUsage app allows you to manage usage data reports for electronic resources.
The app provides automatic harvesting of COUNTER standard usage reports via SUSHI and manual uploading of standard and non-standard statistics. Usage data providers managed in eUsage can be referred to from the Agreements app.
Definition of terms related to the eUsage app:
- Aggregator. A service that aggregates pre-processing statistics for multiple statistics providers and offers an endpoint to download the reports. eUsage allows you to harvest statistics for a usage data provider either directly from the provider via SUSHI or from an aggregator. The only aggregator service currently supported in FOLIO is the German National Statistics Server.
- COUNTER and SUSHI. Standard format and protocol for electronic resource usage statistics. Detailed information is available at Project COUNTER.
- Report. The usage data for a certain set of electronic resources within a certain reporting period in a specific type.
- Usage data provider. The agent that provides usage statistics for a set of electronic resources. Most likely, this is a vendor or a platform provider. The usage data provider record is the basic entity in eUsage used to manage all associated reports and harvesting processes.
Permissions
The permissions listed below allow you to interact with the eUsage app and determine what you can or cannot do within the app. You can assign permissions to users in the Users app. If none of these permissions are assigned to a user, they are unable to see the eUsage app or any related information.
The following are all the eUsage permissions:
- eUsage: All permissions. Ths permission includes all other eUsage permissions.
- eUsage: Can view usage data providers and view/download usage reports. This is the eUsage read permission which allows the user to view usage data provider records and view and download the associated usage reports.
- eUsage: Can create and edit usage data providers. This permission allows the user to create and edit UDP records. It does not include the upload of usage reports to the provider.
- eUsage: Can delete usage data providers. This permission allows the user to delete UDP records. It does not include the deletion of the associated usage reports.
- eUsage: Can upload usage reports. This permission allows the user to upload COUNTER and non-COUNTER usage reports.
- eUsage: Can start harvesting for a single provider. This permission allows the user to start the harvester service for one UDP.
- eUsage: Can delete usage reports. This permission allows the user to delete COUNTER and non-COUNTER usage reports.
- Settings (eUsage): Can view and edit settings. This permission allows the user to view and edit the eUsage settings. It also includes starting the harvester for all usage data providers in the tenant.
Creating a usage data provider
When you create a usage data provider, you are asked to enter the configuration details for automated harvesting. If the provider only supports manual data download, you still need to create a provider record in order to upload reports manually to this provider. For more information on manual report upload, see Uploading reports manually.
- In the Usage data provider pane, click New.
- In the Create usage data provider window, fill in the Usage data provider information and Harvesting configuration sections. For more information on the fields and actions available in these sections, see the section descriptions below.
- Once you have included all of the information you want about the Usage data provider, click Save & close. The usage data provider is saved and added to the Usage data providers pane.
- Provider name (required). Enter the name of the usage data provider.
- Description. A description of the usage data provider. You can use this field to enter additional information in order to identify the provider or any other data corresponding to the usage data provider or reports that should be displayed in a prominent place at the record.
Harvesting configuration
- Harvesting status (required). Select a Harvesting status: Active or Inactive. The status you select here defines whether reports from the usage data provider are harvested in the automated or manually triggered harvesting processes.
- Harvest statistics via (required). Select how to harvest statistics: Aggregator or Sushi. Note: The only aggregator currently supported by FOLIO is the German National Statistics Server.
- Aggregator (required). If you have selected to harvest statistics via an aggregator, select the aggregator that should be used to harvest statistics. Note: The only aggregator currently supported by FOLIO is the German National Statistics Server.
- Vendor code. If you have selected to harvest statistics via an aggregator, enter the code by which the aggregator identifies the vendor for which statistics are requested. The German National Statistics Server requires the vendor names as displayed in the server’s user interface.
- Service type (required). If you have selected to harvest statistics via a SUSHI protocol, select the SUSHI service type implementation to be used by the harvester: Counter-Sushi 4.1 or Counter-Sushi 5.0. The service type normally corresponds to the requested Report release.
- Service URL (required). If you have selected to harvest statistics via a SUSHI protocol, enter the URL to access the SUSHI service. The URL is usually listed on the provider’s backend information pages.
Note: Only enter the_ base URL_ to the service, not the complete URL for an API request. For example, if the provider lists the URL https://usage.catsanddogs.org/sushi/reports/tr_b1, only enter the part before (and excluding) “reports”: https://usage.catsanddogs.org/sushi. Everything else is added by the harvester.
- Report release (required). Select a Report release: Counter 4 or Counter 5. Note: Support for release 5 of the Counter standard is mandatory for Counter compliant vendors from January 2019. FOLIO does not support simultaneous harvesting of reports of both releases for one usage data provider. If you want to retrospectively harvest Counter 4 reports, configure the provider for Counter 4 first and harvest the requested reports. Then edit the usage data provider and configure for Counter 5 harvesting.
- Requested report (required). Add the report types requested to be harvested for the usage data provider. For more information, see Adding a report type.
- Harvesting start (required). Enter the first month for the reports that are to be harvested.
- Harvesting end. Enter the last month for the reports that are to be harvested. Note: You may want to add an end month in case no more resources are licensed from a provider, a provider stops supporting usage statistics, or for any other reason that no ongoing harvesting is wanted. If no harvesting end is configured, reports are harvested continuously until the Harvesting status is changed to Inactive.
- Customer ID (required for SUSHI). If you have selected to harvest statistics via a SUSHI protocol, enter the customer ID assigned by the provider. This information is usually listed on the provider’s backend information pages.
- Requestor ID. Enter the Requestor ID assigned by the provider. If needed, this information is usually listed on the provider’s backend information pages. Not all SUSHI services require a Requestor ID.
- API key. Enter the API key assigned by the provider. If needed, this information is usually listed on the provider’s backend information pages. Not all SUSHI services require an API key.
- **Platform. **Enter the Platform for which reports are requested. If needed, this information is usually listed on the provider’s backend information pages. Most SUSHI services default on all platforms for which a customer has licensed resources.
- Requestor name. Enter the requestor name assigned by the provider. If needed, this information is usually listed on the provider’s backend information pages. Not all SUSHI services require a Requestor name.
- Requestor mail. Enter the requestor mail assigned by the provider. If needed, this information is usually listed on the provider’s backend information pages. Not all SUSHI services require a Requestor mail.
Adding a report type
- Click Add report type.
- Choose a Report type from the list of available report types for the chosen Report Release. You can filter the list.
- Repeat as needed. The report type saves once you save the usage data provider.
Deleting a report type
- Find the Report type you want to delete.
- Click the trash can icon. The Report type is deleted and is removed from the record once you save the usage data provider.
Searching for a usage data provider
You can search for usage data providers in the Search & filter pane. To search for a usage data provider, enter your search terms into the box and click Search.
You can also search for usage data providers by selecting any of the filters in the Search & filter pane. Additionally, you can apply the filters after you perform a search to limit your results. See the sections below for more information.
Harvesting status
To filter usage data providers by their status, select one of the following:
- Active. Usage data providers included in the current harvesting processes.
- Inactive. Usage data providers for which no reports are currently being harvested.
Harvest via
To filter usage data providers by the harvest method of their reports, select one of the following:
- Sushi. Usage data providers where reports are currently configured to be harvested directly from the provider via SUSHI.
- Aggregator. Usage data providers where reports are currently configured to be harvested via an aggregator.
Aggregators
To filter usage data providers by the aggregator used for the harvesting, select one of the Aggregators configured for the tenant. For more information, see Aggregator configuration.
Report types
To search for usage data providers for which reports of a specific type are stored in FOLIO, follow these steps:
- In the Search & filter pane, click Report types.
- Select the type(s) from the drop-down list. Your results appear in the usage data provider pane.
Has failed report(s)
To filter usage data providers based on whether harvesting errors have occurred, select one of the following:
- Yes. Usage data providers where at least one requested report has not been harvested correctly.
- No. Usage data providers where no reports have failed to be harvested.
To search for usage data providers assigned with specific tags, follow these steps:
- In the Search & filter pane, click Tags.
- Select the tag(s) from the drop-down list. Your results appear in the usage data provider pane.
Error codes
To search for usage data providers with reports that have failed with a specific SUSHI error code, follow these steps:
- In the Search & filter pane, click Error code.
- Select the error code(s) from the drop-down list. Your results appear in the usage data provider pane. The list shows usage data providers that have reports failed with either of the selected error codes.
Viewing usage data provider details
Once you search for a usage data provider, the following information appears in the usage data providers pane:
- Provider name. The name of the usage data provider.
- Harvesting status. The status of the usage data provider.
- Latest statistics. The month of the most current report stored in FOLIO.
- Aggregator. The aggregator from which reports are currently configured to harvest.
In the search results, click on a usage data provider to view it. The usage data provider details pane displays with additional information about the usage data provider and the associated reports stored in FOLIO.
Viewing stored COUNTER reports for a usage data provider
- Find the usage data provider for which you want to view the stored reports and select it.
- In the usage data provider details pane, click COUNTER statistics.
- If reports are stored, they are displayed in a separate table for each year. Click on the year you want to view or click Expand all years.
The COUNTER statistics table displays a row for each report type and a column for each month. If a report is stored or has tried to harvest, a Report button is displayed in the appropriate cell of the table. The buttons show the state of the report with an icon:
- Green/checkmark. A valid report is available for the month.
- Orange/exclamation mark. The report tried to harvest but failed. The harvester tries again in the next harvesting cycle.
- Red/Cross. The report tried to harvest for the maximum number of attempts defined in the Settings. In order to attempt another harvest, the report needs to be deleted. For more information, see Setting maximum number of harvesting attempts and Deleting reports.
In the COUNTER statistics table, click on a Report button. The Report info dialog displays with additional information about the report:
- Usage data provider. The name of the usage data provider.
- Type. The report type.
- Date. The reporting period, always one month.
- Info. If the report failed to harvest correctly, the error message provided by the SUSHI service is displayed here.
- Failed attempts. Number of attempted harvestings, which is also the number of maximum attempts.
- Manual changes. If the report has been manually altered, this heading appears along with the reason the report was manually edited.
- Actions. Possible actions, for more information see Deleting reports and Downloading reports.
Editing a usage data provider
- Find the usage data provider you want to edit and select it.
- In the usage data provider details pane, click Actions > Edit.
- Edit the usage data provider.
- Click Save & close. The usage data provider is saved and updated.
Changing the harvesting configuration
Note: Changing the harvesting configuration for a usage data provider doesn’t affect reports already stored in the system. No reports are lost. The configuration is only applied to future harvesting processes. For information on how reports are deleted, see Deleting reports.
- Find the usage data provider you want to edit and select it.
- In the usage data provider details pane, click Actions > Edit.
- Edit the Harvesting configuration.
- Make any additional changes to the usage data provider.
- Click Save & close. The usage data provider is saved and updated.
Deleting a usage data provider
- Find the usage data provider you want to delete and select it.
- In the usage data provider details pane, click Actions > Edit.
- In the usage data provider edit window, click Delete.
- In the Delete usage data Provider dialog, click Delete. The usage data provider and all associated reports are deleted and a confirmation message appears.
Adding a tag to a usage data provider
- Find the usage data provider you want to tag and select it.
- In the usage data provider details pane, click the tag icon.
- In the Tags pane, either select a tag from the box or enter a tag.
- Click the X on the Tags pane to close the pane and save the tag. The tag number updates to the number of tags applied to the usage data provider.
Adding a note to a usage data provider
- Find the usage data provider to which you want to add a note and select it.
- In the usage data provider details pane, click Notes > New.
- In the New note window, select the Note type from the drop-down list. Note types are created in the Settings app. For more information, see Settings > Notes.
- Enter a Note title in the box.
- Optional: Enter any Details about the note in the box.
- Click Save & close. The note is saved and appears in the Notes section in the usage data provider details pane.
Starting the harvester for a specific usage data provider
- Find the usage data provider for which you want to start the harvesting process.
- In the usage data provider details pane, click Actions > Start harvester. A confirmation message appears.
- Optional: If you want to view the current results of the harvesting process, you can refresh the table content in the COUNTER statistics table. To do this, click Actions > Refresh statistics table. Otherwise, the table content will be refreshed the next time you select the usage data provider or refresh the browser window.
Topics still to be covered by documentation…
Starting the harvester for all usage data providers
Setting up periodic harvesting
Setting up an aggregator
Uploading a COUNTER report manually
Marking a COUNTER report as manually changed
Uploading a non-COUNTER report
Downloading a COUNTER report
Downloading a non-COUNTER report
Deleting multiple reports
Deleting a single report
Linking a usage data provider with an agreement
7.4 - Licenses
The Licenses app allows you to create and manage your library’s licenses. The licenses you create here can link to agreements in the Agreements app.
Definition of terms related to the Licenses app:
- Agreement. An agreement outlines the content your library can access.
- License. A license explains what you can do with that content. The license is the contract or Terms of Use.
- Organization. Any institution with which your library interacts (this may or may not be an institution from which you purchase materials). The organizations associated with licenses are generally the licensors or a consortium.
Permissions
The permissions listed below allow you to interact with the Licenses app and determine what you can or cannot do within the app. You can assign permissions to users in the Users app. If none of these permissions are assigned to a user, they are unable to see the Licenses app or any related information.
The following are the Licenses permissions:
- Licenses: Search & view licenses. This permission allows the user to search and view existing licenses and amendments. This includes the permission to see and access the License app in the FOLIO interface.
- Licenses: Edit licenses. This permission grants all permissions included in “Licenses: Search & view licenses” plus it allows the user the ability to edit licenses and amendments, including the ability to add and edit documents and view, add and edit tags on a license.
- Licenses: Delete licenses. This permission grants all permissions included in “Licenses: Search & view licenses” plus it allows the user the ability to delete licenses and amendments.
- Licenses: File download. (ui-licenses.licenses.file.download) This permission grants permission for document downloads, as separate from document uploads.
- Settings (Licenses): Manage pick lists and values. This permission allows the user to access the License settings and the ability to manage pick lists and pick list values.
- Settings (Licenses): Manage license terms. This permission allows the user to access the License settings and the ability to manage the available terms. It includes the ability to view pick list information, which is necessary to manage license terms which use pick lists.
If you want to link or view organizations and/or internal contacts in a license record, you also need to have the following Organizations and Users permissions:
- Organizations: View. This permission allows the user to search and view organization records and settings. The user can also access Contacts and Interfaces but cannot access Interface usernames and passwords.
- Organizations: Interface usernames and passwords: view. This permission allows the user to view the usernames and passwords that appear in the Interface section.
- Users: Can view user profile.
Keyboard shortcuts
Keyboard shortcuts allow you to perform actions in this app using the keyboard. See Platform essentials > Keyboard shortcuts for more information.
Creating a license
- In the Licenses pane, click Actions > New.
- In the New license window, enter a Name for the license record.
- Select a license Type from the drop-down list. For example, local or consortial. License Types are configured in the Settings app. For more information, see Settings > Licenses > Pick list values.
- Select a Status from the drop-down list. License Statuses are configured in the Settings app. For more information, see Settings > Licenses > Pick list values.
- (Optional) To indicate when the license begins, enter a Start date.
- (Optional) To indicate when the license terminates, enter an End date. If the license doesn’t have an End date, select the Open ended checkbox.
- (Optional) Enter a Description of the license in the box.
- (Optional) Add an Alternative name for the license record. See Alternative names, below, for more information.
- (Optional) Fill in the fields in the Internal contacts, Organizations, Core documents, Terms, and Supplementary documents sections. For more information on the fields and actions available in these sections, see the section descriptions below.
- Once you have included all of the information you want about the license, click Save & close. A confirmation message appears, and the license is saved and appears in the License pane.
Alternative names
Alternative names are other names you may want the license record to be associated with, such as abbreviations or prior names. Any value entered as an alternative name is searchable in the Licenses app.
Adding an alternative name
Note: Adding an alternative name is optional, but if you click Add alternative name, you must enter an alternative name or delete the alternative name in order to save the license record.
- Click Add alternative name.
- Enter the license record’s Alternative name in the box.
- Repeat as needed. The alternative name saves once you save the license.
Deleting an alternative name
- Find the Alternative name you want to delete.
- Click the trash can icon. The Alternative name is deleted and is removed from the record once you save the license.
Internal contacts are generally library staff members you want to associate with the license record. For example, your internal contact may be the ERM librarian responsible for renewals, the authorized signatory for new licenses, or the subject matter expert responsible for reviewing content ahead of renewals.
Internal contacts must have a user record created in the Users app in order to be assigned as a contact. Multiple contacts can be assigned to one license record.
- Click Add internal contact.
- Click Link user.
- In the Select User dialog, in the User search box, enter part or all of the internal contact’s name and click Search.
- (Optional) Filter results by Status or by Patron group.
- In the User Search Results pane, click the user to select them. The user is added to the license record as an internal contact.
- Select a Role to assign to the internal contact from the drop-down list. Roles are configured in the Settings app. For more information, see Settings > Licenses > Pick list values.
- Repeat steps 1-6 as needed. The internal contact saves once you save the license.
- Identify the internal contact you want to remove.
- Click the trash can icon. The internal contact is removed from the record once you save the license.
- Identify the internal contact you want to replace.
- Click Replace user.
- Repeat steps 3-6 under Adding an internal contact.
Organizations
Organizations are any institution with which your library interacts. You can add an organization to a license record to create a relationship between the organization and license. For example, you may want to add the licensor as an organization.
Organizations must have an organization record created in the Organizations app in order to be assigned as an organization. Multiple organizations can be assigned to one license record. To set one organization as the primary organization, check the Set as primary organization box.
Adding an organization
- Click Add organization.
- Click Link organization.
- In the Select Organization dialog, in the Search & filter box, enter part or all of the organization’s name, and click Search. Alternatively, you can select the All drop-down list and search for an organization based on the fields listed. For more information, see Searching for an organization.
- (Optional) Filter results by Organizations status, Tags, Is vendor, Country, Languages, or Payment method.
- In the Organizations pane, click the organization to select it. The Select Organization dialog closes and the organization is added to the license record.
- Select a Role for the organization from the drop-down list. Roles are configured in the Settings app under Licenses > Pick list setup.
- (Optional) Enter a Note in the box.
- Repeat steps 1-7 as needed. The organization saves once you save the license.
Removing an organization
- Find the organization you want to remove.
- Click the trash can icon. The Organization is removed from the record once you save the license.
Replacing an organization
- Find the organization you want to replace.
- Click Replace organization.
- Repeat steps 3-7 under Adding an organization.
Core documents
A core document is any central document relevant to the license record, for example, the license agreement or terms of use. You can use this section to identify the physical and/or electronic location of core documents. It can also be used as a space to upload documents for easier access when assessing license information in FOLIO.
Adding a core document
- Click Add core document.
- Enter a Name in the box.
- (Optional) Enter a Note about the core document.
- You must complete at least one of the following:
- Upload a file into the license record by dragging and dropping the file in the Drag & drop to upload box, or click or choose file.
- Enter the Physical location of the document in the box.
- Enter the URL of the document in the box.
- Repeat steps 1-4 as needed. The core document saves once you save the license.
If a core document is present in a license record, then a copy icon will appear in the core document accordion multi-column list under Reference. Clicking the copy icon will copy the text content of the Reference column to your clipboard.
Removing a core document
- Find the Core document you want to remove.
- Click the trash can icon. The Core document is removed from the record once you save the license.
Terms
Terms are the terms of use that define what you can or cannot do with the licensed content. In FOLIO, you can define the Terms that appear in license records through configurations in the Settings app. The Settings app is where you establish the term label, the type of term, default visibility of the term, and term status (primary or optional). For more information, see Settings > Licenses > Terms.
Primary terms appear on every license record by default. Optional terms can be added on a license-by-license basis.
Filling out a primary term
If a term is defined as primary in the Settings app, then it always appears as an option in a license record. You can leave the Value of a primary term blank or select Not set, but primary terms cannot be removed from the license record.
- Complete the Value field either by inputting text, using the up and down arrows to set an integer, or selecting an option from the drop-down list. The value is the definition of, or answer to, the term.
- (Optional) Enter an Internal note in the box. Any text you enter here displays internally to FOLIO users.
- Select the term’s Visibility from the drop-down list. Visibility indicates whether the term should display internally (only within FOLIO), or externally to the public through, for example, your catalog.
- (Optional) Enter a Public note in the box. Any text you enter here displays externally to the public.
- Repeat steps 1-4 for as many primary terms as desired. The terms save once you save the license.
Adding an optional term
A term is optional if it is not defined as primary in the Settings app. Optional terms do not automatically display in a license record.
- Click Add term.
- Select the term Name from the drop-down list.
- Follow steps 1-4 under Filling out a primary term.
- Add as many optional terms as desired. The terms save once you save the license.
Removing an optional term
- Identify the Optional term you want to remove.
- Click the trash can icon. The Optional term is removed from the record once you save the license.
Supplementary documents
A supplementary document is any additional document relevant to the license record.
Adding a supplementary document
- Click Add supplementary document.
- Enter a Name in the box.
- Select a Category from the drop-down list. Categories for Supplementary documents can be configured in the Settings app under Licenses > License term pick list setup.
- (Optional) Enter a Note about the supplementary document.
- You must complete at least one of the following:
- Upload a file into the license record by dragging and dropping the file in the Drag & drop to upload box, or click or choose file.
- Enter the Physical location of the document in the box.
- Enter the URL of the document in the box.
- Repeat steps 1-5 as needed. The supplementary document saves once you save the license.
If a supplementary document is present in a license record, then a copy icon will appear in the supplementary document accordion multi-column list under Reference. Clicking the copy icon will copy the text content of the Reference column to your clipboard.
Removing a supplementary document
- Identify the supplementary document you want to remove.
- Click the trash can icon. The supplementary document is removed from the record once you save the license.
Searching for licenses
You can search for licenses in the Search & filter pane. You can toggle between the Licenses and Amendments search at the top of the search and filter pane. Click Licenses to start your search. Enter your search terms in the search box and click Search.
You can also search for licenses by selecting any of the filters in the Search & filter pane: Status, Type, Organizations, Organization role, Tags, Start date, End date, Terms, Supplementary documents, Core documents, and License content. For more information on the filters, see the filter descriptions below.
Status
To filter licenses by their status, in the Search & filter pane, click Status, and select one of the listed options. Possible statuses may include:
- Active. Licenses currently in use by your library.
- Expired. Licenses no longer in use by your library.
Status values are configured in Settings > Licenses > Pick list values.
Type
To filter licenses by their type, in the Search & filter pane, click Type, and select one of the listed options. Possible types may include:
- Local. Licenses specific to your library.
- Consortial. Licenses entered into through a library consortium.
Type values are configured in Settings > Licenses > Pick list values.
Organizations
To filter licenses associated with a specific organization, follow these steps:
- In the Search & filter pane, click Organizations.
- Click Select an organization.
- In the drop-down list, search for the organization.
- Select the organization you want to filter by. The search results appear in the Licenses pane.
Organization role
To filter licenses by their associated organizations’ roles, follow these steps:
- In the Search & filter pane, click Organization role.
- Click Select a role.
- In the drop-down list, search for the role.
- Select the role you want to filter by. The search results appear in the Licenses pane.
Organization role values are configured in Settings > Licenses > Pick list values.
To search for licenses assigned specific tags, follow these steps:
- In the Search & filter pane, click Tags.
- Select the tag(s) from the drop-down list. The search results appear in the Licenses pane.
Start date
To filter licenses by their start date, enter a date into the On or after and/or On or before search box, or click the calendar icon to select a date from the calendar.
You can also check the box Include licenses with no end date set to locate licenses without end dates.
End date
To filter licenses by their end date, enter a date into the On or after and/or On or before search box, or click the calendar icon to select a date from the calendar.
You can also check the box Include licenses with no end date set to locate licenses without end dates.
Terms
To filter licenses by their terms, follow these steps:
- In the Search & filter pane, click Terms.
- Click Edit term filters.
- In the Term filter builder dialog, select a Term from the drop-down list.
- Select a Comparator from the drop-down list. The comparator options depend on the term selected.
- If the Value box is available, select or enter a value. Whether the value box is available depends on which comparator is selected.
- (Optional) To continue to build the term filter, click Add rule.
- (Optional) To search for licenses using multiple term filters, click Add term filter. Note: To delete a rule or term filter in the Term filter builder, click on the trash can icon next to the rule or term filter.
- Click Apply. The search results appear in the Licenses pane.
Term values are configured in Settings > Licenses > Pick list values.
Supplementary documents
To filter licenses by their supplementary documents, follow these steps:
- In the Search & filter pane, click Supplementary documents.
- Click Edit document filters.
- In the Supplementary document filter builder dialog, select an Attribute from the drop-down list.
- Select an Operator from the drop-down list.
- Enter a value in the Value box.
- (Optional) To continue to build the supplementary document filter, click Add rule.
- (Optional) To search for licenses using multiple supplementary document filters, click Add filter. Note: To delete a rule or filter in the Supplementary document filter builder, click on the trash can icon next to the rule or filter.
- Click Save & close. The search results appear in the Licenses pane.
Document values are configured in Settings > Licenses > Pick list values.
Core documents
To filter licenses by their core documents, follow these steps:
- In the Search & filter pane, click Core documents.
- Click Edit document filters.
- In the Core document filter builder dialog, select an Attribute from the drop-down list.
- Select an Operator from the drop-down list.
- Enter a value in the Value box.
- (Optional) To continue to build the core document filter, click Add rule.
- (Optional) To search for licenses using multiple core document filters, click Add filter. Note: To delete a rule or filter in the Core document filter builder, click on the trash can icon next to the rule or filter.
- Click Save & close. The search results appear in the Licenses pane.
Document values are configured in Settings > Licenses > Pick list values.
License content
To filter licenses by their content, follow these steps:
- In the Search & filter pane, click License content.
- Select Has or Has not from the drop-down list.
- Select one or more license content options from the list. These may include Alternative names, Internal contacts, Organizations, Core documents, Supplementary documents, Amendments, and Tags. Note, if you select multiple license content options, they are combined with OR (rather than AND). For example, if you select Alternative names and Internal contacts, the returned results will include license records with Alternative names OR Internal contacts.
- To add another filter, click Add filter and select And or Or.
- Repeat the above steps as desired.
- Your results will appear in the Licenses pane.
Viewing a license
Once you search for a license, the following information appears in the License pane:
- Name. The name of the license.
- Type. The type of license.
- Status. The status of the license.
In the search results, click on a license to view it. The license details pane displays with additional information about the license. In the license display, any accordions not populated with data and not otherwise required are not displayed to the user.
Editing a license
- Find the license you want to edit and select it.
- In the license details pane, click Actions > Edit.
- Make your desired changes to the license.
- Click Save & close. A confirmation message appears and the license is updated.
Deleting a license
- Find the license you want to delete and select it.
- In the license details pane, click Actions > Delete.
- In the Delete license dialog, click Delete. A confirmation message appears and the license is deleted.
Adding a tag to a license
- Find the license you want to tag and select it.
- In the license details pane, click the tag icon.
- In the Tags pane, either select a tag from the box or enter a tag.
- Click the X on the Tags pane to close the pane and save the tag. The tag number updates to the number of tags applied to the license.
Duplicating a license
- Find the license you want to duplicate and select it.
- In the License details pane, click Actions > Duplicate.
- In the Duplicate license dialog, select which sections of the license to duplicate. See Creating a license for the fields that appear in each of the sections.
- Click Save & close.
- In the Copy of: [duplicated license’s name] window, make your desired changes.
- Click Save & close. A confirmation message appears and the duplicated license appears in the License pane.
Exporting a license
- Find the license(s) you want to export and select the checkbox next to the license name in the Licenses pane.
- Click Actions > Export selected as CSV.
- In the Export licenses as CSV dialog, select which sections of the license(s) to export. See Creating a license for the fields that appear in each of the sections.
- Click Save & close. Depending on your browser and its configurations, the file automatically downloads or you are prompted to save it.
Creating an amendment
- Find the license to which you want to add an amendment and select it.
- In the License details pane, click Amendments > Add amendment.
- Fill out the amendment. The fields that appear are also found in a license record. See Creating a license for more information.
- Click Save & close. A confirmation message appears and the amendment is saved.
Editing an amendment
- Find the license that contains the amendment you want to edit and select it.
- In the License details pane, click Amendments.
- In the Amendments table, click the amendment you want to edit.
- In the Amendment details pane, click Actions > Edit.
- Make your desired changes to the amendment.
- Click Save & close. A confirmation message appears and the amendment is saved.
Duplicating an amendment
- Find the license that contains the amendment you want to duplicate and select it.
- In the License details pane, click Amendments.
- In the Amendments table, click the amendment you want to edit.
- In the Amendment details pane, click Actions > Duplicate.
- In the Duplicate amendment dialog, select which sections of the amendment you want to duplicate. See Creating a license for the fields that appear in each of the sections.
- Click Save & close.
- In the Copy of: [duplicated agreement’s name] window, make your desired changes.
- Click Save & close. A confirmation message appears and the duplicated agreement appears in the Agreements pane.
Deleting an amendment
- Find the license that contains the amendment you want to delete and select it.
- In the License details pane, click Amendments.
- In the Amendments table, click the amendment you want to delete.
- In the Amendment details pane, click Actions > Delete.
- In the Delete amendment dialog, click Delete. A confirmation message appears and the amendment is deleted.
Searching for amendments
You can search for amendments in the Search & filter pane. You can toggle between the Licenses and Amendments search at the top of the search and filter pane. Click Amendments to start your search. Enter your search terms in the search box and click Search.
You can also search for amendments by selecting any of the filters in the Search & filter pane: Status, Start date, End date, Terms, Supplementary documents, Core documents, and Amendment content. For more information on the filters, see the filter descriptions under the Searching for licenses header.
Filtering amendments by content
To filter amendments by their content, follow these steps:
- In the Search & filter pane, click Amendment content.
- Select Has or Has not from the drop-down list.
- Select one or more amendment content options from the list. These may include Core documents, Supplementary documents, and Tags. Note, if you select multiple amendment content options, they are combined with OR (rather than AND). For example, if you select Core documents and Supplementary documents, the returned results will include amendment records with Core documents OR Supplementary documents.
- Your results will appear in the Licenses pane.
Adding and removing notes from a license
You can add and assign notes to license records. Assigning a note means you are reusing a previously created note.
Adding a new note to a license
- Find the license to which you want to add a note and select it.
- In the License details pane, click Notes > New.
- In the New note window, select the Note type from the drop-down list. Note types are created in the Settings app. For more information, see Settings > Notes.
- Enter a Note title in the box.
- (Optional) Enter any Details about the note in the box.
- Click Save & close. The note is saved and appears in the Notes section in the license details pane.
Assigning an existing note to a license
- Find the license to which you want to add a note and select it.
- In the License details pane, click Notes > Assign / Unassign.
- In the Assign / Unassign note dialog, search for a note using the search bar in the Search & filter pane, or select a Note type from the drop-down list. You can also filter by Note assignment status.
- Select the checkbox next to the note you want to assign to the license and click Save. The note is saved and appears in the Notes section in the license details pane.
Editing notes in a license
- Find the license with the note you want to edit and select it.
- In the License details pane, click Notes.
- Find the note you want to edit, and click Edit at the bottom of the Title and details section of the note.
- In the Edit: note window, make your desired changes to the note.
- Click Save & close. The note is saved.
Removing notes from a license
- Find the license with the note you want to remove and select it.
- In the License details pane, click Notes.
- Click on the note you want to remove.
- In the Note window, click Actions > Delete.
- In the Delete note dialog, click Delete. The note is deleted and removed from any records to which it was attached.The Licenses app allows you to create and manage your library’s licenses. The licenses you create here can link to agreements in the Agreements app.
The Dashboard app is designed to enable a personalized view of key information from across FOLIO apps at a glance. In its first release (included in the Juniper flower release), the Dashboard includes the ability to display information from the Agreements and Licenses applications.
In the Quesnelia release, the Licenses app comes with one dashboard widget (“ERM Licenses”). There are examples of how you can use this widget definition to achieve a wide range of outcomes in the Example widget configurations documentation.
7.5 - Local KB Admin
The Local KB admin app allows you to import data in KBART and JSON format into FOLIO’s local knowledgebase (KB) and monitor harvest jobs from external sources of e-resource metadata, which can be configured in Settings > Local KB admin > External data sources. This data is individual e-resources organized in packages. It is available in the Agreements app > E-resources tab after import and can be linked to agreements as agreement lines. If you use the eHoldings app which relies on the knowledgebase from EBSCO, the use of Local KB admin is optional. You can hide the Local KB by activating the “Hide internal agreements knowledgebase” checkbox in Settings > Agreements > Display settings.
Definition of terms related to the Local KB admin app:
- E-resource. An electronic resource. This generally refers to packages and titles.
- Provider. The provider of the e-resource, e.g. the vendor or publisher.
- Package. A collection of e-resources bundled together as a unit.
- Title. An individual e-resource, e.g. an e-book, e-journal, or database, regardless in which package it is included in.
- Package title. A title within a package with a certain package-platform combination, e.g. Title “Trade profiles” in package “WTO iLibrary journals” on platform “WTO iLibrary”.
- Knowledgebase (KB). A knowledge base is an extensive database maintained by a knowledge base supplier that contains information about electronic resources such as title lists and coverage dates etc. Knowledge bases typically organize the resources provided by a content provider into collections or databases that reflect specific content provider offerings, for example packages of e-journals, e-books, or other materials.
- Local knowledgebase. The internal knowledgebase of FOLIO to locally manage packages and e-resources.
- Proxy server. A service which is used to proxy requests for e-resources in order that a user can access the e-resource with minimal authentication/authorisation issues.
- Platform. A platform is a provider’s infrastructure through which e-resources can be accessed.
Permissions
The permissions listed below allow you to interact with the Local KB admin app and determine what you can or cannot do within the app. You can assign permissions to users in the Users app. If none of these permissions are assigned to a user, they are unable to see the Local KB admin app.
The following permissions are applicable to all libraries using the Local KB admin app:
- Local KB admin: Create jobs. This permission allows the user to add new import jobs.
- Local KB admin: Delete jobs. This permission allows the user to delete existing import jobs.
- Local KB admin: Manage proxy server configuration. This permission allows the user to create, edit, and delete proxy server settings in Settings > Local KB admin.
- Local KB admin: Manage remote KB configuration. This permission allows the user to create, edit, and delete external data sources in Settings > Local KB admin.
- Local KB admin: View jobs. This permission allows the user to view existing jobs. It also allows the user to see and access the Local KB admin app in the FOLIO interface.
Connecting an external KB
The Local KB admin app provides the ability to configure external data source that are then periodically queried for changes to metadata. The external source is thereby kept in sync in the local KB and can act as the basis for agreement lines in the Agreements app. To add an external data source to the system, follow these steps:
- Open Settings > Local KB admin > External data sources.
- In the external data sources pane, click “New” to add a new data source to system.
- Fill in the primary fields. For more information on the fields, see the section descriptions below.
- Once you have included all of the information about the external data source, click Save. The harvester is going to fetch data from the new source with its next run.
Fields
- Name. The name of the external source as it will display in Agreements > E-resources tab > External data source filter.
- Type. The adapter type, e.g. for connecting GOKb
org.olf.kb.adapters.GOKbOAIAdapter
- Record type. The record type used to start the harvest process. If set to Package, then the harvester will fetch all packages and titles included in these packages.
- URI. URL that points to the OAI endpoint.
- Trusted for title instance metadata. If this checkbox is selected, the data in the OAI stream will overwrite any existing title data that is matched during the import process. This can be used to update, for example, the name of an e-resource that already exists in the local KB. If the checkbox is not selected, the data in the OAI stream won’t update any existing title data.
- Is active. If this checkbox is selected, the data source is included in the harvest process.
- Supports harvesting. Currently non-functional, this indicates if the data source supports data harvesting
- Activation enabled. Currently non-functional, this indicates if the data source supports activation/selection information for resources
- Listprefix. For data sources harvested using the OAI-PMH (Open Access Initiative Protocol for Metadata Harvesting), this can be used to specify the metadata prefix for the ListRecords method. This may be required depending on the adapter type specified for the source
- Fullprefix. For data sources harvested using the OAI-PMH (Open Access Initiative Protocol for Metadata Harvesting), this can be used to specify the metadata prefix for the fullprefix method. This may be required depending on the adapter Type specified for the source
- Principal: The account ID for the external KB.
- Credentials: The API key for the external KB.
Creating a KBART import job
- In Local KB admin, click Actions > New KBART import job
- In the New KBART job window, fill in the primary fields. For more information on the fields, see the section descriptions below.
- Drag the KBART file to the upload section or click the “or choose file” button to select the KBART file in your file system.
- Once you have included all of the information about the job, click Save & close. The job is saved and being processed in the background.
Fields
- Package name. The name of the package that is displayed in the Agreements app in the E-resources section, if the local KB is used by the library.
- Package source. Specification of the source of the package list.
- Package reference. The package reference, e.g. a package ID.
- Package provider. The name of the provider on whose platform the package content is available. If the Provider entered does not exist, a new one will be created in the local knowledgebase in the Agreements app.
- Trust this job as a source of title instance metadata. If this checkbox is selected, the data in the KBART file will overwrite any existing title data that is matched during the import process. This can be used to update, for example, the name of an e-resource that already exists in the local KB. If the checkbox is not selected, the data in the KBART file won’t update any existing title data.
The Source and Reference fields are used together as a unique identifier for packages. If a package with the given Source+Reference already exists it will be updated, otherwise a new package will be created.
Creating a JSON import job
To add data to the local KB, you can create JSON import files according to a JSON schema.
- In Local KB admin, click Actions > New JSON import job
- In the New JSON job window, drag the JSON file to the upload section or click the “or choose file” button to select the JSON file in your file system.
- Click Save & close. The job is saved and being processed in the background.
Searching for import jobs
You can search for import jobs in the Search & filter pane. To search for import jobs, enter your search terms in the search box and click Search. The search is limited to the Job name and wont search any other data.
You can also search for import jobs by selecting any of the filters in the Search & filter pane: Running status, Result, and Job type. For more information on the filters, see the filter descriptions below.
Running status
To filter jobs by their running status, select one of the following:
- Queued: Jobs that are queued for processing, but have not yet being processed.
- In progress: Jobs that are currently being processed.
- Ended: Jobs that have been processed.
Result
To filter jobs by their running status, select one of the following:
- Success: Jobs that have run to completion without errors.
- Partial success: Jobs that have run to completion with some errors.
- Failure: Jobs that have not run successfully.
- Interrupted: Jobs that have not run to completion because of an unknown interruption.
Job type
To filter jobs by their type, select one of the following
- Harvester: Jobs that were triggered by an automated harvest job.
- File import: Jobs that were triggered by an JSON or KBART file import.
Harvest jobs can be configured in Settings > Local KB admin > External data source.
Viewing an import job
Once you search for an import job, the following information appears in the results pane:
- Job name: The name of the job
- Running status: The running status of the job
- Import outcome: The job result
- Errors: Number of errors
- Started: Date and time of the job start
- Ended: Date and time of the job end
In the search results, click an import job to view it. The job details pane displays with additional information.
Deleting an import job
- Find the import job you want to delete.
- In the job detail pane, click Actions > Delete.
- In the Delete job dialog, click Delete. A confirmation message appears and the import job is deleted. Please note that deleting an import job only deletes the job entry in the log and not the imported data in the local KB. FOLIO currently does not offer the possibility to delete imported data from the local KB.
Exporting logs
<introduced with Kiwi>
Proxy server settings
See https://wiki.folio.org/x/qYL-Ag for further description.
8 - Metadata Management (Cataloging)
In FOLIO, metadata management includes essential cataloging functions. These functions include:
- Creating Instance, Holdings, and Item records
- Managing your collections (physical and/or virtual)
- Importing and exporting bibliographic data
- Editing MARC records
Cataloging Settings
Metadata management is governed by a set of rules and policies. These rules and policies are defined by the library and implemented in the Data export, Data import, and Inventory areas of the FOLIO Settings app.
8.1 - Data export
The Data Export app allows you to:
- Export bibliographic data from Source Record Storage (SRS) in MARC21 format.
- Export Instance, Holdings, and Item data stored by the Inventory app. A file in MARC21 format is generated from non-MARC data in this case.
- Export Authority data stored by the MARC Authority app in MARC21 format.
- Export a list of UUIDs for selected records in a .csv file
The Data Export app usually comes with a few default job profiles, which determine how information is exported in the generated MARC file. To create your own customized job profiles, you can configure job profiles in the Settings app. For more information, see Settings > Data Export.
Definition of terms related to the Data Export app:
- CQL. Contextual Query Language. A CQL query can be used in certain circumstances to identify the FOLIO records to export.
- Job profile. Determines how information from FOLIO is exported to the generated MARC file.
- SRS. Source Record Storage. A storage layer in FOLIO. If an instance has an underlying MARC record, then this record is stored in SRS.
- UUID. Universally unique identifier. Each record in FOLIO has a UUID.
Permissions
In order to view and interact with the Data Export app, a user needs to be assigned the following permission:
- UI: Data export module is enabled. This permission allows the user to see and use the Data Export app.
Note: This is the only permission available for the Data Export app. You are unable to view and access Data Export if you do not have this permission assigned to you. You can assign permissions to users in the Users app.
Quick exports from the Inventory App
Quick exports can be performed from the Inventory app. A quick export creates two files for selected records - a file of UUIDs (.csv) and a file of MARC records (.mrc).
- Open the Inventory app and use the Search & Filter pane to generate a list of records that match your search criteria.
- In the right-hand-side Inventory pane, find the records you want to export, and for each record, select the checkbox in the first column.
- Click Actions > Export instances (MARC). Depending on your browser and its configurations, the file of UUIDs for the selected records automatically downloads or you are prompted to save it. The creation of a MARC (.mrc) file is logged in the Data export app and if you open that app you can find and download the MARC file containing your selected records.
Quick exports from the MARC Authority App
Quick exports can be performed from the MARC Authority app. A quick export creates two files for selected records - a file of UUIDs (.csv) and a file of MARC records (.mrc)
- Open the MARC Authorities app and use the Search & Filter pane to generate a list of records that match your search criteria.
- In the right-hand-side MARC authority pane, find the records you want to export, and for each record, select the checkbox in the first column.
- Click Actions > Export selected records (CSV/MARC). Depending on your browser and its configuration, the file of UUIDs for the selected records automatically downloads or you are prompted to save it. The creation of a MARC (.mrc) file is logged in the Data export app and if you open that app you can fiind and download the MARC file containing your selected records.
Triggering an export from the Data Export App by uploading a file
The Data Export app accepts two types of data and file types that identify sets of records for export: a CSV file listing UUIDs or a CQL query in CQL format. Triggering an export generates a .mrc file.
Uploading UUIDs
A data export can be triggered by providing the list of record identifiers (UUIDs) in a .csv file.
- In the Jobs pane, either drag and drop your file into the box, or click or choose file to locate the file on your computer.
- In the Select job profile to run the export window, select the job profile to run. Export job profiles are set up for different types of records to export, so you’ll have to select the right profile for the record type the list of UUIDs are for (e.g., instance records, holdings records, authority records)
- In the Are you sure you want to run this job dialog, select the correct record type from the drop down list under UUIDS provided for this export, then click Run. The window closes and the job appears under the Running section in the Jobs pane. When the job completes, the export file appears in the Logs list.
Uploading CQL query
Note: The file you upload needs to be a CQL file.
- In the Jobs pane, either drag and drop your file into the box, or click or choose file to locate the file on your computer.
- In the Select job profile to run the export window, select the job profile to run.
- In the Are you sure you want to run this job dialog, select Run. The window closes and the job appears under the Running section in the Jobs pane. WHen the job completes, the export file appears in the Logs list.
Viewing export logs
Once an export is completed, whether it was completed without any errors, completed with errors, or failed, it appears in the Logs list in the Logs pane.
The Logs list contains the following columns:
- File name. Name of the MARC file that was generated.
- Status. Status of the export: Completed, Completed with errors, or Fail.
- Total. Number of records in the export.
- Exported. Number of records exported.
- Failed. Number of records that failed.
- Job profile. Name of the job profile used.
- Started running. Date and time the export started.
- Ended running. Date and time the export finished.
- Run by. User or system by which the export was generated.
- ID. Identification number of the export.
You can click on any column name to sort by that column.
Viewing all logs
Logs are never deleted. The twenty-five most recent logs are displayed in the Logs list in the Logs pane. To view all logs, in the Logs pane, click View all. The Logs window appears.
Searching and filtering logs
After viewing all logs, you can search for files in the Search & filter pane. To search for a file, enter your search terms (presently, only ID values) into the box.
You can also search for logs by selecting any of the filters in the Search & filter pane:
Errors in export
To filter logs by whether or not they contain errors, select one of the following:
- No. Logs without errors
- Yes. Logs with errors
Started running
Enter a start date in the From box and an end date in the To box, then click Apply. The search results appear in the Logs pane.
Ended running
Enter a start date in the From box and an end date in the To box, then click Apply. The search results appear in the Logs pane.
Job profile
Select the job profile you want from the drop-down list. The search results appear in the Logs pane.
User
Click on User look-up and select the user you want. The search results appear in the Logs pane.
Retrieving data export results
For all exports with the Status of Completed or Completed with errors, you can click on the File name in the Logs pane to retrieve your data export results. Depending on your browser and its configurations, the file automatically downloads or you are prompted to save it.
Troubleshooting failed exports
For all exports with the Status of Fail or Completed with errors, click in the row of the export to view the error log. For all failed exports, a MARC file is not generated.
8.2 - Data import
The Data import app allows you to:
- Import one or more Bibliographic MARC records for use by the Inventory app. To create or update (overlay) records.
- Import one or more Bibliographic MARC records for use by the Orders app. To create records.
- Import one or more Authority MARC records for use by the MARC Authority app. To create or update (overlay) records.
- Load EDIFACT invoices for use by the Invoices app. Supports the Folio acquisitions workflow.
Definition of terms related to the Data Import app:
- Action profile. Contains instructions on what actions to take when certain conditions are present when an import job is run.
- Field mapping profile. Contains instructions for mapping field data being imported to field data within Folio.
- Holdings. Holdings data linked to one or more instance records, which may be created from a MARC record’s data or from other data sources and/or apps.
- Instance. A non-MARC bibliographic record in Folio, which may be created from a MARC record’s data or from other data sources and/or apps.
- Job profile. Contains all the steps needed to complete an individual data import job. A job profile connects specific match, action and field mapping profiles together into a set of instructions for importing data.
- Match profile. Contains instructions on how records being imported are matched with existing records within Folio.
- SRS. Source Record Storage. A storage layer in FOLIO. If an instance has an underlying MARC record, then the MARC record is stored in SRS.
- SRS Holdings. Holdings data specified in MARC record information.
Permissions
In order to view and interact with the Data import app, a user needs to be assigned one or more of the following permissions:
-
Data import: Can upload files, import, and view logs. This permission allows the user to see and use the Data import app. The user can perform all functions other than deleting logs.
-
Data import: Can delete import logs. This permission allows the user to delete logs in the Data import app.
-
Data import: Can view only. Assign this permission if a user only needs to view logs and details of import jobs (e.g. check to see if an import has completed) but is NOT permitted to import files using the Data Import app.
Note: These are the only permissions available for the Data import app. You are unable to view and access Data import if you do not have one or more of these permissions assigned to you. You can assign permissions to users in the Users app.
Starting a data import job
The Data import app accepts MARC and EDIFACT files for import.
- In the Jobs pane, either drag and drop your file into the box, or click or choose files to locate the file on your computer. Note that the file must have one of the permitted file extensions that are defined in the Settings App for Data Import.
- In the Job profiles window, select the job profile to run. If the list is long, you can search for job profiles by using the search bar at the top of the window to search through the Name and Description fields. To search for job profiles, enter terms in the search box and click Search.
- In the job profile details pane, click Actions > Run.
- In the Are you sure you want to run this job dialog, click Run. The window closes and the job status appears in the Jobs pane.
Assessing the job profile
After selecting a profile, you can see more details about the profile in the right pane. You can see the Name, Accepted data type, Description, Tags, Overview, which has the attached Action profiles, and a list of previous Jobs using this profile. Clicking on an Action profile opens that profile in the Settings app.
Viewing import logs
Once an import is completed, whether it was completed without any errors, completed with errors, or failed, it appears in the Logs table in the Logs pane.
The Logs table contains the following columns:
- File name. Name of the file that was imported. If the import was a single record import then no file name appears in the File name column.
- Status. Status of the import:: Completed, Completed with errors, or Fail.
- Records. Number of records in the import.
- Job profile. Name of the job profile used.
- Started running. Date and time the import started.
- Ended running. Date and time the import finished.
- Run by. User or system by which the import was generated.
- ID. Identification number of the import.
You can click on any column name to sort by that column.
Viewing all logs
Logs are never deleted unless a user with appropriate permission selects a log for deletion. Users need the permission Can delete import logs in order to delete log entries.
The most recent logs for imports other than single record imports are displayed in the Logs list in the Logs pane when you first select the Data Import app. To view all logs, in the Logs pane, click Actions then select View all.
Searching and filtering logs
After viewing all logs, you can search for files in the Search & filter pane. To search for a file, enter your search terms into the box. Select the Keyword drop-down list to search through one of the following fields:
- Keyword (ID, File name). Keyword search through the ID and File name fields.
- ID. Identification of the import.
- File name. Name of the import file.
You can also search for logs by selecting any of the filters in the Search & filter pane. Additionally, you can apply the filters after you perform a search to limit your results. See the sections below for more information.
Errors in import
To filter logs by whether or not they contained errors, select one of the following:
- No. Logs that don’t contain any errors.
- Yes. Logs with errors.
Date
To search for logs based on the date they were run, follow these steps:
- In the Search & filter pane, click Date.
- Enter a start date in the From box and an end date in the To box.
- Click Apply. The search results appear in the Logs pane.
Job profile
To search for logs based on the job profile, follow these steps:
- In the Search & filter pane, click Job profile.
- Select the job profile you want from the drop-down list. The search results appear in the Logs pane.
User
To search for logs based on the user who ran the report, follow these steps:
- In the Search & filter pane, click User.
- Select the user you want from the drop-down list. The search results appear in the Logs pane.
Inventory single record imports
Single record imports are MARC records loaded from an external source, like OCLC. These records are imported through the Inventory app, but the logs appear in Data import.
To filter logs by whether or not they are inventory single record imports, in the Search & filter pane, click Inventory single record imports and select one of the following:
- No. All other types of logs.
- Yes. Logs for Inventory single record imports.
Retrieving data import results
For all imports with the Status of Completed or Completed with errors, you can click on the File name in the Logs pane to retrieve your data import results. You are presented with a summary of records created, updated, discarded or in error. Clicking on the title link will display the system error if the import failed.
Troubleshooting failed imports
For all imports with the Status of Failed or Completed with errors, click in the row of the import to view the error log. For all failed imports, a record is not created or updated.
8.3 - Inventory
This section of the documentation contains links to external sites. Please be advised that these sites are not maintained by the FOLIO Documentation Group and may be aligned with a different FOLIO release.
The Inventory app allows you to manage your collections (physical and/or virtual). Inventory stores bibliographic, holdings, and item data in the form of Instance, Holdings, and Item records. Instance records may be created within FOLIO or generated from records in source record storage (SRS). Data within Inventory integrates with other apps like Orders, Check in, Check out, and Requests.
Definition of terms related to the Inventory app:
- Instance record. A record that contains bibliographic and administrative information about a particular resource. The Instance record is what is known as the bibliographic record. They are mostly derived from full bibliographic records (in MARC or other formats) and are intended to provide information for library staff to identify and select records in order to perform work on associated holdings and items.
- Holdings record. A record that contains information such as location, call number, and volumes owned, that enables staff to locate and manage library holdings for materials in all formats. A Holdings record must be associated with an Instance record.
- Item record. A record that contains information needed to identify and track a single item or piece. The Item record contains data specific to a single volume or piece, such as barcode and circulation status. An Item record must be associated with a Holdings record.
- HRID. Human readable identifier, also called eye readable ID.
- UUID. Universally unique identifier.
- SRS. Source Record Storage. A storage layer in FOLIO. If an instance has an underlying MARC record, then this record is stored in SRS.
- Intellectual item. This status can be used for an item record that does not correspond to a single, distinct physical object. May also be referred to as a “dummy record.”
Permissions
The permissions listed below allow you to interact with the Inventory app and determine what you can or cannot do within the app. You can assign permissions to users in the Users app.
The following are all the Inventory permissions:
- Inventory: All permissions. This permission allows the user to perform all actions in Inventory.
- Inventory: Create order from instance. This permission allows the user to initiate the creation of a new purchase order or a new purchase order line (in the Orders app) from an Instance record in Inventory.
- Inventory: Enable staff suppress facet. This permission allows the user to search and view instance records that are suppressed for staff.
- Inventory: Import single bibliographic records. This permission allows the user to import and overlay Instance records from external sources. External sources must be configured in Settings.
- Inventory: Mark items in process. This permission allows the user to update an item record’s Item status to In process.
- Inventory: Mark items in process (non-requestable). This permission allows the user to update an item record’s Item status to In process (non-requestable).
- Inventory: Mark items intellectual item. This permission allows the user to update an item record’s Item status to Intellectual.
- Inventory: Mark items long missing. This permission allows the user to update an item record’s Item status to Long missing.
- Inventory: Mark items restricted. This permission allows the user to update an item record’s Item status to Restricted.
- Inventory: Mark items unavailable. This permission allows the user to update an item record’s Item status to Unavailable.
- Inventory: Mark items unknown. This permission allows the user to update an item record’s Item status to Unknown.
- Inventory: Mark items withdrawn. This permission allows the user to update an item record’s Item status to Withdrawn. The user can also view and edit items.
- Inventory: Move holdings. This permission allows the user to move holdings records from one instance record to another. The user can also search and view instances, holdings, and items.
- Inventory: Move items. This permission allows the user to move an item record from one holding record to another. The user can also search and view instances, holdings, and items.
- Inventory: Set record for deletion. This permission allows the user to set instance records and associated MARC records for deletion.
- Inventory: View instances, holdings, and items. This permission allows the user to view instances, holdings, and items.
- Inventory: View, create holdings. This permission allows the user to create new holdings records. The user can also view holdings.
- Inventory: View, create instances. This permission allows the user to create new instance records. The user can also view instances.
- Inventory: View, create items. This permission allows the user to create new item records. The user can also view items.
- Inventory: View, create, edit holdings. This permission allows the user to edit existing holdings records. The user can also view and create holdings.
- Inventory: View, create, edit instances. This permission allows the user to edit existing instance records. The user can also view and create instances.
- Inventory: View, create, edit items. This permission allows the user to edit existing item records. The user can also view and create items.
- Inventory: View, create, edit, delete holdings. This permission allows the user to delete holdings records. The user can also view and edit holdings.
- Inventory: View, create, edit, delete items. This permission allows the user to delete item records. The user can also view and edit items.
- Inventory: View, create, edit, mark missing items. This permission allows the user to update an item record’s Item status to Missing. The user can also view and edit items.
Note: Some actions in Inventory require permissions in other apps. For example, View source requires permissions in quickMARC.
Keyboard shortcuts
Keyboard shortcuts allow you to perform actions in this app using the keyboard. See Platform Essentials > Keyboard shortcuts for more information.
Creating an instance record manually in FOLIO
- In the Inventory pane, click Actions > New.
- In the New Instance window, fill in the Administrative data, Title data, Identifier, Contributor, Descriptive data, Instance notes, Electronic access, Subject, Classification, Instance relationship (analytics and bound-with), and Related instances sections. For more information on the fields and actions available in these sections, see the section descriptions below.
- Once you have included all of the information you want in the instance record, click Save & close. The instance record is saved.
Administrative data
The Administrative data section contains technical information about the instance record.
- Suppress from discovery. If you want to suppress the record from your discovery layer, select the Suppress from discovery checkbox.
- Staff suppress. If you want to suppress the record, and its associated holdings and item records, from staff who do not have the proper permissions to view the record, select the Staff suppress checkbox. If selected, staff need to have the permission Inventory: Enable staff suppress facet in order to view the record.
- Previously held. If the resource was previously held by your library, select the Previously held checkbox. A library may adopt a policy to select the Previously held checkbox in the case where the library no longer owns the bibliographic resource described in the instance record, but for administrative reasons wishes to retain the record in the inventory and indicate previous ownership. For example, permission for library users to view or use items in a consortial collection may require proof that the library at some time owned those items.
- Instance HRID. The human readable identifier, also called eye readable ID, a system-assigned sequential ID.
- Source (required). Format of the instance source record, if a source record exists. For example, FOLIO if it’s a record created in Inventory, MARC if it’s a MARC record created in MARCcat, or EPKB if it’s a record coming from eHoldings. The system assigns the source automatically.
- Cataloged date. Date when an instance is considered “cataloged.”
- Instance status term. Select the instance status type to be assigned to the record. For example, the instance status may be: cataloged, uncataloged, batch loaded, or not yet assigned. Instance status types are configured by your library in the Settings app. See Settings > Inventory > Instance status types for more information.
- Mode of issuance. A bibliographic categorization reflecting whether a resource is issued in one or more parts, the way it is updated, and whether its termination is predetermined or not. You can configure the values that appear in the drop-down list in Settings > Inventory > Modes of issuance. For records created in FOLIO, you may assign a value, but for instance records with an underlying MARC record in the SRS database the value is determined from the MARC fixed field values.
- Statistical code. Statistical codes are locally assigned values used to filter and sort records. Multiple statistical codes can be added to a record. Statistical codes are configured by your library in the Settings app. See Settings > Inventory > Statistical codes for more information.
Adding a statistical code
- Click Add statistical code.
- Select the statistical code from the drop-down list.
- Repeat steps 1-2 as needed. The statistical code is saved once you save the instance.
Deleting a statistical code
- Find the statistical code you want to delete.
- Click the trash can icon next to the code. The code is removed from the record and is deleted once you save the instance.
- Administrative note. Administrative notes are free text fields that can be used to record information about the instance record or actions taken on it.
Adding an administrative note
- Click Add administrative note.
- Enter text.
- Repeat steps 1-2 as needed. The administrative note is saved once you save the instance.
Deleting an administrative note
Click the trash can icon next to the administrative note you wish to delete. The note is removed from the record and is deleted once you save the instance.
Title data
The Title data section contains information about the title of the resource.
- Resource title (required). The primary title (or label) associated with the resource.
- Alternative titles. An alternative title for the resource. For example, the original language version title of a movie. You can add multiple alternative titles to a record.
- Index title. Title normalized for browsing and searching based on the title without initial articles.
- Series statements. A series title associated with the resource. For example, Harry Potter or Lecture Notes in Mathematics.
- Preceding titles. The immediately preceding title by which the resource was formerly identified. You can add multiple preceding titles to a record. For example, there may be multiple preceding titles which merged to form the one current title.
- Succeeding titles. The immediately succeeding title of the resource. You can add multiple succeeding titles to a record. For example, there may be multiple succeeding titles if the current publication splits into multiple succeeding publications.
Adding an alternative title
- Click Add alternative title.
- Select the alternative title Type from the drop-down list. Alternative title types are configured by your library in the Settings app. See Settings > Inventory > Alternative title types for more information.
- Enter the Alternative title in the box.
- Repeat steps 1-3 as needed. The alternative title is saved once you save the instance.
Adding a series statement
- Click Add series.
- Enter the Series statement in the box.
- Repeat steps 1-2 as needed. The series statement is saved once you save the instance.
Adding a preceding title
Note: Adding a preceding title is optional, but if you click Add preceding title, you must enter a Title or delete the preceding title in order to save the instance record.
- Click Add preceding title.
- Enter the Title in the box, or to connect the preceding title to another instance in your Inventory, follow these steps:
- Click the +.
- In the Select instance dialog, in the Search & filter pane, enter all or part of the title in the search box and click Search.
- Optional: Filter results by Language, Resource Type, or Location.
- In the Search results pane, click the Title to select it. The title is connected to the instance record as a preceding title. The Title, Instance HRID, ISBN, and ISSN fields are automatically populated with information from the record, and Not connected changes to Connected.
- Optional: If you didn’t connect the Title to another instance, enter the ISBN or ISSN into their respective boxes.
- Repeat steps 1-3 as needed. The preceding title is saved once you save the instance.
Adding a succeeding title
Note: Adding a succeeding title is optional, but if you click Add succeeding title, you must enter a Title or delete the succeeding title in order to save the instance record.
- Click Add succeeding title.
- Enter the Title in the box, or to connect to the succeeding title represented by another instance in your Inventory, follow these steps:
- Click the +.
- In the Select instance dialog, in the Search & filter pane, enter all or part of the title in the search box and click Search.
- Optional: Filter results by Language, Resource Type, or Location.
- In the Search results pane, click the Title to select it. The title is connected to the instance record as a succeeding title. The Title, Instance HRID, ISBN, and ISSN fields are automatically populated with information from the record, and Not connected changes to Connected.
- Optional: If you didn’t connect the Title to another instance, enter the ISBN or ISSN into their respective boxes.
- Repeat steps 1-3 as needed. The succeeding title is saved once you save the instance.
Deleting an alternative title, preceding title, succeeding title, or series statement
- Find the alternative title, preceding title, succeeding title, or series statement you want to delete.
- Click the trash can icon next to the alternative title, preceding title, succeeding title, or series statement. The alternative title, preceding title, succeeding title, or series statement is removed from the record and is deleted once you save the instance.
Identifier
An extensible set of name-value pairs of identifiers associated with the resource.
Adding an identifier
Note: Adding an identifier is optional, but if you click Add identifier, you must enter a Type or delete the identifier in order to save the instance record.
- Click Add identifier.
- Select the identifier Type from the drop-down list. Identifier types are configured by your library in the Settings app. See Settings > Inventory > Resource identifier types for more information.
- Enter the Identifier in the box.
- Repeat steps 1-3 as needed. The identifier is saved once you save the instance.
Deleting an identifier
- Find the identifier you want to delete.
- Click the trash can icon next to the identifier. The identifier is removed from the edit record display and is permanently deleted once you save the instance.
Contributor
A contributor is any entity who has contributed to the bibliographic resource.
Adding a contributor
Note: Adding a contributor is optional, but if you click Add contributor, you must enter a Name and Name type or delete the contributor in order to save the instance record.
- Click Add contributor.
- Enter the contributor’s Name in the box.
- Select the Name type from the drop-down list.
- Optional: Select the contributor’s role Type from the drop-down list. Contributor types are configured by your library in the Settings app. See Settings > Inventory > Contributor types for more information.
- Optional: Enter a role type in the Type, free text box.
- Optional: Click Make primary to make the contributor the primary contributor.
- Repeat steps 1-6 as needed. The contributor is saved once you save the instance.
Deleting a contributor
- Find the contributor you want to delete.
- Click the trash can icon next to the contributor. The contributor is removed from the record and is deleted once you save the instance.
Descriptive data
Descriptive data contains descriptive information about the resource.
- Publications. Data about the resource relating to its publication, distribution, manufacture, etc.
- Editions. The edition statement.
- Physical descriptions. Physical description of the described resource, including its extent, dimensions, and other physical details.
- Resource type (required). A unique term for the resource that can be assigned from the RDA content term list or locally defined. Configured in Settings > Inventory > Resource types.
- Nature of content. Nature of content is an RDA categorization.
- Formats. A unique term for the format that can be assigned from the RDA carrier term list or locally defined. Configured in Settings > Inventory > Formats.
- Languages. The set of languages used by the resource.
- Publication frequency. The interval at which serial issues are released or an integrating resource is updated. For example, daily, weekly, monthly, quarterly, etc.
- Publication range. Range of sequential designation/chronology of publication, or date range.
Adding publication
Note: Adding publication information is optional, but if you click Add publication, you must enter a Publisher, Place, or Publication date or delete the publication in order to save the instance record.
- Click Add publication.
- Optional: Enter a Publisher in the box.
- Optional: Enter a Publisher role in the box.
- Optional: Enter a Place in the box.
- Optional: Enter a Publication date in the box.
- Repeat steps 1-5 as needed. The publication data is saved once you save the instance.
Adding an edition
- Click Add edition.
- Enter the Edition in the box.
- Repeat steps 1-2 as needed. The edition statement is saved once you save the instance.
Adding a physical description
- Click Add description.
- Enter a Physical description in the box.
- Repeat steps 1-2 as needed. The physical description is saved once you save the instance.
Adding a nature of content
- Click Add nature of content.
- Select the Nature of content term from the drop-down list.
- Repeat steps 1-2 as needed. The nature of content is saved once you save the instance.
- Click Add format.
- Select the Format from the drop-down list.
- Repeat steps 1-2 as needed. The format is saved once you save the instance.
Adding a language
Note: Adding a language is optional, but if you click Add Language, you must enter a Language or delete the language in order to save the instance record.
- Click Add language.
- Select the Language from the drop-down list.
- Repeat steps 1-2 as needed. The language is saved once you save the instance.
Adding a publication frequency
- Click Add frequency.
- Enter the Publication frequency in the box.
- Repeat steps 1-2 as needed. The publication frequency is saved once you save the instance.
Adding a publication range
- Click Add range.
- Enter the Publication range in the box.
- Repeat steps 1-2 as needed. The publication range is saved once you save the instance.
Deleting a publication, edition, description, nature of content, format, language, publication frequency or publication range
- Find the publication, edition, description, nature of content, format, language, publication frequency or publication range
- Click the trash can icon next to the publication, edition, description, nature of content, format, language, publication frequency or publication range. The publication, edition, description, nature of content, format, language, publication frequency or publication range is removed from the record and is deleted once you save the instance.
Instance notes
In the Instance notes section, you can add any notes about the instance record.
Adding a note
Note: Adding a note is optional, but if you click Add note, you must enter a Note or delete the note in order to save the instance record.
- Click Add note.
- Select the Note type from the drop-down list. You can configure the values that appear in the drop-down list in Settings > Inventory > Instance note types.
- Enter a Note in the box.
- Optional: If you only want the note to be visible to staff with the permission Inventory: View instance records being suppressed for staff, select the Staff only checkbox.
- Repeat steps 1-4 as needed. The note is saved once you save the instance.
Deleting a note
- Find the note you want to delete.
- Click the trash can icon next to the note. The note is removed from the record and is deleted once you save the instance.
Electronic access
In the Electronic access section, you can add online access information for the resource.
Adding electronic access
Note: Adding electronic access is optional, but if you click Add electronic access, you must enter a URI or delete the electronic access in order to save the instance.
- Click Add electronic access.
- Optional: Select a Relationship from the drop-down list.
- Optional: Enter a URI in the box.
- Optional: Enter Link text in the box.
- Optional: Enter the Materials specified in the box.
- Optional: Enter a URL public note in the box.
- Repeat steps 1-6 as needed. The electronic access is saved once you save the instance.
Deleting electronic access
- Find the electronic access you want to delete.
- Click the trash can icon next to the electronic access. The electronic access is removed from the record and is deleted once you save the instance.
Subject
In the Subject section, you can add any subjects that pertain to the resource.
Adding a subject
- Click Add subject.
- Enter the Subject in the box.
- Repeat steps 1-2 as needed. The subject is saved once you save the instance.
Removing a subject
- Find the subject you want to delete.
- Click the trash can icon next to the subject. The subject is removed from the record and is deleted once you save the instance.
Classification
In the Classification section, you can add classification information for the resource.
Adding a classification
Note: Adding a classification is optional, but if you click Add classification, you must enter a Classification identifier type and Classification or delete the classification in order to save the instance record.
- Click Add classification.
- Select a Classification identifier type from the drop-down list. Configured in Settings > Inventory > Classification identifier types.
- Enter a Classification in the box.
- Repeat steps 1-3 as needed. The classification is saved once you save the instance.
Deleting a classification
- Find the classification you want to delete.
- Click the trash can icon next to the classification. The classification is removed from the record and is deleted once you save the instance.
Instance relationship (analytics and bound-with)
In the Instance relationship section, you can add any relationships between the instance and other instances. This is not the same as the Bound-with data in the Holdings and Item records.
- Parent instances. The parent instance is the record chosen as the primary record and to which all other child records are linked. Information about parent instances (Title, Instance HRID, Publisher, Publication date, ISBN, ISSN) including a link to the corresponding parent instance record displays on the child instance record(s).
- Child instances. A child instance record is any record that has been associated with a parent record. Information about child instances (Title, Instance HRID, Publisher, Publication date, ISBN, ISSN) including a link to each corresponding child instance record displays on the parent instance record.
Adding a parent instance
Note: Adding a parent instance is optional, but if you click Add parent instance, you must enter Parent instances and Type of relation or delete the parent instance in order to save the instance record.
- Click Add parent instance.
- Enter the Parent instances in the box.
- Select the Type of relation from the drop-down list.
- Repeat steps 1-3 as needed. The parent instance is saved once you save the instance.
Adding a child instance
Note: Adding a child instance is optional, but if you click Add child instance, you must enter Child instance and Type of relation or delete the child instance in order to save the instance record.
- Click Add child instance.
- Enter the Child instance in the box.
- Select the Type of relation from the drop-down list.
- Repeat steps 1-3 as needed. The child instance is saved once you save the instance.
Removing a parent or child instance
- Find the parent or child instance you want to delete.
- Click the trash can icon next to the parent or child instance. The parent or child instance is removed from the record and is deleted once you save the instance.
The Related instances section displays any linked parent or child instances.
Creating a Fast Add instance record
You can use Fast Add to create an instance record with a limited set of information that is most likely to be needed. To see the complete list of information that can be added to the record, see Creating an instance record manually in FOLIO, Adding holdings to a record, and Adding an item to a record.
- In the Inventory pane, click Actions > New Fast Add Record.
- In the New fast add record, fill in the Instance, Holdings, and Item sections. For more information on the fields and actions available in these sections, see the section descriptions below.
- Once you have included all of the information you want in the instance record, click Save & close. The instance record is saved.
Instance
The Instances section contains select instance record fields. For all fields available in an instance record, see Creating an instance record manually in FOLIO.
- Suppress from discovery. Fast add records are suppressed from your discovery layer by default. If you want to display the record in your discovery layer, clear the Suppress from discovery checkbox.
- Instance status term. Select the instance status type to be assigned to the record. For example, the instance status may be: cataloged, uncataloged, batch loaded, or not yet assigned. Instance status types are configured by your library in the Settings app. See Settings > Inventory > Instance status types for more information.
- Resource title (required). The primary title (or label) associated with the resource.
- Publication date. The year of publication, distribution, etc.
- ISBN. International Standard Book Number.
- ISSN. International Standard Serial Number.
- Resource type (required). A unique term for the resource that can be assigned from the RDA content term list or locally defined. Configured in Settings > Inventory > Resource types.
- Contributors. Any entities who have contributed to the instance.
Adding a contributor
Note: Adding a contributor is optional, but if you click Add contributor, you must enter a Name and Name type or delete the contributor in order to save the instance record.
- Click Add contributor.
- Enter the contributor’s Name in the box.
- Select the Name type from the drop-down list.
- Optional: Click Make primary to make the contributor the primary contributor.
- Repeat steps 1-4 as needed. The contributor is saved once you save the fast add record.
Deleting a contributor
- Find the contributor you want to delete.
- Click the trash can icon next to the contributor. The contributor is removed from the record and is deleted once you save the fast add record.
Holdings
The Holdings section contains select holdings record fields. For all fields available in a holdings record, see Creating a holdings record.
- Permanent location (required). The default location of the resource, which can be a physical location where the resource is stored or an online location. Permanent location is assigned at the holdings level, but can be overridden at the item level, if needed. Select a Permanent location from the drop-down list, or click Location look-up to select a location.
- Temporary location. A temporary location for the resource, which can be a physical location where the resource is stored or an online location. Temporary location can be assigned at the holdings level and overridden at the item level, if needed. Select a Temporary location from the drop-down list, or click Location look-up to select a location.
- Call number type. The classification system used for the call number. Select the Call number type from the drop-down list. Configured in Settings > Inventory > Call number types.
- Call number prefix. Prefix of the call number on the holdings level. For example, FIC.
- Call number. Call number is an identifier assigned to an item, usually printed on a label attached to the item. The call number is used to determine the resource’s physical position in a shelving sequence. For example, K1 .M44.
- Call number suffix. Suffix of the call number on the holdings level. For example, the year (2001).
Item
The Item section contains select item record fields. For all fields available in an item record, see Adding an item to a record.
- Barcode. Generally a numerical sequence attached to the resource and validated by a barcode scanner. Must be a unique value.
- Material type (required). Describes the material nature of a specific item, with the intention to permit more specific information than resource type alone. Configured in Settings > Inventory > Material types.
- Permanent loan type (required). The default loan type for a given item. For example, Can circulate, Course reserves, Reading room, Selected, etc. Configured in Settings > Inventory > Loan types.
- Item notes (required). Any notes about the item that you want to appear to staff during check in or check out.
- Electronic access. Online access information for the item.
Adding check in / check out notes
A check in or check out note is required by default.
- Select the Note type from the drop-down list. Configured in Settings > Inventory > Item note types.
- Enter a Note in the box.
- Optional: If you want the note to be visible to only staff with the proper permissions to view the note, select the Staff only checkbox.
- To add another note, click Add check in / check out note and repeat steps 1-3. The note is saved once you save the fast add record.
Removing check in / check out notes
- Find the note you want to delete.
- Click the trash can icon next to the note. The note is removed from the record and is deleted once you save the fast add record.
Adding electronic access
- Click Add electronic access.
- Optional: Select a Relationship from the drop-down list.
- Optional: Enter a URI in the box.
- Optional: Enter Link text in the box.
- Optional: Enter the Materials specified in the box.
- Optional: Enter a URL public note in the box.
- Repeat steps 1-6 as needed. The electronic access is saved once you save the fast add record.
Removing electronic access
- Find the electronic access you want to delete.
- Click the trash can icon next to the electronic access. The electronic access is removed from the record and is deleted once you save the fast add record.
Creating an instance record using the Import action in FOLIO
Note: Import options are configured in [Settings > Inventory > Integrations]((../../settings/settings_inventory/settings_inventory/#settings–inventory–integrations).
- In the default or middle pane, click Actions > Import.
- In the Single Record Import dialog box, verify or select the External target (source) of the record to be imported.
- Verify or select the profile to be used.
- Enter the record number, without any prefixes, in the Enter [source] identifier box.
- Click Import.
A new instance record is created along with an underlying SRS record. Only the editable Administrative Data elements in the instance can be edited directly in Inventory. These elements are entered as described in Administrative Data.
Any other edits to the instance record data must be made by editing the source record using quickMARC.
Adding holdings to a record
Adding a MARC holdings record
- Find the instance record to which you want to add holdings and select it.
- In the Instance record details pane, in the Holdings section, click Add MARC holdings record.
- Edit the new record following the instructions in Editing a MARC record using quickMARC.
- Once you have included all of the information you want in the holdings record, click Save & close. The record is saved.
Adding a FOLIO holdings record
- Find the instance record to which you want to add holdings and select it.
- In the Instance record details pane, in the Holdings section, click Add holdings.
- In the Holdings record window, fill in the Administrative data, Location, Holdings details, Holdings notes, Electronic access, Acquisition, and Receiving history sections. For more information on the fields and actions available in these sections, see the section descriptions below.
- Once you have included all of the information you want in the holdings record, click Save & close. The record is saved.
Administrative data
The Administrative data section contains technical information about the holdings.
- Suppress from discovery. If you want to suppress the record from your discovery layer, select the Suppress from discovery checkbox.
- Holdings HRID. The human readable ID, also called eye readable ID. A system-assigned sequential ID which maps to the Holdings ID.
- Source. Format of the holdings source record, if a source record exists. For example, FOLIO if it’s a record created in Inventory, MARC if it’s a MARC record created in MARCcat, or EPKB if it’s a record coming from eHoldings.
- Former holdings ID. Former holdings ID
- Holdings type. Indicates the type of bibliographic format of the holdings record. For example, print or electronic. Configured in Settings > Inventory > Holdings types.
- Statistical code. Statistical codes (e.g. ASER; name: Active serial; type: SERM (Serial management) or books; name: Book, print (books); type ARL (Collection stats) etc.). Configured in Settings.
- Click Add former holdings ID.
- Enter the Former holdings ID in the box.
- Repeat steps 1-2 as needed. The former holdings ID is saved once you save the holdings record.
Adding a statistical code
- Click Add statistical code.
- Select the statistical code from the drop-down list.
- Repeat steps 1-2 as needed. The statistical code is saved once you save the holdings record.
- Find the former holdings ID or statistical code you want to delete.
- Click the trash can icon next to the ID or code. The ID or code is removed from the record and is deleted once you save the holdings record.
Location
The Location section contains information on the physical or electronic location of the holdings.
- Permanent (required). The default location of the resource, which can be a physical location where the resource is stored or an online location. Permanent location is assigned at the holdings level, but can be overridden at the item level, if needed. Select a Permanent location from the drop-down list, or click Location look-up to select a location.
- Temporary. A temporary location for the resource, which can be a physical location where the resource is stored or an online location. Temporary location can be assigned at the holdings level and overridden at the item level, if needed. Select a Temporary location from the drop-down list, or click Location look-up to select a location.
- Shelving order. A system-generated normalization of the call number that allows for call number sorting in reports and in search results.
- Shelving title. A title by which the resource is shelved.
- Copy number. The copy number of the holdings.
- Call number type. The classification system used for the call number. Select the Call number type from the drop-down list. Configured in Settings > Inventory > Call number types.
- Call number prefix. Prefix of the call number on the holdings level. For example, FIC.
- Call number. Call Number is an identifier assigned to an item, usually printed on a label attached to the item. The call number is used to determine the items physical position in a shelving sequence (e.g. K1 .M44)
- Call number suffix. Suffix of the call number on the holdings level. For example, the year (2001).
Holdings details
The Holding details section contains additional details about the holdings.
- Number of items. Number of items in the holding.
- Holdings statements. Specifies the exact content to which the library has access, typically for continuing publications.
- ILL policy. Select list of values defining the library’s lending policy, the ILL policy. For example, Will lend, Will not lend, Will reproduce, Will not reproduce, etc. Configured in Settings > Inventory > ILL policy.
- Digitization policy. Notes about the digitization policy.
- Retention policy. Notes about the retention policy.
Adding a holdings statement
- Click Add holdings statement.
- Optional: Enter a Holdings statement.
- Optional: Enter a Holdings statement public note. Bibliographic public note associated with the holdings statement.
- Optional: Enter a Holdings statement staff note. Bibliographic staff note associated to the holdings statement.
- Repeat steps 1-4 as needed. The holdings statement is saved once you save the holdings record.
Adding a holding statements for supplement
Specifies the exact content of Supplements to which the library has access, typically for continuing publications.
- Click Add holdings statement for supplements.
- Optional: Enter a Holdings statement for supplements.
- Optional: Enter a Holdings statement for supplements public note.
- Optional: Enter a Holdings statement for supplements staff note.
- Repeat steps 1-4 as needed. The holdings statement is saved once you save the holdings record.
Adding a holding statements for indexes
Specifies the exact content of Indexes to which the library has access, typically for continuing publications.
- Click Add holdings statement for indexes.
- Optional: Enter a Holdings statement for indexes.
- Optional: Enter a Holdings statement for indexes public note.
- Optional: Enter a Holdings statement for indexes staff note.
- Repeat steps 1-4 as needed. The holdings statement is saved once you save the holdings record.
Deleting a holding statement
- Find the holdings statement you want to delete.
- Click the trash can icon next to the holdings statement. The holdings statement is removed from the record and is deleted once you save the holdings record.
Holdings notes
The Holdings notes section contains any notes about the holdings.
Adding a note
- Click Add note.
- Select the Note type from the drop-down list. Configured in Settings > Inventory > Holdings note types.
- Enter a Note in the box.
- Optional: If you want the note to be visible to only staff with the proper permissions to view the note, select the Staff only checkbox.
- Repeat steps 1-4 as needed. The note is saved once you save the instance.
Removing a note
- Find the note you want to delete.
- Click the trash can icon next to the note. The note is removed from the record and is deleted once you save the holdings.
Electronic access
In the Electronic access section, you can add online access information for the resource.
Adding electronic access
Note: Adding electronic access is optional, but if you click Add electronic access, you must enter a URI or delete the electronic access in order to save the holdings.
- Click Add electronic access.
- Optional: Select a Relationship from the drop-down list.
- Optional: Enter a URI in the box.
- Optional: Enter Link text in the box.
- Optional: Enter the Materials specified in the box.
- Optional: Enter a URL public note in the box.
- Repeat steps 1-6 as needed. The electronic access is saved once you save the holdings record.
Deleting electronic access
- Find the electronic access you want to delete.
- Click the trash can icon next to the electronic access. The electronic access is removed from the record and is deleted once you save the holdings record.
Acquisition
The Acquisition section contains information on the acquisition of the holdings.
- Acquisition method. The method by which the holding was acquired.
- Order format. The order format of the holding. For example, DVD or monograph.
- Receipt status. Receipt status. For example, Pending, Awaiting receipt, Partially Received, Fully received, Receipt not required, and Cancelled.
Receiving history
Receiving history is used for serials and continuing resources. Shows the materials that have already been received.
Adding receiving history
- Click Add receiving history.
- Optional: If you want to display the enumeration and chronology to the public, select the Public display checkbox.
- Optional: Enter the Enumeration.
- Optional: Enter the Chronology.
- Repeat steps 1-4 as needed. The receiving history is saved once you save the holdings record.
Deleting receiving history
- Find the receiving history you want to delete.
- Click the trash can icon next to the receiving history. The receiving history is removed from the record and is deleted once you save the holdings record.
Adding an item to a record
- Find the record to which you want to add an item and select it.
- In the Instance record details pane, in the Holdings section, click Add item.
- In the Item record window, fill in the Administrative data, Item data, Enumeration data, Condition, Item notes, Loan and availability, Location, and Electronic access sections. For more information on the fields and actions available in these sections, see the section descriptions below.
- Once you have included all of the information you want in the item record, click Save & close. The item record is saved.
Administrative data
- Record last updated. Date and time when the record was last updated. Click Record last updated to see the next three fields.
- Source. Name of the user who last updated the record.
- Record created. Date and time when the record was created.
- Source. Name of the user who created the record.
- Suppress from discovery. If you want to suppress the record from your discovery layer, select the Suppress from discovery checkbox.
- Item HRID. The human readable ID, also called eye readable ID. A system-assigned sequential ID which maps to the Item ID
- Barcode. Generally a numerical sequence attached to the resource and validated by a barcode scanner. Must be a unique value.
- Accession number. A unique number assigned to an item in the order in which it is added to a library collection. Most libraries assign accession numbers in a continuous numerical sequence, but some use a code system to indicate type of material and/or year of accession in addition to order of accession. Also called inventar number.
- Item identifier. Item identifier number. For example, imported from the union catalog (read only).
- Former identifier. Previous identifiers assigned to the item.
- Statistical code. Statistical codes (e.g. ASER; name: Active serial; type: SERM (Serial management) or books; name: Book, print (books); type ARL (Collection stats) etc.)
- Click Add former identifier.
- Enter a Former identifier in the box.
- Repeat steps 1-2 as needed. The former identifier is saved once you save the item.
Adding a statistical code
- Click Add statistical code.
- Select the statistical code from the drop-down list.
- Repeat steps 1-2 as needed. The statistical code is saved once you save the item.
- Find the former identifier or statistical code you want to delete.
- Click the trash can icon next to the identifier or code. The identifier or code is removed from the record and is deleted once you save the item.
Item data
The Item data section contains additional information on the item.
- Material type (required). Describes the material nature of a specific item, with the intention to permit more specific information than resource type alone. Configured in Settings > Inventory > Material types.
- Copy number. Copy number is the piece identifier. The copy number reflects if the library has one (or more) copies of a single-volume monograph; one (or more) copies of a multi-volume, (e.g. Copy 1, or C.7.)
- Call number type. The classification system used for the call number. Select the Call number type from the drop-down list. Configured in Settings > Inventory > Call number types.
- Call number prefix. Prefix of the call number on the item level.
- Call number. Call number is an identifier assigned to an item, usually printed on a label attached to the item. The call number is used to determine the resource’s physical position in a shelving sequence. For example, K1 .M44.
- Call number suffix. Suffix of the call number on the item level.
- Number of pieces. Number of pieces. Used when an item is checked out or returned to verify that all parts are present (e.g. 7 CDs in a set).
- Description of pieces. Description of pieces. For example, 500 puzzle pieces.
Enumeration data
The Enumeration data section contains enumeration information for any serials or multipart monographs.
- Enumeration. The descriptive information for the numbering scheme of a serial, usually identified by level and a descriptive caption. For example, level 0 = v. and level 1 = no. This means that each issue of the serial has a volume and an issue number that would appear (v.71:no.2-4).
- Chronology. The descriptive information for the dating scheme of a serial, usually identified by level. For example, level 0 = year level 1 = month. This means that each issue of the serial has a month and a year on each issue (1985:July-Dec.)
- Volume. Volume is intended for multipart monographs. For example, a biography of George Bernard Shaw in three volumes.
- Year, caption. In multipart monographs, a caption is used to label a level of chronology. For example, year 1985.
Adding a year, caption
- Click Add year, caption.
- Enter a Year, caption in the box.
- Repeat steps 1-2 as needed. The year, caption is saved once you save the item.
Deleting a year, caption
- Find the year, caption you want to delete.
- Click the trash can icon next to the year, caption. The year, caption is removed from the record and is deleted once you save the item.
Condition
The Condition section contains information on the condition of the item.
- Number of missing pieces. Number of missing pieces
- Missing pieces. Description of the missing pieces.
- Date. Date when the piece(s) went missing
- Item damaged status. Whether the item is damaged or not damaged
- Date. Date when the pieces were damaged.
Item notes
The Item notes section contains any notes about the item.
Adding a note
- Click Add note.
- Select the Note type from the drop-down list. Configured in Settings > Inventory > Item note types.
- Enter a Note in the box.
- Optional: If you want the note to be visible to only staff with the proper permissions to view the note, select the Staff only checkbox.
- Repeat steps 1-4 as needed. The note is saved once you save the item.
Deleting a note
- Find the note you want to delete.
- Click the trash can icon next to the note. The note is removed from the record and is deleted once you save the item.
Loan and availability
The Loan and availability section contains information on the lending status of the item.
- Permanent loan type (required). The default loan type for the item. For example, Can circulate, Course reserves, Reading room, Selected, etc. Configured in Settings > Inventory > Loan types.
- Temporary loan type. A temporary loan type for the item. For example, Can circulate, Course reserves, Reading room, Selected, etc. Configured in Settings > Inventory > Loan types.
- Status. Name of the item state. For example, Available, Checked out, In transit, Awaiting pickup, On order, etc. By default, the item’s status is set to Available.
- Check in / check out notes. Any notes about the item that you want to appear to staff during check in or check out.
Adding check in / check out notes
A check in or check out note is required by default.
- Select the Note type from the drop-down list. Configured in Settings > Inventory > Item note types.
- Enter a Note in the box.
- Optional: If you want the note to be visible to only staff with the proper permissions to view the note, select the Staff only checkbox.
- To add another note, click Add check in / check out note and repeat steps 1-3. The note is saved once you save the fast add record.
Removing check in / check out notes
- Find the note you want to delete.
- Click the trash can icon next to the note. The note is removed from the record and is deleted once you save the fast add record.
Location
The Location section contains information on the physical or electronic location of the item. For more information on locations, see item effective location.
- Permanent. The default location of the resource, which can be a physical location where the resource is stored or an online location. Permanent location is assigned at the holdings level, but can be overridden at the item level, if needed. Select a Permanent location from the drop-down list, or click Location look-up to select a location.
- Temporary. A temporary location for the resource, which can be a physical location where the resource is stored or an online location. Temporary location can be assigned at the holdings level and overridden at the item level, if needed. Select a Temporary location from the drop-down list, or click Location look-up to select a location.
Electronic access
In the Electronic access section, you can add online access information for the resource.
Adding electronic access
Note: Adding electronic access is optional, but if you click Add electronic access, you must enter a URI or delete the electronic access in order to save the instance..
- Click Add electronic access.
- Optional: Select a Relationship from the drop-down list.
- Optional: Enter a URI in the box.
- Optional: Enter Link text in the box.
- Optional: Enter the Materials specified in the box.
- Optional: Enter a URL public note in the box.
- Repeat steps 1-6 as needed. The electronic access is saved once you save the instance.
Deleting electronic access
- Find the electronic access you want to delete.
- Click the trash can icon next to the electronic access. The electronic access is removed from the record and is deleted once you save the instance.
Bound-with and analytics
The Bound-with and analytics section contains information on holdings that are bound with the instance.
Adding a bound-with
- Click Add Bound-with and analytics.
- In the modal that appears, enter the Holdings HRID of the bound-with. You may add up to seven at once. Bound-withs should be added in the same order that they appear in the piece. They cannot be reordered.
- Click Save & close. The bound-with Instance HRID, Instance title, and Holdings HRID will now appear in the instance record.
- Repeat steps 1-3 as needed. The bound-with is saved once you save the instance.
Deleting a bound-with
- Find the bound-with you want to delete.
- Click the trash can icon next to the bound-with. The bound-with is removed from the record and is deleted once you save the instance.
Generating an In transit items report
The In transit items report displays all items with the Item status of In transit.
- In the Inventory pane, click Actions > In transit items report (CSV). Depending on your browser and its configurations, the file automatically downloads or you are prompted to save it.
Saving instances UUIDs
Produces a .csv file that is ONLY a listing of UUIDs
- Find the instances, holdings, or items with the instances UUIDs you want to save.
- In the Inventory pane, click Actions > Save instances UUIDs. Depending on your browser and its configurations, the file automatically downloads or you are prompted to save it.
Saving instances CQL query
Produces a file that contains the ‘commands’ used in the query, in Contextual Query Language (CQL), as defined on dev.folio.org.
- Find the instances, holdings, or items with the instances CQL queries you want to save.
- In the Inventory pane, click Actions > Save instances CQL query. Depending on your browser and its configurations, the file automatically downloads or you are prompted to save it.
Exporting instances (MARC)
See Exporting instances (MARC).
Exporting instances (JSON)
Exporting instances to JSON is not implemented at this time.
Searching for a record
When you search for a record in the Inventory App, the Search toggle is highlighted and then you can toggle between searching on an instance, holdings, or item level. Searching for an instance record supports bibliographic data searches. Searching for a holdings or item record allows you to search through instance record data along with holdings and item specific data elements.
You can search for instance, holdings, or items by clicking on either Instance, Holdings, or Item in the Search & filter pane. The elements available for searching and filtering are different based on your selection, but the results always display instance records.
To search, first select the record type (instance, holdings, or item) then enter your search terms into the box and click Search. Use the drop-down list to select what you want to search:
- Keyword (title, contributor, identifier, HRID, UUID). Keyword search through title, contributor, identifier, HRID, UUID fields.
- Contributor. Keyword search through all contributor fields.
- Title (all). Keyword search through all title fields. This includes searching the equivalent of title proper, alternative titles (including uniform titles) and, series titles, but not preceding and succeeding titles.
- Identifier (all). Searches through all identifier types. Not normalized: the search may be left truncated, otherwise the entire identifier, including any prefix, must be entered.
- ISBN. Searches the number exactly as it appears in the data. For example, if there are hyphens in the data, the hyphens must be entered in the search.
- ISSN. Searches the number exactly as it appears in the data. Searches should include hyphens.
- LCCN, normalized. Searches for the LCCN number with or without any prefixes.
- OCLC number, normalized. Searches for the OCLC number with or without any prefixes.
- Instance notes (all). Keyword search across all Instance notes; includes administrative notes.
- Instance administrative notes. Keyword search of instance record administrative notes.
- Subject. Keyword search through all subject fields. This may include Library of Congress Subjects, FAST, and other subject vocabularies, including Genre/Form terms.
- Effective call number (item), shelving order. Retrieves Instance records based on the shelving order element in the item record.
- Instance HRID. Human readable identifier for the instance record.
- Instance UUID. Universally unique identifier for the instance record.
- Authority UUID. Universally unique identifier for an authority record stored in FOLIO. This searches for UUIDs in bibliographic data where a field is linked to and controlled by an authority record. This value is stored in a $9 in the bibliographic record (visible via “View source”).
- All. Searches across all fields in all record types. May impact performance.
- Query search. A search for advanced users to query by property names using CQL.
- Advanced search Either selected from the list of search options, or by clicking the Advanced search button, the user is presented with a modal where up to six different search terms, boolean operators (AND, OR, NOT), types of search (Exact phrase, Contains all, Starts with, Contains any) and fields to search may be specified.
- Call number, eye readable. Requires you to enter the call number exactly as it appears in the holdings record, including punctuation.
- Call number, normalized. Ignores any characters other than numbers and letters, such as punctuation and spaces.
- Holdings notes (all). Keyword search across all holdings notes; includes administrative notes.
- Holdings administrative notes. Keyword search of holdings record administrative notes.
- Holdings HRID. Human readable identifier for the holdings record.
- Holdings UUID. Universally unique identifier for the holdings record.
- Barcode. Allows you to scan, copy/paste, or type a barcode.
- Effective call number (item), eye readable. Requires you to enter the call number exactly as it appears in the item record, including the punctuation and call number prefix.
- Effective call number (item), normalized. Ignores any characters other than numbers and letters, such as punctuation and spaces.
- Item notes (all). Keyword search across all item notes; includes administrative notes, check in and check out notes.
- Item administrative notes. Keyword search of item record administrative notes.
- Circulation notes. Keyword search across check in and check out notes.
- Item HRID. Human readable identifier for the item record.
- Item UUID. Universally unique identifier for the item record.
Browsing for a record
When you browse records in the Inventory App, the Browse toggle is highlighted and then you can select a browse option:
- Call numbers. The call number browse is based on the shelving order element in the item record; only instances with item records will be retrieved. You can choose to browse all call numbers, or to browse only those call numbers with a particular call number classification (e.g., Dewey Decimal, Library of Congress, Local, National Library of Medicine, SuDoc or Other Scheme). Note that call number types must first be configured in Settings for Inventory, then specified for an item call number when each item record is created, before it is possible to browse by call number classification.
- Contributors. The contributor browse is based on the contributor field in instance records. Names should be entered as they appear in the contributor field.
- Subjects. The subject browse is based on the subject field in instance records. Subjects should be entered as they appear in the subject field.
The result of a browse search is shown in the pane to the right of the Search & filter pane under the title Browse inventory. It will include a list of call numbers, contributors or subjects that come before and after the data you specified, along with a number that indicates how many inventory records have those call numbers, contributors or subjects. If there is a match to what you specified, that result will be highlighted, otherwise you’ll see a highlighted message “[your specified data] would be here”. If you click on one of the links in the browse results you’ll get list of inventory records that contain the selected call number, contributor or subject.
Filtering for a record, limiting results after a search, and sorting
You can also search for instance, holdings, or item records by selecting any of the filters in the Search & filter pane. Additionally, you can apply the filters after you perform a search to limit your results. The filters available vary depending on whether you are searching for an instance, holdings, or item record. See the sections below for more information.
When using filters, keep the following in mind:
- Multiple filters can be combined to further limit searches.
- Multiple values in the same filter are combined with “OR.”
- Multiple values in different filters are combined with “AND.”
For example, a search filtered by multiple locations finds resources that match any of those locations. However, a search filtered by a location and a language finds resources in that location and in that language.
Effective location (item)
To search for instances, holdings, or items based on their effective location, follow these steps:
- In the Search & filter pane, under Effective location (item), click the drop-down list.
- Either enter the location or select it from the list.
- Repeat step 2 to add more than one location. Your search results appear in the Inventory pane.
Language
To search for instances in a specific language, follow these steps:
- In the Search & filter pane, click Language.
- Click the drop-down list and either enter the language or select it from the list.
- Repeat step 2 to add more than one language. Your search results appear in the Inventory pane.
Resource type
To search for instances with a specific resource type, follow these steps:
- In the Search & filter pane, click Resource Type.
- Click the drop-down list and either enter the resource type or select it from the list.
- Repeat step 2 to add more than one resource type. Your search results appear in the Inventory pane.
To search for instances with a specific format, follow these steps:
- In the Search & filter pane, click Format.
- Click the drop-down list and either enter the format or select it from the list.
- Repeat step 2 to add more than one format. Your search results appear in the Inventory pane.
Mode of issuance
To search for instances based on their mode of issuance, follow these steps:
- In the Search & filter pane, click Mode of issuance.
- Click the drop-down list and either enter the mode or select it from the list.
- Repeat step 2 to add more than one mode. Your search results appear in the Inventory pane.
Nature of content
To search for instances based on their nature of content, follow these steps:
- In the Search & filter pane, click Nature of content.
- Click the drop-down list and either enter the nature of content or select it from the list.
- Repeat step 2 to add more than one nature of content. Your search results appear in the Inventory pane.
Staff suppress
To search for instances by whether or not they are suppressed to staff, in the Search & filter pane, click Staff suppress and select one of the following:
- Yes. The instance is suppressed to staff.
- No. The instance is not suppressed to staff.
Note: To view this facet, staff need to have the permission Inventory: Enable staff suppress facet. Inventory search defaults Staff suppress to No.
Suppress from discovery
To search for instances, holdings, or items by whether or not they are suppressed from discovery, in the Search & filter pane, click Suppress from discovery and select one of the following:
- Yes. The instance, holding, or item is suppressed from discovery
- No. The instance, holding, or item is not suppressed from discovery.
Statistical code
To search for instances, holdings, or items based on their statistical code, follow these steps:
- In the Search & filter pane, click Statistical code.
- Click the drop-down list and either enter the code/code name or select it from the list.
- Repeat step 2 to add more than one statistical code. Your search results appear in the Inventory pane.
Date created
To search for instances based on the date they were created, follow these steps:
- In the Search & filter pane, click Date created.
- Enter a start date in the From box and an end date in the To box.
- Click Apply. Your search results appear in the Inventory pane.
Date updated
To search for instances based on the date they were last updated, follow these steps:
- In the Search & filter pane, click Date updated.
- Enter a start date in the From box and an end date in the To box.
- Click Apply. Your search results appear in the Inventory pane.
Instance status
To search for instances based on the instance status, follow these steps:
- In the Search & filter pane, click Instance status.
- Select the status from the list.
- Repeat step 2 to select multiple instance statuses.
- Your search results appear in the Inventory pane.
Source
To search for instances based on their source, follow these steps:
- In the Search & filter pane, click Source.
- Select the source from the list.
- Repeat step 2 to select multiple sources
- Your search results appear in the Inventory pane.
Note: Sources may vary across institutions. The following are examples of sources that may appear:
- FOLIO. The instance was created in FOLIO.
- MARC. The instance was created by uploading MARC records.
To search for instances based on assigned tags, follow these steps:
- In the Search & filter pane, click Tags.
- Click the drop-down list and either enter the tag or select it from the list.
- Repeat step 2 to add more than one tag. Your search results appear in the Inventory pane.
Holdings permanent location
To search for holdings or items based on their holdings permanent location, follow these steps:
- In the Search & filter pane, click Holdings permanent location.
- Click the drop-down list and either enter the holdings permanent location or select it from the list.
- Repeat step 2 to add more than one holdings permanent location. Your search results appear in the Inventory pane.
Holdings type
To search for holdings or items based on their holdings type, follow these steps:
- In the Search & filter pane, click Holdings type.
- Click the drop-down list and either enter the holdings type or select it from the list.
- Repeat step 2 to add more than one holdings type. Your search results appear in the Inventory pane.
Item status
To search for items based on their item status, follow these steps:
- In the Search & filter pane, under Item status, click the drop-down list.
- Either enter the item status or select it from the list.
- Repeat step 2 to add more than one status. Your search results appear in the Inventory pane.
Material type
To search for items based on their material type, follow these steps:
- In the Search & filter pane, click Material type.
- Click the drop-down list and either enter the material type or select it from the list.
- Repeat step 2 to add more than one material type. Your search results appear in the Inventory pane.
Sorting search results
To sort results after conducting a search, click Action and use the dropdown menu under Sort by to select a sort option:
- Title. This is the default sort option. Sorts the search results alphabetically (A to Z) by title.
- Contributors. Sorts the search results alphabetically (A to Z) by contributor.
- Relevance. Sorts the search results by relevancy (most to least relevant).
Viewing an instance record
Once you search for an instance, holding, or item, the following information appears in the Inventory pane:
- Title. Title of the instance.
- Contributors. Contributors of the instance.
- Publishers. Publisher of the instance.
- Relation. Relation to other instances.
In the search results, click any result to view the instance record.
Viewing holdings records
Holdings records can be viewed once you have an instance record opened.
To view a holdings record, follow these steps:
- Find the instance with the holdings record you want to view and select it.
- In the Instance record details pane, the Holdings section, click View holdings. The Holding record details window appears.
Viewing an item record
Item records can be viewed once you have an instance record opened.
To view an item record, follow these steps:
- Find the instance with the item record you want to view and select it.
- In the Instance record details pane, expand the Holdings accordion.
- Click the Item barcode of the item you want to view. The Item record details window appears.
Editing an instance record
- Find the instance you want to edit and select it.
- In the Instance record details pane, click Actions > Edit.
- Make your desired changes to the instance record.
- Click Save and close. The instance record is updated.
Editing an instance record with underlying MARC
See Editing a MARC record using quickMARC).
Updating an instance record with underlying MARC using the Overlay source bibliographic record action in FOLIO
- Find the instance you want to edit and select it.
- In the Instance record details pane, click Actions > Overlay source bibliographic record.
- In the Re-import dialog box, verify or select the External target (source) of the record to be imported.
- Verify or select the profile to be used to overlay the current data.
- Enter the record number, without any prefixes, in the Enter [source] identifier box.
- Click Import.
The selected instance record and any underlying source data will be replaced by the re-imported record. The instance uuid and hrid as well as manually configurable Administrative Data such as suppression from discovery, instance status, cataloged date, and any statistical codes assigned will remain the same. Some configurations may be made locally to the import profile used for single record import. These changes are made in the settings for Data Import.
Duplicating an instance record
- Find the instance you want to duplicate and select it.
- In the Instance record details pane, click Actions > Duplicate.
- In the New instance window, make your desired changes to the record.
- Click Save and close. The instance is duplicated.
Moving items within an instance
To move items to a different holdings record within the same instance record, follow these steps:
- Find the instance with the items you want to move and select it.
- In the Instance record details pane, click Actions > Move items within an instance. A drag and drop column and checkbox column appear in the Holdings tables.
- In the Holdings section, you can move items to another holding by following either of these steps:
- Click the drag and drop column of the item you want to move and drag it over to the Holdings table to which you want to move it. A confirmation message appears and the item appears in its new Holdings table.
- Select the checkbox in the row of the item you want to move and click Move to > [Holdings record]. A confirmation message appears and the item appears in its new Holdings table.
- Optional: Repeat step 3 as needed.
- Once you are finished, click Actions > Stop items movement within an instance.
Moving holdings or items to another instance
- Find the instance with the holdings or items you want to move and select it.
- In the Instance record details pane, click Actions > Move holdings/items to another instance.
- In the Select instance dialog, in the Search & filter pane, search for the instance to which you want to move the holdings or items by entering search words in the box.
- Optional: Filter your results by Language, Resource Type, or Location.
- In the Search results, click on the instance to select it. Both instance records appear in the window and have drag and drop columns and checkbox columns in their Holdings tables.
- To move holdings to another instance, follow either of these steps:
- Click the ^ next to the Holdings name of the holding record you want to move and drag it over to the Holdings section to which you want to move it. In the Confirm move dialog, click Continue. The holding appears in its new Holdings section.
- Click Move to > [Instance record]. In the Confirm move dialog, click Continue. The holding appears in its new Holdings section.
- To move items to another instance, follow either of these steps:
- Click the drag and drop column in the row of the item you want to move and drag it over to the Holdings table to which you want to move it. In the Confirm move dialog, click Continue. The item appears in its new Holdings table.
- Select the checkbox in the row of the item you want to move and click Move to > [Instance record Holdings record]. In the Confirm move dialog, click Continue. The item appears in its new Holdings table.
- Once you are finished, click the X at either of the instance records.
Viewing requests
- Find the instance with the requests you want to view and select it.
- In the Instance record details pane, click Actions > View requests (number of requests). The Requests on items window appears.
Deleting an instance record
Note: This is only a soft delete. When a record is set for deletion, the instance will be Suppressed from discovery and Staff suppressed. If the instance source is MARC, then the MARC LDR 05 will be set to “d”.
- Find the instance you want to delete and select it.
- In the Instance record details pane, click Actions > Set record for deletion.
- In the Confirm deletion of record dialog, click Confirm. The instance record is deleted.
Editing holdings records
- Find the instance with the holdings record you want to edit and select it.
- In the Instance record details pane, in the Holdings section, click View holdings.
- In the Holdings record window, click Actions > Edit.
- Make your desired changes to the holding record.
- Click Save and Close. The holding record is updated.
Duplicating holdings records
- Find the instance with the holdings record you want to edit and select it.
- In the Instance record details pane, in the Holdings section, click View holdings.
- In the Holdings record window, click Actions > Duplicate.
- Make your desired changes to the holding record.
- Click Save and Close. The holding record is duplicated.
Deleting holdings records
- Find the instance with the holdings record you want to edit and select it.
- In the Instance record details pane, in the Holdings section, click View holdings.
- In the Holdings record window, click Actions > Delete.
- In the Confirm deletion of holdings record dialog, click Delete. The holding record is deleted.
Editing an item record
- Find the instance with the item you want to edit and select it.
- In the Instance record details pane, in the Holdings section, click the Item barcode of the item.
- In the Item record details window, click Actions > Edit.
- Make your desired changes to the item record.
- Click Save and close. The item record is updated.
Duplicating an item record
- Find the instance with the item you want to duplicate and select it.
- In the Instance record details pane, in the Holdings section, click the Item barcode of the item.
- In the Item record details window, click Actions > Duplicate.
- Make your desired changes to the item record.
- Click Save and close. The item record is duplicated.
Deleting an item record
- Find the instance with the item you want to delete and select it.
- In the Instance record details pane, in the Holdings section, click the Item barcode of the item.
- In the Item record details window, click Actions > Delete.
- In the Confirm deletion of item dialog, click Delete. The item record is deleted.
Marking item status
- Find the instance with the item you want to change.
- In the Instance record details pane, in the Holdings section, click the Item barcode of the item.
- In the Item record details window, click Actions > Mark as ….
- In the Confirm item status dialog, click Confirm. The item record is updated and its Item status changes to the value selected.
Note: See Platform Essentials for more information on Item status.
Creating a new order
- Find the instance for which you want to add an order.
- In the Instance record details pane, click Actions > New order.
- In the Create order dialog box, you can enter an existing PO number to add a new purchase order line to an existing purchase order: Orders > Adding an order line to an order, or leave the PO number field black to create a new purchase order and purchase order line: Orders > Creating an order
Creating a new request
- Find the instance with the item you want to create a new request for and select it.
- In the Instance record details pane, in the Holdings section, click the Item barcode of the item.
- In the Item record details window, click Actions > New Request.
- In the New request window, Select a Request type. The options that appear depend on the Item status of the item you are requesting.
- Optional: Enter a Request expiration date. If the request is still open by the selected date, it closes and its status changes to Closed - Unfilled.
- In the Requester information box, either scan the requester’s barcode or enter the barcode and click Enter.
- If you do not have the requester’s barcode, click Requester look-up to search for the patron:
- In the Select User dialog, search for the requester.
- Once you find the requester, select them from the User Search Results list. They are applied to the request and their information appears.
- Select the Fulfilment preference.
- Select the Pickup service point or Delivery address, depending on your selection in the previous step.
- Click Save & close. The request is saved and the Request Detail pane appears. The patron receives an email notification saying their request was received by the library, if you have this notification configured.
8.3.1 - MARC authority
The MARC authority app allows the management of MARC authority records within FOLIO.
Definition of terms related to the MARC authority app:
- Access point. Element in a bibliographic record intended to be searched, e.g., contributor’s name, title, subject. Also referred to as a “heading.”
- Authority record. A record that records the authorized forms of names, subjects, and subject subdivisions to be used in constructing access points in MARC records, the forms of these names, subjects, and subject subdivisions that should be used as references to the authorized forms, and the interrelationships among these forms.
- Authorized access point. An access point that is represented by an authority record.
- Heading. Same as: access point.
- Reference. An entry in an authority record that points the user to either the authorized access point or a related authorized access point.
Permissions
The permissions listed below allow you to interact with the Inventory app and determine what you can or cannot do within the app. You can assign permissions to users in the Users app.
- MARC Authority: View MARC authority record. This permission allows the user to view authority records.
- MARC Authority: Edit MARC authority record. This permission allows the user to edit authority records.
- MARC Authority: Delete MARC authority record. This permission allows the user to delete authority records.
- MARC Authority: Create new MARC authority record. This permission allows the user to create authority records.
- quickMARC: View, edit MARC authority record. This permission allows the user to view and edit MARC authority records.
Keyboard shortcuts
Keyboard shortcuts allow you to perform actions in this app using the keyboard. See Platform Essentials > Keyboard shortcuts for more information.
Viewing a MARC authority record
The full MARC record opens in the third pane once you search for and select an authority record. The heading or reference you selected will be highlighted in the record.
Creating MARC authority records
Creating new MARC authority records via Data Import
MARC authority records can be created via Data import. To create one or more authority records via Data Import, see instructions on starting a data import job.
Creating new MARC authority records in the MARC Authority app
To create a new authority record in the MARC authority app, follow these steps:
- Open the MARC authority app.
- Click Actions > New.
- Follow instructions for editing authority records via quickMARC.
Editing MARC authority records
Updating MARC authority records via Data import
MARC authority records can be updated via Data import. To update one or more authority records via Data Import, see instructions on starting a data import job.
Editing MARC authority records via quickMARC
When viewing the MARC authority record you wish to edit, click Edit in the upper right. The record opens in edit mode.
In the Edit MARC authority record window, you can perform the following actions:
- Add a field. To add a field, click the +. The new field appears below.
- Delete a field. To delete a field, click the trash can icon. The field is deleted.
- Move a field up. To move a field up, click the up arrow in the row of the field you want to move. The field is moved one row up.
- Move a field down. To move a field down, click the down arrow in the row of the field you want to move. The field is moved one row down.
- Edit text within a field. Click into a field to make changes to the text. To add a literal dollar sign ($) in a field, enter {dollar}.
- Once you have made your desired changes, click Save & close. A confirmation record appears, and the record is updated.
Validations and restrictions
A subfield is defined by a $ (dollar sign).
Tags must consist of 3 numeric characters.
Indicators must consist of single characters.
The following validation rules and restrictions apply:
- Fields 001 and 999ff are system supplied and cannot be edited or deleted.
- 1xx is required and non-repeatable.
- The leader (LDR) field can be edited via dropdown menus under each position. Only Record status (Status, corresponds with position 05), Type of record (Type, position 06), Encoding Level (Elvl, position 17), and Punctuation policy (Punct, position 18) can be edited.
- No other validation is performed.
Deleting MARC authority records
To delete a MARC authority record, follow these steps:
- Click Actions > Delete
- In the Confirm deletion of authority record dialog, click Delete. The authority record is deleted.
Searching for authority records
You can search for MARC authority records in the Search & filter pane. Enter your search terms in the box and click Search. Select the Keyword drop-down list to search through one of the following:
- Keyword. Keyword search through the title, contributor, and identifier fields.
- Identifier (all). Keyword search through all identifier types.
- LCCN. Keyword search through all Library of Congress control numbers.
- Personal name. Keyword search through the personal name field. The search terms must be ordered as follows: Last Name, First Name, Initial.
- Corporate/Conference name. Keyword search through the name corporate/conference name field.
- Geographic name. Keyword search through the geographic name field. The search terms must be ordered as follows: City, State/Province, Country.
- Name-title. Keyword search through the name-title field. The search terms must be ordered as follows: Last Name, First Name, Title.
- Uniform title. Keyword search through the uniform title field.
- Subject. Keyword search through all subject fields. This may include a single term, phrase, or a group of terms.
- Children’s subject heading. Keyword search through all children’s subject heading fields.
- Genre. Keyword search through all genre/form fields.
- Advanced search. Keyword search through multiple fields.
Advanced Search
Advanced Search allows you to add additional requirements to your search.
To use Advanced Search, follow these steps:
- Select Advanced Search in the Search segment drop-down list on Search & filter pane. A pop-up box will appear.
- Enter a search term into the first box.
- On the same row, click the Contains all drop-down list and select an option from the list below:
- Exact phrase. Results include records that contain only an exact match to the search term.
- Contains all. Results include records that contain the entire search term, but individual words can appear in any order.
- Starts with. Results include records that include a field that starts with the search term.
- Contains any. Results include records that include any of the words included in the search term.
- On the same row, click the Keyword drop-down list and select a field. See searching for authority records for a list of fields.
- To enter search terms into additional rows, you must select an operator from the AND drop-down list.
- Click the AND drop-down list and select an operator from the list below:
- AND. Results include records containing all of the search terms.
- OR. Results include all records containing at least one of the search terms.
- NOT. Results do not include records containing the search terms in this row.
- Continue entering additional search terms and selecting the appropriate fields for each row.
- Click Search.
After performing a search, you can limit results by selecting any of the filters in the Search & filter pane.
When using filters, keep the following in mind:
- Multiple filters can be combined to limit searches further.
- Multiple values in the same filter are combined with “OR.”
- Multiple values in different filters are combined with “AND.”
Browsing authority headings and references
You can browse for MARC authority records in the Search & filter pane. Enter your search terms in the box and click Search. Select the Select a browse option drop-down list to search through one of the following:
- Personal name.
- Corporate/Conference name.
- Geographic name.
- Name-title.
- Uniform title.
- Subject.
- Genre.
Some filters can also be applied to Browse results:
- Authority source.
- References.
- Type of heading.
When using filters, keep the following in mind:
- Multiple filters can be combined to limit searches further.
- Multiple values in the same filter are combined with “OR.”
- Multiple values in different filters are combined with “AND.”
Exporting MARC authority records
MARC authority records can be exported in the same way that instance records are exported as MARC (See Exporting instances (MARC).
- Open the MARC authority app.
- In the MARC authority pane, find the records you want to export, and for each record, select the checkbox in the first column. Note that associated references in the results list will also be checked; the message at the top of the pane will display the accurate number of records selected.
- Click Actions > Export selected records (CSV/MARC). Depending on your browser and its configurations, the file automatically downloads or you are prompted to save it. The export is logged in the Data export app.
To view the exported records, follow the instructions in Retrieving data export results
Reporting
Users can generate reports within the MARC Authority app and retrieve them via Export Manager. Two reports are available, MARC authority headings updates and Failed updates: linked bibliographic fields.
The MARC authority headings updates report shows which MARC authority records’ 1XX fields have been updated during a particular date range. It contains the following fields: date and time that the authority record was last updated, original heading, new heading, original 1XX, new 1XX, authority source file name, number of bibliographic records linked, and the FOLIO account name of the record updater.
To generate the MARC authority headings updates report:
- Open the MARC authority app.
- Click Actions > MARC authority headings updates (CSV)
- Enter a start date and end date.
- Click Export
- Open the Export manager app.
- Locate the correct job and click its Job ID to download the CSV report.
The Failed updates: linked bibliographic fields report shows when a MARC authority record’s 1XX or 010$a field is updated but the linked bibliographic field(s) has not updated. It contains the following fields: date and time of the failed link, bibliographic title, bibliographic UUID, MARC tag of the bibliographic field that failed to update, linked authority identifier, and reason for error.
To generate the Failed updates: linked bibliographic fields report:
- Open the MARC authority app.
- Click Actions > Failed updates: linked bibliographic fields (CSV)
- Open the Export manager app.
- Locate the correct job and click its Job ID to download the CSV report.
8.3.2 - quickMARC
This section of the documentation contains links to external sites. Please be advised that these sites are not maintained by the FOLIO Documentation Group and may be aligned with a different FOLIO release.
quickMARC is FOLIO’s MARC editing tool, which allows you to make edits to instance and holdings records with underlying MARC records. For all instances or holdings whose source record is a MARC record you have the option to edit the MARC using quickMARC. quickMARC saves to Source Record Storage (SRS) and updates both the Source Record and the corresponding Inventory record. quickMARC has minimal validation and is best used in addition to other cataloging tools.
Note: quickMARC is a module that you can access through the Inventory app; it is not its own app. For more information, see Accessing quickMARC.
Definition of terms related to quickMARC:
- Instance record. A record that contains bibliographic and administrative information about a particular resource. The Instance record is what is known as the bibliographic record. They are mostly derived from full bibliographic records (in MARC or other formats) and are intended to provide information for library staff to identify and select records in order to perform work on associated holdings and items.
- Holdings record. A record that contains information such as location, call number, and volumes owned, that enables staff to locate and manage library holdings for materials in all formats. A Holdings record must be associated with an Instance record.
- SRS. Source Record Storage. A storage layer in FOLIO. If an instance or holdings has an underlying MARC record, then this record is stored in SRS.
Permissions
The permissions listed below allow you to interact with quickMARC and determine what you can and cannot do within the module. You can assign permissions to users in the Users app. If none of these permissions are assigned to a user, they are unable to see the quickMARC module or any related information.
The following are all the quickMARC permissions:
- quickMARC: Can Link/unlink authority records to bib records. This permission allows the user to link and unlink authority records to access points in bibliographic records.
- quickMARC: Create a new MARC holdings record. This permission allows the user to create new MARC holdings records.
- quickMARC: Create new MARC bibliographic record. This permission allows the user to create a new MARC bibliographic record.
- quickMARC: Derive new MARC bibliographic record. This permission allows the user to duplicate and create new MARC bibliographic records.
- quickMARC: View MARC bibliographic record. This permission allows the user to view MARC bibliographic records in the Inventory app.
- quickMARC: View MARC holdings record. This permission allows the user to view MARC holdings records in the Inventory app.
- quickMARC: View, edit MARC bibliographic record. This permission allows the user to view and edit MARC bibliographic records.
- quickMARC: View, edit MARC holdings record. This permission allows the user to view and edit MARC holdings records.
Accessing quickMARC
quickMARC is a module that is contained within the Inventory app. In order for an instance or holdings record to be viewed and edited in quickMARC, its source must be MARC.
Note: If an instance record was created manually in the Inventory app, then it doesn’t have an underlying MARC record and cannot be used with quickMARC.
- Open the Inventory app.
- Find the record you want to view or edit, and select it.
-To open an bibliographic record in quickMARC
In the Instance record details pane, click Actions > Edit MARC bibliographic record. The Edit MARC record window appears.
- To open a holdings record in quickMARC
Select View holdings, click Actions > Edit in quickMARC. The Edit MARC record window appears.
Editing a MARC record using quickMARC
To edit a MARC record, click on the appropriate Edit option, located in the Actions menu of an Inventory Instance or Holdings record. A MARC view of the record will display.
To edit a bibliographic record:
- Open the Inventory app.
- Find the record you want to view or edit, and select it.
- In the Instance record details pane, click Actions > Edit MARC bibliographic record.
To edit a holdings record:
- Open the Inventory app.
- Find the record you want to view or edit, and select it.
- In the Instance record details pane, select View holdings, click Actions > Edit in quickMARC. The Edit MARC record window appears.
In the Edit MARC record window, you can perform the following actions:
- Add a field. To add a field, click the +. The new field appears below.
- Delete a field. To delete a field, click the trash can icon. The field will be deleted.
- Move a field up. To move a field up, click the up arrow in the row of the field you want to move. The field is moved one row up.
- Move a field down. To move a field down, click the down arrow in the row of the field you want to move. The field is moved one row down.
- Edit text within a field. Click into a field to make changes to the text. To add a literal dollar sign ($) in a field, enter {dollar}.
- Once you have made your desired changes, click Save & close. A confirmation message appears and the record is updated. Alternatively, click Save & keep editing to save the current changes and stay in edit mode. Click Cancel to discard changes and exit the Edit MARC record window.
Linking to authority records
Link icons can display to the right of the following MARC tags: 100, 110, 111, 600, 610, 611, 650, 651, 700, 710, 711. These fields can be enabled or disabled for automatic linking at the tenant level with the linking-rules API end point.
Linking a single field to an authority record
To link a field to an authority record:
- Click on the link to the right of the selected field.
- In the MARC authority Search & filter modal, verify that the desired type of entity and authority source are selected.
- Search by text string or by identifier.
- Select and open the appropriate authority record from the results list.
- Click the Link button in the upper right.
The access point in the bibliographic record will exactly match the authorized access point in the authority record and the $0 will be populated.
The link icon to the right of the field is replaced with Unlink from MARC Authority record and View MARC authority record icons.
When a field is linked, all subfields that are part of the access point, as well as the $0 (identifier) cannot be edited.
To unlink a field from an authority record:
- Click on the Unlink from MARC Authority record icon to the right of the selected field.
- Click again on Unlink in the verification modal.
The field is no longer linked and all subfields can be edited.
Linking all access points in a bibliographic record to authority records
Access point fields must contain a $0 in order to be linked using this feature.
To link all access points in a bibliographic record to authority records:
- Click the Link headings button in the upper right.
The access points in the bibliographic record will exactly match the authorized access points in the authority record.
The link icon to the right of the field is replaced with Unlink from MARC Authority record and View MARC authority record icons.
When a field is linked, all subfields that are part of the access point, as well as the $0 (identifier) cannot be edited.
Fields must be unlinked individually from an authority record:
- Click on the Unlink from MARC Authority record icon to the right of the selected field.
- Click again on Unlink in the verification modal.
The field is no longer linked and all subfields can be edited.
Validations and restrictions
A subfield is defined by a $ (dollar sign).
Tags must consist of 3 numeric characters.
Indicators must consist of single characters.
The following validation rules and restrictions apply when working with bibliographic records using quickMARC:
- Fields 005 and 999ff are system supplied and cannot be edited or deleted.
- The leader (LDR) can be edited using the dropdown menus under each position. Only Record status (Status, corresponds with position 05), Type of record (Type, position 06), Bibliographic level (BLvl, position 07), Type of control (Ctrl, position 08), Encoding level (ELvl, position 17), Descriptive cataloging form (Desc, position 18), and/or Multipart resource record level (MultlLvl, position 19) in the LDR can be edited. Invalid values in the LDR will result in an error message.
- 008 may be required based on the values entered in LDR Type and BLvl. The 008 field appears after LDR Type and BLvl are entered, and required positions’ dropdown menus are highlighted in red. 008 can be edited using the dropdown menus under each position.
- 245 is required and non-repeatable.
The following validation rules and restrictions apply to working with MARC holdings records in quickMARC:
- 001, 004, 005, and 999ff are system supplied and cannot be edited or deleted.
- The LDR must contain 24 characters, including null spaces.
- Only Record Status (Status, corresponds with position 05), Type of record (Type, position 06), Encoding Level (Elvl, position 17), and Item information in record (Item, position 18) can be edited in the LDR.
- 004 is required and non-repeatable, with no indicators or subfields.
- 004 must be a valid HRID for an instance record with source = MARC.
- 008 is required and can be edited using the dropdown menus under each position.
- 010 subfields must contain more than 3 characters.
- 852 is required; value in /$b must match a valid location code.
Record status
The record status shows the state of the MARC record in relation to the corresponding Inventory record and the SRS. You can view the record status at the top of the Edit MARC record window. When a MARC record is saved in quickMARC, any changes made to the record are reflected in SRS and in the corresponding Inventory record.
There are three record statuses:
- Current. The record is up to date and should be the same as the Inventory record and SRS.
- In progress. A change has been made to the record that has not made it to the Inventory record and/or SRS yet.
- Error. Something is preventing an update from moving to the Inventory record or SRS.
Creating a new MARC record using quickMARC
Information on how MARC bibliographic fields are mapped to inventory instances is available in the FOLIO Wiki.
To create a new MARC bibliographic record for an item without an instance or SRS record:
- Click Actions > New MARC Bib Record.
- Filling in LDR field Type of record (Type, corresponds with position 06) and Bibliographic Level (BLvl, position 07) will add fillable form fields to the 008 field.
- Edit the new record following the instructions in Editing a MARC record using quickMARC.
To derive a new MARC bibliographic record:
- Start with an instance record that has an underlying MARC source record and the same Resource type and Format as the record you wish to create.
- Click Actions > Derive new MARC bibliographic record.
- Edit the new record following the instructions in Editing a MARC record using quickMARC.
To create a new MARC holdings record:
- Find the instance record to which you want to add holdings and select it. The instance source must be MARC.
- Click Actions > Add MARC holdings record.
- Edit the new record following the instructions in Editing a MARC record using quickMARC.
9 - Lists
The Lists app provides actionable lists in FOLIO at the point of need. Some use cases include:
- Create a custom list when a report isn’t available in FOLIO;
- Create lists of records across apps and record types;
- Enable actions and workflows on a list of records;
- Access a set of pre-generated (canned) lists.
Functionality of the Lists app includes:
- Lists persist, can be refreshed and edited;
- List data updated in near real-time;
- User-friendly process for building a query to create a list;
- Export records from a list as a .csv file;
- Each list can include up to 1.25 million records.
Definition of terms related to the Lists app:
- Record set: The set (or list) of records retrieved through a query.
- Operator: The function applied in a query to match records by selected field and inputted value.
- Value: The text and/or number(s) input to query records with a selected field and selected operator.
- Field: The identifier used to query records.
- Query: The search string used to generate a list that includes a field, operator, and value.
- Source: The FOLIO account used to create and save a list.
Permissions
The permissions listed below allow a user to interact with the Lists app and determine what the user can and cannot do within the app. If none of these permissions are assigned to a user, they are unable to see the Lists app or any related information. For more information on permissions, see Platform Essentials > Permissions.
The following are the permissions for the Lists app:
- Lists (Admin): All permissions. This permission allows a user to view, edit, refresh, export, and delete lists.
- Lists (Delete): Can create, edit, refresh, and delete lists. This permission allows a user to view, create, edit, refresh, and delete lists.
- Lists (Edit): Can create, edit, and refresh lists. This permission allows a user to view, create, edit, and refresh lists.
- Lists (Enable): Can view Lists. This permission allows a user to view Lists and List details.
- Lists (Export): Can create, edit, refresh, and export lists. This permission allows a user to view, create, edit, refresh, and export lists.
View a list
To view a list, open the Lists app. A list of Lists is displayed in the Lists pane.
Filters
The selection of lists in the Lists pane can be narrowed by applying filters. The Filter pane includes the following filters:
-
Status
- Active: An active list contains a query and a resulting record set.
- Inactive: An inactive list contains a query but no record set.
-
Visibility
- Shared: Shared lists can be accessed by all users with permissions to the Lists app in this organization.
- Private: Private lists can only be accessed by the user logged in.
-
Record Types
- Holdings: Record set of list includes holdings records.
- Instance: Record set of list includes instance records.
- Items: Record set of list includes item records.
- Loans: Record set of list includes loans.
- Organizations - contact info: Record set of list includes contact information for each organization.
- Organizations - vendor: Record set of list includes agreements for each organization.
- Purchase order lines: Record set of list includes information about purchase order lines (POLs).
- Users: Record set of list includes user records.
Select a list to view by highlighting and clicking on it in the Lists pane. The selected list opens in a new window.
The List information section displays details about the list.
- List name: Title of the list
- Description: A description of the list. This criteria is optional.
- Visibility: Shared or Private.
- Status: Active or Inactive
- Source: Username or FOLIO account used to create the list.
Query
Query details for the selected list appear in the Query section and include the query string, the number of records found by the query, and the number of items in the list.
Field headings
In a list, the fields for the record set display as column headings. Customize the display of column headings in the record set by checking or unchecking the field(s) in Actions > Show columns as appropriate.
To view the refreshed list, click Actions > Refresh List and click the View updated list link in the confirmation message.
Create a list
A new list must have List information and a Query assigned to establish the record set for the list. A Test query must be performed before the query can be run and saved.
To add list details for a new list, follow these steps:
- In the Lists pane, click on New.
- In the New List window, add the List name, Description, Visibility, and Status criteria in the List information section.
- Select the appropriate Record type for the list. Select the appropriate Record type for the list. Record types include Holdings, Instances, Items, Loans, Organizations - contact info, Organizations - vendor info, Purchase order lines, and Users.
Build a query
The Build query function in the Lists app allows the user to build a query for these record types: Holdings, Instances, Items, Loans, Organizations - contact info, Organizations - vendor info, Purchase order lines, and Users. The query string populates in the Query field as the query is built.
To set criteria and build a query for new list, follow these steps:
- Click the Build query button to open the Build query window.
- Select the Record type for the query.
- Select a Field from the Filter options list drop-down menu. The Fields available for selection in the Filter options are based on the Record Type.
- Select an Operator from the Select operator drop-down list. The operators available for selection are based on the Field.
- ==: Field equals the selected Value.
- !=: Field does not equal the selected Value.
- In: Field appears in the selected Value.
- Not in: Field does not appear in the selected Value.
- Is null/empty: Field is empty; it contains no data.
- Select a Value from the Select value drop-down list. The Values available for selection are based on the Record Type and Field.
- Click on the + icon to add additional lines to the query; Click on the trash can icon to delete a line from the query.
- Click the Test query button to preview the returned record set of the list.
Test query is required before the query can be run and saved whenever 1) creating a new list and building the query; and 2) editing the query of an existing list. Test query runs the query and displays the total number of records retrieved and a preview of the first 100 records in the record set.
- Click Run query & save. If saved successfully, a (Name of List) saved successfully message appears momentarily. Once the query is completed, a Refresh complete with (number of) records: View updated list at the top of the window.
- Click the View updated list link in the confirmation message to view the record set in the list.
- In a list, the fields of the record type display as column headings. The default display of column headings is based on the record type assigned to the list. Customize the display of column headings in the record set by checking or unchecking the field(s) in Actions > Show columns as appropriate for the selected record type.
Test query
Once a query is built, it must be tested before the query can be run and saved. Test query is required in the following scenarios:
- Creating a new list and building the query.
- Editing the query of an existing list.
Test query runs the query and displays a preview of the returned record set. The first 100 records are displayed in the preview pane and the total count of records appears at the top of the preview pane.
Update a record set in a list
The record set in a list is static, but the metadata of each record is updated in near real-time. If modification is made to a record outside of the Lists app, the record remains in the record set of the list. The updated record can be viewed by refreshing the list.
To refresh or update the record set in a list, follow these steps:
- Click Actions > Refresh list. The system will re-run the query. A Refresh complete with (number of) records confirmation message appears at the top of the screen.
- Click the View updated list link in the confirmation message to view the updated record set in the list.
Edit a list
To edit the List information in a list, follow these steps:
- Select the list in the Lists pane. The list opens a new window.
- Click Actions > Edit List.
- In the List information section, edit the List name, Description, Visibility, and/or Status fields as appropriate.
- Click Save. A List (List Title) was saved confirmation message will appear in the lower right corner of the screen.
To edit the Query in a list, follow these steps:
- Select the list in the Lists pane. The list opens a new window.
- Click Actions > Edit List.
- In the Query section, click Edit query. Make changes to Field, Operator, and/or Value as appropriate. The Query field displays a preview of the query as it is edited.
- If necessary, click on the + icon to add additional rows to the query or click on the trash can icon to delete rows from the query.
- Click the Test query button to see how many records are returned and to preview the record set of the list. See Test query for more information.
- Click the Run query & save button. A confirmation message, List_ListTitle_was saved will appear in the lower right corner of the screen.
Duplicate a list
To duplicate a list, follow these steps:
- Select the list from the Lists pane. The selected list will open in a new window.
- Click Actions > Duplicate List.
- Edit the List name, Description (optional), or change Visibility and Status, if appropriate.
- Edit the query, if appropriate, by clicking the Edit query button.
- Make changes to Field, Operator, and/or Value. The Query field displays a preview of the query string as it is edited.
- If necessary, click on the + icon to add additional rows to the query; click on the trash can icon to delete rows from the query.
- Click the Test query button to see how many records are returned and to preview the record set of the list. Test query is required when editing the query of a list before the new query can be run and saved.
- Click the Run query & save button. A confirmation message, List (Duplicate List Name) was saved will appear in the lower right corner of the screen.
If duplicating the list without making any changes, click Save. A confirmation message, List (Original List Name) - copy was saved appears in the lower right corner of the screen.
Delete a list
To delete a list, follow these steps:
- Select the list from the Lists pane. The selected list will open in a new window.
- Click Actions > Delete List.
- A confirmation modal appears: Are you sure you want to delete the list List Title?
- Click the Delete button to delete the list.
Export a list
A list can be exported from the Lists app and downloaded as a .csv file. To export a list, follow these steps:
- Select the list from the Lists pane.
- Click the Actions button. Select or deselect the column headings to display in your exported file.
- Click Actions > Export list (CSV) to download the list as a .csv file. When successfully completed, an Exported list … confirmation message appears in the bottom right corner of the screen.
- Depending on your browser settings, the exported list may be automatically saved in your Downloads folder.
10 - Bulk Edit
This section of the documentation contains links to external sites. Please be advised that these external sites are not maintained by the FOLIO Documentation Group and may be aligned with a different FOLIO release.
The Bulk Edit app allows a user to apply changes to multiple FOLIO records simultaneously.
Bulk edit can apply changes to these record types:
- Inventory - holdings
- Inventory - instances
- Inventory - items
- Users
Permissions
The permissions listed below allow you to interact with the Bulk Edit app and determine what you can or cannot do within the app. Permissions are assigned to users in the Users app. If none of these permissions are assigned to a user, they are unable to see the Bulk Edit app or any related information.
Bulk edit permissions, combined with other functional app permissions, allow a user to access specific areas of the Bulk Edit app. Depending on how your library runs bulk edit jobs, users may also need permissions in other modules, such as Export Manager, Inventory, Users, and Settings. For more information about permissions, see Users > Permissions.
The following are the permissions for the Bulk edit app:
- Bulk edit: In App - Edit user records. This permission allows the user to edit multiple user records in the Bulk Edit app.
- Bulk edit: Can build query: This permission allows the user to build and test a query, and preview matched records in the Bulk edit app.
- Bulk edit: Can view logs This permission allows the user to download and view logs in the Bulk Edit app.
- Bulk edit: In app - Edit inventory records This permission allows the user to edit a field in multiple inventory records in the Bulk Edit app.
- Bulk edit: In app - View inventory records This permission allows the user to view a list of inventory records in the Bulk Edit app.
- Bulk edit: Local - Edit user records This permission allows the user to edit a field in multiple user records in Bulk Edit using the CSV approach.
- Bulk edit: Local - View user records This permission allows the user to view a list of identified user records in Bulk Edit using the CSV approach.
Bulk edit methods
The Bulk edit app provides two methods for editing records:
-
Bulk edit: The Bulk edit approach is also referred to as In-app. This approach allows the user to set criteria for the bulk edit by uploading a list of record identifiers from a .csv file. Once the records are identified and matched, Bulk edit allows the user to designate an action for these records and commit the changes to the records in FOLIO’s user interface.
-
Bulk edit (Local): The Bulk edit (Local) approach is also referred to as CSV. This approach uses a .csv file to display records matching a selected Record identifier. Changes are made to the records and saved in the .csv file, and committed to FOLIO by uploading the edited .csv file.
Note that Microsoft Excel processes .csv files in ways that may change data unexpectedly, especially date and time fields. Reviewing the .csv data in a text editor helps ensure that no unexpected changes are made to records when using Bulk edit (Local).
Inventory - holdings
Identify records
The Bulk edit app accepts only .csv files for upload. Files should include only one column of record identifiers. If the file contains more than one column, the upload will not be successful and a Something went wrong message will display.
To set the criteria and identify records for bulk edit, follow these steps:
- In the Set criteria pane, ensure Record types is set to Inventory - holdings.
- In the Set criteria pane, select the Record identifier from the drop-down list. The record identifier you select should correspond to the type of record identifier in the .csv file.
- Either Drag and drop your .csv file into the Select a file box, or click or choose file to locate the file on your computer. The .csv file automatically uploads and searches for matching Holdings records.
Preview matched records
Once the file upload is complete, the matching Holdings records are listed in the Preview of record matched pane. To customize the column headings in the preview, click the Actions button. To add, check the box next to the column heading; to remove, uncheck the box or leave it empty.
Errors
The Error accordion contains a list of errors found when searching for the matched records, if any, and displays the errors in two columns:
- Record identifier. The identifier for the record that produced the error
- Reason for error. The reason the search did not result in a matched record.
Start bulk edit
Inventory - holdings records may be changed by using the Bulk edit or In-app approach. The fields that can be changed in holdings records using this approach include temporary holdings location, permanent holdings location, and suppress from discovery.
To start a bulk edit on the matched records, follow these steps:
- Click the Actions > Start bulk edit.
- Under Options, click the drop-down list and select the field you want to edit.
- Under Actions, click Select action and select the action you want to apply to the item records.
- To edit an additional field during the same bulk edit job, click the plus sign near the end of the row. Another row will appear under the existing row(s).
- To delete a row, click the trash icon at the end of the row you want to delete. The row is deleted.
- Click Confirm changes. A new window will appear with a preview of the first 10 records to be changed.
- To return to the bulk edit, click Keep editing. The window will close and you can continue editing.
- To preview the entire list of records, click Download preview. A .csv file is downloaded to your local device.
- To run the bulk edit job, click Save & close. The window closes and the banner at top of the Bulk edit pane displays the number of records successfully changed.
- To download the list of changed records, click the Actions button at the top right of the pane.
- Select Download changed records (CSV). The .csv file is downloaded to your local device.
Temporary holdings location
To bulk edit the temporary holdings location of the matched records, follow these steps:
- Under Options, select Temporary holdings location from the drop-down list.
- Click Actions to select Replace with or Clear field.
- For Replace with, click Select Location and select the temporary holdings location from the drop-down list or use the Location look-up.
- For Clear field, proceed to step 5.
Click Confirm changes.
- The Preview of records to be changed will pop up with options of Keep editing, Download preview, or Commit changes.
- The changes will be applied to the item records once Commit changes is clicked.
Permanent holdings location
To bulk edit the permanent holdings location of the matched records, follow these steps:
- Under Options, select Permanent holdings location from the drop-down list.
- Click Actions to select Replace with or Clear field.
- For Replace with, click Select Location and select the permanent holdings location from the drop-down list or use the Location look-up.
- Click Confirm changes.
- The Preview of records to be changed will pop up with options of Keep editing, Download preview, or Commit changes.
- The changes will be applied to the item records once Commit changes is clicked.
Inventory - instances
Identify records
The Bulk edit app accepts only .csv files for upload. Files should include only one column of record identifiers. If the file contains more than one column, the upload will not be successful and a Something went wrong message will display.
In the Set criteria pane, ensure Record types is set to Inventory - instances.
In the Set criteria pane, select the Record identifier from the drop-down list. The record identifier you select should correspond to the type of record identifier in the CSV file uploaded.
Either drag and drop your CSV file into the box, or click or choose file to locate the file on your computer. The .csv file automatically uploads and searches for matching Items records.
Preview matched records
Once the file upload is complete, the matching Instances records are listed in the Preview of record matched pane. To customize the column headings in the preview, click the Actions button. To add, check the box next to the column heading; to remove, uncheck the box or leave it empty.
Download Matched Records (CSV)
- Click the Actions button.
- From the drop-down menu, select Download matched records (CSV).
- Open the file on your local device.
- Edit the records and save the file on your local device. Make sure you save the file in CSV format.
Download Errors (CSV)
The Error accordion contains a list of errors found when searching for the matched records, if any, and displays the errors in two columns:
Record identifier. The identifier for the record that produced the error
Reason for error. The reason the search did not result in a matched record.
Start bulk edit
Inventory - instances may be changed by using the Bulk edit or In-app approach. The actions that can be done in instance records with this approach include Staff suppress and Suppress from discovery.
To start a bulk edit on the matched records, follow these steps:
- Click the Actions button.
- From the drop-down menu, select Start bulk edit.
- Under Options, click the drop-down list and select the option you want to execute.
- Under Actions, click Select action and select the action you want to apply to the instance records.
- To edit another field during the same bulk edit job, click the plus sign near the end of the row. Another row will appear under the existing row(s).
- To delete a row, click the trash icon at the end of the row you want to delete. The row is deleted.
- Click Confirm changes. A new window will appear with a preview of the first 10 records to be changed.
- To return to the bulk edit, click Keep editing. The window will close and you can continue editing.
- To preview the entire list of records, click Download preview. A .csv file is downloaded to your local device.
- To run the bulk edit job, click Commit changes. The window closes and the banner at top of the Bulk edit pane displays the number of records successfully changed.
- To download the list of changed records, click the Actions button at the top right of the pane.
- Select Download changed records (CSV). The .csv file is downloaded to your local device.
Staff suppress
To suppress the matched item records from staff view in the Bulk edit app, follow these steps:
- In the Bulk edit window, select Staff suppress from the Select option drop-down list.
- Select the appropriate Action from the Select action drop-down list.
- Set true: Suppresses the matched item records from staff view in the Bulk edit app.
- Set false: Unsuppresses the matched item records from staff view in the Bulk edit app.
- Click Confirm changesto apply the changes to the matched item records.
- An Are you sure? message appears in a new window with a Preview of records to be changed. An alert appears at the top of the window: *(Number of) records will be changed if the Commit changes button is clicked. You may choose Download preview to review all changes prior to saving.
- Click Keep editing to return to the Bulk edits window, Download preview to preview the changes before saving, or Commit changes to run the bulk edit.
Suppress from discovery
To suppress the matched instance records from discovery in the Bulk edit app, follow these steps:
- In the Bulk edit window, select Suppress from discovery from the Select option drop-down list.
- Select the appropriate Action from the Select action drop-down list.
- Set true: Suppresses the matched instance records from discovery.
- Set false: Unsuppresses the matched instance records from discovery.
- Once an action is selected, the Data defaults to apply the same Set true or Set false action to all holdings records and all items records. Click the appropriate checkbox(es) if you do not want the selected action to be applied to the holdings records and/or item records,
- Click Confirm changes to apply the changes to the matched ins records.
- An Are you sure? message appears in a new window with a Preview of records to be changed. An alert appears at the top of the window: (Number of) records will be changed if the Commit changes button is clicked. You may choose Download preview to review all changes prior to saving.
- Click Keep editing to return to the Bulk edits window, Download preview to preview the changes before saving, or Commit changes to run the bulk edit. The changes will be applied to the matched item records once Commit changes is clicked.
Inventory - items
Identify records
The Bulk edit app accepts only .csv files for upload. Files should include only one column of record identifiers. If the file contains more than one column, the upload will not be successful and a Something went wrong message will display.
- In the Set criteria pane, ensure Record types is set to Inventory - items.
- In the Set criteria pane, select the Record identifier from the drop-down list. The record identifier you select should correspond to the type of record identifier in the CSV file uploaded.
- Either drag and drop your CSV file into the box, or click or choose file to locate the file on your computer. The .csv file automatically uploads and searches for matching Items records.
Preview matched records
Once the file upload is complete, the matching Items records are listed in the Preview of record matched pane. To customize the column headings in the preview, click the Actions button. To add, check the box next to the column heading; to remove, uncheck the box or leave it empty.
Download Matched Records (CSV)
- Click the Actions button.
- From the drop-down menu, select Download matched records (CSV).
- Open the file on your local device.
- Edit the records and save the file on your local device. Make sure you save the file in CSV format.
Download Errors (CSV)
The Error accordion contains a list of errors found when searching for the matched records, if any, and displays the errors in two columns:
- Record identifier. The identifier for the record that produced the error
- Reason for error. The reason the search did not result in a matched record.
Start bulk edit
Inventory - items may be changed by using the Bulk edit or In-app approach. The fields that can be changed in item records with this approach include Administrative note, Check in note, Check out note, Item notes, Item status, Loan type, Location, and Suppress from discovery.
For more information about item record status changes available in Bulk Edit, see Supported Item Record Status Changes.
To start a bulk edit on the matched records, follow these steps:
- Click the Actions button.
- From the drop-down menu, select Start bulk edit.
- Under Options, click the drop-down list and select the field you want to edit.
- Under Actions, click Select action and select the action you want to apply to the item records.
- To edit another field during the same bulk edit job, click the plus sign near the end of the row. Another row will appear under the existing row(s).
- To delete a row, click the trash icon at the end of the row you want to delete. The row is deleted.
- Click Confirm changes. A new window will appear with a preview of the first 10 records to be changed.
- To return to the bulk edit, click Keep editing. The window will close and you can continue editing.
- To preview the entire list of records, click Download preview. A .csv file is downloaded to your local device.
- To run the bulk edit job, click Commit changes. The window closes and the banner at top of the Bulk edit pane displays the number of records successfully changed.
- To download the list of changed records, click the Actions button at the top right of the pane.
- Select Download changed records (CSV). The .csv file is downloaded to your local device.
Administrative note
To bulk edit the Administrative note in the matched records, follow these steps:
-
Under Options, select Administrative note from the drop-down list.
-
Click Actions to select the action you want to apply from the drop-down list.
- Add note. Input note text you want added.
- Remove all will delete any administrative notes in the item records..
- Find Input note text you want to find. Select Replace with and input new text or select Remove to remove the text.
- Change note type. Select the new note type.
-
Click Confirm changes. The selected action will be applied to the matched item records.
-
The Preview of records to be changed will pop up with options of Keep editing, Download preview, or Commit changes.
-
The changes will be applied to the item records once Commit changes is clicked.
Check in note
To bulk edit the Check in note in the matched records, follow these steps:
-
Under Options, select Check in note from the drop-down list.
-
Click Actions to select the action you want to apply from the drop-down list.
- Mark as staff only marks the item note as viewable by staff only.
- Remove mark as staff only removes the staff only designation for the item note.
- Add note. Input note text you want added.
- Remove all will delete any check in notes in the item records.
- Find input note text you want to find. Select Replace with and input new text or select Remove to remove the text.
- Change note type. Select the new note type you want.
-
Click Confirm changes. The selected action will be applied to the item records.
-
The Preview of records to be changed will pop up with options of Keep editing, Download preview, or Commit changes.
-
The changes will be applied to the matched item records once Commit changes is clicked.
Check out note
To bulk edit the Check out note in the matched records, follow these steps:
-
Under Options, select Check out note from the drop-down list.
-
Click Actions to select the action you want to apply from the drop-down list.
- Mark as staff only marks the item note as viewable by staff only.
- Remove mark as staff only removes the staff only designation for the item note.
- Add note. Input note text you want added.
- Remove all will delete any check in notes in the item records.
- Find. Input note text you want to find. Select Replace with and input new text or select Remove to remove the text.
- Change note type. Select the new note type you want.
-
Click Confirm changes. The selected action will be applied to the item records.
-
The Preview of records to be changed will pop up with options of Keep editing, Download preview, or Commit changes.
-
The changes will be applied to the matched item records once Commit changes is clicked.
Item notes
To bulk edit an item note in the matched records, follow these steps:
-
In the Bulk edit window, select the appropriate item note from the Select option drop-down list. The following types of item notes may be changed in the Bulk edit app:
- Action note
- Binding
- Copy note
- Electronic bookplate
- Provenance
- Reproduction
-
Click Actions to select the action you want to apply from the drop-down list. Actions available in the Bulk edit app include:
- Mark as staff only marks the item note as viewable by staff only.
- Remove mark as staff only removes the staff only designation for the item note.
- Add note. Input note text you want added.
- Remove all will delete any selected item notes from the item records.
- Find. Input note text you want to find. Select Replace with and input new text or select Remove to remove the text.
- Change note type. Select the new note type you want.
-
Click Confirm changes. The selected action will be applied to the matched item records..
-
The Preview of records to be changed will pop up with options of Keep editing, Download preview, or Commit changes.
-
The changes will be applied to the matched item records once Commit changes is clicked.
Item status
To bulk edit the item status field in the matched records, follow these steps:
- In the Bulk edit window, select Item status from the Select option drop-down list.
- For item status, Replace with is the only Action allowed in bulk edit and is pre-selected by default.
- Click Actions to select the item status you want to apply from the drop-down lis
- Click Confirm changes. The new item status will be applied to the item records.
- The Preview of records to be changed will pop up with options of Keep editing, Download preview, or Commit changes.
- The changes will be applied to the item records once Commit changes is clicked.
Loan type
To bulk edit the loan type in the matched records, follow these steps:
-
In the Bulk edit window, select the appropriate loan type from the Select option drop-down list. The following loan types may be changed in the Bulk edit app:
- Permanent loan type
- Temporary loan type
-
Click Actions to select the action you want to apply from the drop-down list.
- For permanent loan type, Replace with is the only Action allowed in bulk edit and is pre-selected by default.
- For temporary loan type, Replace with and Clear field are the actions available in bulk edit.
- Replace with. Replaces the loan type in the matched records with the loan type selected in the Select loan type drop-down list.
- Clear field. Removes the data in the loan type field of the matched records.
-
Select the new loan type from the Select loan type drop-down menu or use the Filter options list to select the new loan type.
-
Click Confirm changes. The selected action will be applied to the matched item records.
-
The Preview of records to be changed will pop up with options of Keep editing, Download preview, or Commit changes.
-
The changes will be applied to the matched item records once Commit changes is clicked.
Location
To bulk edit the Location in the matched records, follow these steps:
-
In the Bulk edit window, select the appropriate location from the Select option drop-down list. The following locations may be changed in the Bulk edit app:
- Permanent location
- Temporary location
-
Click Actions to select the action you want to apply from the drop-down list.
- Replace with: Replaces the location field in the matched records with the location selected in the Select loan type drop-down list.
- Clear field. Removes the data in the location field.
-
Click Confirm changes. The selected action will be applied to the matched item records.
-
The Preview of records to be changed will pop up with options of Keep editing, Download preview, or Commit changes.
-
The changes will be applied to the matched item records once Commit changes is clicked.
Suppress from discovery
To suppress the matched item records from discovery in the Bulk edit app, follow these steps:
-
In the Bulk edit window, select Suppress from discovery from the Select option drop-down list.
-
Select the appropriate Action from the Select action drop-down list.
- Set true: Suppresses the matched item records from discovery.
- Set false: Unsuppresses the matched item records from discovery.
-
Click Confirm changes to apply the changes to the matched item records.
-
An Are you sure? message appears in a new window with a Preview of records to be changed. An alert appears at the top of the window: (Number of) records will be changed if the Commit changes button is clicked. You may choose Download preview to review all changes prior to saving. Click Keep editing to return to the Bulk edits window, Download preview to preview the changes before saving, or Commit changes to run the bulk edit.
-
The changes will be applied to the matched item records once Commit changes is clicked.
Users
Identify records
The Bulk Edit app accepts only .csv files for editing record identifiers in a record. The .csv file used to set criteria must include only one column of record identifiers.
The Bulk Edit app accepts only .csv files for identifying records. The .csv file used to set criteria must include only one column of record identifiers.
There are two methods for identifying records for Bulk edit: Identifier and Query.
Identifier
To set criteria for bulk edit using Identifier, follow these steps:
- In the Set Criteria pane, select the Identifier button.
- Select Users under Record types.
- Select the record identifier type from the Select record identifier drop-down menu.
- The record identifiers for Users include:
- User UUIDs
- User barcodes
- External IDs
- Usernames
- Drag and drop your .csv file into the Select a file with record identifiers box, or click or choose file to upload the .csv file from your computer.
Query
The Query function in the Bulk Edit app allows the user to build a query to identify records for bulk edit.
To set criteria for bulk edit using Query, follow these steps:
- In the Set Criteria pane, click on the Query tab.
- Select Users under Record types.
- Click the Build query button to open the Build query modal.
- Select a Field from the Select field drop-down menu or filter the selection by typing the field in the Filter options list text box.
- Select an Operator from the Select operator drop-down list. The operators available for selection are based on the Field.
- ==: Field equals selected or input Value.
- !=: Field does not equal selected or input Value.
- Contains: Field appears in selected or input Value.
- Starts: Field starts with selected or input Value.
- >: Field is greater than the selected or input Value.
- <: Field is less than the selected or input Value.
- >=: Field is greater than or equal to the selected or input Value.
- <=: Field is less than or equal to the selected or input Value.
- Is null/empty: Field is blank; it contains no data.
- Select a Value from the Select value drop-down list or type the value in the Value text box. The Values available for selection are based on the Field and Operator.
- Click on the + icon to add additional lines to the query; Click on the trash can icon to delete a line from the query.
- Once a query is built, it must be tested before the query can be run and saved. Click the Test query button to run the query and display a preview of matched records. The query string can be edited in the Query string field. If edited, another Test query must be done.
- If the Test query is successful, click the Run query button to run the query and preview the matched records in the Bulk edit query modal.
Preview matched records
If the Identifier method is used to identify records for bulk edit, the number of records matched and the filename display at the top of the Bulk edit modal.
If the Query method is used to identify records for bulk edit, a Test query displays the Query string and number of records retrieved at the top of the Build query modal.
If the Query is run, the query and a preview of matched records display in the Bulk edit query modal.
In either method, the following information appears in the Preview of record matched pane:
- Username. The username of the user.
- Barcode. The barcode from the user record.
- Status. The status of the user.
- Patron group. The patron group assigned to the user.
- Last name. The last name of the user.
- First name. The first name of the user.
To include or remove record identifier columns in the preview pane, click Actions > Show columns, check the box next to the name of the record identifier to include as a column in the preview; or uncheck the box next to the name of the record identifier to remove the column from the preview.
Download matched records
To download the matched records as a .csv file, follow these steps:
- In the Preview pane, click Actions > Download matched records (CSV).
- Depending on the web browser settings, the .csv file may be opened and/or saved.
Download errors
If there are errors in the matched records, a message indicating the filename, number of entries, number of records matched, and number of errors display in the Errors section.
Any errors display in a two-column table in the Errors section.
- Record identifier. The record identifier for the records that produced the error.
- Reason for error. The reason why the error was produced.
To download the errors as a .csv file, follow these steps:
- In the Preview pane, select Actions > Download errors (CSV).
- Depending on the web browser settings, the .csv file may be opened and/or saved.
Start bulk edit
The data in the Email, Expiration date, and Patron group fields of matched user records can be replaced with new data by using the Bulk edit approach. Bulk edit may be performed on each of these fields individually or simultaneously. To bulk edit all three fields simultaneously, click the + icon at the end of the row to add another bulk edit option.
To start a bulk edit, follow these steps:
- In the Preview pane, click Actions > Start bulk edit. The number of matched records and the filename of the .csv file display at the top of the Bulk edit window.
- In the Bulk edits section, select Email, Expiration Date, or Patron Group.
- For Email, bulk edit performs a find and replace in the email address field of the matched records. Thus, the Actions available are Find (full field search) and Replace with . Type the current data (text) in the Find (full field search) box. Type the new data (text) in the Replace with box.
- For Expiration date, bulk edit replaces the date in the Expiration date of the matched records. Thus, the Actions available are limited to Replace with. Type the new expiration date in MM/DD/YYYY format in the Data box.
- For Patron group, bulk edit replaces the Patron group data in the matched records. Thus, the Actions available are limited to Replace with. Select the new Patron group from the Data drop-down menu.
- Click the Confirm changes button.
- A message appears in the **Are you sure?**modal. The message (Number of) records will be changed if the Commit changes button is clicked. You may choose Download preview to review all changes prior to saving. A Preview of records to be changed is also displayed.
- Click Keep editing to return to the Bulk edit window.
- Click Download preview to download a .csv file of the proposed changes.
- Click Commit changes to run the bulk edit.
- When the bulk edit is complete, a confirmation message, (Number of) records have been successfully changed, appears in the Bulk edit window.
- To change the column headings in the Preview of record changed table, click Actions and select or deselect the fields in the Show columns list as appropriate.
- To download a .csv file of changed records, click Actions > Download changed records (CSV).
Start bulk edit (Local)
The Bulk edit (Local) function allows the user to perform a bulk edit on records edited locally (external to FOLIO) by uploading a .csv file of the changed, or edited, records.
Any field in matching user records can be changed by using the Bulk edit (Local) approach.
Note that Microsoft Excel processes .csv files in ways that may change data unexpectedly, especially date and time fields. Reviewing the .csv data in a text editor helps ensure that no unexpected changes are made to records with Bulk edit (Local).
To use Bulk edit (Local) approach to apply changes to records, follow these steps:
- In the Set criteria pane, select Users as the Record type and select the appropriate Record identifier: User UUIDs, User barcodes, External IDs, or Usernames.
- Upload a .csv file with the selected Record identifier by either using the Drag and drop option or clicking the Choose file button.
- Select Actions > Download matched records (CSV) to download a .csv file of matched user records; or select Actions > Download errors (CSV) to download a .csv file of records that did not match your selected record identifier.
- Edit the downloaded .csv file and make changes to the user records in the file itself. Save the edited .csv file to your computer.
- Select Actions > Start bulk edit (Local).
- In the Bulk edit window, Drag and drop the .csv file into the Upload CSV file with edited records box, or click or choose file to upload the .csv file from your computer. If the .csv file is uploaded successfully, the confirmation message, (Name of File).csv successfully uploaded, displays in a new window.
- Click Next. The warning message, (Number of) records will be updated if the Commit changes button is clicked. appears in a new window.
- Click Commit changes. Bulk edit will apply the local changes to the records in FOLIO.
Logs
The Bulk edit app allows users to preview bulk edit logs based on set criteria and download a file associated with a bulk edit job.
Preview bulk edit logs
The options available for setting criteria include: Statuses, Record types, Started, Ended, and User.
To set criteria and preview bulk edit logs, follow these steps:
-
Click on the Identifier tab in the Set criteria pane.
-
Under the Statuses accordion, select the status for the bulk edit log by checking the appropriate box:
- New
- Retrieving records
- Saving records
- Data modification
- Reviewing changes
- Completed
- Completed with errors
- Failed
-
Under the Record types accordion, select the record type for the bulk edit log by checking the appropriate box:
- Inventory - holdings
- Inventory - instances
- Inventory - items
- Users
-
In the Started accordion, use the calendar icon or type in the date using the YYYY-MM-DD format in the From and To fields to limit the preview by the start date of the bulk edit. Click Apply.
-
In the Ended accordion, use the calendar icon or type in the date using the YYYY-MM-DD format in the From and To fields to limit the preview by the end date of the bulk edit. Click Apply.
-
In the Users accordion, select the user, or FOLIO account, that ran the bulk edit job from the Choose user drop-down list.
-
A preview list of bulk edit logs displays in the Bulk edit logs pane. The number of bulk edit logs in the preview displays at the top of the pane as (number of) records found. The column headings display the following criteria for each bulk edit log:
- Record type: type of records changed in the bulk edit job
- Status: status of the bulk edit job
- Editing: method of bulk edit used - In App or Local
- # of records: number of records retrieved for bulk edit
- Processed: number of records changed in bulk edit job
- Started: start date and start time of bulk edit job
- Ended: end date and end time of bulk edit job
- Run by: user or FOLIO account used to run the bulk edit job
- ID: system-generated number assigned to the bulk edit job
Download a bulk edit log file
In the Bulk edit app, a file used to run a bulk edit job can be downloaded and saved from the Bulk edit logs pane.
To download a file associated with a bulk edit log, follow these steps:
-
In the Bulk edit logs pane, click on the ellipses in the Actions column next to the appropriate bulk edit log.
-
Select the appropriate action from the Download drop-down list. The types of files available for download include:
- File that was used to trigger the bulk edit
- File with the matching records
- File with errors encountered during the record matching
- File with the preview of proposed changes
- File with updated records.
-
Depending on the web browser, the file can be opened or saved to your computer.
11 - Export manager
The Export manager app allows users to view manual or automated file exports for specific export operations. The Export manager app supports the following types of exports: Authority control, Bursar, Circulation log, eHoldings, Bulk edit, and EDIFACT orders. While these exports are initiated from other apps and areas of FOLIO, the Export manager app allows administrative staff to check on the status of scheduled exports, view error details, and download files for review.
Permissions
The permissions listed below allow you to interact with the Export manager app and determine what you can and cannot do within the app. If none of these permissions are assigned to a user, they are unable to see the Export manager app or any related information.
Note: For information on assigning permissions to users, see Assigning permissions to a user record.
The following are all the Export manager app permissions:
- Export manager: All. This permission enables the Export manager app for the user and allows the user to view and access logs, download files from the Export manager app, and download and re-send EDIFACT export jobs.
- Export manager: Download and re-send files. This permission allows the user to download and re-send EDIFACT export jobs.
- Export manager: View. This permission allows the user to view the Export manager, search and view logs, but not download generated files.
Since exports begin in other FOLIO apps, not in the Export Manager app, a user needs additional permissions to begin an export, but may download files given the Export manager: All permission.
Viewing export jobs
The Export manager app allows users to view export logs and reports initiated from the following apps or functions:
- Bulk edit
- Bursar
- Circulation log
- EDIFACT orders
- eHoldings
- MARC authority
Once an export is initiated in any of these areas, a log of the export appears in the Export manager app. The app’s Search & filter pane displays two tabs: All and Organizations. The Organizations tab supports EDIFACT order export, while all other supported exports are accessible using the All tab.
Column display in the results pane will vary based on the tab selected in the Search & filter pane.
The All tab results pane displays the following columns:
- Job ID. Identification number of the export.
- Status. Status of the export:: Scheduled, In progress, Successful, Failed.
- Job type. The type of export that resulted in the corresponding job. Job types include: Bursar, Circulation log, eHoldings, MARC authority headings update, EDIFACT orders export, Bulk edit identifiers, and Failed updates: Linked bibliographic fields.
- Description. A description of the file, if applicable.
- Source. The user who initiated the export. Entries may include ‘System’ for automated exports or ‘folio’ for jobs resulting from bulk edit or a re-run EDIFACT export.
- Start time. Date and time the export began.
- End time. Date and time the export finished.
Click on any column name, except Description and Source, to sort by that column.
The Organizations tab results pane displays the following columns:
- Job ID. Identification number of the export.
- Status. Status of the export:: Scheduled, In progress, Successful, Failed.
- Description. A description of the file, if applicable.
- Source. The user who initiated the export. Entries may include ‘System’ for automated exports or ‘folio’ for jobs resulting from bulk edit or a re-run EDIFACT export.
- Start time. Date and time the export began.
- End time. Date and time the export finished.
- Export method. This value corresponds to the Integration name on the associated Organization record’s Integration details.
Click on any column name, except Description and Source, to sort by that column.
For jobs with a status of Successful, click on the hyperlinked job ID to download the file.
To view additional details about the job, including Error details, click on the job row.
Searching and filtering jobs
You can search for jobs in the Search & filter pane. To search for a job by Job ID, enter your search terms into the box.
Search for logs by selecting any of the filters in the Search & filter pane. Additionally, you can apply the filters after you perform a search to limit your results. See the sections below for more information.
Status
To filter by Status, select a filter filter:
- Scheduled. This export has been scheduled, but not yet run.
- In progress. This export is currently running.
- Successful. This export has run to completion.
- Failed. This export could not be performed. Error details are available by clicking on rows with this status.
Job type
To filter by Job type, select a filter:
- Authority control. This export contains reports exported from the MARC authority app. Output format is .csv.
- Bursar. This export contains charges and/or refunds transferred to the bursar. Output format is .dat.
- Circulation log. This export contains search results from the Circulation log. Output format is .csv.
- eHoldings. This export contains package and title details from eHoldings. Output format is .csv.
- Bulk edit This export contains downloaded information from Bulk edit. Output format is .csv.
- EDIFACT orders export This export contains records exported from the Orders app in EDIFACT format. Output format is .edi.
System
To filter by whether or not the job was system-generated, select one of the following:
- Yes. The export was initiated automatically.
- No. A user manually initiated the export.
Source
To search for logs based on the user who initiated the export:
In the Search & filter pane, click Source.
Click Find user.
In the Select User dialog, search for the user.
Select the user you want to filter by.
Start time
To search for logs based on the date they started running:
In the Search & filter pane, click Start time.
Enter a start date in the From box and an end date in the To box.
Click Apply. The search results appear in the Export jobs pane.
End time
To search for logs based on the date they ended running:
In the Search & filter pane, click End time.
Enter a start date in the From box and an end date in the To box.
Click Apply. The search results appear in the Export jobs pane.
Export method
This filter is available only on the Organizations pane . To search for exports by export method:
In the Search & filter pane, click Export method.
Select the export method from the drop-down list.
The search results appear in the Export jobs pane.
Organizations
This filter is available only on the Organizations pane.
To search for exports associated with a specific organizations:
In the Search & filter pane, click Organization.
Click Organization look-up.
In the Select Organization dialog, search for the organization.
Select the organization you want to filter by. The search results appear in the Export jobs pane.
Errors in jobs
If a job has a status of Failed, click on the row to view additional information, including Error details.
Managing EDIFACT orders export jobs
A FOLIO tenant may be configured to support the export of EDIFACT orders to a vendor. This requires configuration of Integration details on the Organization record. All exports are recorded and accessible in the Export manager app under the Organizations pane . The file is available for download in FOLIO, with no expiry date. If a library needs a new copy of the EDIFACT file that was created, they must use the download or resend options within the Export manager app. The Resend action will send a new copy of the previously exported EDIFACT file to the organization’s FTP site, where the library and the vendor can once again access the file.
Resending an EDIFACT orders export job
To resend an export:
In the Search & filter pane, click Organization.
Locate the export you wish to resend and click on the row to access the export record.
Click Actions /> Resend.
A green toast message appears to indicate the file upload has started successfully.
Rerunning an EDIFACT orders export job
Rerunning an export job will trigger a new export job, generating a new file, containing different orders. The job will use the same configuration, but the results will appear different.
To rerun an export:
In the Search & filter pane, click Organization.
Locate the export you wish to rerun and click on the row to access the export record.
Click Actions /> Rerun.
The rerun export appears at the top of the export logs and the file can be downloaded by clicking on the new export record, and clicking Actions /> Download.
12 - Dashboard
This section of the documentation contains links to external sites. Please be advised that these sites are not maintained by the FOLIO Documentation Group and may not be aligned with the current release of FOLIO.
The Dashboard app is designed to enable a personalized view of key information from across FOLIO apps at a glance. In its first release (included in the Juniper flower release), the Dashboard includes the ability to display information from the Agreements and Licenses applications.
Information for developers wishing to take advantage of Dashboard functionality for their own apps is available at the Dashboard Documentation FOLIO wiki page.
Definition of terms related to the Dashboard app:
-
Dashboard. A dashboard is a screen which can display widgets. A user can have access to one or more dashboards within the dashboard app. A dashboard will have a set of configured widgets and also a User access list.
-
Widget. To display information on your dashboard, you need to add widgets. Widgets can fetch and display information from FOLIO applications or other sources. There are different types of widget which are used depending on the type of information you want to display.
Widgets are often configurable by the user, so the same type of widget can be added multiple times but with a different configuration to display a different set of information. Users can decide which widgets are displayed on their dashboard, and the order in which they display. Each user has their own dashboard, so each user can configure the widgets they need in an appropriate way for their particular needs.
- User access list. Dashboards can be accessed by one or more users. Which users can access a dashboard is controlled by the user access list for the dashboard. Only users on this list can access the dashboard. Users can be added or removed from the user access list. There are three levels of access that a user can be granted in the user access list: View, Edit, Manage.
Permissions
There are two levels of permission control for dashboards. Firstly the Dashboard app permissions which determine the functionality the user has access to within the dashboard app. Secondly the user access level to each dashboard granted by the dashboard’s user access list determines what the user can do in relation to a particular dashboard.
Dashboard app permissions
The permissions listed below allow you to interact with the Dashboard app and determine what you can or cannot do within the app. You can assign permissions to users in the Users app. If none of these permissions are assigned to a user, they are unable to see the Dashboard app or any related information.
The following are the Dashboard permissions:
- Dashboard: Manage dashboard. This includes the permission to see and access the Dashboard app in the FOLIO interface and allows the user to:
** create, edit and delete dashboards.
** add, edit, remove, reorder and resize widgets on dashboards.
** add and remove users to/from the user access list for a dashboard.
** update the access level for a user in the user access list for a dashboard.
- Dashboard: Dashboard Administrator. This permission allows the user to access and make changes to all dashboards in the system as if they had been granted the ‘manage’ access level to the dashboard.
Dashboard access levels
The access levels determine what actions a user can carry out in relation to a particular dashboard.
If the user has no access level for a dashboard, they will not be able to access that dashboard (unless they have been granted the application permission “Dashboard: Dashboard Administrator.”).
Note that in order to access dashboards the user must have the application permission “Dashboard: Manage dashboard.” as well as having been granted an access level for the dashboard.
The following are the user access levels that can be granted for a dashboard:
- View. This allows the user to view the dashboard, including the widgets on the dashboard and the user access list for the dashboard, but not make any changes to the dashboard name or description, the widgets on the dashboard or the user access list for the dashboard.
- Edit. This allows the user the same dashboard viewing rights as the View access level and additionally allows the user to edit the dashboard name and description and add, remove or edit widgets on the dashboard. It does not allow the user to make any changes to the user access list for the dashboard.
- Manage. This allows the user the same view and edit rights as the Edit access level and additionally allows the user to add, remove and edit user access levels to the dashboard and to delete the dashboard.
Keyboard shortcuts
Keyboard shortcuts allow you to perform actions in this app using the keyboard. See Platform essentials > Keyboard shortcuts for more information.
Upon accessing the Dashboard application for the first time, the user is presented with a blank dashboard containing the text “Add a new widget to your dashboard.” To display information on the dashboard, the user must add a widget.
- In the Dashboard pane, click the Actions button and select New widget.
- In the New widget window, enter a Widget name for the widget. The widget name is used when displaying the widget on the dashboard.
- Select a Widget definition from the drop-down list.
- The widget definition determines the type of widget being added to the dashboard, and comes with its own configuration options.
- The widget definitions are created by the applications that support the dashboard, so which widget definitions are available depends on the applications you have installed in your FOLIO tenant.
- In the Quesnelia release the Agreements app comes with three dashboard widgets (“ERM Agreements,” “ERM Agreement Jobs,” and “ERM Agreement Lines”) and the Licenses app comes with one dashboard widget (“ERM Licenses”). There are examples of how you can use these four widget definitions to achieve a wide range of outcomes in the Example widget configurations documentation.
- Complete the required fields.
- Click Save & close. The widget is saved and appears in the Dashboard pane.
Hover your mouse pointer over the six dots on the upper-left corner of a widget. A hand icon will appear. You can now drag and drop the widget into the desired position on the dashboard.
Widget reordering via keyboard shortcuts is also supported. Use the Tab key until the widget you wish to move is highlighted, indicated by a solid bar across the top of a widget and an outline around the six dots on the upper-left corner of a widget. Press the spacebar to put the widget into move mode, then use an arrow key to move the widget left, right, up or down.
Hover your mouse pointer over the L shaped mark on the bottom-right corner of a widget. An arrow icon will appear. You can now drag and drop the corner of the widget to get it to the desired size
Widget resizing via keyboard shortcuts is also supported. Use the Tab key until the widget you wish to move is highlighted, indicated by a solid bar across the top of a widget and an outline around the six dots on the upper-left corner of a widget. Press the spacebar to put the widget into move mode, then use Shift+an arrow key to increase or decrease the height or the width of the widget.
Existing widgets can be edited to change their configuration.
The “Widget definition” cannot be changed when editing an existing widget (for example, you cannot change an ERM Agreements widget into an ERM Licenses widget), but all other aspects of the configuration, including the widget name, can be edited.
- Click the three dots at the top right of the widget and choose Edit from the menu that displays.
- Make the desired changes.
- Click Save & close. The widget changes are saved and appear in the Dashboard pane.
Deleting a widget is only deleting the particular widget configuration used for this widget and does not affect any other data in FOLIO. Once a widget has been deleted it cannot be recovered, and you would have to add a new widget and recreate the previous configuration to be able to get an identical widget back on your dashboard.
- Click the three dots at the top right of the widget and choose Delete from the menu that displays.
- Click Delete in the Delete widget dialog. The widget is removed from the Dashboard pane.
Adding dashboards
- In the Dashboard pane, click the Actions button and select New dashboard.
- In the New dashboard window, enter a Name for the dashboard. The dashboard name will be used to create the menu button for the dashboard. You can add a Description to the dashboard.
- Click Save & close. The dashboard is saved and appears as a menu button at the top of the Dashboard pane.
- See Adding widgets to populate your dashboard with widgets.
Note that when you add a dashboard you are automatically granted the Manage access level in the dashboard’s user access list.
Managing dashboards
Under manage dashboards, you can reorder your dashboards, as well as see your access level for each dashboard’s access level, and select a default dashboard.
Reordering dashboards
- In the Dashboard pane, click the Actions button and select Manage dashboards. You will be shown a list of your dashboards.
- Hover over the six dots to drag and drop the dashboards into the desired order.
- Click Save & close. The dashboard order is saved and appears in the Dashboard pane.
Selecting a default dashboard
The default dashboard is the one that will display by default when you first open the Dashboard app.
- In the Dashboard pane, click the Actions button and select Manage dashboards. You will be shown a list of your dashboards.
- Under the Default column, click the radio button next to your primary dashboard.
- Click Save & close. The primary dashboard will display by default when you first open the Dashboard app.
The Access level column displays whether you have View, Edit, or Manage access to the dashboard.
Managing user access to dashboards
Under manage user access, you can add a user, remove a user, or change a user’s access level to a dashboard.
Adding a user to a dashboard
- In the Dashboard pane, select the dashboard you wish to add a user to by clicking on the dashboard’s name in the dashboard menu button.
- Click the Actions button and select Manage user access.
- In the User access window, click Add user.
- In the Select user window, you can search for a user by name, barcode, username, or email, and filter by status and patron group.
- To add the user to your dashboard, click on the user in the User search results list. The user will appear in your list of users on the dashboard’s User access window.
- Select an Access level for the user. Access levels include: View, Edit, and Manage. See Dashboard access levels.
- Click Save & close. The dashboard will now appear in the added user’s dashboard menu button with the selected access level.
Removing a user from a dashboard
- In the Dashboard pane, select the dashboard you wish to remove a user from by clicking on the dashboard’s name in the dashboard menu button.
- Click the Actions button and select Manage user access.
- In the User access window, under the Remove column, click the trash can icon next to the user you wish to remove from accessing the dashboard.
- Click Save & close.
- In the Remove user(s) dialog, click Save & close. The selected user will no longer have access to the dashboard.
Editing dashboards
- In the Dashboard pane, select the dashboard you wish to edit by clicking on its name in the dashboard menu button.
- Click the Actions button and select Edit dashboard. You can edit the dashboard name and description. To edit the widgets on the dashboard, see Editing widgets.
- Make the desired changes. Note: if the dashboard is shared, any changes made will be visible to all users with access.
- Click Save & close. The dashboard changes are saved and appear in the Dashboard pane.
- In the Dashboard pane, select the dashboard you wish to delete by clicking on its name in the dashboard menu button.
- Click the Actions button and select Delete dashboard. Note: if the dashboard is shared, deleting the dashboard will remove access for the other user(s).
- Click Delete in the Delete dashboard dialog. The dashboard is deleted from your Dashboard pane.
13 - Reporting with LDP/Metadb
The Library Data Platform (LDP) is a project that develops an open-source platform which is utilized by both the FOLIO and ReShare projects to provide statistical and operational analytics. The LDP software extracts data from FOLIO modules into a relational database (informally called “the LDP” by many in the FOLIO community), making it possible to engage in complex reporting and analytics using FOLIO data. While some FOLIO apps have built-in reports or the ability to download results from a search-and-filter workflow, the LDP supports larger and more complex queries that combine data from across the FOLIO apps.
LDP is the current software platform. The next generation software platform Metadb has been released and has been adopted by some institutions. Metadb is a new streaming data integration platform intended to eventually replace LDP. Find detailed and very recent information about the platforms on the project website.
Some FOLIO apps include functionality that allows the user to download data as a CSV (comma separated values) file. For example, the Users app allows you to run an overdue loans report and download the results as a CSV file. See the documentation on individual apps for more details on this functionality where it is available.
The basic flow of data from FOLIO to LDP/Metadb is described in the figure below. The LDP/Metadb extracts data from the database used by FOLIO apps. From the LDP/Metadb, data flows into two types of queries: derived tables (which simplify the FOLIO data and save the results back into the LDP/Metadb) and report queries (which meet specific needs of report users). These queries are shared via the FOLIO Analytics query repository and also form the backbone of ad hoc querying.
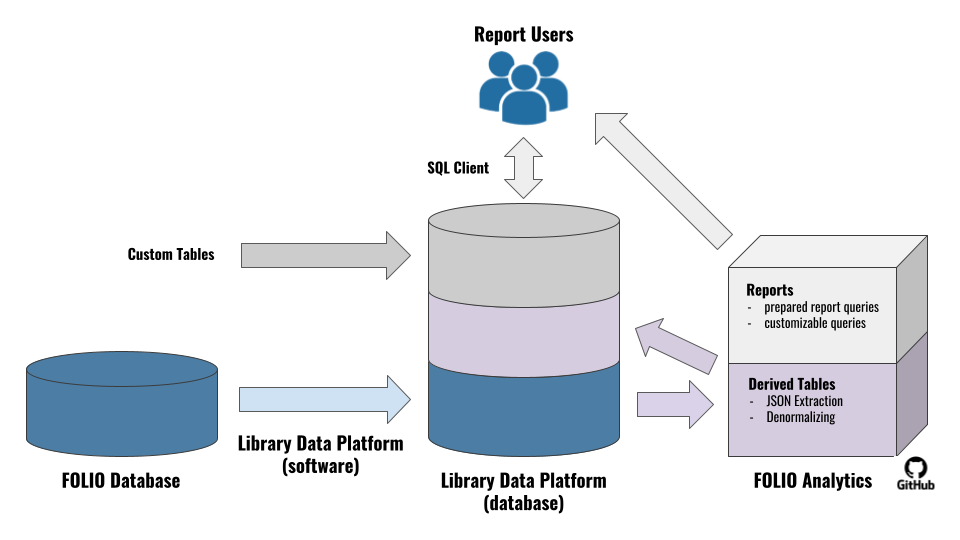
- Open-source software and query development
- Built on trusted database platforms
- Ability to create custom tables to import non-FOLIO data
- Historical tracking of FOLIO records
- Ability to connect from a wide variety of reporting applications
- Ability to perform cross-app FOLIO queries
- Ability to query FOLIO data without impacting production application performance
- Ability to query a simplified FOLIO data model through the use of derived tables
- Nearly real time data through streaming technique
- Expanded JSON data array extraction
- Full FOLIO data coverage
FOLIO Data Coverage in LDP
LDP utilizes the FOLIO APIs to get most of its content. To see more details about the APIs can be found at FOLIO Developers API documentation.
LDP pulls data from the following FOLIO modules*:
- mod-audit
- mod-circulation-storage
- mod-configuration
- mod-courses
- mod-email
- mod-feesfines
- mod-finance-storage
- mod-inventory-storage
- mod-invoice-storage
- mod-notes
- mod-orders-storage
- mod-organizations-storage
- mod-source-record-storage
- mod-users
Note: Metadb features full FOLIO data coverage.
13.1 - Reporting App
The Reporting app provides a FOLIO interface for interacting with an LDP database. There are two section to the app, the Query builder and Saved queries. The Query builder allows you to build a query with the option to save it for later use. Saved queries allows you to load a previous query into the Query builder to start editing or run.
Permissions
The permissions listed below allow you to set user permissions to interact with the Reporting app. You can assign permissions to users in the Users app. If none of these permissions are assigned to a user, they are unable to see the Reporting app or any related information.
The following are all the Reporting app permissions:
.
-
Reporting: all permissions – This permission allows the user to see and use the Reporting app.
-
Settings (Reporting): Can modify templated-query repos configuration
-
Settings (Reporting): Can modify reporting database connection details
-
Settings (Reporting): Can modify default record limits
-
Settings (Reporting): Can modify saved-query configuration details
-
Settings (Reporting): Can select which tables are available to search
Schema
Think of schema as the “buckets” in which data tables live. The schema drop-down menu allows you to select one schema at a time to use in your query. Three schemas are available: public, folio_reporting, and local. For a fuller explanation of schemas and examples of some defaults included see Library Data Platform - Using schemas.
Table
The Table drop-down menu allows you to select a data table from the schema you have selected to use in your query. Tables are where related data lives. Tables belong to a specific schema. With the schema and table selected, the other fields will unlock and update based on the selection.
Filter by column
The Filter by column drop-down menu allows you to refine your results by selecting a column and applying constraints. You can create multiple filters using the Add Filter button. When you use multiple filters, results are generated using the AND operator. Once you select a column to filter on, you may select equality and inequality operations in combination with a numeric value (e.g., a date or a count), TRUE, or FALSE. Operators include:
- equal to (=)
- not equal to (<>)
- less than (<)
- less than or equal to (<=)
- greater than (>)
- greater than or equal to (>=)
- TRUE (not case sensitive)
- FALSE (not case sensitive)
Here are some examples for filtering by column:
- find where previously_held = TRUE
- find where _version > 1
When entering date ranges, both YYYY-MM-DD and MM/DD/YYYY are supported. The LIKE and ILIKE operators, which allow pattern matching within character-based column data, will be included in a future release. LIKE is case-sensitive, while ILIKE is case-insensitive.
Show columns
The Show columns drop-down menu allows you to select one or more fields from the schema and table you have selected to show in your query results. By default all columns will be present. The list of columns you wish to include will build as you select each column from the drop-down menu.
To limit, simply click on the Show Columns drop-down and click on the listed fields.
To remove added fields you can either click on the x next to the field name in the box or from the drop-down list, click on the field again to deselect it.
Order by column
You can click the Add ordering criterion button to add one or more columns to use to order your results. Options such as ascending in the next field to the right will appear in a drop-down menu, which you may combine with additional options, such as Nulls at end in the third field to the right. If you wish to order on multiple columns you can click the Add ordering criterion button again. To remove a column sort click the trashcan icon.
Limit number of results
The Limit number of results drop-down menu allows you to restrict the number of rows returned in your query results to 1, 10, 100, or 1000. This is useful if you just want to see a sample of the full results set, especially if you expect the number of rows returned to be particularly large.
Save icon
The Save icon at the top right of the Query builder allows you to save a query once you have built it. Once saved, queries will appear in the list in the Saved queries section of the Reporting app.
Saved queries
The Saved queries section of the Reporting app lists queries that have been saved by Reporting app users by clicking the Save icon in the Query builder section of the Reporting app. Anyone with access to the Reporting app may click and run the queries in the Saved queries list. Queries may be removed from this list by clicking the trash can icon next to the individual query on the right end of the list.
13.2 - LDP and Metadb
In order for the LDP software to connect to FOLIO, it needs read-only access to Okapi and the FOLIO database. The LDP can be hosted and administered locally by an institution’s own staff or by contracting hosting services out to a third party. You can find specific system requirements in the LDP documentation.
Installing and configuring the LDP software*
There are three main software components to install for your LDP implementation: LDP2, ldpmarc, and Folio Analytics. In general, install the latest production release for the LDP and ldpmarc software components, which do not have a dependency on FOLIO (flower) software release versions. For FOLIO Analytics, see https://github.com/folio-org/folio-analytics/blob/main/README.md.
Documentation
For detailed information about how to set up and configure the LDP software, please review this link to access individual links to guides in the LDP repository. There you also will find the latest versions and fixes of the LDP software.
Setting up derived tables
To let report users take full advantage of the community-developed report queries as well as having a good starting point for ad hoc querying, it is strongly recommended to set up a nightly update on derived tables.
Note: use of views and materialized views is not supported in LDP databases and may cause the LDP software to be unable to perform data updates.
You can find instructions in Github on how to set up FOLIO Reporting Derived Tables.
Data privacy
The LDP software is designed to support GDPR and other data privacy requirements. Administrators can exclude a predefined set of tables.
See the Anonymization Guide for information on how to activate and configure these features.
The pages linked below list attributes that contain potential personal data:
Adding local data
As documented in the user guide, it is also possible to load and create local data into your LDP reporting database.
Using schemas
The concept of schemas allows you to organize tables and permissions within one database. In LDP we have initially four relevant schemas:
- public: contains all extracted tables and its current data from the bound FOLIO tenant
- history: stores data that have been updated in the past or may no longer exist
- folio_reporting: contains all derived tables created and supported by the community
- local: common area for report users to create or import own data
Besides using the local schema, you might consider setting up separate schemas for different report user groups or purposes. You are free to create more schemas for your local needs (e.g., to provide data for different departments or to separate and protect sensitive data).
Learn more about the schema concept and how to configure schemas using Postgres’s Schema Documentation.
For a granular setup of permissions, see also the built-in Roles and Privileges concepts of Postgres.
Moving and loading data
Loading and moving data into an LDP reporting database is as simple as it is for databases in general.
For Postgres there are two common approaches:
- COPY: SQL command for moving table data via csv files
- pg_dump / pg_restore: Postgres command line tools for importing and exporting data
The next generation software platform Metadb has been released and has been adopted by some institutions. Metadb is a new streaming data integration platform intended to eventually replace LDP. For installing and configuring Metadb follow the Metadb Documentation at the Library Data Platform - resources site.
13.3 - MARC Transformation
The marct tool is part of the Library Data Platform (LDP) project. The marct tool converts SRS/MARC records from JSON to tabular format in preparation for loading them into an LDP reporting database. SRS stands for Source Record Storage. MARC stands for Machine-Readable Cataloging, which is a standard format for storing data elements within bibliographic records in computer systems. Once the MARC data has been loaded into the reporting database, marct performs incremental updates to the data, which saves time on the data transfer from the transactional to the reporting database.
The marct tool reads the SRS MARC data from the database tables marc_records_lb and records_lb. Next, it transforms only the current versions of the records from these tables into tabular data. The transformed records are written to the folio_source_record.marc__t table.
Once the MARC data is transformed, the folio_source_record.marc__t table is ready to be used in queries that require MARC data from the reporting database. For example, the query below shows the contents of the MARC 008 field, which captures general bibliographic information about a library item.
SELECT
	sm.instance_hrid,
	sm.field,
	sm.content
FROM folio_source_record.marc__t AS sm
WHERE (sm.field = '008')
LIMIT 10
;
For detailed information about how to set up and configure the marct tool for LDP, please review the guide linked below:
Metadb includes native marct tables when it is installed. For information about how MARC data is transformed in Metadb, please review the guide linked below:
13.4 - FOLIO Analytics
Note: This documentation covers FOLIO Analytics v1.7.0, which was released at approximately the same time as the FOLIO Poppy release.
What is the FOLIO Analytics repository
The FOLIO Analytics repository contains reports and other analytics developed for FOLIO and designed to run on the Library Data Platform. Reports developed for FOLIO are stored as code written in Structured Query Language (SQL). The SQL queries can be opened inside of database querying software to pull data out of the LDP.
You can read an introduction to the repository at its overarching README file on GitHub. The file describes the following:
- The two types of SQL queries to be found in the repository:
- Report queries, which you can copy and paste to run on your LDP.
- Derived table queries, which simplify and speed up report queries. A derived table is simply a table created using data from one or more other tables. These queries are managed behind the scenes through LDP administration so that they run automatically and generate the derived tables in the database.
- Documentation for the queries.
- Examples of reporting applications that can be used to run the queries.
- How the queries are organized in the repository.
The first section below outlines how to make use of the report queries in the FOLIO Analytics repository to generate reports on FOLIO data. Other sections of the documentation cover administration of derived tables and use of derived tables for ad hoc querying.
Using queries from the FOLIO Analytics repository
FOLIO Analytics has releases aligned with FOLIO flower releases as well as monthly rolling releases. This allows institutions to match the FOLIO Analytics version to the FOLIO flower release that they’re running.
Report queries in the FOLIO Analytics repository are laid out in a particular structure that will make it easy for you to find the various areas you need as you build your knowledge of SQL.
- Introductory comments. Queries may start with a short block of text that is not part of the query. These “comments” often describe basic components of the query and give a brief description of the purpose.
- Parameters. To make things easier for the user, queries typically include a “parameters” section at the top that allows one to easily specify the values needed for filtering on a field.
- Subqueries. Queries may include several groups of smaller queries, which may be referred to as subqueries. These subqueries help simplify and rearrange different parts of the database to make the final query easier. (Note: The official term for these parts of the query is common table expressions, or CTEs. Calling them subqueries is meant to emphasize the role they play in the larger query.)
- Main query. The main query determines the final look of the report. Under the keyword
SELECT, you will see a list of the fields that will show up in the final report. After the keyword FROM, there is a list of the tables the fields are coming from. The keyword WHERE specifies the filters that should be applied to limit the rows in the report. Additional keywords may appear after the WHERE keyword to further customize the output of the report. Comments can appear throughout the query to provide instructions or clarifications.
Locating queries in the repository
Report queries for LDP are stored in the sql/report_queries folder of the repository and sql_metadb/report_queries for Metadb. Each subdirectory contains one or more SQL queries, along with documentation that describes the purpose and output of the queries.
Once you have located a desired report query, you can perform the following steps to run the query and generate a report:
- Copy the query code from GitHub.
- Open a database query tool.
- Connect to the LDP.
- Paste the SQL query code into a local file.
- Run the SQL query.
- Export the query results in the desired format.
The following section demonstrates this workflow using DBeaver, a database querying tool that has a free community edition and is available for Windows, Mac OSX and Linux operating systems.
Example of running a query using DBeaver
Copy the query code from GitHub
- In the sql folder of the FOLIO Analytics Repository, click on the report_queries folder.
- Click on the subfolder for the report you are interested in. For this example, open the ACRL Circulation query file by clicking first on the acrl subdirectory and then on the circulation subdirectory, and finally clicking on the acrl_circulation.sql file.
- To open the query file directly, click on the raw button located in the upper right corner of the file preview box.
- To copy the query code, type Ctrl-A (Cmd-A on Mac) to highlight all of the text, followed by Ctrl-C (Cmd-C on Mac) to copy the text.
- Install the DBeaver community edition corresponding to your operating system.
- Open DBeaver.
- To add your database connection, click on the New Database Connection button toward the top of the Database Navigator tab. It should look like an electrical plug with a plus sign.
- In the Select your database window that pops up, click on the PostgreSQL symbol and then click Next.
- Fill out the connection dialog:
- You will need to get the following information from your local LDP/Metadb administrator:
- Host (typically looks like a URL, like ldp.institution.edu)
- Port (typically 5432)
- Database name
- User name and password
- SSL mode (will likely be “require”)
Note that a hosted LDP/Metadb reporting database is currently available for the FOLIO community. It provides access to data from the FOLIO reference environment folio-snapshot and is updated hourly. For login info, please review the
Library Data Platform testbed documentation.
- In addition to the first page of connection details, you must click on the SSL tab to select “require” under SSL mode.
- Finally, expand Connection Settings in the sidebar on the left and select the Initialization subheading. In the settings on the right, make sure the Auto-commit check box is selected.
- When you are done setting up the connection, you can double click on the connection name in the Database Navigator tab to connect to the database.
Paste the SQL query code into a local file
- To create a new script file, either click on the New SQL Editor button in the toolbar (it will look like a document with a plus sign) or select New SQL script from the SQL Editor menu.
- If you have multiple databases, DBeaver may prompt you to select the one you want to query. Select the correct database and click on select. The new script window should show up on the right, with the script editor on the top and the results window (currently empty) on the bottom.
- Paste the copied query code from GitHub into the script editor. (Once you paste in your copy of the script, you can change it however you want. This is your copy of the SQL. Read more about tailoring queries below, and note that you should pay special attention to the “parameters” section in your query.)
- To save the query, select “Save As” from the “File” menu and navigate to your preferred directory, using a filename with “.sql” as the file extension.
Run the SQL query
- To run the query, either click on the Execute SQL Script button on the left side of the script editor (it should be the third button from the top and look like a document with a “play” symbol inside of it) or select Execute SQL Script from the SQL Editor menu.
- The results will hopefully then appear in the results panel below the script.
Note: When querying parts of the database with a lot of data, like the inventory tables, there may be a long delay before results are returned.
Export the query results as a CSV
- To export the results, right-click inside the results table and select Export data….
- Complete the data export wizard:
- Select “CSV” as the data transfer target type and click Next >.
- Adjust any data transfer settings and click Next >.
- Adjust any output settings (e.g., output directory, file name pattern) and click Next >.
- Confirm settings and click Start to export the file.
Tailoring queries
Many queries allow you to specify the correct values for report filters by editing the “parameters” sections at the top of the query. You should always review and update the parameters before running your query. If you do not update the values in the parameters section, the default values will be used, and in many cases these may be inappropriate for the data in LDP/Metadb.
To edit the parameter values, all you need to do is type in the measure value of interest between the single quotation marks at the start of one or more parameter lines. The values must be typed in exactly as they appear in the database. Possible values might be suggested in query comments (although those examples may not be in use at your institution). If you do not want to filter the data, you can remove anything between the single quotation marks.
To further tailor the query, consult the introduction to this section above to identify the different sections you may wish to review and modify. One edit you may want to make would be to add your own comments to guide yourself and others. Comment text will be gray (in DBeaver) and will not affect how the query runs. There are two ways to make comments. Typing -- will create a comment out of the rest of that particular line of the file. To create a comment that spans multiple lines, use /* at the beginning of the comment and */ at the end of the comment.
Another edit you may want to make would be to remove a field from the report. To do this, you can look for the SELECT keyword in the main query section (which is usually where you will see the longest list of field names). Inside the list of fields after that SELECT keyword, you can delete the lines that list fields you do not want to include. Just make sure that the last item in the list, the one that appears right before the FROM keyword, is not followed by a comma.
For more advanced query writing techniques, refer to the documentation on ad hoc querying using LDP or Metadb tables.
Troubleshooting queries
What to do if you do not get any results
- Check to see if a parameter was entered by the report writer that does not apply. If not, seek out additional training here or through your local (or the larger) FOLIO community.
What to do if there are errors
- Check to see if the error message indicates that a derived table is missing. These derived tables are stored in a schema called folio_reporting (LDP) or folio_derived (Metadb), so that schema name followed by a table name might appear in the error message. If a derived table is missing, contact your LDP/Metadb administrator.
- If you edited the query, check to make sure you don’t have a comma appearing at the end of a list, like the list of the fields that occurs after the
SELECT keyword.
- If you can’t determine what is causing the error, consult with your local LDP/Metadb administrator or either your local or the larger FOLIO Reporting community.
If the shared queries do not meet your needs, you can also develop your own “ad hoc” (or as needed) queries to pull data from LDP/Metadb. In addition to creating queries with different fields and table connections than the shared queries, ad hoc queries make it possible to connect FOLIO to other custom tables available in your local LDP/Metadb. Because LDP/Metadb is built on standard relational database software, you can build ad hoc LDP/Metadb queries in the same way you would build queries for any other database, such as writing an SQL query and using a database query tool to run the query.
Learning SQL
To develop ad hoc queries, you will need to write query scripts using Structured Query Language (SQL). The table below includes a few resources for learning SQL.
| Training Resource |
Description |
| The Data School: Learn Introductory SQL Concepts |
An interactive tutorial with an approachable style. The tutorial has built-in SQL evaluation, so you don’t need to set up a separate database tool to try the exercises. |
| Select Star SQL |
An interactive book that teaches SQL concepts using real-world datasets and problems. The book has built-in SQL evaluation, so you don’t need to set up a separate database tool to try the exercises. |
| SQL Murder Mystery |
The SQL Murder Mystery is designed to be both a self-directed lesson to learn SQL concepts and commands and a fun game for experienced SQL users to solve an intriguing crime. They also have a walkthrough for SQL beginners. |
| CodeAcademy: |
A course called Learn SQL and a list of SQL Commands. Without a Pro account, course features are limited. |
| Linked In Learning |
Linked In Learning provides access to several courses on SQL at many levels of expertise. Requires a paid subscription. |
After learning how to use SQL, there are a few resources that outline specifics of how LDP/Metadb organizes FOLIO data.
- The LDP User Guide. This guide includes details about writing SQL that works for the LDP data model; note especially the sections describing the data model, JSON queries, and the differences between the relational attributes and JSON fields. The guide also includes a section that describes the historical data functionality within the LDP, which allows users to compose queries that explore how FOLIO data records change over time.
- The Metadb User Guide This guide acts as a user and administrator’s guide to Metadb. It includes information about configuring Metadb as well as creating SQL queries using Metadb tables.
- SchemaSpy (LDP)./ SchemaSpy (Metadb) This SchemaSpy installation is attached to the LDP reference environment, which pulls data from the FOLIO snapshot reference environment. SchemaSpy gives a concise list of LDP/Metadb tables and fields and can be helpful when developing queries, if your local LDP/Metadb uses the same software version as the LDP reference environment.
- FOLIO Schema Parser. This lightweight FOLIO Schema Parser automatically populates a spreadsheet using FOLIO’s data schema documentation, connecting FOLIO fields to LDP tables and fields. It can be helpful as a tool for quickly looking up what fields are available from FOLIO apps and what LDP tables include those fields.
- Shared LDP derived tables./Shared Metadb derived tables The derived tables (found in the folio_reporting schema of the LDP or the folio_derived schema for Metadb) often serve as the best starting point for ad hoc queries. The derived tables combine and simplify the original FOLIO tables in ways that make query development much easier. You should work with your local LDP/Metadb administrator to determine how your local LDP/Metadb is using derived tables (e.g., what FOLIO Analytics release you are using, how frequently the derived tables are updated).
Sharing ad hoc queries
If your ad hoc query might be of use to other institutions, we encourage you to consider submitting it to the folio-analytics repository. Our contributing guidelines describe the requirements for new contributions to the repository.
Tips for using DBeaver to write an ad hoc query
Developing ad hoc queries using DBeaver follows a similar workflow to the example workflow above. You can either start with an existing report query or derived table query and modify it for your own uses, or you can write the SQL code from scratch.
An example of a simple ad hoc query might be:
SELECT
	group_name,
	COUNT(user_id) AS num_users
FROM
	folio_reporting.users_groups
GROUP BY
	group_name
;
This code specifies that the report should contain two columns: group_name and a column that stores a calculation of the count of values in the user_id column, which should appear in the query with the label “num_users.” The code then specifies that these columns are coming from the folio_reporting.users_groups derived table. Finally, it specifies that the data from the original table should be separated into separate groups using values from the group_name column, so that the num_users calculation is done separately for each group. The result is a table where each value of group_name is matched with a count of the number of users in that group.
As you are writing your query file in DBeaver, you may find it helpful to browse the LDP using the Database Navigator tab. For example, you can expand the connection, then expand the Schemas, then expand the folio_reporting (LDP) or folio_derived (Metadb) schema, then expand Tables to see the available derived tables. Each table can be expanded to see its available columns. To browse the data in a table, right-click on a table and select View Data. Use the same procedure to browse the tables and columns available in the various schemas.
13.5 - LDLite
LDLite is a tool that is part of the Library Data Platform project. It provides basic LDP data reporting functions without requiring the LDP reporting database server to be installed. It also can be used to supplement a LDP database with additional or real-time FOLIO data.
LDLite allows users to query FOLIO directly. Once connected to Okapi-based services, the LDLite software can provide some features of the full Library Data Platform software such as JSON transformation. The transformed data can be saved in an embedded database as a simple file on the user’s computer or into a shared database like the LDP database. Users must be running Python to install LDLite.
LDLite can also be used to report on MARC data retrieved from Source Record Storage (SRS). This feature is still in the experimental stages and not officially supported at this time. Instructions for setting up access to MARC data from LDLite are available on GitHub.
For more information about LDLite and access to the code base, see the GitHub repository.
14 - Consortium manager
This section of the documentation contains links to external sites. Please be advised that these external sites are not maintained by the FOLIO Documentation Group and may be aligned with a different FOLIO release.
The Consortium manager app allows libraries to share data and settings between multiple FOLIO tenants. A FOLIO tenant must be implemented with Enhanced Consortial Support (ECS) enabled in order to use Consortium manager. For more information about setting up an ECS-enabled tenant, see Steps to setup Consortia environment.
Definitions of terms related to Consortium manager:
- Affiliation: Association with a given tenant (e.g. a user’s “active affiliation” is the tenant in which the user is currently working)
- Central tenant: The administrative tenant when Enhanced Consortial Support (ECS) is enabled.
- Client: A library or a branch library.
- Consortium: An association of independent libraries and/or library systems established by formal agreement, usually for the purpose of resource sharing. Membership may be restricted to a specific geographic region, type of library (public, academic, special), or subject specialization.
- Enhanced Consortial Support (ECS): The underlying architecture that defines the relationship and interactions among multiple tenants.
- Member: An independent library’s or library system’s FOLIO tenant affiliated with a consortium in Consortium manager.
- Permission: A setting that allows users to perform specific functions in FOLIO.
- Permission set: A set of individual permissions.
- Primary tenant: A user’s home tenant; the tenant in which the user’s record was initially created in FOLIO.
- Shadow account: A user record existing outside of a member’s primary tenant. A shadow account is automatically created when a user record is affiliated with a member library in the consortium that is not that user’s primary affiliation.
- Shared: Settings that are shared between member libraries and managed at the central consortium level (e.g. shared settings, shared Instances)
- Service Point: A setting that libraries configure to support circulation functions. Each library must set up at least one service point.
- Tenant: A FOLIO client whose data are stored separately and are accessible and visible separately from other FOLIO clients.
Permissions
The permissions listed below allow the user to interact with the Consortium manager app and determine what the user can and cannot do within the app. If none of these permissions are assigned to a user, they are unable to see the Consortium manager app or any related consortial information.
For general information about permissions, see Platform Essentials > Permissions.
The following are the permissions for Consortium manager:
- Consortia API module - all permissions. This permission allows the user to use the Consortia API module to add or remove members in Consortium manager.
- Consortia: Assign and unassign affiliations. This permission allows the user to add or remove affiliations of other users.
- Consortia: View affiliations. This permission allows the user to view the affiliations of other users.
- Consortium manager: Can create, edit and remove settings. This permission allows the user to perform build, create, edit and delete actions via the Consortia manager BUT the user must have the correct permissions in individual tenants to carry out these actions.
- Consortium manager: Can share settings to all members. This permission allows a user to create settings that will be shared by all members and is only editable in the central tenant.
- Consortium manager: Can view existing settings. This permission allows a user to view all the settings of members they are affiliated with via the consortia manager.
- Inventory: Share local instance with consortium. This permission allows a user to share local instance records with consortium members.
Members
To view membership in Consortium manager, the user must be affiliated with the primary tenant of the consortium. To view membership, follow these steps:
- Select the primary tenant as the active affiliation in the top right corner if it is not already selected.
- To switch the active affiliation, click on the service point menu in the top right corner of the screen.
- Select switch active affiliation in the drop-down menu.
- Select the primary member from the Consortium members menu.
- Click Save & close.
- Click on the Select members.
- In the Select members window, the list of members in the consortia is displayed.
Members cannot currently be added or removed in Consortium manager, but membership details can be edited. For more information about editing membership, see Edit member details.
User type
User records include the same fields in all FOLIO tenants. However, user type is a required field for user records in an ECS-enabled environment.
In Consortium manager, user types include:
- Staff: Users who are employed by a library and must log into FOLIO to conduct library work. Staff accounts are assigned a primary tenant and a unique username. If the staff account is affiliated with multiple tenants, the username is used to log in at a single service point.
- Patron: Users who borrow library items. Patrons have user records in the Users app but do not log into FOLIO to manage their library accounts. They are assigned a primary tenant only and do not have any assigned affiliations or user permissions for other tenants in the consortium.
- Shadow: Shadow accounts serve as a representation of a user record and are automatically created by the FOLIO system in the central tenant whenever a staff user record is created. Shadow accounts display a user’s assigned permissions for a member tenant and allow management of permissions for the user record outside of the central tenant. If an affiliation is removed, the shadow account becomes inactive. If the staff user is deleted from their primary tenant, all of the user’s shadow accounts are also deleted from the member tenants.
- System: At least one system-level account must be in place in order to assign other roles and permissions.
For more information about creating a new user record manually, see Users > Creating a user record manually.
For more information about editing user records, see User > Edit a user record.
Affiliations
In an ECS-enabled tenant, each user must have an affiliation with at least one member library. The tenant in which the user record is initially created serves as the primary affiliation. When a user logs into FOLIO, the primary affiliation is set to active and displays in the top right corner of the screen.
When working in an active affiliation, the local data in that tenant is displayed as well as any data shared across the consortium.
Assign an affiliation
When a user record is created in an ECS-enabled environment, the user is automatically affiliated with the tenant in which the user record was created. This affiliation is the user’s primary affiliation.
To assign an additional affiliation to a user record, follow these steps:
- Search for the user record. For more information, see Users > Search for user records. Select the user record. It will open in a new pane.
- Click Actions > Edit to edit the user record.
- Open the Affiliations accordion.
- Click the Assign/unassign button.
- Check the box next to the Name of the member to assign the affiliation. One or more affiliations can be assigned in this step.
- Click Save & close.
Unassign an affiliation
A user’s primary affiliation and affiliation with the central tenant cannot be removed or changed, but affiliation with other members can be unassigned. Doing so sets the user’s status to Inactive for that member.
To unassign an affiliation with a member, follow these steps:
- Search for the user record. For more information, see Users > Search for user records. Select the user record. It will open in a new pane.
- Click Actions > Edit to edit the user record.
- Open the Affiliations accordion. The user’s primary affiliation appears in bold type.
- Click the Assign/unassign button.
- Find the member in the Affiliations window or use the Search & filter pane to search for a member or filter the list by Affiliation assignment status.
- Uncheck the box next to the Name of the member to unassign, or remove, the affiliation. One or more affiliations to member libraries, excluding the primary affiliation and affiliation with central tenant, can be unassigned in this step.
- Click Save & close.
Assign or unassign user permissions for an affiliation
Users may be assigned permissions for any assigned affiliations. To manage user permissions for an affiliation, the process is similar to doing so for a user record in an individual tenant, except the Affiliation option is displayed in the Permissions accordion of the user record and the appropriate affiliation must be selected. For more information on assigning or unassigning permissions, see Users > Assign or unassign permissions.
To assign affiliation permissions to a user record, go to the Users app and follow these steps:
- Search for the user record. For more information, see Users > Search for user records. Select the user record. It will open in a new pane.
- Click Actions > Edit to edit the user record.
- Expand the User permissions accordion.
- Select the Affiliation from the drop-down menu.
- Click on Add permissions.
- Select the permission(s) to assign by checking the box next to the permission or permission set name. You can also search and filter for a permission or permission set in the Search & filter pane and check the box next to its name in the Permissions pane.
- Click Save & close to save the permissions to the user record.
To remove affiliation permissions from a user’s record, go to the Users app and follow these steps:
- Search for the user record. For more information, see Users > Search for user records for user records.
- Select the user record. It will open in a new pane.
- Click Actions > Edit.
- Expand the User permissions accordion.
- Select the Affiliation in the Affiliation drop-down menu.
- Unassign permissions by any of these methods:
- Click on the X icon next to a permission to remove the permission for that affiliation.
- Or click on Add permission and uncheck the box next to Name in the Permissions window to unassign all of the permissions for that affiliation with one click.
- To remove all permissions for an affiliation, click on the Unassign all permissions button or unassign the affiliation. All permissions are removed for that user in that member’s tenant.
- Click Save & close to save the changes to the user record.
Shared Settings
In Consortium manager, some settings can be modified and centrally managed for all member libraries through the Share option. By sharing settings, member libraries apply a controlled vocabulary to ensure consistency in library records and transactions across the consortium.
The sharing option cannot be edited once the setting is initially created and saved. To change the sharing option in a setting, each of the relevant settings must first be deleted and then a new setting created with the appropriate sharing option. The Share option must be set when the setting is created and saved, and cannot be edited after the setting is initially saved. If Share is selected, the data fields, Source, Member libraries, and Update display as consortium, ALL, and SystemConsortia, respectively, indicating the setting can be managed in Consortium manager.
If a setting is not shared, it serves as a local setting for a specific member library in the consortium regardless of which member tenant was used to create it.
Shared settings are available in Consortium manager for these FOLIO apps:
Circulation
For resource sharing purposes, shared settings allow the same Request cancellation reasons to be used by all members.
To create a shared setting for Circulation, follow these steps:
- In the Settings pane, select Circulation
- In the Circulation pane, select Request cancellation reasons.
- Click the New button in the Request cancellation reasons pane.
- Fill out the Cancel reason, Description (internal), and Description (public) fields.
- Check the box next to Share.
- Click on Save in the Actions column.
- A Confirm share to all window appears with the message, Are you sure you want to share (Name of Note) with ALL members?
- Click Confirm to save the shared Circulation note.
To create a local (unshared) setting for Circulation, follow these steps:
- In the Settings pane, select Circulation
- In the Circulation pane, select Request cancellation reasons.
- Click on the Select members button in the Request cancellation reasons pane. Check the box in the Name column next to the member’s name to select the member for whom the local (unshared) setting will be created.
- Confirm the number of selected members. In the Settings for selected members can be modified at the same time window, the number of members selected will display at the top of the window.
- Click the New button in the Request cancellation reasons pane.
- Fill out the Cancel reason, Description (internal), and Description (public) fields.
- Do not check the box next to Share.
- Click on Save in the Actions column.
- A Confirm member libraries window appears with the message, (Name of Note) will be saved for the member libraries with an accompanying list of members.
- Click Confirm to save the local Circulation note.
Data Export
For troubleshooting purposes, the central tenant can view data export logs in another member’s tenant.
To view a data export log for a member library, follow these steps:
- Select the central, or primary, tenant as the active affiliation in the top right corner if it is not already selected. If the central tenant is not selected:
- Click on the user profile icon in the top right corner of the screen to switch the active affiliation.
- Select switch active affiliation in the drop-down menu.
- Select the primary member from the Consortium members menu.
- Click Save & close.
- In Consortium manager, select Data export in the Settings pane.
- In the Data export pane, select the Member for which you wish to view the logs.
- The Data export logs are listed in the Data export pane with these identifiers:
- File name: File name assigned by the FOLIO system.
- Status: Completed, Fail, or Completed with errors
- Total: Number of records requested for export
- Exported: Number of records exported
- Failed: Number of records not exported successfully
- Job profile: Description of data export job
- Ended running: Date and time the data export job finished
- Run by: FOLIO username of user who ran the data export job
- ID: Number assigned to the data export log by the FOLIO system
Data Import
For troubleshooting purposes, the central tenant can view imported records in another member’s tenant.
To view a data import log for a member library, follow these steps:
- Select the central, or primary, tenant as the active affiliation in the top right corner if it is not already selected. If the central tenant is not selected:
- Click on the user profile icon in the top right corner of the screen to switch the active affiliation.
- Select switch active affiliation in the drop-down menu.
- Select the primary member from the Consortium members menu.
- Click Save & close.
- In Consortium manager, select Data import in the Settings pane.
- In the Data import pane, select the Member for which you wish to view the logs.
- The Data import logs are listed in the Data import pane with these identifiers:
- File name: File name assigned by the FOLIO system.
- Status: Completed, Fail, or Completed with errors
- Records: Number of records imported
- Job profile: Description of data import job
- Started running: Date and time the data import job started
- Ended running: Date and time the data import job finished
- Run by: FOLIO username of user who ran the data import job
- ID: Number assigned to the data import log by the FOLIO system
Inventory
For Inventory purposes, shared settings allow the following Inventory settings to be used by all member libraries:
Instances
- Alternative title types
- Classification identifier types
- Contributor types
- Formats
- Instance note types
- Instance status types
- Modes of issuance
- Nature of content
- Resource identifier types
- Resource types
Holdings
- Holdings note types
- Holdings types
Items
- Item note types
- Loan types
- Material types
Instances, Holdings, Items
- Statistical code types
- Statistical codes
- URL relationship
Holdings, Items
To create a shared setting for Inventory, follow these steps:
- In the Settings pane, select Inventory
- In the Inventory pane, select the appropriate setting in the Instances, Holdings, Items, Instances, Holdings, Items or Holdings, Items sections.
- Click on the Select members button in the Request cancellation reasons pane. Check the box in the Name column next to the member’s name to select the member for whom the local (unshared) setting will be created.
- Confirm the number of selected members. In the Settings for selected members can be modified at the same time window, the number of members selected will display at the top of the window.
- Click the New button.
- Fill out the Name field for the new setting.
- Check the box next to Share.
- Click on Save in the Actions column.
- A Confirm share to all modal appears with the message, Are you sure you want to share (Name of Inventory Setting) with ALL members?.
- Click Keep editing to make additional changes or click Confirm to save the setting. A (Name of Inventory Setting) successfully created for ALL libraries appears in the bottom right corner.
To create a local (unshared) setting for Inventory, follow these steps:
- In the Settings pane, select Inventory
- In the Inventory pane, select the appropriate setting in the Instances, Holdings, Items, Instances, Holdings, Items or Holdings, Items sections.
- Click on the Select members button. Check the box next to the Name to select the member for whom the local (unshared) setting will be created. More than one member may be selected. To select all members, check the box next to Name.
- Confirm the number of selected members. In the Settings for selected members can be modified at the same time window, the number of members selected will display at the top of the window.
- Click the New button.
- Fill out the Name field for the new Instance note..
- Leave the box next to Share empty.
- Click on Save in the Actions column.
- A Confirm member libraries window appears with the message, (Name of Note) will be saved for the member libraries with an accompanying list of members.
- Click Confirm to save the local (unshared) setting.
Users
For user management and consortium management purposes, shared settings allow members to view, edit, and compare Permission sets, Patron groups, and Departments for all member libraries.
Permission sets
To view shared permissions, follow these steps:
- Select the central, or primary, tenant as the active affiliation in the top right corner if it is not already selected. If the central tenant is not selected, switch the active affiliation.
- Click on the user profile icon in the top right corner of the screen to switch the active affiliation.
- Select switch active affiliation in the drop-down menu.
- Select the primary member from the Consortium members menu.
- Click Save & close.
- In Consortium manager, select Users in the Settings pane.
- In the Users pane, select Permission sets.
- In the Permission sets pane, select the Member for which you wish to view the assigned permission set(s) from the drop-down menu. If the member is not displayed as an option, click on the Select members button and check the box next to the member’s Name in the Select members window.
- Select the Permission set to view its General information, including Permission set name and Description, Assigned permissions, and Assigned users in a new pane.
- Expand the Assigned permissions accordion to view the list of permissions included in the permission set.
To create a shared permission, follow these steps:
- Select the central tenant as the active affiliation in the top right corner if it is not already selected. If the central tenant is not selected, switch the active affiliation.
- Click on the user profile icon in the top right corner of the screen to switch the active affiliation.
- Select switch active affiliation in the drop-down menu.
- Select the primary member from the Consortium members menu.
- Click Save & close.
- In Consortium manager, select Users in the Settings pane.
- In the Users pane, select Permission sets.
- In the Permission sets pane, click ** the Select members button and check the box next to the name of each member for which the new permission will be created.
- Click Actions > New.
- In the New permission set window, add the Permission set name and a Description.
- Click the Add permission button. The new permission is added for each member in the consortium.
To compare shared user permission sets between two members, follow these steps:
- Select the central, or primary, tenant as the active affiliation in the top right corner if it is not already selected. If the central tenant is not selected, switch the active affiliation.
- Click on the user profile icon in the top right corner of the screen to switch the active affiliation.
- Select switch active affiliation in the drop-down menu.
- Select the primary member from the Consortium members menu.
- Click Save & close.
- Select Users in the Settings pane.
- In the Users pane, select Permission sets.
- In the Permission sets pane, click the Actions button and select Compare.
- The Compare window is divided into 2 panes, one for each member. Select the Member and Permission set for each member as appropriate.
- The lists of assigned permissions are compared side-by-side in the Assigned permissions accordion. Any assigned permissions that are unique to a member tenant are highlighted in yellow. Any assigned permissions that are common between member tenants are not highlighted.
To edit permissions assigned to a shared user permission set, follow these steps:
- Select the central, or primary, tenant as the active affiliation in the top right corner if it is not already selected. If the central tenant is not selected, switch the active affiliation.
- Click on the user profile icon in the top right corner of the screen to switch the active affiliation.
- Select switch active affiliation in the drop-down menu.
- Select the primary member from the Consortium members menu.
- Click Save & close.
- In Consortium manager, select Users in the Settings pane.
- In the Users pane, select Permission sets.
- In the Permission sets pane, select the Member for which you wish to view the assigned permission set(s).
- Select the Permission set to view its General information, including Permission set name and Description, Assigned permissions, and Assigned users.
- Expand the Assigned permissions accordion to view the list of permissions included in the permission set.
- Select the permission set. The permission set will open in a new pane.
- Click on the Edit button in the top right corner of the permission set pane. A new Edit: [Permission name] window opens.
- Expand the Assigned permissions accordion and click on the Add permission button. In the new window, select the appropriate permissions to add to the permission set by searching and filtering or checking the box by the permission’s name. More than one permission may be added to the permission set in this step.
- Click Save & close.
To remove, or unassign, a permission from a permission set:
- Expand the Assigned permissions accordion and click on the Add permission button. In the new window, uncheck the box next to the name of the permission to remove it from the permission set. More than one permission may be removed from the permission set in this step.
- Click Save & close.
To remove or unassign all permissions in the permission set:
- Click on the Unassign all permissions button.
- Click Save & close.
For more information about creating, editing, assigning, and unassigning permissions, see Users > Permissions.
To assign or unassign shared permissions to a user:
- Select the central, or primary, tenant as the active affiliation in the top right corner if it is not already selected. If the central tenant is not selected, switch the active affiliation.
- Click on the user profile icon in the top right corner of the screen to switch the active affiliation.
- Select switch active affiliation in the drop-down menu.
- Select the primary member from the Consortium members menu.
- Click Save & close.
- In Consortium manager, select Users in the Settings pane.
- In the Users pane, select Permission sets.
- In the Permission sets pane, select the Member for which you wish to view the assigned permission set(s).
- Select the Permission set to view its General information, including Permission set name and Description, Assigned permissions, and Assigned users.
- Expand the Assigned users accordion to view the list of users who have the permission set assigned to them.
- Click the Assign/unassign button.
- In the Select user window, search for the user by name or filter by Status or Patron group and select. For more information about searching for users, see Users > Search for user records.
- To add or assign a user to the shared permission, check the box next to the user’s name. To remove or unassign the user from the shared permission, uncheck the box next to the user’s name.
- Click Save.
Patron Groups
To view the shared Patron groups, follow these steps:
- Select the central tenant as the active affiliation in the top right corner if it is not already selected. If the central tenant is not selected, switch the active affiliation.
- Click on the user profile icon in the top right corner of the screen to switch the active affiliation.
- Select switch active affiliation in the drop-down menu.
- Select the primary member from the Consortium members menu.
- Click Save & close.
- Select Users in the Settings pane.
- Select Patron groups in the User pane.
- The list of Patron groups displays in the Patron groups pane. The identifiers, Description, Expiration date offset (number of days), Last updated, and Member libraries display in separate columns.
To create a shared Patron group for the consortium, follow these steps:
- Select the central tenant as the active affiliation in the top right corner if it is not already selected. If the central tenant is not selected, switch the active affiliation.
- Click on the user profile icon in the top right corner of the screen to switch the active affiliation.
- Select switch active affiliation in the drop-down menu.
- Select the primary member from the Consortium members menu.
- Click Save & close.
- Select Users in the Settings pane.
- Select Patron groups in the User pane.
- In the Patron groups pane, click the Select members button to select the member(s) for which you wish to create the shared setting. To select all members, check the box next to Name.
- Confirm the number of selected members. In the Settings for selected members can be modified at the same time window, the number of members selected displays at the top of the window.
- Click Save & close.
- Click the New button in the Patron groups pane.
- Fill out the Patron group, Description, Expiration date offset (number of days) fields.
- Check the Share box in the Member libraries column.
- Click Actions > Save.
To create a local (unshared) Patron group for the consortium, follow these steps:
- Select the central tenant as the active affiliation in the top right corner if it is not already selected. If the central tenant is not selected, switch the active affiliation.
- Click on the user profile icon in the top right corner of the screen to switch the active affiliation.
- Select switch active affiliation in the drop-down menu.
- Select the primary member from the Consortium members menu.
- Click Save & close.
- Select Users in the Settings pane.
- Select Patron groups in the User pane.
- In the Patron groups pane, click the Select members button to select the member(s) for which you wish to create the local, or unshared, setting.
- Confirm the number of selected members. In the Settings for selected members can be modified at the same time window, the number of members selected displays at the top of the window.
- Click Save & close.
- Click the New button in the Patron groups pane.
- Fill out the Patron group, Description, Expiration date offset (number of days) fields.
- Leave the Share box in the Member libraries column unchecked.
- Click Actions > Save.
To edit a Patron group, follow these steps:
- Click on the pencil icon in the Actions column.
- Make edits to the Patron group, Description, or Expiration Offset Date (number of days) fields.
- The Share box is grayed out because the sharing option cannot be edited once the setting is created and initially saved. For more information about changing sharing options in a shared setting, see Shared Settings.
- Click Actions > Save.
To delete a Patron group, follow these steps:
- Click on the trash can icon in the Actions column.
- A Delete patron group name of patron group] pop-up window appears with the message, The patron group (Patron Group Name) will be deleted.
- Click the Delete button to delete the patron group or click the Cancel to cancel the deletion.
Departments
To view the shared Departments, follow these steps:
- Select the central tenant as the active affiliation in the top right corner if it is not already selected. If the central tenant is not selected, switch the active affiliation.
- Click on the user profile icon in the top right corner of the screen to switch the active affiliation.
- Select switch active affiliation in the drop-down menu.
- Select the primary member from the Consortium members menu.
- Click Save & close.
- Select Users in the Settings pane.
- Select Departments in the User pane.
- The list of Departments displays in the Departments pane. The identifiers, Name, Code, Last updated, # of users, and Member libraries display in separate columns.
To create a shared Department for the consortium, follow these steps:
- Select the central tenant as the active affiliation in the top right corner if it is not already selected. If the central tenant is not selected, switch the active affiliation.
- Click on the user profile icon in the top right corner of the screen to switch the active affiliation.
- Select switch active affiliation in the drop-down menu.
- Select the primary member from the Consortium members menu.
- Click Save & close.
- Select Users in the Settings pane.
- Select Departments in the User pane.
- In the Departments pane, click the Select members button to select the member(s) for which you wish to create the shared setting. To select all members, check the box next to Name.
- Confirm the number of selected members. In the Settings for selected members can be modified at the same time window, the number of members selected displays at the top of the window.
- Click Save & close.
- Click the New button in the Departments pane.
- Fill out the Name and Code fields.
- Check the Share box in the Member libraries column.
- Click Actions > Save.
To create a local (unshared) Department for the consortium, follow these steps:
- Select the central tenant as the active affiliation in the top right corner if it is not already selected. If the central tenant is not selected, switch the active affiliation.
- Click on the user profile icon in the top right corner of the screen to switch the active affiliation.
- Select switch active affiliation in the drop-down menu.
- Select the primary member from the Consortium members menu.
- Click Save & close.
- Select Users in the Settings pane.
- Select Departments in the User pane.
- In the Departments pane, click the Select members button to select the member(s) for which you wish to create the local, or unshared, setting.
- Confirm the number of selected members. In the Settings for selected members can be modified at the same time window, the number of members selected displays at the top of the window.
- Click Save & close.
- Click the New button in the Departments pane.
- Fill out the Name and Code fields.
- Leave the Share box in the Member libraries column unchecked.
- Click Actions > Save.
To edit a Departments, follow these steps:
- Click on the pencil icon in the Actions column.
- Make edits to the Name and Code fields.
- The Share box is grayed out because the sharing option cannot be edited once the setting is created and initially saved. For more information about changing sharing options in a shared setting, see Shared Settings.
- Click Actions > Save.
To delete a Department, follow these steps:
- Click on the trash can icon in the Actions column.
- A Delete Departments [name of Department] pop-up window appears with the message, *The Departments (Department Name) will be deleted.
- Click Delete to delete the Department or click Cancel to cancel the deletion.
15 - Settings
In FOLIO, libraries use the Settings app to configure apps according to each institution’s unique needs. Most apps have associated settings in the Settings app, some of which are required and some of which are optional. However, some apps do not have explicitly associated settings, and some settings do not have explicitly associated apps, but are meant to support configuration for FOLIO as a whole.
Some settings have effects across multiple apps. For example, inventory settings for material types are used in circulation rules and are visible in loan records in Check Out and Users.
15.1 - Settings > Acquisition units
The Acquisition units section of the Settings app is where you can configure your acquisition units and assign users to the units you created.
Acquisition units are an additional layer you can add to acquisitions records that restrict a user’s ability to interact with those records unless they have been assigned to that unit. While acquisition permissions may allow a user to perform certain actions within a particular app to any record within that app, acquisition units can further limit user access to only individual records.
For example, a university that shares FOLIO across multiple independent libraries, such as a Law Library, Medical Center Library, and Undergraduate Library could set up separate acquisition units for each library and assign staff from each library to the appropriate unit. Only staff within an assigned acquisition unit could take allowed actions on orders, organizations, invoices, or funds that share the same acquisition unit assignment. Even if a Law Library user has permissions to create and delete records within the Finance app, they would still be restricted from creating or deleting a Medical Center Library fund if they are not assigned to the Medical Center Library acquisition unit.
Acquisitions units can be applied to the following types of records in FOLIO:
- Fiscal years
- Ledgers
- Groups
- Funds
- Invoices
- Orders
- Organizations
Permissions
In order to interact with acquisition units settings, a user needs to be assigned the following permission:
- Settings (acquisition units): Can view, edit, create and delete acquisition units. This permission allows you to view, edit, create, and delete acquisition units.
- Settings (acquisition units): Manage acquisition unit user assignments. This permission allows you to assign users to acquisition units.
- Settings (acquisition units): View. This permission provides view-only access to the acquisition units area of the Settings app.
Creating an acquisition unit
-
In the Acquisition units pane, click New.
-
Enter the Name of the unit in the box.
-
Select the types of actions members in the unit can perform:
- View. Users assigned to the unit are the only ones who can view records that have the unit assigned. If you want to allow all users to view the records that have this unit assigned, do not select this checkbox.
- Edit. Users assigned to the unit are the only ones who can edit records that have the unit assigned.
- Create. Users assigned to the unit are the only ones who can add the unit to a record they are creating.
- Delete. Users assigned to the unit are the only ones who can delete records that have the unit assigned.
- Click Save. The unit is saved and appears in the Acquisition units pane.
Assigning users to an acquisition unit
Note: Users can be assigned to more than one acquisition unit.
-
In the Acquisition units pane, find the acquisition unit you want to assign the user to and select it.
-
In the Acquisition unit detail pane, click Assigned users > Assign users.
-
In the Select User dialog, in the User search box, enter part or all of the user’s name.
-
Optional: Filter results by Status (Inactive/Active), or by Patron group.
-
Click Search.
-
Select the checkbox in the row of the users(s) you want to add to the unit and click Save. The Select User dialog closes and the user appears in the Assigned users section.
Deleting a user from an acquisition unit
-
In the Acquisition units pane, find the acquisition unit you want to delete the user from and select it.
-
In the Acquisition unit detail pane, locate the user you wish to delete under the Assigned users accordion.
-
Click the trash can icon at the end of their row. The user is removed from the list and deleted from the unit.
Editing an acquisition unit
-
In the Acquisition units pane, find the acquisition unit you want to edit and select it.
-
In the Acquisition unit detail pane, click Actions > Edit.
-
Edit the acquisition unit.
-
Click Save. The acquisition unit is updated.
Deleting an acquisition unit
Note: You cannot delete acquisition units that have users assigned to them. Acquisition units can be deleted if in use on records in acquisition apps. This may leave a broken reference on these records, so it is recommended to check for usage of the acquisition unit within these apps prior to deletion.
-
In the Acquisition units pane, find the acquisition unit you want to delete and select it.
-
In the Acquisition unit detail pane, click Actions > Delete.
-
In the Delete acquisition unit dialog, click Confirm. The acquisition unit is deleted and is removed from the Acquisition units pane.
15.2 - Settings > Agreements
The Agreements section of the Settings app is where you can partially customize the display of agreement records, create supplementary properties, and manage pick lists.
Permissions
In order to interact with Agreements settings, a user needs to be assigned the following permissions:
- Settings (Agreements): Can view and edit general settings. This permission allows the user to view and edit the Display settings in the General settings section of the agreements settings.
- Settings (Agreements): Manage agreement supplementary properties. This permission allows the user the ability to manage the available supplementary properties. It also grants all permissions included in “Settings (Agreements): Can view and edit general settings.”
- Settings (Agreements): Manage pick lists and values. This permission allows the user the ability to manage pick lists and pick list values. It also grants all permissions included in “Settings (Agreements): Can view and edit general settings.”
- Settings (Agreements): Can view app settings. This permission allows the user to view permissions to a set of “app settings” via the Settings. As of Lotus, the available app settings are to set up options for storing documents uploaded to the Agreements module in database (default) or S3 storage.
- Settings (Agreements): Can view and edit app settings. This permission allows the user to view and edit permissions to a set of “app settings” via the Settings. As of Lotus, the available app settings are to set up options for storing documents uploaded to the Agreements module in database (default) or S3 storage.
Settings > Agreements > Display settings
Use the settings in this section to turn certain features in agreement records on or off.
Hide internal agreements knowledgebase
If you are using an external knowledge base (for example, you are using EBSCO with the eHoldings app) and want to hide the internal knowledge base available in the Agreements app, select the Hide internal agreements knowledgebase checkbox. The checkbox is cleared by default.
Selecting the checkbox causes the following to happen:
- The E-resources tab in the Agreements app is hidden.
- The basket icon in the Agreements app is hidden.
- The E-resources covered by this agreement section does not appear in the agreement details pane.
Use this setting to control the number of lines to show per page (i.e. before showing the “Load more” button) in multi-column lists (tabular lists) across the Agreements application. The default value for all lists is 10. The multi-column lists affected are:
- Agreement view pane > Agreement lines
- Agreement view pane > E-resources covered by this agreement
- E-resource view pane > Options for acquiring e-resource
- Package view pane > E-resources in package
- E-resource view pane > Agreements for this e-resource
Display “Suppress from discovery” setting on
Use this setting to enable the Supress from discovery checkbox to display in agreement line records and/or package content item records. All checkboxes are selected by default.
Turning this setting on doesn’t automatically suppress agreement line records and/or package content item records. Rather, you are given the option to hide individual agreement line records and/or package content item records from your discovery layer when this setting is selected. For example, if you clear the checkboxes, then the Supress from discovery checkbox doesn’t appear on either record.
To enable the Suppress from discovery checkbox, follow these steps:
- To display the Suppress from discovery checkbox on agreement lines, select the Agreement lines checkbox.
- To display the Supress from discovery checkbox on package content items, select the Package content items checkbox.
To disable the Suppress from discovery checkbox, follow these steps:
- To disable the Suppress from discovery checkbox on agreement lines, clear the Agreement lines checkbox.
- To disable the Supress from discovery checkbox on package content items, clear the Package content items checkbox.
Hide accordions in agreement edit view
This setting allows institutions not using the eUsage module to not display the Usage data accordion in the Agreements edit screen.
Selecting the checkbox causes the following to happen:
- The Usage data module in the Agreements app is hidden.
Settings > Agreements > Supplementary properties
Supplementary properties are an optional way to record additional information about the agreement not captured anywhere else in the record. For example, the authentication method used to access the material covered by the agreement.
When you configure supplementary properties, the Supplementary properties section appears in your agreement records. Supplementary properties are similar to license terms. There are two types of supplementary properties you can create in FOLIO: primary and optional. Primary properties appear on every agreement record by default. Optional properties can be added on an agreement-by-agreement basis.
Creating a supplementary property
- Click New.
- In the New supplementary property box, fill in all the fields:
- Type. Select a property Type from the drop-down list: Decimal, Integer, Text, Pick list, Pick list (multi-select), or Date.
- Pick list and Pick list (multi-select). If the property type selected is Pick listor Pick list (multi-select), a pick list field displays. Select the Pick list you want to use from the drop-down list. For more information on pick lists, see Settings > Agreements > Pick lists.
- Label. The property name that appears when displaying the property to users in FOLIO. It is recommended that you create a short text string that clearly communicates the information recorded in the property. If you need to further explain the property, you should use the Description field.
- Name. Used when outputting property data in a machine readable format. It is not intended to be displayed to users (staff or patrons). It should be a short Latin alphabet string that can be used by any external systems or programs that access the agreement property data. Use of camelCase is suggested but not required. Changes to the Name affects any external systems using agreement property data and changes should not be made without consulting those responsible for relevant external systems and software.
- Description. Use to provide further explanation of the property. In the Agreements app, you can display the description by clicking the information icon next to the property’s label.
- Category. (Not required.) Supplementary properties can be categorized for Open Access and other uses. Each category will appear as a separate accordion when viewing or editing the agreement. You can also filter properties by category under the Category drop-down list, which contains any categories that you have allocated to properties. To add a category, click on the Category box. You are offered a list of existing categories that will filter as you type. You can add new categories by typing a new value and clicking the option to Add context . If you remove all occurrences of a category across all properties, it will be removed from the list of existing categories.
- Order weight. To determine the order in which the properties appear in the agreement record, enter a number. If you do not set a value and leave the order weight at 0 for each property, or they all contain the same number, then they are sorted alphabetically. When sorted alphabetically, uppercase letters are sorted before lowercase letters. For example, “Zebra” appears before “aardvark.”
- Primary property. Select whether the property is a primary property. Primary properties always display in agreement records. If you select No, then the property will be optional, and you have to manually add it to an agreement record whenever you want to use that property.
- Deprecated. Use to indicate if a property should be deprecated. If Yes is selected, then the property will be preserved in past agreements, but will not display in the list of available properties when adding properties to an agreement going forward.
- Default visibility. Select whether you would like the property to display internally within FOLIO, or externally to the public (for example, if you are setting up properties to display in your catalog).
- Click Save. A confirmation message appears, and the supplementary property is saved and appears in the Supplementary properties pane.
Editing a supplementary property
- Find the property you want to edit and click Edit at the top of its property box.
- Make your desired changes to the property.
- Click Save. A confirmation message appears and the property is updated.
Deleting a supplementary property
Note: You can only delete a property if it is not assigned to any agreement records.
- Find the property you want to edit and click Delete at the top of its property box.
- In the Delete supplementary property dialog, click Delete. A confirmation message appears and the property is deleted.
Searching a supplementary property
You can search for a supplementary property in the search box. To search for a property, enter the property in the search box and click Search.
You can also filter properties by category. Select a category from the Category drop-down list, and click Search. The drop-down list contains any categories that you have allocated to properties.
Settings > Agreements > Pick lists
A pick list is a customizable drop-down list used in the Agreements app. Pick lists are applied to Supplementary properties that have Pick list as their property type. Additionally, default pick lists like Status, Reason for closure, and Renewal priority can be found in this setting.
A multi-select pick list permits you to select multiple values from the pick list. All selected values will display in the agreement record.
Use this setting to establish the names of your available pick lists. Once you have named your pick lists, you can configure the values that are available in each pick list in Settings > Agreements > Pick list values .
Creating a pick list
Note: Pick lists cannot be edited once they are created. However, they can be deleted.
- Click New.
- Enter a name in the Pick list box.
- Click Save. The pick list is saved and appears alphabetically in the Pick list column.
Deleting a pick list
Note: You can only delete pick lists if they aren’t assigned to any agreement records. If they are currently being used, the trash can icon doesn’t appear in the Actions column.
- Find the pick list you want to delete.
- In the Actions column, click the trash can icon.
- In the Delete Pick list dialog, select Delete. A confirmation message appears and the pick list is deleted.
Settings > Agreements > Pick list values
Pick list values are the values available for selection within a pick list. You must first create the pick list in Settings > Agreements > Pick lists before creating its values.
Note: FOLIO contains default pick lists that can only have their values edited. These values cannot be deleted, and new values cannot be added. The New button appears grayed out and the trash can icon won’t be present for these pick lists.
Adding pick list values
- Select the Pick list to which you want to add values in the drop-down list.
- Click New.
- Enter a Label. The label appears as an option in the pick list.
- Click Save. The label is saved and its value is generated.
Editing pick list values
Note: If you edit a pick list value, only the Label changes and not the Value.
- Select the Pick list with the value you want to edit in the drop-down list.
- In the row of the value you want to edit, click the pencil icon.
- Edit the Label.
- Click Save. The label is updated.
Deleting pick list values
- Select the Pick list with the value you want to delete in the drop-down list.
- In the row of the value you want to edit, click the trash can icon.
- In the Delete Value dialog, click Delete. A confirmation message appears and the value is deleted.
Settings > Agreements > App settings
File storage
The Agreements app allows the uploading of files as part of the Supplementary documents functionality (note that a document does not require a file upload as the document can refer to a physical document or an online document with a URL). When a file is uploaded as part of a supplementary record, it will be automatically stored in one of two ways, depending on how the application has been configured.
Viewing and Editing the file storage settings requires appropriate permissions, which are as follows:
Settings (Agreements): Can view and edit app settings
The primary setting, which determines the overall method used for file storage, is the “Storage engine”. There are currently two valid values for the Storage engine setting:
- LOB
- S3
For information about using the LOB or S3 storage engines, please see: https://wiki.folio.org/display/FOLIOtips/File+storage+options
This FOLIO wiki page also contains information about switching storage engines and maximum file sizes.
15.3 - Settings > Calendar
The Calendar section of the Settings app is where you can manage open and closed hours for library service points.
Item check out workflows reference service points when calculating due dates. That means that the service point must have an existing calendar that covers the time period that the item could potentially be loaned for in order for the check out to be successful.
The Calendar section of Settings allows you to create a new calendar, edit existing calendars, duplicate existing calendars, and delete calendars. You can create a single calendar and assign it to multiple service points.
Permissions
To interact with Settings > Calendar, a user needs to be assigned at least one of the following permissions.
- Settings (Calendar): Can view existing calendars. This permission allows users to view, but not modify, service point calendars.
- Settings (Calendar): Can create and assign new calendars. This permission allows users to view calendars, create new calendars, and assign them to service points.
- Settings (Calendar): Can edit and reassign existing calendars. This permission allows users to view calendars, edit existing calendars, and change the service points those calendars are assigned to.
- Settings (Calendar): Can delete existing calendars. This permission allows users to delete calendars.
Settings > Calendar > All calendars
This area shows all calendars on your system, including those with end dates in the past, and what service points those calendars may be assigned to.
From here, a user with appropriate permissions can use the Actions menu to edit and/or duplicate an existing calendar, create a brand new calendar, or delete a calendar.
Settings > Calendar > Current calendar assignments
Use this option to see the calendars that are currently in effect for each service point in your FOLIO instance.
From here, you can click New to create a brand new calendar to assign to a service point.
Settings > Calendar > Monthly calendar view
Use this option to view a service point’s calendar for a particular month. Each day will show the service point’s open and closed hours. Schedule exceptions are emphasized with an exclamation mark.
View a calendar
To view a calendar, click on the calendar from All calendars or Current calendar assignments. The calendar will open in the fourth pane.
A calendar has five sections:
- Calendar information. This shows the calendar name, start date, end date, and record metadata.
- Service point assignments. This shows if the calendar is assigned to any service points.
- Hours of operation. This shows a table with open times and close times by weekday.
** If a weekday closing time extends into the next day between 12 AM and 4 AM, the open and closing time will both show on the opening weekday. These times are denoted with a
*.
** If a library is open for 24 hours over multiple days, the opening and closing times on those days will have dashes.
- Exceptions — openings. If a library has exceptions that change a service point’s open hours, the exception name will be shown alongside all start and end times.
- Exceptions — closures. If a library has exceptions that close a service point for one or more days, the exception name will be shown, along with the start and end dates.
Create a new calendar
To create a new calendar:
- Go to All calendars.
- Select Actions > New.
- Enter a Calendar name.
- Enter a Start date and End date.
- Select one or more Service points to assign the calendar to. You can also leave this option blank, and assign the calendar to a service point later.
Next, you will add open hours.
Hours are represented on the calendar as a table, each row representing a slot of Hours of operation - a period when the service point opened for service, and then closed.
If a service point opens on one day and then does not close until a future day, the Start day and End day of a particular row may be different days. This may happen if, for example, a library remains open overnight for students studying for final exams.
If a library’s standard hours include a day when it is completely closed, it is recommended that you still set a row for that day and designate the status as closed. For example, if a service point is always closed on Sundays, you would represent that day with a row with a status of Closed, a Start day of Sunday, and an End day of Sunday.
To add Hours of operation:
- From Status, choose Open or Closed.
- Choose the start day for your Hours of operation time slot.
- Choose the Start time when the service point opens. If the status of the row is Closed, you do not set a start time.
- Choose the End day when the service point closes. If your library remains open after 11:59 PM, your end day will be different than your start day.
- Choose the End time when the service point closes. If the status of the row is Closed, you do not set an end time.
- Click Add row to add additional rows as needed.
- When you are finished adding your hours of operation, click Save and close at the bottom to save your calendar.
If you make a mistake with a calendar row, click the Trash can under Actions to remove it and add a new time slot. When you save your changes, FOLIO will sort the rows so that they display in a standard week order.
Add exceptions to a calendar
Libraries will often have standard hours that apply for a long period of time, such as an academic semester, but also want to be able to change their hours for specific dates like local holidays or exam periods. Exceptions provide a way to override a service point’s regular hours.
A library can use exceptions to completely close a service point, or to change a service point’s hours. For example, a library may be open 9 AM to midnight Sunday through Saturday during the academic year, but only be open 9 AM to 5 PM Monday through Friday during Spring Break. Exceptions would allow them to set up the 9 AM to 5 PM schedule and apply it to a specific week.
There are two types of exceptions:
- Closures: Exceptional closures will close a service point from the start to the end date, inclusive. These can be applied to one or more calendar days.
- Openings: Exceptional openings can allow you to specify multiple date/time ranges, allowing you change opening and closing hours on a day.
To add an exception to a calendar:
- Under the Exceptions accordion, click Add row.
- Provide a Name for the exception period.
- From Status, choose Open to create an exceptional opening period, or Closed to create an exceptional closure period.
- Choose the Start date when the exception period begins. Note that unlike Hours of operation, you are specifying a specific date, rather than a generic day of the week.
- If the status of the row is Open, set a start time.
- Choose the End date when the exception period ends.
- If the status of the row is Open, set a close time.
If your exception has a status of Open, you can add additional date/time periods to the exception by clicking the + in the Actions column.
Example with Calendar Exceptions: Closing to celebrate the Chinese New Year.
Suppose a university library is open 9 AM to midnight seven days a week for the spring semester, but will be closed some days, and open for shorter hours other days, during the Chinese New Year holiday, from Saturday January 21 2023 to Sunday January 29 2023.
For the library main service point, they could do the following:
- Create a calendar named “Spring 2023 Main Library Hours.”
- Set a start date for the first day of classes in January, and an end date for the last day of classes in May.
- Assign the calendar to the service point “Main Library.”
- Under Hours of operation, create a row for each calendar day, with a status of “Open”, a start time of 9 AM, and an end time of 11:59 PM.
- Under Exceptions, create an exception named “Chinese New Year Holiday - First Weekend”. Set the status to “Closed,” with a start date of January 21 2023 and an end date of January 22 2023. This would close the library the first weekend.
- Create a second exception called “Chinese New Year Holiday - Weekday”. Set the status to “Open”. For the first row, set the start and end date to January 23 2023, with a start time of 9 AM and an end time of 4 PM. Then add a second row by clicking the + sign under Actions, and set the start date and end date to January 24, 2023, with a start time of 9 AM and an end time of 4 PM. Repeat this to add a row for each of the five days that week.
- Create a third exception called “Chinese New Year Holiday - Second Weekend.” Set the status to “Closed”, with a start date of January 28 2023 and an end date of January 29 2023.
- Click Save and close to save the calendar.
Once this calendar is created, it could then be reused in future years by duplicating the calendar and changing the dates, rather than creating the schedule again from scratch.
Duplicate an existing calendar
Instead of creating a service point calendar from scratch, you may want to duplicate an existing calendar and modify it instead.
To duplicate a calendar:
- In All calendars, click the calendar you wish to duplicate.
- Click Actions > Duplicate.
This will open a copy of that calendar for you to edit and then save. Note that you can save two calendars with the same name, but it is recommended that you use different names to reduce errors.
Edit an existing calendar
To edit an existing calendar:
- From All calendars, click the calendar you wish to edit.
- Click Actions > Edit.
Make changes as desired, and then click Save and close to save your changes.
Delete a single calendar
Users with appropriate permissions can delete FOLIO calendars.
Note that FOLIO will not warn you if deleting a calendar will leave a service point without an active calendar, and it will not warn you if deleting a calendar will leave a service point with a gap in calendar coverage in the future. Accordingly, before you delete a calendar, you should review the dates on the calendar and any service point assignments to ensure that you can address any gaps in calendar coverage.
To delete a single calendar:
- In All calendars, click the calendar you wish to delete.
- Click Actions > Delete.
- In the confirmation box, click Delete to confirm you wish to delete the calendar.
Purge old calendars
Over time, institutions may end up with a large number of historical calendars, and want to remove them to improve usability and performance. This can be done through the Purge old calendars function.
- Go to All calendars.
- Select Actions > Purge old calendars. A dialog will appear.
- From Purge calendars that ended…, choose a date option from the drop down.
- From And were, you can choose whether to include calendars that were assigned to service points or calendars that were not assigned to service points.
The dialog will show a preview of the calendars that will be deleted. Click Delete to remove them.
15.4 - Settings > Circulation
This section of the documentation contains links to external sites. Please be advised that these sites are not maintained by the FOLIO Documentation Group and may be aligned with a different FOLIO release.
The Circulation section of the Settings app is where you establish your loan policies, lost item policies, overdue policies, notices, and other circulation configurations.
Permissions
Each setting within Circulation has its own permission associated with it. If a user has one of the below permissions, they will be able to view and interact with that particular setting. You can assign permissions to users in the Users app.
The following are all the Circulation Settings permissions:
- Settings (Circ): Can create, edit and remove cancellation reasons: Allows the user to create, read, update, and delete request cancellation reasons.
- Settings (Circ): Can create, edit and remove circulation rules: Allows the user to create, read, update, and delete circulation rules.
- Settings (Circ): Can create, edit and remove fixed due date schedules: Allows the user to create, read, update, and delete fixed due date schedules.
- Settings (Circ): Can create, edit and remove loan policies: Allows the user to create, read, update, and delete loan policies.
- Settings (Circ): Can create, edit and remove lost item fee policies: Allows the user to create, read, update, and delete lost item fee policies.
- Settings (Circ): Can create, edit and remove notice policies: Allows the user to create, read, update, and delete patron notice policies.
- Settings (Circ): Can create, edit and remove other settings: Allows the user to read and update Settings > Circulation > Other settings.
- Settings (Circ): Can create, edit and remove overdue fine policies: Allows the user to create, read, update, and delete overdue fine policies.
- Settings (Circ): Can create, edit and remove patron notice templates: Allows the user to create, read, update, and delete patron notice templates.
- Settings (Circ): Can create, edit and remove request policies: Allows the user to create, read, update, and delete request policies.
- Settings (Circ): Can create, edit and remove staff slips: Allows the user to create, read, and update staff slips. Note: Users can erase the content of staff slips in the editor, but cannot delete the staff slip itself.
- Settings (Circ): Can edit loan history: Allows the user to edit settings in Settings > Circulation > Loan anonymization.
- Settings (Circ): Can view loan history: Allows the user to view settings in Settings > Circulation > Loan anonymization but does not allow editing.
- Settings (Circ): Can view loan policies: Allows the user to view loan policies but does not allow create, edit or delete.
- Settings (Circ): Can view lost item fee policies: Allows the user to view lost item fee policies but does not allow create, edit or delete.
- Settings (Circ): Can view overdue fine policies: Allows the user to view overdue fine policies but does not allow create, edit or delete.
- Settings (Circ): View circulation rules: Allows a user to view circulation rules but does not allow them to create, edit or delete rules.
- Settings (Circulation): Can view staff slips: Allows the user to view staff slips but does not allow editing of staff slips.
- Settings (Circulation): Title level request edit: Allows the user to enable, disable and configure title-level requesting. Note that title level requesting cannot be disabled via settings if there are any open title level requests.
Settings > Circulation > Circulation rules
Using Folio specific criteria and logic, libraries can create rules that determine how items circulate. Each circulation rule is made up of one or more criteria and the policies associated with those criteria. When a defined set of criteria matches a circulation action, the policies attached to those criteria are applied. You can find the guidelines for constructing circulation rules in the FOLIO GitHub Circulation rules documentation.
You can write circulation rules to determine the following:
- The groups of patrons that can borrow items.
- The rules for items in different locations, libraries, campuses, or institutions.
- The types of items (material types or loan types) that can be borrowed.
- The number of items of a particular type that a patron can borrow.
- The notices that are sent to patrons.
- The fines and fees that are charged.
Implementing Circulation rules
Before you implement Circulation rules, you need to configure these settings in FOLIO:
Before you begin to write your circulation rules, you should:
Creating circulation rules
Add your circulation rules to the Circulation rules editor. The editor contains responsive features that help you write the rules. For example, when you type a criteria letter, the Circulation rules editor facilitates your selection of the criteria value by displaying a drop-down list of the possible values for that criteria. Click Save once you have completed adding your circulation rules.
Circulation rule tips
When writing your circulation rules, keep the following in mind:
- You can use comments in the rules editor. Enter a # or / to add a comment line.
- When adding a criteria in the location tree, the Editor will provide a tool to allow you to pick from the location hierarchy, and then pull in the code value for you.
- Rules can be written in a nested format to make them easier to read.
- You can use keywords to match on all or none for a particular criteria.
- You can specify the priority order for criteria for cases where more than one rule matches.
Settings > Circulation > Other settings
Patron id(s) for checkout scanning
This setting allows you to specify what types of patron IDs can be scanned to checkout items. All options correspond to fields in the user record.
At least one of the options must be selected:
- Barcode.
- External system ID.
- FOLIO record number (ID).
- Username.
- User custom fields.
If you choose User custom fields, you can then select one or more custom fields that the Check out app would include when searching for patron records. Custom fields must be configured in Settings > Users before they can be selected here.
Automatically end check in and check out session after period of inactivity
This setting is turned on by default with an inactivity period of 3 minutes.
- Select the Automatically end check in and check out session after period of inactivity checkbox to turn the setting on.
- Enter the number of minutes of inactivity after which the session should end.
- Click Save.
Enable audio alerts
You can turn on audio alerts to signal to library staff when a checkout succeeds or fails. This setting is turned off by default.
Select Enable audio alerts to enable audio alerts. Select your desired audio-alerts theme from the drop-down.
Some libraries may want to use FOLIO and support circulating items that have the same barcode. These libraries may be migrating to FOLIO from a prior system that allowed duplicate barcodes or they may need to support consortial lending.
Since the inventory app requires unique barcodes, libraries with this scenario need to append a string to the barcode. That will make the barcode unique without changing the physical barcode on the item. The library then needs the Check in and Check out apps to know what to do if they search for the physical barcode on the item and it’s possible to retrieve more than one record.
If your library could potentially encounter duplicate barcodes as described, you can check this box to enable the Check in and Check out apps to use a wildcard search for item barcodes and present a modal if duplicate barcodes are found, so library staff can select the correct item.
Settings > Circulation > Staff slips
Staff slips allow you to configure the information that appears on your staff slips. You have the option of printing these slips when their associated action occurs:
- Hold. This slip is available through the Check in app, when you check in an item with a request.
- Pick slip. This slip is available in the Requests app, when you generate the pick slip report.
- Request delivery. This slip is available in the Check in app, when you check in an item with a delivery request.
- Search slip (Hold requests). This slip is available in the Requests app, when you generate the search slip report.
- Transit. This slip is available in the Check in app, when you check in an item that is in transit to another location.
Configuring a staff slip
- In the Staff slips pane, select the staff slip you want to configure.
- In the staff slip details pane, click Edit.
- Optional: Enter a Description in the box.
- Use the Display box to edit the slip. Click { } to add tokens to the slip.
- Optional: Click Preview to view a preview of the slip.
- Click Save & close. The slip is saved and updated.
Previewing a staff slip
- In the Staff slips pane, select the staff slip you want to preview.
- In the staff slip details pane, click Preview. A Preview of staff slip - [slip type] window appears and the preview is shown.
- Optional: To print the preview, click Print.
- To close the window, click Close.
Settings > Circulation > Fixed due date schedules
Fixed due date schedules are used in Loan policies when you want to have a loan period with a specific end date.
Creating a fixed due date schedule
- In the Fixed due date schedules pane, click New.
- In the Create fixed due date schedule window, enter a Fixed due date schedule name.
- Optional: Enter a Description in the box.
- In the Schedule section, enter a date range for the fixed due date by selecting dates in the Date from and Date to boxes. Items checked out during this date range will be due on the Due date selected in step 5.
- Enter the Due date that applies to all items checked out during the time range you selected above.
- Optional: To create additional date ranges, click New and repeat steps 4 and 5. If you need to delete a date range, click the trash can icon.
- Once you are finished creating your schedule, click Save & close. The fixed due date schedule is saved and appears in the Fixed due date schedules pane.
Duplicating a fixed due date schedule
- In the Fixed due date schedules pane, select the fixed due date schedule you want to duplicate.
- In the fixed due date schedule details pane, click Actions > Duplicate. A Create fixed due date schedule window appears with the same fixed due date schedule information.
- Edit the fixed due date schedule. Note that you must change the Fixed due date schedule name to a unique name.
- Click Save & close. The fixed due date schedule is saved and appears in the Fixed due date schedules pane.
Edit a fixed due date schedule
- In the Fixed due date schedules pane, select the fixed due date schedule you want to edit.
- In the fixed due date schedule details pane, click Actions > Edit.
- Edit the fixed due date schedule.
- Click Save & close. The fixed due date schedule is updated.
Delete a fixed due date schedule
- In the Fixed due date schedules pane, select the fixed due date schedule you want to delete.
- In the fixed due date schedule details pane, click Actions > Delete.
- In the Delete fixed due date schedule dialog, click Delete. The fixed due date schedule is deleted and a confirmation message appears. Note that you cannot delete a fixed due date schedule that is being used in a loan policy.
Settings > Circulation > Loan anonymization
When closed loans are anonymized, all related patron information is removed from the loan, but the action will still appear in the Circulation log.
Closed loans
Anonymize closed loans
Select one of the following options to determine if closed loans are anonymized:
- Immediately after loan closes. The anonymization process begins after the session is closed. Immediate anonymizing of loans runs on a schedule that can be determined by your system administrator or hosting provider.
- [Interval of time] after loan closes. Use the boxes to select the interval of time.
- Never.
Treat closed loans with associated fees/fines differently
If you want to treat loans with fees/fines differently, select Treat closed loans with associated fee/fines differently. The Closed loans with associated fees/fines section appears once the checkbox is selected. If the checkbox is cleared, then closed loans with associated fees/fines are treated according to the option you selected in Closed loans.
Closed loans with associated fees/fines
Anonymize closed loans
Select one of the following options to determine if closed loans with associated fees/fines are anonymized:
- Immediately after fee/fine closes.
- [Interval of time] after fee/fine closes. Use the boxes to select the interval of time.
- Never.
Exception for payment method
If you want to create exceptions for closed loans with associated fees/fines paid off using a certain payment method, follow these steps:
- Click Add exception to add an exception for a payment method.
- Select the Payment method.
- Select when you want to anonymize loans paid off with the payment method.
- Optional: Click Add exception to create additional exceptions. If you need to delete an exception, click the trash can icon.
- Click Save. The loan history settings are saved and a confirmation message appears.
Settings > Circulation > Loan policies
Loan policies determine how an item is treated if it is checked out, renewed, or requested. Loan policies include a wide variety of configuration options and are used in Circulation rules.
Loan policy behavior differs depending on the unit of time used for the loan period. If an item is checked out for minutes or hours, the loan is considered “short term.” If an item is checked out for days, weeks or months, the loan is considered “long term.” See Additional topics > Loans for more information.
Implementation considerations
You may find it beneficial to consider your current loan policies and lending rules and write policies to reflect your library’s typical loan behaviors. Loan policies are reusable in circulation rules, so you do not need to create multiples of the same type of policies to be applied to different patron groups, for example.
Before you begin configuring your loan policies, make sure you have set up your Fixed due date schedules, if you will be using schedules in your policies.
After you create your loan policies, you should test them to make sure they function as expected.
Creating a new loan policy
- In the Loan policies pane, click New.
- In the New loan policy window, enter a Loan policy name in the box.
- Optional: Enter a Description in the box.
- Use the information in the following sections to help guide you in creating loan policies. Different fields are available depending on the options you select in the policy.
- Click Save & close. The policy is saved and added to the Loan policies list.
Loans
Loanable. To create a non-circulating loan policy, clear the checkbox. Clearing the checkbox causes all other fields to disappear. Since loan policies are reusable, you only need one non-circulating policy.
Loan profile. Select the type of loan profile. Depending on your selection, you will see different fields.
- Select Fixed if items loaned out during a certain period of time are to have a fixed due date. For example, use this for items loaned until the end of the semester.
- Select Rolling if loans are for a defined period of time, including short term loans. For example, use this for items loaned for 28 days.
Depending on your selection for Loan Profile, you see different fields.
If you select Fixed, you see the following fields:
Fixed due date schedule. Select a fixed due date schedule, as configured in Settings > Circulation > Fixed due date schedules. The selected schedule determines the due date for the item. Note: Fixed due dates are only applicable for loans longer than 24 hours, and the calculated due date/time is set to 11:59 PM on the due date.
Closed library due date management. Select when the item is due if an item’s calculated due date lands in closed hours for the service point.
- The due date will follow the choice given in the loan policy only in the case that the service point is completely closed on the day that the item would be due. When the loan is created, FOLIO will check the service point calendar; if the service point is open for any time on the day that the item is due, FOLIO will set the due time to 11:59 PM on that day.
Grace period. Enter a grace period for overdue items. If you choose to have a grace period, items will not count against the Maximum number of overdue items patron block and there will be no overdue fine until after the loan due date/time plus the grace period interval. If the grace period expires and the item has not been returned, the grace period will count towards calculating an overdue or lost item fee/fine. Adding a grace period to a due date follows the same logic that you chose for closed library due date management, if the grace period lands in a closed time for the service point.
Item limit. Enter the maximum number of items that can be borrowed by one patron under this policy. Leave blank to have no item limit.
If you select Rolling, you see the following fields:
Loan period. Select an amount of time for the loan period.
Fixed due date schedule (due date limit). Select a fixed due date schedule, as configured in Settings > Circulation > Fixed due date schedules. The schedule is used to enforce a stop point on loans. For example, you may want to generally have 28 day loans, but have items that are borrowed 1-4 weeks before the end of the semester be due on the last day of the semester. This setting applies to both initial loans and renewals (unless over-ridden by having an Alternate loan period for renewals).
Closed library due date management. Select when the item is due if an item’s calculated due date lands in closed hours for the service point.
- If an item’s loaned interval is in minutes or hours, the due date will be determined by the loan policy.
- Opening time offset. For short-term loans (time intervals of minutes or hours), if you choose Move to the beginning of the next open service point hours then you need to enter the Opening time offset. The item will be due [Opening time offset] [Interval] after the service point opens if the item’s calculated due date lands in closed hours for the service point.
- If an item’s loaned interval is in days, weeks, or months, the due date will follow the choice given in the loan policy only in the case that the service point is completely closed on the day that the item would be due. When the loan is created, FOLIO will check the service point calendar; if the service point is open for any time on the day that the item is due, FOLIO will set the due time to 11:59 PM on that day.
Grace period. Enter a grace period for overdue items. If you choose to have a grace period, items will not count against the Maximum number of overdue items patron block and there will be no overdue fine until after the loan due date/time plus the grace period interval. If the grace period expires and the item has not been returned, the grace period will count towards calculating an overdue or lost item fee/fine. Adding a grace period to a due date follows the same logic that you chose for closed library due date management if the grace period lands in a closed time for the service point.
Item limit. Enter the maximum number of items that can be borrowed by one patron under this policy. Leave blank to have no item limit.
Renewals
Renewable. If you do not want to allow renewals under this policy, clear the checkbox. Clearing the checkbox causes all other fields to disappear and items are not renewable.
Unlimited renewals. Select the checkbox if you want to allow unlimited renewals.
Number of renewals allowed. If you have not selected Unlimited renewals, enter the number of renewals allowed.
Renew from. Select whether a renewed item is renewed from the Current due date or System date, the date on which the item is renewed.
Renewal period different from original loan. Select the checkbox if you want renewed items to have a different loan period than the original loan period. If selected, the next two options appear.
Alternate loan period for renewals. Enter the alternate loan period for renewals.
Alternate fixed due date schedule (due date limit) for renewals. Select a fixed due date schedule, as configured in Settings > Circulation > Fixed due date schedules. The schedule is used to enforce a stop point on renewals.
Request management
All of the fields in this section are optional. If you leave them blank, the recall return interval and minimum guaranteed loan period default to zero.
Recalls
Recall return interval. Enter an amount of time for the recall return interval. This is the period of time the patron has to return a recalled item before it becomes overdue.
Minimum guaranteed loan period for recalled items. Enter an amount of time for the minimum guaranteed loan period for recalled items. If you allow an item to be recalled, but do not have a minimum guaranteed loan period, the recall return interval effectively becomes the minimum guaranteed loan period for recalled items.
Allow recalls to extend due dates for overdue loans. Checking this box ensures that if an overdue item is recalled, patrons are not assessed unexpected recall fines for a recalled item that they had thought was simply overdue.
Holds
Alternate loan period at checkout for items with an active, pending hold request. To shorten a loan period for an item that has a request queue, enter an amount of time. If an item is checked out and has no queue, the regular loan period is applied.
Allow renewal of items with an active, pending hold request. If you want to allow renewals on a checked out item that has hold requests, select the checkbox. When renewals are allowed, patrons can continue to renew the item based on the settings in the Renewals section.
Alternate loan period at renewal for items with an active, pending hold request. If you allow renewals on items with an active, pending hold request, and want to shorten the renewal loan period, enter an amount of time.
Duplicating a loan policy
- In the Loan policies pane, select the loan policy you want to duplicate.
- In the loan policy details pane, click Actions > Duplicate. A New loan policy window appears with the same loan information as the policy you chose to duplicate.
- Edit any of the loan information before saving the policy. Be aware that the system does not warn you or prevent you from having two loan policies with the same Loan policy name.
- Click Save & close. The loan policy is saved and appears in the Loan policy pane.
Editing a loan policy
- In the Loan policies pane, select the loan policy you want to edit.
- In the loan policy details pane, click Actions > Edit.
- Edit the loan policy.
- Click Save & close. The policy is updated.
Deleting a loan policy
- In the Loan policies pane, select the loan policy you want to delete.
- In the loan policy details pane, click Actions > Delete.
- In the Delete Loan policy dialog, click Delete. The policy is deleted and a confirmation message appears.
Overdue fine policies
Overdue fine policies determine the fines that accrue when an item is checked out for longer than its loan period. Overdue fine policies are used in Circulation rules.
Creating an overdue fine policy
- In the Overdue fine policies pane, click New.
- In the New overdue fine policy window, enter an Overdue fine policy name in the box.
- Optional: Enter a Description in the box.
- In the Overdue fine section, enter the Overdue fine amount in the box and Select interval at which the fine accrues.
- Select Yes in the Count closed days/hours/minutes checkbox if you want overdue fines to continue accruing on days the library is closed.
- Enter a Maximum overdue fine amount in the box. The overdue fine will stop accruing once this amount is reached.
- Select Yes in the Forgive overdue fine if item renewed checkbox if you want overdue fines forgiven once a patron renews the item.
- Enter the Overdue recall fine amount in the box and Select interval at which the fine accrues. This fine applies when an item is recalled and the patron does not return the item on time according to the recall.
- Select whether to Ignore grace periods for recalls. If you select Yes, the grace period is not applied in the case of an overdue recall.
- Enter a Maximum recall overdue fine amount in the box. The recall overdue fine will stop accruing once this amount is reached.
- Click Add reminder fee to add a reminder fee. Reminder fees differ from overdue fines in that reminder fees are billed when an item becomes overdue, whereas overdue fines are billed when the item is returned.
- Click Save & close. The overdue fine policy is saved and appears in the Overdue fine policies pane.
Reminder fees
- Create on closed days. If you select Yes, Reminder fees will be created on days the library is closed. Select No to have Reminder fees created on the first open day after they would otherwise be created. See example in Additional topics > Fees and fines.
- Ignore grace periods for recalls. This setting can only be No for Quesnelia.
- Ignore grace periods for holds. This setting can only be No for Quesnelia.
- Allow renewal of items with reminder fee(s). If you select Yes, items with reminder fees can be renewed. The reminder fee will not be removed when the item is renewed.
- Clear patron block when paid. This setting can only be No for Quesnelia.
Click Add reminder fee to set up a reminder fee schedule:
- Enter a number in Interval and choose the time interval in Frequency to determine how long after an item is overdue the fee is applied and the notice is sent. See example in Additional topics > Fees and fines.
- Enter a Fee amount.
- Choose a Notice method. Email will send an email to the address in the user record. Select Print if you want to send a printed notice.
- Select a fee/fine Notice template that aligns with the Notice method chosen in the previous step.
- Block template functionality is not yet available. Block templates are set up in Settings > Users > Patron Block Templates.
- Click Add reminder fee again to add another reminder fee. Reminder fees after the first in the sequence are created [Interval] [Frequency] after the previous reminder fee.
Duplicating an overdue fine policy
- In the Overdue fine policies pane, select the overdue fine policy you want to duplicate.
- In the overdue fine policy details pane, click Actions > Duplicate. A New overdue fine policy window appears with the same overdue fine policy information as the policy you chose to duplicate.
- Edit any of the overdue fine policy information before saving the policy. Note that you must change the Overdue fine policy name to a unique name.
- Click Save & close. The overdue fine policy is saved and appears in the Overdue fine policies pane.
Editing an overdue fine policy
- In the Overdue fine policies pane, select the overdue fine policy you want to edit.
- In the overdue fine policy details pane, click Actions > Edit.
- Edit the overdue fine policy.
- Click Save & close. The overdue fine policy is updated.
Deleting an overdue fine policy
- In the Overdue fine policies pane, select the overdue fine policy you want to delete.
- In the overdue fine policy details pane, click Actions > Delete.
- In the Delete Overdue fine policies dialog, click Delete. The policy is deleted and a confirmation message appears. Note that you cannot delete an overdue fine policy that is associated with an open loan.
Lost item fee policies
Lost item fee policies determine when overdue items automatically age to lost (their Item status changes to Aged to lost); it also determines the charges billed to patrons for lost items. Lost item fee policies are used in Circulation rules.
Creating a lost item fee policy
- In the Lost item fee policies pane, click New.
- In the New lost item fee policy window, enter a Lost item fee policy name in the box.
- Optional: Enter a Description in the box.
- In the Lost item fee section, enter the amount of time in which Items aged to lost after overdue.
- Enter the amount of time in which Patron billed after aged to lost.
- Enter the amount of time in which Recalled items aged to lost after overdue. This setting allows libraries to set a shorter “aged to lost” period if the item has been recalled for use by other patrons. This setting must have a value in order for recalled items to age to lost.
- Enter the amount of time in which Patron billed for recall after aged to lost. This setting must have a value in order for patrons to be billed when a recalled item ages to lost.
- In the Charge amount for item section, choose Actual cost or Set cost. If you use Actual cost, you can use the Lost items requiring actual cost report in the Users app to find the aged to lost items and then apply a manual cost. If you use Set cost, then enter an amount in the box.
- Enter a Lost item processing fee. This is an additional charge that will be added to the charge amount for the item when billed to the patron.
- Select whether to Charge lost item processing fee if item declared lost by patron.
- Select whether to Charge lost item processing fee if item aged to lost by system.
- Enter an amount of time For lost items not charged a fee/fine, close the loan after. (This setting is required for Actual cost and does not apply to Set cost.)
- Select whether If lost item returned or renewed, remove lost item processing fee.
- Select whether to charge overdue fines If lost item returned or renewed.
- Select whether Replacement allowed.
- Select If lost item replaced, remove lost item processing fee.
- Enter a Replacement processing fee amount in the box.
- Enter an amount of time that No fees/fines shall be refunded if a lost item is returned more than [amount] late.
- Click Save & close. The policy is saved and appears in the Lost item fee policies pane.
Duplicating a lost item fee policy
- In the Lost item fee policies pane, select the lost item fee policy you want to duplicate.
- In the lost item fee policy details pane, click Actions > Duplicate. A Lost item fee policies window appears with the same lost item fee policy information as the policy you chose to duplicate.
- Edit any of the lost item fee policy information before saving the policy. Note that you must change the Lost item fee policy name to a unique name.
- Click Save & close. The lost item fee policy is saved and appears in the Lost item fee policy pane.
Editing a lost item fee policy
- In the Lost item fee policies pane, select the Lost item fee policy you want to edit.
- In the lost item fee policy details pane, click Actions > Edit.
- Edit the lost item fee policy.
- Click Save & close. The policy is updated.
Deleting a lost item fee policy
- In the Lost item fee policies pane, select the lost item fee policy you want to delete.
- In the lost item fee policy details pane, click Actions > Delete.
- In the Delete New Lost item fee policy dialog, click Delete. The policy is deleted and a confirmation message appears. Note that you cannot delete a lost item fee policy that is associated with an open loan.
Patron notice policies
Patron notice policies determine which patron notice templates are sent out before, during, or after certain triggering events. Multiple notices can be set up in one policy. Patron notice policies are used in Circulation rules.
Note: Reminder fees and Title level hold requests do not use the patron notice policy. See Reminder fees and TLR Notice templates.
Implementation considerations
Before you can set up your patron notice policies, you must first configure your Patron notice templates.
You can set up multiple notices in one policy. Libraries’ needs differ. Some will want to create several policies with one or few notices in each policy. Other libraries may find it advantageous to create few policies, each containing several notices. Additionally, patron notice policies can be associated with more than one circulation rule.
Creating a patron notice policy
- In the Patron notice policies pane, click New.
- In the New patron notice policy window, enter a Patron notice policy name. Note: The policy name is what you will see in Circulation rules.
- To make the policy available to Circulation rules, select Active. You may want to clear the checkbox if the policy is not in use but you do not want to delete it.
- Optional: Enter a Description in the box.
- Click Add notice in the particular notice section that you want to set up. See Loan notices, Request notices, and Fee/fine notices for more information.
- Select a notice Template. Depending on the type of notice you are setting up, different templates will appear. Templates are created in Patron notice templates. Templates can be used more than once in a policy.
- Select the Format the notice will be sent as. Currently, email is the only option.
- Select the Triggering event. This event triggers the system to send a notice. Depending on the event, you might have the option to select a time period before or after.
- If you select a time-based event, the Send drop-down list appears. Select to send the request Upon/At, Before, or After the event (settings variable on the Triggering event).
- If you select Before or After in the previous step, you will see the Frequency drop-down list. Select whether to send the notice One Time or Recurring.
- Click Save & close. The policy is saved and appears in the Patron notice policies pane.
Loan notices triggering events
Check in. The notice is sent when items are checked in. Additionally, the notice is always sent with multiples by patron by session. The template you select must be configured for multiple loans/items.
Check out. The notice is sent when items are checked out. Additionally, the notice is always sent with multiples by patron by session. The template you select must be configured for multiple loans/items.
Item renewed. The notice is sent when items are renewed.The template you select must not be configured for multiple loans/items.
Loan due date/time. The notice is sent before, after, or when an item is due. Select when the notice is sent from the Send drop-down list:
- To send the notice when the item is due, select Upon/At.
- To send the notice before the item is due, select Before. Then, determine the Frequency of the notice. To send the notice once, select One Time. To send the notice multiple times before the item is due, select Recurring and enter how often the notice sends until the due date is reached.
- To send the notice after the item is due, select After. Then, determine the Frequency of the notice. To send the notice once, after the item is due, select One Time. To send the notice multiple times after the item is due, select Recurring and enter how often the notice sends until the item is returned or renewed.
- Additionally, select whether you want to Send overnight with multiple loans/items by patron. Useful for long-term loans. or Send throughout the day without multiple loans/items. Useful for short-term loans.
Loan due date change. The notice is sent when an item’s due date/time is manually changed.
Item recalled. The notice is sent when an item is recalled.
Item aged to lost. The notice is sent when or after an item is aged to lost. Select when the notice is sent from the Send drop-down list:
- To send the notice when the item ages to lost, select Upon/At.
- To send the notice after the item ages to lost, select After. Then, determine the Frequency of the notice. To send the notice once, after the item ages to lost, select One Time. To send the notice multiple times after the item ages to lost, select Recurring and enter how often the notice sends while the status remains aged to lost.
Request notices triggering events
For all request notices, the system is scanned every five minutes for triggering events and sent when a triggering event is detected.
Awaiting pickup. The notice is sent when a requested item is checked in at the pickup service point specified in the request.
Page request. The notice is sent when a page request is placed.
Hold request. The notice is sent when an item-level hold request is placed. You can select a notice to send when title-level holds are placed in Settings > Circulation > Title level requests.
Recall request. The notice is sent when a recall request is placed.
Cancel request. The notice is sent when a request is cancelled. Note: Title level hold request cancellations will send the notice selected in Settings > Circulation > Title level requests.
Hold shelf expiration. The notice is sent before or when the item is no longer available for pickup on the hold shelf. Select when the notice is sent from the Send drop-down list:
- To send the notice when the item’s time on the hold shelf expires, select Upon/At.
- To send the notice before the item’s time on the hold shelf expires, select Before. Then, determine the Frequency of the notice. To send the notice once, select One Time. To send the notice multiple times, select Recurring and enter how often the notice sends until the hold shelf expiration is reached.
Request expiration. The notice is sent before or when the request expires. Select when the notice is sent from the Send drop-down list:
- To send the notice when the request expires, select Upon/At.
- To send the notice before the request expires, select Before. Then, determine the Frequency of the notice. To send the notice once, before the request expires, select One Time. To send the notice multiple times, select Recurring and enter how often the notice sends until the request expiration is reached.
Fee/fine notices triggering events
The system is scanned every five minutes for triggering events and fee/fine notices are sent when a triggering event is detected.
Overdue fine, returned. The notice is sent after or when an overdue fine is charged to a patron. The fine would be charged when the item is returned. Overdue fine, returned notices always bundle fees/fines. The template you select should be configured for multiple loans. Select when the notice is sent from the Send drop-down list:
- To send the notice when the overdue fine is charged, select Upon/At.
- To send the notice after the overdue fine is charged, select After. Then, determine the Frequency of the notice. To send the notice once, select One Time. To send the notice multiple times, select Recurring and enter how often the notice sends until the fee/fine is closed.
Overdue fine, renewed. The notice is sent after or when an overdue fine is charged to a patron. The fine would be charged when the item is renewed. Overdue fine, renewed notices always bundle fees/fines. The template you select should be configured for multiple loans. Select when the notice is sent from the Send drop-down list:
- To send the notice when the overdue fine is charged, select Upon/At.
- To send the notice after the overdue fine is charged, select After. Then, determine the Frequency of the notice. To send the notice once, select One Time. To send the notice multiple times, select Recurring and enter how often the notice sends until the fee/fine is closed.
Lost item fee(s) charged. The notice is sent after or when a lost item fee is charged to a patron. The notice will be sent for both set cost and actual cost lost item fees.
Select when the notice is sent from the Send drop-down list:
- To send the notice when the lost item fee is charged, select Upon/At.
- To send the notice after the lost item fee is charged, select After. Then, determine the Frequency of the notice. To send the notice once, select One Time. To send the notice multiple times, select Recurring and enter how often the notice sends until the fee is closed.
Select whether multiple lost item fee notices are bundled together:
- To bunch all a patron’s open lost item fees together in one email (processed at 11:59pm) choose Send overnight with multiple lost item fee charges by patron. The template you select should be configured for multiple loans.
- To send notices throughout the day (typically processed every five minutes, with a separate notice for each fee/fine charged) choose Send throughout the day with one lost item fee charge per notice. The template you select should not be configured for multiple loans.
Lost item returned - fee(s) adjusted. The notice is sent when the event is triggered, i.e. when the lost item is checked in. The notice will be sent for both set cost and actual cost lost item fees.
Duplicating a patron notice policy
- In the Patron notice policies pane, select the patron notice policy you want to duplicate.
- In the patron notice policy details pane, click Actions > Duplicate. A New patron notice policy window appears with the same patron notice policy information as the policy you chose to duplicate.
- Edit any of the patron notice policy information before saving the policy. You cannot have two patron notice policies with the same name.
- Click Save & close. The patron notice policy is saved and appears in the Patron notice policies pane.
Editing a patron notice policy
- In the Patron notice policies pane, select the patron notice policy you want to edit.
- In the patron notice policy details pane, click Actions > Edit.
- Edit the patron notice policy.
- Click Save & close. The policy is updated.
Deleting a patron notice policy
- In the Patron notice policies pane, select the patron notice policy you want to delete.
- In the patron notice policy details pane, click Actions > Delete.
- In the Delete Patron notice policy dialog, click Delete. The policy is deleted and a confirmation message appears. Note that you cannot delete a patron notice policy that is being used in a circulation rule.
Patron notice templates
Patron notice templates are the templates used in your Patron notice policies. Except for Reminder fees, patron notices can only be sent via email.
Creating a new patron notice template
- In the Patron notice templates pane, click New.
- In the New patron notice template window, enter a Patron notice template name for the notice.
- Clear the Active checkbox if you do not want the notice to be available for use in notice policies.
- Optional: Enter a Description in the box.
- Select a Category for the template. Categories determine which section of the notice policy the notice can be used in and which tokens are available to be used in the body of the email.
- In the Email or print section, select the Print only checkbox to delete the subject line. Notices are printed in the Users search results pane. Currently, only Reminder fees are able to be collected in the nightly print job.
- Clear the Print only checkbox if you want to email the notice, and enter a Subject.
- Enter a Body for the email sent to the patron. Click { } to add tokens to the notice. Tokens fill in the item, loan, request, or user information based on the selected variables related to the notice event.
- Optional: Click Preview to view a preview of the notice.
- Click Save & close. The notice is saved and appears in the Patron notice templates pane.
Duplicating a patron notice template
- In the Patron notice templates pane, select the patron notice template you want to duplicate.
- In the patron notice template details pane, click Actions > Duplicate. A New patron notice template window appears with the same patron notice information as the notice you chose to duplicate.
- Edit the notice name and any other details. You cannot have two notices with the same name.
- Click Save & close. The patron notice template is saved and appears in the Patron notice templates pane.
Editing a patron notice template
- In the Patron notice templates pane, select the patron notice template you want to edit.
- In the Patron notice template details pane, click Actions > Edit.
- Edit the patron notice template.
- Click Save & close. The template is updated.
Deleting a patron notice template
- In the Patron notice templates pane, select the patron notice template you want to delete.
- In the Patron notice template details pane, click Actions > Delete.
- In the Delete Patron notice templates dialog, click Delete. The template is deleted and a confirmation message appears. Note that you cannot delete a template that is being used in a Patron notice policy.
Settings > Circulation > Request cancellation reasons
When you cancel a request, you must select a cancellation reason. Use this setting to configure request cancellation reasons for your library.
Creating a new request cancellation reason
- Click New.
- Enter a Cancel Reason, and optionally, internal and public descriptions of the reason into the boxes.
- Click Save. The reason is saved and appears in the Request cancellation reasons table.
Editing a request cancellation reason
- Find the request cancellation reason you want to edit and click the pencil icon.
- Edit the reason.
- Click Save. The changes you made to the request cancellation reason are saved.
Deleting a request cancellation reason
- Find the request cancellation reason you want to delete and click the trash can icon.
- In the Delete cancel reason dialog, click Delete. The reason is deleted and a confirmation message appears.
Settings > Circulation > Request policies
Request policies determine the types of requests (pages, holds, and recalls) allowed. Request policies are used in Circulation rules.
Creating a new request policy
- Click New in the Request policies pane.
- In the New request policy window, enter a Request policy name.
- Optional: Enter a Description.
- Select the Request types allowed.
- Allow all pickup service points allows the item to be requested for pickup at any service point. Select Allow some pickup service points if you want to choose which service points are allowed to be chosen as pickup locations. This can be used, for example, to restrict valuable items from going to an unstaffed service point.
- Click Save & close. The policy saves and appears in the Request policies list.
Duplicating a request policy
- In the Request policies pane select the request policy you want to duplicate.
- Select Actions > Duplicate.
- Edit the policy name and any other details of the request. You cannot have two policies with the same name.
- Click Save & close. The request policy is saved and appears in the Request policies list.
Editing a request policy
- In the Request policies pane select the request policy you want to edit.
- Select Actions > Edit.
- Edit the request policy.
- Click Save & close. The request policy is updated and saved.
Deleting a request policy
- In the Request policies pane select the request policy you want to delete.
- Select Actions > Delete.
- In the Delete Request policy dialog, click Delete. A confirmation message appears confirming the request policy is deleted. You cannot delete a request policy that is being used in a circulation rule.
Settings > Circulation > Title level requests
FOLIO provides functionality for both item-level and title-level requesting. Since title-level requesting is off by default, you need to enable and configure related settings in this section if your library wants to use it.
- Allow title level requests. If your library wants to use title-level requesting, check this box. Before allowing title level requesting, be aware that you will not be able to turn title-level requesting off if there are any open title level requests.
- ”Create title level request” selected by default. If you are using title-level requesting, there will be a checkbox in the Requests app to toggle whether a request is title-level or item-level. If you’d like title-level request to be the default choice, check this box.
- Fail to create title level hold when request is blocked by circulation rule. Check this box if you want title level hold requests to follow the circulation rules. If you do not check this box, then title level hold requests will go through even when item level hold requests are blocked by the circulation rule.
Click Save at the bottom of the screen to save any changes.
Notice templates
Notices that are triggered by title-level requests are not yet included in FOLIO’s circulation rules system. If a title-level request is placed by a patron and immediately associated to an item, the item-level notices in the circulation rules will be sent. If a title-level request is placed and it is a hold - e.g., not immediately associated to an item - the title-level request templates selected here are used instead.
- Confirmation notice. Choose a notice template from the drop-down if you want to send a patron notice when a title-level request is created.
- Cancellation notice. Choose a notice template from the drop-down if you want to send a patron notice when a title-level request is canceled.
- Expiration notice. Choose a notice template from the drop-down if you want to send a patron notice when a title-level request expires without having been fulfilled.
Click Save at the bottom of the screen to save any changes.
Settings > Circulation > Print hold requests
Allow print hold requests (Open - Not yet filled). Check the box if you want the option to print Search slips for item level hold requests.
Click Save at the bottom of the screen to save any changes.
15.5 - Settings > Consortium Manager
This section of the documentation contains links to external sites. Please be advised that these sites are not maintained by the FOLIO Documentation Group and may be aligned with a different FOLIO release.
The Consortium Manager app allows libraries to share data and settings between multiple FOLIO tenants.
Enhanced Consortial Support (ECS) must be enabled in the tenant in order to use Consortium Manager. For more information about setting up ECS in your tenant, see Steps to setup Consortia environment.
Definition of terms related to Settings > Consortium manager:
- Consortium: An association of independent libraries and/or library systems established by formal agreement, usually for the purpose of resource sharing. Membership may be restricted to a specific geographic region, type of library (public, academic, special), or subject specialization.
- Central tenant: The administrative tenant in a multi-tenant system. Also referred to as a primary tenant,
- Enhanced Consortial Support (ECS): A setting enabled in a tenant for managing a consortium using the Consortium Manager.
- Permission: Value assigned to a FOLIO user that allows them access to view, create, update or delete records in FOLIO, or to carry out specific FOLIO tasks.
- Permission set: A group of permissions that allows a user to perform a specific set of tasks.
- Primary tenant: See Central tenant.
- Tenant: A FOLIO client whose data are stored separately and are accessible and visible separately from other FOLIO clients.
The following are the permissions for Settings > Consortium Manager:
- Settings (Consortia): Can view and edit consortia membership This permission allows the user to view and edit the details of the list of members in the Settings app of the central tenant.
- Settings (Consortia): Can view consortia membership This permission allows the user to view the details of the list of members in the Settings app of the central tenant.
For more general information about permissions, see Platform Essentials > Permissions.
Edit member details
Members cannot be added or removed in Consortium manager, but member details can be edited in Settings > Consortium manager.
To edit a member, go to Settings > Consortium manager and follow these steps:
- Select Membership in the Network settings pane. The list of members displays in the Addresses pane. Code, Name, and Tenant address for each member also displays.
- Click on the appropriate pencil icon in the Actions column.
- Make changes to the Code or Name fields.
- Click the Save button in the Actions column to save the changes.
15.6 - Settings > Courses
The Courses section of the Settings app is where you manage your terms, course types, course departments, and other courses settings.
Permissions
The following are all the permissions for Courses in the Settings app:
- Settings (Courses): Can create, edit and delete course settings. This permission allows users to maintain (view, add, edit, and delete) all course settings.
- Settings (Courses): Can view course settings. This permission allows users to view course settings. They cannot add, edit or delete course settings.
Settings > Courses > Display settings
This setting controls FOLIO’s behavior when duplicating a course in the Courses app via Actions > Duplicate.
If the user chooses this setting when duplicating a course, the “Duplicate all cross-listed courses” checkbox in the Duplicate modal will be checked by default.
Settings > Courses > Terms
Use this setting to create and manage Terms. Terms define the start and end date of a course. For example, when a user adds items to a course, Folio automatically assigns a Start Date and End Date to the new item as specified in the Term. If needed, you can edit the dates by editing the reserve item.
Creating a term
- Click New.
- Enter a Name, Start Date, and End Date in the boxes.
- Click Save. The Term is saved and appears alphabetically in the list.
Editing a term
- Find the Term you want to edit and click the pencil icon.
- Edit the Name, Start Date, or End Date.
- Click Save. The Term is saved.
Deleting a term
- Find the Term you want to delete and click the trash can icon.
- In the Delete Term dialog, click Delete. A confirmation message appears and the term is deleted.
Settings > Courses > Course Types
Use this setting to create and manage Course Types. Examples of Course Types include: Online, Hybrid, and In Person.
Creating a course type
- Click New.
- Enter a Name in the box.
- Optional: Enter a Description in the box.
- Click Save. The Course Type is saved.
Editing a course type
- Find the Course Type you want to edit and click the pencil icon.
- Edit the Name or Description.
- Click Save. The Course Type is saved.
Deleting a course type
- Find the Course Type you want to delete and click the trash can icon.
- In the Delete Course Types dialog, click Delete. A confirmation message appears and the term is deleted.
Settings > Courses > Course Department
Use this setting to create and manage Course Departments. Examples of Course Departments include: Mathematics, English, and Business.
Creating a course department
- Click New.
- Enter a Name in the box.
- Optional: Enter a Description in the box.
- Click Save. The Course Department is saved.
Editing a course department
- Find the Course Department you want to edit and click the pencil icon.
- Edit the Name or Description.
- Click Save. The Course Department is saved.
Deleting a course department
- Find the Course Department you want to delete and click the trash can icon.
- In the Delete Department dialog, click Delete. A confirmation message appears and the department is deleted.
Settings > Courses > Processing Statuses
Use this setting to create and manage Processing Statuses. These statuses are specific to the Courses app and can be used to reflect the status of a reserve item. Examples of Processing Statuses include: On Order, Cataloging, and Recalled.
Creating a processing status
- Click New.
- Enter a Name in the box.
- Optional: Enter a Description in the box.
- Click Save. The Processing Status is saved.
Editing a processing status
- Find the Processing Status you want to edit and click the pencil icon.
- Edit the Name or Description.
- Click Save. The Processing Status is saved.
Deleting a processing status
- Find the Processing Status you want to delete and click the trash can icon.
- In the Delete Processing Status dialog, click Delete. A confirmation message appears and the status is deleted.
Settings > Courses > Copyright Statuses
Use this setting to create and manage Copyright Statuses. These statuses are specific to the Courses app and can be used to indicate the copyright of license of a reserve item. Examples of Copyright Statuses include: Public Domain, CC BY, and CC BY-SA.
Creating a copyright status
- Click New.
- Enter a Name in the box.
- Optional: Enter a Description in the box.
- Click Save. The Copyright Status is saved.
Editing a copyright status
- Find the Copyright Status you want to edit and click the pencil icon.
- Edit the Name or Description.
- Click Save. The Copyright Status is saved.
Deleting a copyright status
- Find the Processing Status you want to delete and click the trash can icon.
- In the Delete Copyright Status dialog, click Delete. A confirmation message appears and the status is deleted.
15.7 - Settings > Data export
The Data export section of the Settings app is where you can configure the job profiles used in the data export process. Job profiles determine how information is exported to the MARC file that is generated as a result of the export.
The Data export app comes with one or more default job profiles that export instance, holdings, or authority data. Additional profiles can be created as needed. The mapping profiles allow you to customize the data that is used in the job profile.
The mapping and job profiles add flexibility to the data export and provide an easy way to execute a different type of export on the same data set or the same type of export on different data sets. For example, one user can export bibliographic data only and another user can export instances with appended elements of the holdings and items records using the same set of data.
Permissions
In order to interact with Data export settings, a user needs to be assigned the following permission:
- Settings (data-export): display list of settings pages. This permission allows the user to set up data export profiles.
Settings > Data export > Job profiles
When exporting data, each export is associated with a job profile. The job profile provides a way of connecting a specific list of record identifiers with a field mapping profile. The field mapping profile determines how the data from FOLIO records appears in the generated MARC file.
Before you begin configuring job profiles, you should first configure your field mapping profiles. See Settings > Data export > Field mapping profiles, below, for more information.
Default export job profile
The system comes with one or more default job profiles that are associated with default field mapping profiles. Records exported with a default job profile generate a MARC file containing information for the provided record IDs.
If you use a default job profile, simplified MARC bibliographic records are generated for instances without underlying MARC records. For instances with underlying MARC records stored in SRS, those records are used in the export.
Creating an export job profile
- In the Job profiles pane, click New.
- Enter a Name for the job profile.
- Select a Mapping profile from the drop-down list. Field mapping profiles are created in Settings. See Settings > Data export > Field mapping profiles for more information.
- Optional: Enter a Description of the job profile.
- Click Save & close. A confirmation message appears and the job profile is created.
Searching for an export job profile
Use the search bar to search for profiles contained in the Job profile list.
The Job profiles list contains the following columns:
- Name. Name of the job profile.
- Updated. Date the job profile was last updated.
- Updated by. User who last updated the job profile.
You can click on any column name to sort by that column.
Viewing an export job profile
To view the details of a job profile, follow these steps:
- In the Job profiles pane, find the profile you want to view and select it. The export job profile details window appears.
Editing an export job profile
Note: Once a job profile has been used for a data export job, it cannot be edited or deleted.
- In the Job profiles pane, find the profile you want to edit and select it.
- In the export job profile details window, click Actions > Edit.
Duplicating an export job profile
- In the Job profiles pane, find the profile you want to duplicate and select it.
- In the export job profile details window, click Actions > Duplicate.
Deleting an export job profile
Note: Once a job profile has been used for a data export job, it cannot be edited or deleted.
- In the Job profiles pane, find the job profile you want to delete and select it.
- In the export job profile details window, click Actions > Delete.
- In the Delete job profile dialog, click Delete. A confirmation message appears and the job profile is deleted.
Settings > Data export > Field mapping profiles
The system comes with one or more default field mapping profiles that are associated with a default job profile. A field mapping profile determines how the data from FOLIO records appears in the generated MARC file.
Creating an export field mapping profile
- In the Field mapping profiles pane, click New.
- In the New field mapping profile window, enter a Name for the field mapping profile.
- Select an Output format from the drop-down list. MARC is the only option.
- Select as many FOLIO record types that apply by selecting the checkbox next to the option: Source record storage (entire record), Authority, Inventory instance (selected fields), Holdings, and/or Item. You must select at least one option.
- Optional: Enter a Description for the field mapping profile.
- Optional: To add a transformation, click Add transformations and follow these steps:
- In the Select transformations dialog, use the search box and filters to find the transformations you want to add to the field mapping profile.
- For every transformation you want to add, select the checkbox next to it and fill out the field number, indicators, and subfield boxes. Subfields must begin with a $.
- Once you have added all transformations, click Save & close. A confirmation message appears and the transformations are added to the field mapping profile.
- Click Save & close. A confirmation message appears and the field mapping profile is created.
Searching for an export field mapping profile
Use the search bar to search for profiles contained in the Field mapping profiles list.
The Field mapping profiles list contains the following columns:
- Name. Name of the job profile.
- FOLIO record type. The types of records included in the export: Source record storage (entire record), Authority, Instance, Holdings, and/or Item.
- Format. Format of the exported record.
- Updated. Date the field mapping profile was last updated.
- Updated by. User or system who last updated the field mapping profile.
You can click on any column name to sort by that column.
Viewing an export field mapping profile
To view the details of a field mapping profile, follow these steps:
- In the Field mapping profiles pane, find the profile you want to view and select it. The field mapping profile details window appears.
Editing an export field mapping profile
Note: While a field mapping is assigned to a job profile, it cannot be edited or deleted.
- In the Field mapping profiles pane, find the profile you want to edit and select it.
- In the field mapping profile details window, click Actions > Edit.
- Make your changes to the profile.
- Click Save & close. A confirmation message appears and the field mapping profile is updated.
Duplicating an export field mapping profile
- In the Field mapping profiles pane, find the profile you want to duplicate and select it.
- In the field mapping profile details window, click Actions > Duplicate.
- In the New field mapping profile window, make your desired changes to the duplicated policy.
- Click Save & close. A confirmation message appears and the field mapping profile is created.
Deleting an export field mapping profile
Note: While a field mapping is assigned to a job profile, it cannot be edited or deleted.
- In the Field mapping profiles pane, find the profile you want to delete and select it.
- In the field mapping profile details window, click Actions > Delete.
- In the Delete mapping profile dialog, click Delete. A confirmation message appears and the field mapping profile is deleted.
15.8 - Settings > Data import
The Data Import section of the Settings app is where you can configure the source and structure of the import files, map incoming records to existing records, configure the types of action to be taken on an import (e.g., creating new records, updating existing records, etc.), and define ways to transform the data and map data to particular fields (e.g., add a value such as a proxy to the information in the incoming record, or eliminate data such as selected MARC tags from the incoming data).
It is recommended that you configure the Data Import settings in the following order for a new Job Profile:
- Field mapping profile
- Action profile
- Match profile
- Job profile
Permissions
The permissions listed below allow you to interact with Data Import settings. You can assign permissions to users in the Users app.
-
Settings (Data import): Can view, create, edit, and remove. This permission allows the user to see and and change the Data Import settings.
-
Settings (Data import): Can view only. This permission allows the user to see the Data Import settings but not make any changes to them.
Settings > Data import > Job profiles
Job profiles define the type of import at the highest level. A job profile contains all of the steps needed to complete an individual data import job: field mapping, action, and matching.
Creating an import job profile
- In the Job profiles pane, click Actions > New job profile.
- In the New job profile window, enter a Name for the job profile.
- Select the Accepted data type: MARC or EDIFACT. This is the accepted format of the imported record.
- Optional: Enter a Description of the job profile.
- In the Overview accordion, you can add or remove Match Profiles and Action Profiles. When you add a Match Profile, you repeat this process for when matches are found and when non-matches are found. Using this, you can nest several Match Profiles together to enable matching on multiple data fields. Any Action Profile or Match Profile you wish to add must already exist before adding them to the Job Profile.
- Click Save as profile & Close. A confirmation message appears and the job is created.
Searching for an import job profile
Use the search bar at the top of the Job Profiles pane to search the names of job profiles contained in the Job profile list.
The Job profiles list contains the following columns:
- Name. Name of the job profile.
- Tags. Any tags assigned to the job profile
- Updated. Date the job profile was last updated.
- Updated by. User who last updated the job profile.
You can click on any column name to sort by that column.
Viewing an import job profile
To view the details of a job profile, follow these steps:
- In the Job profiles pane, find the profile you want to view and select it. The import job profile details window appears.
Editing an import job profile
- In the Job profiles pane, find and select the job profile you want to edit.
- In the job profile details pane, click Actions > Edit.
- Make your desired changes to the job profile.
- Click Save as profile & Close. A confirmation message appears and the job profile is updated.
Duplicating an import job profile
- In the Job profiles pane, find and select the job profile you want to duplicate.
- In the job profile details pane, click Actions > Duplicate.
- In the New job profile window, make your desired changes.
- Click Save as profile & Close. A confirmation message appears and the duplicate job profile is created.
Deleting an import job profile
- In the Job profiles pane, find and select the job profile you want to delete.
- In the job profile details pane, click Actions > Delete.
- In the Delete job profile dialog, click Delete. A confirmation message appears and the job profile is deleted.
Adding a tag to an import job profile
- In the Job profiles pane, find and select the job profile you want to tag.
- In the job profile details pane, click Tags.
- In the Tags box, either select a tag or enter a tag. The tag is automatically applied to the job.
Exporting an import job profile
Exporting an import job profile is not implemented at this time.
Settings > Data import > Match profiles
Match profiles define the match between an incoming record and existing record. Match profiles can be used for multiple job profiles.
Before creating a match profile, you should first create action profiles and field mapping profiles.
Creating an import match profile
- In the Match profiles pane, click Actions > New match profile.
- In the New match profile window, enter a Name for the match profile.
- Optional: Enter a Description of the match profile.
- In the Details section, select the format of the incoming record, then select the format of the existing record to which you are matching (e.g., Instance, Holdings, Item, MARC Bibliographic, MARC Authority)
- In the Match criteria section, select the field to match from the incoming record and the corresponding field to match on in the existing record.
- Click Save as profile & Close. A confirmation message appears and the match profile is created.
Searching for an import match profile
Use the search bar to search for match profiles contained in the Match profile list.
The Match profiles list contains the following columns:
- Name. Name of the match profile.
- Match. The match contained within the match profile.
- Tags. Any tags assigned to the match profile
- Updated. Date the match profile was last updated.
- Updated by. User who last updated the match profile.
You can click on any column name to sort by that column.
Viewing an import match profile
To view the details of a match profile, follow these steps:
- In the Match profiles pane, find the profile you want to view and select it. The match profile details window appears.
Editing an import match profile
- In the Match profiles pane, find and select the match profile you want to edit.
- In the match profile details pane, click Actions > Edit.
- Make your desired changes to the match profile.
- Click Save as profile & Close. A confirmation message appears and the match profile is updated.
Duplicating an import match profile
- In the Match profiles pane, find and select the match profile you want to duplicate.
- In the match profile details pane, click Actions > Duplicate.
- In the New match profile window, make your desired changes.
- Click Save as profile & Close. A confirmation message appears and the duplicate match profile is created.
Deleting an import match profile
- In the Match profiles pane, find and select the match profile you want to delete.
- In the match profile details pane, click Actions > Delete.
- In the Delete match profile dialog, click Delete. A confirmation message appears and the match profile is deleted.
Exporting an import match profile
Exporting an import match profile is not implemented at this time.
Settings > Data import > Actions profiles
Action profiles define specific actions to take on import with the incoming records and/or existing records.
Before creating an action profile, you should first create field mapping profiles.
Creating an import action profile
- In the Action profiles pane, click Actions > New action profile.
- In the New action profile window, enter a Name for the profile.
- Optional: Enter a Description of the profile.
- In the Action drop-down list, select one of the following:
- Create. Select to create a new record.
- Update. Select to update an existing record.
- Modify. Select to modify the incoming record prior to either creating or updating a record. Use for incoming MARC records only.
- In the FOLIO record type drop-down list, select the record type that results from the action selected.
- Optional: To associate a field mapping profile with the action profile, click Link Profile. This field mapping profile must already exist to link to it. An action profile can only be linked to one field mapping profile. If an action profile is edited, those edits are reflected in all field mapping and job profiles where the action profile is used.
- In the Select Field Mapping Profiles dialog, use the search box to find the field mapping profile you want to add to the action profile.
- Click the field mapping profile to select it. The field mapping profile is added to the action profile.
- Click Save as profile & Close. A confirmation message appears and the action profile is saved.
Searching for an import action profile
Use the search bar to search for action profiles contained in the Action profile list.
The Action profiles list contains the following columns:
- Name. Name of the action profile.
- Action. The action contained within the action profile.
- Tags. Any tags assigned to the action profile
- Updated. Date the action profile was last updated.
- Updated by. User who last updated the action profile.
You can click on any column name to sort by that column.
Viewing an import action profile
To view the details of a match profile, follow these steps:
- In the Action profiles pane, find the profile you want to view and select it. The action profile details window appears.
Editing an import action profile
- In the Action profiles pane, find and select the action profile you want to edit.
- In the action profile details pane, click Actions > Edit.
- Make your desired changes to the match profile.
- Click Save as profile & Close. A confirmation message appears and the match profile is updated.
Duplicating an import action profile
- In the Action profiles pane, find and select the action profile you want to duplicate.
- In the action profile details pane, click Actions > Duplicate.
- In the New action profile window, make your desired changes.
- Click Save as profile & Close. A confirmation message appears and the duplicate action profile is created.
Deleting an import action profile
- In the Action profiles pane, find and select the action profile you want to delete.
- In the action profile details pane, click Actions > Delete.
- In the Delete action profile dialog, click Delete. A confirmation message appears and the action profile is deleted.
Exporting an import action profile
Exporting an import action profile is not implemented at this time.
Adding a tag to an import action profile
- In the Action profiles pane, find and select the action profile you want to tag.
- In the action profile details pane, click Tags.
- In the Tags box, either select a tag or enter a tag. The tag is automatically applied to the profile.
Settings > Data import > Field mapping profiles
Field mapping profiles map fields of the incoming records to FOLIO according to the actions associated with that field mapping.
Creating an import field mapping profile
- In the Field mapping profiles pane, click Actions > New field mapping profile.
- In the New field mapping profile window, enter a Name for the field mapping profile.
- Select an Incoming record type from the drop-down list: MARC Bibliographic, MARC Holdings, MARC Authority or EDIFACT invoice.
- Select a FOLIO record type from the drop-down list: Instance, Holdings, Item, Order, Invoice, MARC Bibliographic, MARC Holdings, or MARC Authority. Depending on your selection, different options appear. The field mapping details are designed to mimic the FOLIO record’s create/edit screen as much as possible. However individual fields may be populated with a reference to a particular field in the incoming record, a default value, or a combination of both. See the sections below for more information.
- Optional: Enter a Description for the field mapping profile.
- Optional: To link action profiles to the field mapping profile, under Associated action profiles, click Link Profile, and follow these steps:
- In the Select Action Profiles dialog, use the search box to find the action profiles you want to associate with the field mapping profile.
- Select the checkboxes next to the action profiles and click **Save**. The action profiles are added to the field mapping profile.
- Click Save & close. A confirmation message appears and the field mapping profile is created.
Instance
Note: Inactive fields cannot be mapped because they are controlled by the system or by the library’s MARC-Instance mapping profile
Holdings
- In the Field mapping - Holdings section, fill in the applicable fields. For more information on the fields, see Adding holdings to a record.
Item
- In the Field mapping - Item section, fill in the applicable fields. For more information on the fields, see Adding an item to a record.
Order
- In the Field mapping - Order section, fill in the applicable fields. for more information on the fields, see Creating an order.
Invoice
- In the Field mapping - Invoice section, fill in the applicable fields. Required fields are marked with an asterisk (*). For more information on the fields, see Creating an invoice.
MARC Bibliographic
- Select the Field mappings for MARC from the drop-down list: Modifications or Updates.
- If you selected Modifications, follow these steps:
- In the Field mapping - MARC Bibliographic - Modifications section, in the Action column, select the modification you want to occur: Add, Delete, Edit, or Move.
- Enter a MARC Field in the box.
- Optional: By default, the Indicators and Subfield fields are populated with the asterisk (\*) wildcard, which includes all data within those fields. If needed, you can update these fields with specific data.
- Select a Subaction from the drop-down list. The Subaction options vary spending on the Action you selected. Fill out any fields that appear that are associated with the subaction.
- If you selected Add or Edit as the Action, enter Data into the box.
- To add another field mapping, click the + and repeat steps a-e.
- To delete a field mapping, click the trash can icon.
- If you selected Updates, follow these steps:
- If updates should only affect specific fields, In the Field mapping - MARC Bibliographic - Modifications section, click Add field and fill in the Field, In.1, In.2, and Subfield boxes. To add another field, click the +. To delete a field, click the trash can icon.
- If any protected field should be updated by the profile, select the checkboxes in the Override column for each field that you want to update.
Searching for an import field mapping profile
Use the search bar to search for field mapping profiles contained in the Field mapping profile list.
The Field mapping profiles list contains the following columns:
- Name. Name of the field mapping profile.
- FOLIO record type. The record type affected by the field mapping profile.
- Tags. Any tags assigned to the actifield mapping on profile
- Updated. Date the action field mapping was last updated.
- Updated by. User who last updated the field mapping profile.
You can click on any column name to sort by that column.
Viewing an import field mapping profile
To view the details of a field mapping profile, follow these steps:
- In the Field mapping profiles pane, find the profile you want to view and select it. The field mapping profile details window appears.
Editing an import field mapping profile
- In the Field mapping profiles pane, find the profile you want to edit and select it.
- In the field mapping profile details window, click Actions > Edit.
- Make your changes to the profile.
- Click Save & close. A confirmation message appears and the field mapping profile is updated.
Duplicating an import field mapping profile
- In the Field mapping profiles pane, find the profile you want to duplicate and select it.
- In the field mapping profile details window, click Actions > Duplicate.
- In the New field mapping profile window, make your desired changes to the duplicated policy.
- Click Save & close. A confirmation message appears and the field mapping profile is created.
Deleting an import field mapping profile
- In the Field mapping profiles pane, find the profile you want to delete and select it.
- In the field mapping profile details window, click Actions > Delete.
- In the Delete mapping profile dialog, click Delete. A confirmation message appears and the field mapping profile is deleted.
Exporting an import field mapping profile
Exporting an import action profile is not implemented at this time.
Adding a tag to an import field mapping profile
- In the Field mapping profiles pane, find the profile you want to tag and select it.
- In the field mapping profile details window, click Tags.
- In the Tags box, either select a tag or enter a tag. The tag is automatically applied to the profile.
Settings > Data import > File extensions
Use File extensions to configure which file formats are allowed for import and which are blocked and cannot be imported. For example, you may want to block .mrk files from import. If a file has an extension that isn’t in the list, the file can be uploaded and import is attempted. If there are problems with the file structure or data, the import fails, and that is reflected in the Data import log.
Adding a new file extension
- In the File extensions pane, click Actions > New file extension.
- In the New file extension mapping window, enter a Description of the file extension.
- Enter the File extension in the box.
- Optional: If the extension is to be blocked from import, select Block import.
- In the Data type(s) field, select the data types to which the extension applies: MARC and/or EDIFACT.
- Click Save as file extension & Close. A confirmation message appears and the file extension is added.
Searching for a file extension
Use the search bar to search for file extensions contained in the File extensions list.
The File extensions list contains the following columns:
- Extension. The file extension.
- Block import. Whether an import of the file extension is allowed or blocked.
- Data type(s). The data type associated with the file extension.
- Updated. Date when file extension entry was last updated.
- Updated by. ID of user who made the last update.
You can click on any column name to sort by that column.
Viewing a file extension
To view the details of a file extension profile, follow these steps:
- In the File extensions pane, find the file extension you want to view and select it. The file extension details window appears.
Editing a file extension
- In the File extensions pane, find the file extension you want to edit and select it.
- In the file extension details pane, click Actions > Edit.
- Make your desired changes to the file extension.
- Click Save as file extension & Close. A confirmation message appears and the file extension is updated.
Deleting a file extension
- In the File extensions pane, find the file extension you want to delete and select it.
- In the file extension details pane, click Actions > Delete.
- In the Delete file extension dialog, click Delete. A confirmation message appears and the file extension is deleted.
Settings > Data import > MARC field protection
Use this setting to protect all or part of a particular MARC field from updates when new copies of MARC records are imported.
Field protection differs for repeatable and non-repeatable fields. If the field is repeatable, the existing field is retained and a new field is created with the new data. If the field is non-repeatable, the existing field is retained and the updated data is discarded.
Adding a MARC field protection
The asterisk (*) is the only available wildcard. When used, it means anything.
- In the MARC field protection pane, click New.
- Enter the Field.
- If you want to protect all data within that field, regardless of Indicator, Subfield, and Data, leave an asterisk (*) in each field, otherwise fill in the fields.
- Click Save. The MARC field is added to the table.
Editing a MARC field protection
- In the MARC field protection pane, click the pencil icon in the row of the field you want to edit.
- Make your desired edits.
- Click Save. The MARC field is updated.
Deleting a MARC field protection
- In the MARC field protection pane, click the trash can icon in the row of the field you want to delete.
- In the Delete MARC field protection dialog, click Delete. A confirmation message appears and the MARC field protection is deleted.
15.9 - Settings > eHoldings
The eHoldings section of the Settings app is where you establish your root proxy server, create access status types and custom labels, assign users, and enter API credentials to call the EBSCO KB API (Holdings IQ). Note: Assign users is only applicable to multiple libraries in a single tenant (e.g. Five Colleges).
Permissions
In order to interact with eHoldings settings, a user needs to be assigned the following permissions:
- Settings (eHoldings): Can create, edit, and view knowledge base credentials. This permission allows the user to create, view, and edit knowledge base API credentials.
- Settings (eHoldings): Can delete knowledge base credentials. This permission allows the user to delete knowledge base API credentials. This action should only be done if the library is no longer subscribed to EBSCO KB.
- Settings (eholdings): Can create, edit, view, and delete custom labels. This permission allows the user to create, view, edit, and delete custom labels that display on a title-package (aka resource) record.
- Settings (eholdings): Can view custom labels. This permission allows the user to view custom labels in settings.
- Settings (eholdings): Can create, edit, view, and delete access status types. This permission allows the user to create, view, edit, and delete a list of access status types that display on a selected package and title-package (aka resource) record.
- Settings (eholdings): Can create, edit, and view access status types. This permission allows the user to create, view, and edit a list of access status types that display on a selected package and title-package (aka resource) record.
- Settings (eholdings): Can view access status types. This permission allows the user to view a list of access status types that display on a selected package and title-package (aka resource) record.
- Settings (eHoldings): Configure root proxy setting. This permission allows the user to edit the root proxy selection.
- Settings (eholdings): Create, edit, and view Usage Consolidation API credentials. This permission allows the user to update and view usage consolidation settings. For libraries that subscribe to EBSCO’s Usage Consolidation service.
- Settings (eHoldings): Display list of settings pages. This permission allows the user to view Settings (eholdings) pages.
Settings > eHoldings > Root proxy
The root proxy server establishes the proxy for all links and resources in eHoldings currently set to inherit the root proxy selection.
Note for EBSCO KB API customers: Access EBSCOAdmin to setup and maintain proxies.
- Select the root proxy server from the drop-down list.
- Click Save. A confirmation message appears and the root proxy server is saved.
Settings > eHoldings > Custom labels
Use this setting to create up to five custom labels. Custom labels allow your library to have additional customizable fields within title records. The labels you create here are displayed across all title records, but the information in each label’s field can be supplied and edited from within the title record. If created, custom labels appear within selected title records in the eHoldings app.
Creating a custom label
- Enter a title for your custom label into a Display label box.
- If you want the label to show on the publication finder and/or full text finder, select the checkbox next to each option.
- Click Save. A confirmation message appears and the labels are saved.
- Repeat steps 1-3 for up to five custom labels.
Editing a custom label
- Make your changes to the Display label box.
- Click Save. A confirmation message appears and the label is updated. The label changes across all selected title records in eHoldings.
Deleting a custom label
- Remove the text from a Display label box.
- Click Save. A confirmation message appears and the label is updated. The label is removed from all selected title records in eHoldings.
Settings > eHoldings > Access status types
Access status type is a customizable drop-down list that appears within selected package and title records in the eHoldings app. The drop-down list can be customized to indicate the various ways a resource might be accessible, for example, Evidence Based Acquisition (EBA), open access, or trial subscriptions. If created, the Access status type drop-down list appears in the Package settings section in selected package records and the Resource settings section in selected title records.
Creating an access status type
- Click New.
- Enter a name for the Access Status Type.
- Optional: Enter a Description of the access status type.
- Click Save. The access status type is saved.
Editing an access status type
- Find the access status type you want to edit and click the pencil icon in the Actions column.
- Make your desired changes.
- Click Save.
Deleting an access status type
Note: Access status types can only be deleted if they aren’t assigned to any records. The trash can icon doesn’t appear otherwise.
- Find the access status type you want to edit and click the trash can icon in the Actions column.
- In the Delete access status type dialog, click Delete. A confirmation message appears and the access status type is deleted.
Settings > eHoldings > Assigned users
Use this setting only if your library is planning to have multiple EBSCO KBs configured. If your library has access to multiple KBs, eHoldings needs to know to which KB to grant a user access, so users need to be assigned to a KB. Users are configured in the Users app.
Assigning a user
- Click Assign users.
- In the Select User dialog, enter the user’s name or a portion of their name into the search box in the User Search pane, and click Search. User Search Results appear.
- Optional: Filter results by Status or by Patron group.
- Select the desired user by clicking on the user’s name. The user is assigned.
Unassigning a user
- Find the user you want to unassign.
- Click the trash can icon in the row of the user.
- In the Unassign a user from a knowledge base dialog, click Unassign. The user is unassigned and removed from the assigned users table.
Settings > eHoldings > Usage consolidation
For libraries that subscribe to EBSCO’s Usage Consolidation service. Use this setting to integrate FOLIO with the EBSCO Usage Consolidation product in order to populate eResource usage statistics (typically from a FOLIO’s site’s COUNTER reports). A Usage & analysis accordion will display in eHoldings package and title records.
Libraries can add cost per package and title to the Usage & analysis display, if this information is available in EBSCOAdmin. The library selects how to track their usage in EBSCOAdmin.
Request Usage consolidation credentials from your library’s EBSCO-FOLIO implementation consultant or submit a request to EBSCOConnect.
- Enter your library’s Usage consolidation ID (required).
- Enter your library’s Usage consolidation client ID (required).
- Enter your library’s Usage consolidation API key (required).
- Select the Start month for usage statistics from the drop-down list.
- Select the platform for the usage statistics default display. Options include all platforms, publisher platforms, and non-publisher platforms.
- Select the Currency (required).
- Click Save.
15.10 - Settings > Finance
The Finance section of the Settings app is where you establish and specify the categories you want to use to classify the different fund types that will be used during a fiscal year.
Permissions
In order to interact with Finance settings, a user needs to be assigned the following permission:
- Settings (Finance): Export fund and expense class codes. This permission allows the user to export a CSV file containing fund codes and expense classes for a selected fiscal year.
- Settings (Finance): View settings. This permission allows the user view-only access to finance settings.
- Settings (Finance): View, edit, create, delete. This permission allows the user to view, create, edit, and delete all finance settings.
Note: This is the only permission available for Finance settings. With some other Finance permissions, the user is able to view the settings, but they are unable to create, edit, or delete the settings. You can assign permissions to users in the Users app.
Settings > Finance > Fund types
A fund type is a categorization to help distinguish between the purpose of the different funds. You can use fund types to track the types of items funds are applied to, such as gifts, endowments, and exchanges. You need to first add the fund types in the Settings app in order to assign them to funds as fund types are created within the system. Fiscal year rollover of funds is often defined by fund type, so definition of the type values should consider future fiscal year rollover requirements.
Creating a new fund type
-
Click New.
-
Enter a fund type Name in the box.
-
Click Save. The fund type is saved and appears in the Fund types list.
Editing a fund type
-
Find the fund type you want to edit and click the pencil icon.
-
Edit the Name.
-
Click Save. The fund type is updated. Note: if another user edited and saved the same fund type record while you were editing, the following message appears: “You are editing an old version of this data. To load the latest version click cancel, refresh the page and try again.”
Deleting a fund type
-
Find the fund type you want to delete. Click the trash can icon.
-
In the Delete Fund type dialog, click Delete. A confirmation message appears and the fund type is deleted. Note: Fund types cannot be deleted if assigned to a fund. The action will result in an error message: “This fund type cannot be deleted, as it is in use by one or more records.”
Settings > Finance > Expense classes
Expense classes allow you to track spending by defined categories within a fund. They enable tracking and reporting by the classes defined in this setting. For example, you may want to track spending based on order format (electronic vs print). When an order or invoice is created, both the fund and the expense class can be selected by the user.
Creating a new expense class
-
Click New.
-
Enter a category Name, Code, and External account number extension in the boxes.
-
Name. The name to designate the expense class.
-
Code. Self-created, based on name, a unique identifier for the expense class.
-
External account number extensions., optional. The financial account listing outside of the system linked to the expense class. For example, 01. This value will be appended to the external account number specified on the fund record.
-
Click Save. The expense class is saved and appears in the Expense class list.
Editing an expense class
-
Find the expense class you want to edit and click the pencil icon.
-
Edit the Name, Code, or External account number extension.
-
Click Save. The expense class is updated. Note: if another user edited and saved while you were editing the same expense class, the following message appears: “You are editing an old version of this data. To load the latest version click cancel, refresh the page and try again.”
Deleting an expense class
-
Find the expense class you want to delete. Click the trash can icon.
-
In the Delete Expense class dialog, click Delete. A confirmation message appears and the expense class is deleted. Note: Expense classes cannot be deleted if assigned to a budget. The action will result in an error message: “This expense class cannot be deleted, as it is in use by one or more records.”
Settings > Finance > Export fund and expense class codes
When exporting the combined fund and expense class codes for a selected fiscal year you will receive a delimited file that includes all fund codes and all fund code & expense class code combinations where expense class has a status of ‘active’.
-
In the Fiscal year dropdown, select the fiscal year for which you wish to export information.
-
The CSV file will download to your machine. It contains two columns: Fund code and Fund and active expense class codes.
15.11 - Settings > GOBI integration
The GOBI integration section of the Settings app defines your configuration for an integration with the provider GOBI Library Solutions. This integration supports the creation of FOLIO orders initiated from the GOBI order form.
Permissions
In order to interact with GOBI integration settings, a user needs to be assigned the following permission. For information on assigning permissions to users, see Assigning permissions to a user record.
- GOBI Integration: view and edit settings. This permission allows you to view and edit GOBI integration settings.
Settings > GOBI integration > Integration details > Mapping configuration
To view the mapping configuration files, open Settings > GOBI integration > Integration details > Mapping configuration. A list of existing mapping configuration files is listed on the Configuration files pane.
- Listed Electronic Monograph
- Listed Electronic Serial
- Listed Print Monograph
- Listed Print Serial
- Unlisted Print Monograph
- Unlisted Print Serial
Viewing configuration files
Each configuration file contains default values that will populate fields on purchase orders created through this integration with GOBI. To view a configuration file, click on the configuration file name in the Configuration files pane. To expand or collapse all accordions on the page, click Expand all or Collapse all When expanded, each accordion section lists the following configuration information about each purchase order field:
From field. To map a value from the GOBI order form, select the field name from the drop-down list:
- Base Account
- Sub Account
- Title
- Product ID
- Product Qualifier
- Publication Date
- Publisher
- Contributor
- Fund Code
- Location
- Quantity
- YBP Order Key
- Order Placed
- Unit Price
- Currency
- Local Data 1
- Local Data 2
- Local Data 3
- Local Data 4
- Custom Path
Path. The path string. For all From field values in the drop-down list, this path string will automatically populate. To manually enter a path string, select Custom path from the From field drop-down list.
Default value. Enter a default value to apply to this field on the purchase order.
Translation. Select a method from the drop-down list to apply to an incoming text value for translation into a system recognized unique identifier. For example, select “Lookup organization” to link an incoming vendor code value of GOBI to the organization record containing the vendor code GOBI. Select one of the following translation methods:
- Lookup contributions UUID
- Lookup expense class UUID
- Lookup acquisition method UUIDs
- Lookup acquisition unit UUIDs associated with name
- Lookup acquisition unit UUIDs associated with account
- Lookup UUID of the (inventory) location record
- Lookup UUID of the material type
- Lookup fund UUID
- Lookup organization
- Lookup UUID corresponding to the type of product ID
- Lookup suffix UUID for purchase order number
- Lookup prefix UUID for purchase order number
- Lookup purchase order line UUID by order line number
- Lookup config address
- Separating the ISBN qualifier
- Truncation the ISBN qualifier
- To boolean
- To date
- To double
- To integer
Translate default. Check this box to apply translation logic to the default value the user has entered for the field mapping. Some fields accommodate a reference value or a text value while some require reference value. For example, the PO information > Vendor field mapping needs to contain a UUID reference value to link an organization record to the order. If the default value for this mapping is “GOBI,” then this checkbox must be set to true since a translation must be applied to this default.
Editing configuration files
Each configuration file contains default values that will populate fields on purchase orders created through this integration with the GOBI ordering platform. To edit a configuration file, follow these steps:
-
Click on the configuration file name in the Configuration files pane.
-
In the action menu, select Edit. The window title changes to Edit and all fields are now editable. To enter a Path value, select Custom path in the From field drop-down list..
-
To expand all accordions on the page, click Expand all.
-
To clear all field mappings, click the Clear all field mappings button.
-
Edit the mappings and default values as needed and click Save & close.
Resetting default configuration
After editing a configuration file you can optionally reset the configuration back to the original default setup. To reset a configuration file to the original default configuration, follow these steps:
-
Click on the configuration file name in the Configuration files pane.
-
In the action menu, select Reset default configuration.
-
Confirm the dialog prompt, “Resetting this configuration will delete all customizations and restore the default configuration file mappings.”
-
A green toast message confirms that the default configuration is restored.
15.12 - Settings > MARC authority
The MARC authority section of Settings allows you to view, create, edit, and delete authority files.
Permissions
To interact with MARC Authority app settings, a user may be assigned the following permissions:
- Settings (MARC authority): View authority files. This permission allows the user to view authority files but not make changes to them.
- Settings (MARC authority): View, create, edit, delete authority files. This permission allows the user to view, create, edit, and delete authority files.
Settings > MARC authority > Manage authority files
Creating new authority files
- In the Manage authority files pane, click New.
- Enter the following information for the new authority file:
- Name. The name of the authority file.
- Prefix. The prefix for authority record identifiers within the authority file. This prefix can only contain alphabetical values, is limited to 25 characters, and must be unique among the listed authority files.
- HRID stats with. A number starting from which the HRID will be assigned to authority records. This number cannot contain leading zeros.
- Base URL. (Optional) The base URL for the authority file.
- Check the box in the Active column if the authority file should be active.
- Click Save.
Editing authority files
- In the Manage authority files pane, click the pencil icon in the row of the authority file you want to edit.
- Make your desired edits.
- Click Save.
Deleting authority files
- In the Manage authority files pane, click the trash can icon in the row of the authority file you want to delete.
- In the Delete authority file dialog, click Yes, delete. A confirmation message appears and the authority file is deleted.
15.13 - Settings > Inventory
The Inventory section of Setting allows you to customize your Inventory app.
Permissions
Each setting within Inventory has its own permission associated with it. If a user has one of the below permissions assigned to their user record, they will be able to view and interact with that particular setting. You can assign permissions to users in the Users app.
The following are all the Inventory Settings permissions presented in the order the configurations appear in the Settings app:
- Settings (Inventory): Create, edit, delete alternative title type. This permission allows the user to create, read, update, and delete alternative title types.
- Settings (Inventory): Create, edit, delete classification identifier types. This permission allows the user to create, read, update, and delete identifier types.
- Settings (Inventory): Create, edit, delete contributor types. This permission allows the user to create, read, update, and delete contributor types.
- Settings (Inventory): Create, edit, delete formats. This permission allows the user to create, read, update, and delete formats.
- Settings (Inventory): Create, edit, delete instance note types. This permission allows the user to create, read, update, and delete instance note types.
- Settings (Inventory): Create, edit, delete instance status types. This permission allows the user to create, read, update, and delete instance status types.
- Settings (Inventory): Create, edit, delete locally defined modes of issuance. This permission allows the user to create, read, update, and delete modes of issuance.
- Settings (Inventory): Create, edit, delete nature of content. This permission allows the user to create, read, update, and delete natures of content.
- Settings (Inventory): Create, edit, delete resource identifier types. This permission allows the user to create, read, update, and delete resource identifier types.
- Settings (Inventory): Create, edit, delete locally defined resource types. This permission allows the user to create, read, update, and delete locally defined resource types.
- Settings (Inventory): Create, edit, delete holdings note types. This permission allows the user to create, read, update, and delete holdings note types.
- Settings (Inventory): Create, edit, delete holdings sources. This permission allows the user to create, read, update, and delete holdings sources.
- Settings (Inventory): Create, edit, delete holdings types. This permission allows the user to create, read, update, and delete holdings types.
- Settings (Inventory): Create, edit, delete ILL policies. This permission allows the user to create, read, update, and delete ILL policies.
- Settings (Inventory): Create, edit, delete item note types. This permission allows the user to create, read, update, and delete item note types.
- Settings (Inventory): Create, edit, delete loan types. This permission allows the user to create, read, update, and delete loan types.
- Settings (Inventory): Create, edit, delete material types. This permission allows the user to create, read, update, and delete material types.
- Settings (Inventory): Edit fast add settings. This permission allows the user to edit fast add settings.
- Settings (Inventory): Create, edit and delete HRID handling. This permission allows the user to create, read, update, and delete HRID handlings.
- Settings (Inventory): Create, edit, delete statistical code types. This permission allows the user to create, read, update, and delete statistical code types.
- Settings (Inventory): Create, edit, delete statistical codes. This permission allows the user to create, read, update, and delete statistical codes.
- Settings (Inventory): Create, edit, delete URL relationships. This permission allows the user to create, read, update, and delete URL relationships.
- Settings (Inventory): Create, edit, delete call number types. This permission allows the user to create, read, update, and delete call number types.
- Settings (Inventory): Display list of settings pages. This permission allows the user to view the list of settings for the Inventory app.
Settings > Inventory > Alternative title types
Use this setting to create and manage alternative title types. Alternative titles types appear in the Type drop-down list when you add an alternative title to an instance record. FOLIO provides alternative title types by default, which can be edited or deleted.
Creating an alternative title type
- Click New.
- Enter a Name in the box.
- Click Save. The Alternative title type is saved.
Editing an alternative title type
- Find the alternative title type you want to edit and click the pencil icon.
- Edit the Name.
- Click Save. The Alternative title type is saved.
Deleting an alternative title type
- Find the alternative title type you want to edit and click the delete icon.
- In the Delete Alternative title type dialog, click Delete. A confirmation message appears and the Alternative title type is deleted.
Settings > Inventory > Classification identifier types
Use this setting to create and manage classification identifier types. Classification identifier types appear in the Classification identifier type drop-down list when you add a classification to an instance record. FOLIO provides identifier types by default, but the default values cannot be edited or deleted. However, you can add your own local identifier types.
Creating a classification identifier type
- Click New.
- Enter a Name in the box.
- Click Save. The Classification identifier type is saved.
Editing a classification identifier type
Note: You can only edit local classification identifier types. Default FOLIO identifier types cannot be edited.
- Find the classification identifier type you want to edit and click the pencil icon.
- Edit the Name.
- Click Save. The Classification identifier type is saved.
Deleting a classification identifier type
Note: You can only delete local classification identifier types. Default FOLIO identifier types cannot be deleted.
- Find the classification identifier type you want to edit and click the delete icon.
- In the Delete Classification identifier type dialog, click Delete. A confirmation message appears and the Classification identifier type is deleted.
Settings > Inventory > Contributor types
Use this setting to create and manage contributor types. Contributor types appear in the Type drop-down list when you add a contributor to an instance record. FOLIO provides MARC relator terms by default, but the relator terms cannot be edited or deleted. However, you can add your own local contributor types.
Creating a contributor type
- Click New.
- Enter a Name in the box.
- Enter a code in the box.
- Click Save. The Contributor type is saved.
Editing a contributor type
Note: You can only edit local Contributor types. Default MARC relator types cannot be edited.
- Find the contributor type you want to edit and click the pencil icon.
- Edit the Name or code.
- Click Save. The Contributor type is saved.
Deleting a contributor type
Note: You can only delete local Contributor types. Default MARC relator types cannot be deleted.
- Find the contributor type you want to edit and click the delete icon.
- In the Delete Contributor type dialog, click Delete. A confirmation message appears and the Contributor type is deleted.
Use this setting to create and manage formats. Formats appear in the Format drop-down list when you add a format to an instance record. FOLIO provides RDA media/carrier terms by default, and the default terms cannot be edited or deleted. However, you can add your own local formats. Format also appears as an instance search filter.
- Click New.
- Enter a Name in the box.
- Enter a code in the box.
- Click Save. The Format is saved.
Note: You can only edit local Formats. Default RDA media/carrier formats cannot be edited.
- Find the format you want to edit and click the pencil icon.
- Edit the Name or code.
- Click Save. The Format is saved.
Note: You can only delete local Formats. Default RDA media/carrier formats cannot be deleted.
- Find the format you want to edit and click the delete icon.
- In the Delete Format dialog, click Delete. A confirmation message appears and the Format is deleted.
Settings > Inventory > Instance note types
Use this setting to create and manage instance note types. Instance note types appear in the Note type drop-down list when you add a note to an instance record. FOLIO provides note types by default, which can be edited or deleted.
Creating an instance note type
- Click New.
- Enter a Name in the box.
- Click Save. The Instance note type is saved.
Editing an instance note type
- Find the instance note type you want to edit and click the pencil icon.
- Edit the Name.
- Click Save. The Instance note type is saved.
Deleting an instance note type
- Find the instance note type you want to edit and click the delete icon.
- In the Delete Instance note type dialog, click Delete. A confirmation message appears and the Instance note type is deleted.
Settings > Inventory > Instance status types
Use this setting to create and manage instance status types. Instance status types appear in the Instance status term drop-down list in the Administrative data section of an instance record. FOLIO provides status types by default, which can be edited or deleted.
Creating an instance status type
- Click New.
- Enter a Name in the box.
- Enter a code in the box.
- Click Save. The Instance status type is saved.
Editing an instance status type
- Find the instance status type you want to edit and click the pencil icon.
- Edit the Name or Code.
- Click Save. The Instance status type is saved.
Deleting an instance status type
- Find the instance status type you want to edit and click the delete icon.
- In the Delete Instance status type dialog, click Delete. A confirmation message appears and the Instance status type is deleted.
Settings > Inventory > Modes of issuance
Use this setting to create and manage modes of issuance. Modes of issuance appear in the Mode of issuance drop-down list in the Administrative data section of an instance record. FOLIO provides some modes of issuance by default, and the default modes of issuance cannot be edited or deleted. However, you can add your own local modes of issuance. Mode of issuance also appears as an instance search filter.
Creating a mode of issuance
- Click New.
- Enter a Name in the box.
- Click Save. The Mode of issuance is saved.
Editing a mode of issuance
Note: You can only edit local and FOLIO Modes of issuance. Default Modes of issuances cannot be edited.
- Find the mode of issuance you want to edit and click the pencil icon.
- Edit the Name.
- Click Save. The Mode of issuance is saved.
Deleting a mode of issuance
Note: You can only delete local and FOLIO Modes of issuance. Default Modes of issuances cannot be deleted.
- Find the mode of issuance you want to edit and click the delete icon.
- In the Delete Mode of issuance dialog, click Delete. A confirmation message appears and the Mode of issuance is deleted.
Settings > Inventory > Nature of content
Use this setting to create and manage nature of content terms. Nature of content terms appear in the Nature of content term drop-down list when you add a nature of content to an instance record. FOLIO provides nature of content terms by default, and the default terms cannot be edited or deleted. However, you can add your own local nature of content terms. Nature of content also appears as an instance search filter.
Creating a nature of content
- Click New.
- Enter a Name in the box.
- Click Save. The Nature of content is saved.
Editing a nature of content
Note: You can only edit local Nature of contents. Default FOLIO Nature of contents cannot be edited.
- Find the nature of content you want to edit and click the pencil icon.
- Edit the Name.
- Click Save. The Nature of content is saved.
Deleting a nature of content
Note: You can only delete local Nature of contents. Default Nature of contents cannot be deleted.
- Find the nature of content you want to edit and click the delete icon.
- In the Delete Nature of content term dialog, click Delete. A confirmation message appears and the Nature of content is deleted.
Settings > Inventory > Resource identifier types
Use this setting to create and manage resource identifier types. Resource identifier types appear in the Type drop-down list when you add an identifier to an instance record. FOLIO provides identifier types by default, and the default identifier types cannot be edited or deleted. However, you can add your own local identifier types.
Creating a resource identifier type
- Click New.
- Enter a Name in the box.
- Click Save. The Resource identifier type is saved.
Editing a resource identifier type
Note: You can only edit local Resource identifier types. Default FOLIO Resource identifier types cannot be edited.
- Find the resource identifier type you want to edit and click the pencil icon.
- Edit the Name.
- Click Save. The Resource identifier type is saved.
Deleting a resource identifier type
Note: You can only delete local Resource identifier types. Default FOLIO Resource identifier types cannot be deleted.
- Find the resource identifier type you want to edit and click the delete icon.
- In the Delete Resource identifier type dialog, click Delete. A confirmation message appears and the Resource identifier type is deleted.
Settings > Inventory > Resource types
Use this setting to create and manage resource types. Resource types appear in the Resource type drop-down list in the Descriptive data section of an instance record. FOLIO provides RDA content terms by default, and the default content terms cannot be edited or deleted. However, you can add your own local resource types. Resource type also appears as an instance search filter.
Creating a resource type
- Click New.
- Enter a Name in the box.
- Enter a Code in the box.
- Click Save. The Resource type is saved.
Editing a resource type
Note: You can only edit local Resource types. Default RDA content types cannot be edited.
- Find the resource type you want to edit and click the pencil icon.
- Edit the Name or Code.
- Click Save. The Resource type is saved.
Deleting a resource type
Note: You can only delete local Resource types. Default RDA content types cannot be deleted.
- Find the resource type you want to edit and click the delete icon.
- In the Delete Resource type dialog, click Delete. A confirmation message appears and the Resource type is deleted.
Settings > Inventory > Holdings note types
Use this setting to create and manage holdings note types. Instance note types appear in the Note type drop-down list when you add a note to a holdings record. FOLIO provides note types by default, which can be edited or deleted.
Creating a holdings note type
- Click New.
- Enter a Name in the box.
- Click Save. The Holdings note type is saved.
Editing a holdings note type
- Find the holdings note type you want to edit and click the pencil icon.
- Edit the Name.
- Click Save. The Holdings note type is saved.
Deleting a holdings note type
- Find the holdings note type you want to edit and click the delete icon.
- In the Delete Holdings note type dialog, click Delete. A confirmation message appears and the Holdings note type is deleted.
Settings > Inventory > Holdings sources
Use this setting to create and manage holdings sources. Holdings source appears in the Administrative Data section of the Holdings record and is system supplied on record creation. FOLIO provides holdings sources by default, which cannot be edited or deleted. New sources can be added and edited
Creating a holdings source
- Click New.
- Enter a Name in the box.
- Click Save. The Holdings source is saved.
Editing a holdings source
- Find the holdings source you want to edit and click the pencil icon.
- Edit the Name.
- Click Save. The Holdings source is saved.
You can only edit local Holdings sources. Default sources cannot be edited.
Deleting a holdings source
- Find the holdings source you want to edit and click the delete icon.
- In the Delete Holdings source dialog, click Delete. A confirmation message appears and the Holdings source is deleted.
You can only delete local Holdings sources. Default sources cannot be deleted.
Settings > Inventory > Holdings types
Use this setting to create and manage holdings types. Holdings types appear in the Holdings type drop-down list in the Administrative data section of a holdings record. FOLIO provides holdings types by default, which can be edited or deleted.
Creating a holdings type
- Click New.
- Enter a Name in the box.
- Click Save. The Holdings type is saved.
Editing a holdings type
- Find the holdings type you want to edit and click the pencil icon.
- Edit the Name.
- Click Save. The Holdings type is saved.
Deleting a holdings type
- Find the holdings type you want to edit and click the delete icon.
- In the Delete Holdings type dialog, click Delete. A confirmation message appears and the Holdings type is deleted.
Settings > Inventory > ILL policy
Use this setting to create and manage ILL policies. ILL policies appear in the ILL policy drop-down list in the Holdings details section of a holdings record. FOLIO provides ILL policies by default, which can be edited or deleted.
Creating an ILL policy
- Click New.
- Enter a Name in the box.
- Click Save. The ILL policy is saved.
Editing an ILL policy
- Find the ILL policy you want to edit and click the pencil icon.
- Edit the Name.
- Click Save. The ILL policy is saved.
Deleting a holdings type
- Find the ILL policy you want to edit and click the delete icon.
- In the Delete ILL policy dialog, click Delete. A confirmation message appears and the ILL policy is deleted.
Settings > Inventory > Item note types
Use this setting to create and manage item note types. Item note types appear in the Note type drop-down list when you add a note to an item record. FOLIO provides note types by default, which can be edited or deleted.
Creating an item note type
- Click New.
- Enter a Name in the box.
- Click Save. The Item note type is saved.
Editing an item note type
- Find the item note type you want to edit and click the pencil icon.
- Edit the Name.
- Click Save. The Item note type is saved.
Deleting an item note type
- Find the item note type you want to edit and click the delete icon.
- In the Delete Item note type dialog, click Delete. A confirmation message appears and the Item note type is deleted.
Settings > Inventory > Loan types
Use this setting to create and manage loan types. Loan types appear in the Permanent loan type and Temporary loan type drop-down lists in the Loan and availability section of an item record. FOLIO provides loan types by default, which can be edited or deleted. Loan types are also used in Circulation rules.
Creating a loan type
- Click New.
- Enter a Name in the box.
- Click Save. The Loan type is saved.
Editing a loan type
- Find the loan type you want to edit and click the pencil icon.
- Edit the Name.
- Click Save. The Loan type is saved.
Deleting a loan type
- Find the loan type you want to edit and click the delete icon.
- In the Delete Loan type dialog, click Delete. A confirmation message appears and the Loan type is deleted.
Settings > Inventory > Material types
Use this setting to create and manage material types. Material types appear in the Material type drop-down list in the Item data section of an item record. FOLIO provides material types by default, which can be edited or deleted. Material types are also used in Circulation rules and appear as an item search filter.
Creating a material type
- Click New.
- Enter a Name in the box.
- Click Save. The Material type is saved.
Editing a loan type
- Find the material type you want to edit and click the pencil icon.
- Edit the Name.
- Click Save. The Material type is saved.
Deleting a material type
- Find the material type you want to edit and click the delete icon.
- In the Delete Material type dialog, click Delete. A confirmation message appears and the Material type is deleted.
Settings > Inventory > Fast add
Use this setting to customize your Fast add default instance status and whether or not Fast add records are suppressed from discovery by default.
Default instance status
Select from the Default instance status drop-down list the instance status you want applied to every instance record created using Fast add:
- Other
- Cataloged
- Uncataloged
- Temporary
- Not yet assigned
- Batch Loaded
Suppress from discovery
Select “Yes” to keep records created using Fast add suppressed from discovery by default.
Select “No” to make records created using Fass add not suppressed from discovery by default.
The default suppression value can be overridden by the user when the record is being created.
Settings > Inventory > HRID handling
After initial data migration, new FOLIO HRIDs are assigned sequentially, based on the starting number in these settings. Unless changed or removed, the default prefix is assigned to new FOLIO HRIDs. HRIDs in existing FOLIO Inventory and MARC records cannot be changed.
Inventory instances and MARC bibliographic records
For instances
Inventory holdings and MARC holdings records
For holdings
Inventory item records
For items
Settings > Inventory > Statistical code types
Use this setting to create and manage statistical code types. Statistical code types appear in the Statistical code drop-down list when you add a statistical code to an instance, holdings, or item record. FOLIO provides statistical codes by default, which can be edited or deleted.
Creating a statistical code type
- Click New.
- Enter a Name in the box.
- Click Save. The Statistical code type is saved.
Editing a statistical code type
- Find the statistical code type you want to edit and click the pencil icon.
- Edit the Name.
- Click Save. The Statistical code type is saved.
Deleting a statistical code type
- Find the statistical code type you want to edit and click the delete icon.
- In the Delete Statistical code type dialog, click Delete. A confirmation message appears and the Statistical code type is deleted.
Note: Statistical code types that are assigned to at least one Statistical code, cannot be deleted. The codes must first be assigned a different type or deleted.
Settings > Inventory > Statistical codes
Use this setting to create and manage statistical codes. Statistical code appear in the Statistical code drop-down list when you add a statistical code to an instance, holdings, or item record. FOLIO provides statistical codes by default, which can be edited or deleted. A statistical code must be assigned a statistical code type.
Creating a statistical code
- Click New.
- Entier a Code in the box.
- Enter a Name in the box.
- Select a Type from the menu.
- Click Save. The Statistical code is saved.
Editing a statistical code
- Find the statistical code you want to edit and click the pencil icon.
- Edit the Name, Code, or Type.
- Click Save. The Statistical code is saved.
Deleting a statistical code
- Find the statistical code you want to edit and click the delete icon.
- In the Delete Statistical code dialog, click Delete. A confirmation message appears and the Statistical code is deleted.
Note: The Settings will allow deletion of Statistical codes that have been assigned to records in Inventory. In this case the codes will be deleted from the records to which they were assigned.
Settings > Inventory > URL relationship
Use this setting to create and manage URL relationships. URL relationships appear in the Relationship drop-down list when you add electronic access to an instance, holdings, or item record. FOLIO provides URL relationships by default, which can be edited or deleted.
Creating a URL relationship
- Click New.
- Enter a Name in the box.
- Click Save. The URL relationship is saved.
Editing a URL relationship
- Find the URL relationship you want to edit and click the pencil icon.
- Edit the Name.
- Click Save. The URL relationship is saved.
Deleting a URL relationship
- Find the URL relationship you want to edit and click the delete icon.
- In the Delete Statistical code dialog, click Delete. A confirmation message appears and the URL relationship is deleted.
Settings > Inventory > Call number types
Use this setting to create and manage call number types. Call number types appear in the Call number type drop-down list in the Location section of a holdings record and the Item data section of an item record. FOLIO provides call number types by default, which can be edited or deleted.
Creating a call number type
- Click New.
- Enter a Name in the box.
- Click Save. The Call number type is saved.
Editing a call number type
- Find the call number type you want to edit and click the pencil icon.
- Edit the Name.
- Click Save. The Call number type is saved.
Deleting a call number type
- Find the call number type you want to edit and click the delete icon.
- In the Delete Call number type dialog, click Delete. A confirmation message appears and the Call number type is deleted.
Note: Call number types that have at least one value assigned in Inventory cannot be deleted. The call numbers must first be assigned a different type or deleted.
Settings > Inventory > Integrations
Z39.50 target profiles
Targets created and enabled here will determine the available options for the single record import and overlay functionality in Inventory.
To create a new target
- Click New.
- Enter a Name for the target. This is the label that will appear in the import and overlay modal.
- Enter other information as needed for the target.
- Click Save & close.
To edit an existing target (including enabling or disabling the target)
- Click on the target Name.
- Click Edit.
- Change desired information.
- Click Save & close.
15.14 - Settings > Invoices
The Invoices section of the Settings app is where you establish one click approvals, create preset adjustments, manage and configure batch groups, and control voucher settings.
Permissions
To interact with invoice settings, users need the following permission:
- Settings (Invoices): Can view and edit settings. This permission lets you view and edit all of the Invoice settings.
Note: This is the only permission for invoice settings. You can assign permissions to users in the Users app.
Settings > Invoices > Approvals
This setting lets you approve and pay invoices with one click. Select Approve and pay in one click to combine the acts of approving an invoice and processing payment. If you enable this setting, the Invoices app still asks you to confirm your approval before submitting. The invoice and the voucher produced by this action will transition to a paid status.
Settings > Invoices > Adjustments
Use this setting to create preset adjustments that you can add to invoices at any time.
Creating an adjustment
- Click New.
- Enter a Description in the box.
- Select a Type from the list: Percent, Amount.
- Select the Always show checkbox if you want the adjustment to show up automatically when you create a new invoice. Note: You can still remove an adjustment from invoices with this option enabled.
- Enter a Value in the box.
- Select a Pro rate from the list: By line, By amount, By quantity, Not prorated.
- Select a Relation to total from the list: In addition to, Separate from. Note: Adjustments that are created with a “Relation to total” value of “Separate from” are not included in the Total adjustments amount or Calculated total amount for the invoice."
- Select the Export to accounting checkbox if you want to send a copy of the adjustment to an external financial system.
- Click Save & close. The adjustment is saved.
Editing an adjustment
- Find the adjustment you want to edit and click it.
- Click Actions > Edit.
- Edit the adjustment.
- Click Save & close.
Deleting an adjustment
- Select the adjustment you want to delete.
- In the adjustment window, select Actions > Delete.
- In the Delete adjustment dialog, click Delete. A confirmation message appears and the adjustment is deleted.
Settings > Invoices > Batch groups
Use this setting to create, edit, and delete batch groups, which are used to organize invoices for export as vouchers to an external payment system. FOLIO tenants come with a single batch group, FOLIO, configured. Additional batch groups can be added and the FOLIO batch group label may be edited, but the group itself cannot be deleted.
Creating a batch group
- Click New.
- Enter a Name in the box.
- Optional: Enter a Description in the box.
- Click Save. The Batch group is saved.
Editing a batch group
- Find the Batch group you want to edit and click the pencil icon.
- Edit the batch group.
- Click Save.
Deleting a batch group
- Find the Batch group you want to edit and click the trash can icon.
- In the Delete Batch group dialogue box, click Delete. A confirmation message appears and the Batch group is deleted. Note: A batch group may not be deleted if in use on invoice records.
Settings > Invoices > Batch group configuration
Use this setting to configure batch group voucher exports. This configuration enables you to setup automated exports of files containing all invoice vouchers created since the last export. For more information about how vouchers are created, see Invoices > Approving an invoice. All vouchers with the Export to accounting checkbox selected that were created since the last export for the batch group will be exported to a file. For more information about the Export to accounting checkbox, see Invoices > Extended information. Each invoice generates a single unique voucher on which all fund charges are grouped by the fund external account number.
Configuring a batch group
- Select a Batch group.
- Select a Location type. FTP or SFTP.
- Enter an Upload location. If this box is left blank, the export downloads the file to your computer.
- Enter a Port, if needed for the file upload location.
- Enter a Directory, if needed for the file upload location.
- Select a Format. JSON or XML.
- Enter a Username, if needed for the file upload location.
- Enter a Password, if needed for the file upload location.
- Click Save.
Click Show credentials/Hide credentials to show or hide the password. If you want to test the connection with the upload location, click Test connection.
Settings > Invoices > Voucher number
This section lets you configure voucher numbers to use for invoices.
- Enter a Prefix, if required by your library. For example, if your financial office requires all invoice payments for the library to begin with “LIB”.
- Enter a Starting number.
- Click Reset sequence if you need to reset the voucher number.
- Select the Allow voucher number to be edited checkbox if you want to allow editing for the voucher number.
15.15 - Settings > Licenses
The Licenses section of the Settings app is where you create license Terms and manage pick lists.
Permissions
In order to interact with License settings, a user needs to be assigned the following permissions:
- Settings (Licenses): Manage pick lists and values. This permission allows the user to access the License settings and the ability to manage pick lists and pick list values.
- Settings (Licenses): Manage license terms. This permission allows the user to access the License settings and the ability to manage the available license terms.
- Settings (Licenses): Can view app settings. This permission allows the user to view permissions to a set of “app settings” via the Settings. As of Lotus, the available app settings are to set up options for storing documents uploaded to the Licenses module in database (default) or S3 storage.
- Settings (Licenses): Can view and edit app settings. This permission allows the user to view and edit permissions to a set of “app settings” via the Settings. As of Lotus, the available app settings are to set up options for storing documents uploaded to the Licenses module in database (default) or S3 storage.
Settings > Licenses > Terms
Terms are the terms of use that define what you can or cannot do with the content associated with the license.
There are two types of terms you can create in FOLIO: primary and optional. Primary terms appear on every license record by default. Optional terms can be added on a license-by-license basis. Primary terms will sort above optional terms even if an optional term is weighted higher.
Creating a term
- Click New.
- In the New license term box, fill in all the fields:
- Type. Select a term Type from the drop-down list: Decimal, Integer, Text, Text, Pick list, Pick list (multi-select), or Date.
Note: This cannot be edited once the Term is created.
- Pick list and Pick list (multi-select). If the term type is Pick list or Pick list (multi-select), a pick list field displays. Select the Pick list you want to use from the drop-down list. For more information on pick lists, see Settings > Licenses > Pick lists.
- Label. The term name that appears when displaying the Term to users in FOLIO and in any other systems that display license terms to users. It is recommended that you create a short text string that clearly communicates the information recorded in the term. If you need to further explain the term, you should use the Description field.
- Name. Used when outputting term data in a machine readable format. It is not intended to be displayed to users (staff or patrons). It should be a short Latin alphabet string that can be used by any external systems or programs that access the license term data. Use of camelCase is suggested but not required. Changes to the license term name would affect any external systems using license term data and changes should not be made without consulting those responsible for relevant external systems and software.
- Description. Use to provide further explanation of the term. In the Licenses app, you can display the description by clicking the information icon next to the term’s label.
- Category. Terms can be categorized. Each category will appear as a separate accordion when viewing or editing the license. You can also filter terms by category under the Category drop-down list, which contains any categories that you have allocated to terms. To add a category, click on the Category box. You are offered a list of existing categories that will filter as you type. You can add new categories by typing a new value and clicking the option to Add context . If you remove all occurrences of a category across all terms, it will be removed from the list of existing categories.
- Order weight. To determine the order in which the terms appear in the license record, enter a number. If you do not set a value and leave the Order weight at 0 for each term, or they all contain the same number, then they are sorted alphabetically. When sorted alphabetically, uppercase letters are sorted before lowercase letters. For example, “Zebra” appears before “aardvark.”
- Primary term. Select whether the term is a primary term. Primary terms always display for selection in the license record. If you select No, then the term will be optional, and you will have to manually add it to the license record whenever you want to use that term.
- Deprecated. Use to indicate if a term should be deprecated. If Yes is selected, then the term will be preserved in past licenses, but will not display in the list of available terms when adding terms to a license going forward.
- Default visibility. Select whether you would like the term to display internally within FOLIO, or externally to the public (for example, if you are setting up properties to display in your catalog).
- Click Save. A confirmation message appears, and the term is saved and appears in the Terms pane.
Editing a term
Note: You cannot edit the term Type once the term is created.
- Find the term you want to edit and click Edit at the top of its term box.
- Make your desired changes to the term.
- Click Save. A confirmation message appears and the term is updated.
Deleting a term
Note: You can only delete a term if it is not assigned to any license records.
- Find the term you want to edit and click Delete at the top of its term box.
- In the Delete term dialog, click Delete. A confirmation message appears and the term is deleted.
Searching a term
You can search for a term in the search box. To search for a term, enter the term in the search box and click Search.
You can also filter terms by category. Select a category from the Category drop-down list, and click Search. The drop-down list contains any categories that you have allocated to terms.
Settings > Licenses > Pick lists
A pick list is a customizable drop-down list used in the Licenses app. Pick lists are applied to license Terms that have the property Type of Pick list. Additionally, default pick lists like Type and Status can be found in this setting.
A multi-select pick list permits you to select multiple values from the pick list. All selected values will display in the license record.
Use this setting to establish the names of your available pick lists. Once you have named your pick lists, you can configure the values that are available in each pick list in Settings > Licenses > Pick list values.
Creating a pick list
Note: Pick lists cannot be edited once they are created. However, they can be deleted.
- Click New.
- Enter a name in the Pick list box.
- Click Save. The pick list is saved and appears alphabetically in the Pick list column.
Deleting a pick list
Note: You can only delete pick lists if they aren’t assigned to any license records. If they are used in any license records, the trash can icon will not appear in the Actions column.
- Find the pick list you want to delete.
- In the Actions column, click the trash can icon.
- In the Delete Pick list dialog, select Delete. A confirmation message appears and the pick list is deleted.
Settings > Licenses > Pick list values
Pick list values are the values available for selection within a pick list. You must first create the pick list in Setting > Licenses > Pick lists before creating its values.
Note: FOLIO contains default pick lists that can only have their values edited. These values cannot be deleted, and new values cannot be added. The New button appears grayed out and the trash can icon won’t be present for these pick lists.
Adding pick list values
- Select the Pick list to which you want to add values in the drop-down list.
- Click New.
- Enter a Label. The label appears as an option in the pick list.
- Click Save. The label is saved and its value is generated.
Editing pick list values
Note: If you edit a pick list value, only the Label changes and not the Value term.
- Select the Pick list with the value you want to edit in the drop-down list.
- In the row of the value you want to edit, click the pencil icon.
- Edit the Label.
- Click Save. The label is updated.
Deleting pick list values
- Select the Pick list with the value you want to delete in the drop-down list.
- In the row of the value you want to edit, click the trash can icon.
- In the Delete Value dialog, click Delete. A confirmation message appears and the value is deleted.
Settings > Licenses > App settings
File storage
The Licenses app allows the uploading of files as part of the Supplementary documents and Core documents functionality (note that a document does not require a file upload as the document can refer to a physical document or an online document with a URL). When a file is uploaded as part of a supplementary or core document record, it will be automatically stored in one of two ways, depending on how the application has been configured.
Viewing and Editing the file storage settings requires appropriate permissions, which are as follows:
Settings (Licenses): Can view and edit app settings
The primary setting, which determines the overall method used for file storage, is the “Storage engine”. There are currently two valid values for the Storage engine setting:
- LOB
- S3
For information about using the LOB or S3 storage engines, please see: https://wiki.folio.org/display/FOLIOtips/File+storage+options
This FOLIO wiki page also contains information about switching storage engines and maximum file sizes.
15.16 - Settings > Notes
The Notes section of the Settings app is where you establish your library’s note types.
Notes are a way for your library to add extra information to a record. The Notes section appears in records in the following FOLIO apps:
- Agreements
- eHoldings
- eUsage
- Licenses
- Organizations
- Users
Permissions
In order to interact with Notes settings, a user needs to be assigned the following permission:
- Settings (notes): display list of settings pages. This permission allows the user to create, edit and delete note types.
In order to manage notes attached to FOLIO records, the following permissions are required:
- Notes: Can assign and unassign a note. This permission allows the user to assign and unassign notes.
- Notes: Can create a note. This permission allows the user to create notes.
- Notes: Can delete a note. This permission allows the user to delete notes.
- Notes: Can edit a note. This permission allows the user to edit notes.
- Notes: Can view a note. This permission allows the user to view notes.
Settings > Notes > General
Note types are categories you can create for notes to indicate the type of note they are. Notes have associated types that can be used to categorize the note. This area of Settings is where you configure note types. The note types you create here appear throughout FOLIO. They are not app specific. This means that note types can be used in different apps, even if they were created with a particular app in mind.
Creating a note type
- Click New.
- In the Note type column, enter a name for the note type in the box.
- Click Save. The note type is saved and appears in the Note types list.
Editing a note type
- Find the note type you want to edit, and in the actions column, click the pencil icon.
- In the Note type column, make your desired changes to the name.
- Click Save. The note type is updated.
Deleting a note type
- Find the note type you want to delete.
- In the actions column, click the trash can icon.
- In the Delete Note type dialog, click Delete. A confirmation message appears and the note type is deleted.
15.17 - Settings > OAI-PMH
This section of the documentation contains links to external sites. Please be advised that these sites are not maintained by the FOLIO Documentation Group and may be aligned with a different FOLIO release.
The OAI-PMH section of the Settings app is where you configure the behavior of FOLIO’s OAI-PMH feed. Learn more about the OAI-PMH Specification at the Open Archives website.
FOLIO currently supports three metadata formats:
- marc21
- oai_dc
- marc21_withholdings
This list can be viewed by using the ListMetadataFormats verb.
Permissions
To interact with OAI-PMH settings, a user needs to be assigned the following permission:
- Settings (OAI-PMH): Can view This permission allows the user to view all the OAI-PMH settings, but “Save” button is disabled.
- Settings (OAI-PMH): Can view and edit settings This permission allows the user to view and edit the OAI-PMH settings.
- Settings (OAI-PMH): Can view logs This permission allows the user to view Settings > OAI-PMH > Logs.
Settings > OAI-PMH > General
General settings to configure how the Identify verb responses.
Enable OAI service
Checkbox to globally enable or disable OAI services.
Repository name
Sets the content in the respositoryName XML element of the Identify response.
Base URL
Sets the content in the baseURL XML element of the Identify response. This value also appears in the content of the response XML element of the ListRecords verb.
Time granularity
Sets the content in the granularity XML element of the Identify response.
Administrator email(s)
Sets the content in the adminEmail XML element of the Identify response.
Settings > OAI-PMH > Technical
Max records per response
Number of records to return per page of response.
Enable validation
Defines if the response content should be validated against XSD schemas.
Determines if the marshalled XML data is line feeds and indentation.
Settings > OAI-PMH > Behavior
Deleted records support
One of:
- No - Indicates that no information about deleted records is presented.
- Persistent - Records with MARC Leader 05 equal to ’d’, ’s’ or ‘x’ will be listed as deleted in OAI-PMH ListRecords responses.
- Transient - Same behavior as Persistent, but without a guarantee that deleted records will be kept indefinitely in FOLIO.
See https://issues.folio.org/browse/MODOAIPMH-108 for more details of the implementation.
Setting value appears in deletedRecord XML element of Identify response.
Suppressed records processing
One of:
- Transfer suppressed records with discovery flag value - Adds a MARC subfield $t = 1 to FOLIO’s 999 field (for Instances), 852 field (for Holdings) or 952 field (for Items).
- Skip suppressed from discovery records - Instances marked ‘Suppress from Discovery’ are not included in the OAI-PMH response.
OAI-PMH errors processing
One of:
- Associate with HTTP status 200 - Error messages are returned with an HTTP 200 response code.
- Associate with HTTP error statuses - Error messages are returned with an appropriate HTTP error code.
Record source
One of:
- Source records storage - MARC instance records are harvested from SRS.
- Inventory - Instance records are harvested from inventory only, and all OAI-PMH records are generated on-the-fly as part of the harvesting.
- Source records storage and inventory - All instance records with a metadata source of MARC are retrieved from source record storage. Instance records with a metadata source are retrieved from inventory and OAI-PMH records are generated on-the-fly for those inventory-only records as part of the harvest.
Settings > OAI-PMH > Logs
The logs page displays a list of completed harvests and is kept for 30 days. If a harvest contains a record or records that cannot be handled, a “Download” link will appear in the rightmost column of the logs. Clicking this link will download a spreadsheet where errors are listed with the UUID of the affected instance and an error message.
Field mappings for ListRecords response
In order for Discovery services and OPACs to allow for filtering, aggregating and searching based on location and call number information, the OAI-PMH server in FOLIO needs to be able to supply this information as part of the feed.
Mapping from Inventory records to MARC fields as part of the feed is as follows:
| Inventory field |
MARC |
Additional rules |
| Effective location: Institution |
952$a |
|
| Effective location: Campus |
952$b |
|
| Effective location: Library |
952$c |
|
| Effective location: Name |
952$d |
|
| Effective call number components: call number |
952$e |
|
| Effective call number components: prefix |
952$f |
|
| Effective call number components: suffix |
952$g |
|
| Effective call number components: type |
952$h |
|
| Material type |
952$i |
|
| Volume |
952$j |
|
| Enumeration |
952$k |
|
| Chronology |
952$l |
|
| Barcode |
952$m |
|
| Copy number |
952$n |
|
| Electronic access: URI |
856$u |
Creates separate datafield for each URL. Uses URLs from each record level (holding and item) |
| Electronic access: Link text |
856$y |
Creates separate datafield for each URL. Uses URLs from each record level (holding and item) |
| Electronic access: Materials specified |
856$3 |
Creates separate datafield for each URL. Uses URLs from each record level (holding and item) |
| Electronic access: Public note |
856$z |
Creates separate datafield for each URL. Uses URLs from each record level (holding and item) |
| Electronic access: Relationship: No display constant generated |
856 2nd indicator 8 1st indicator 4 |
|
| Electronic access: Relationship: No information provided |
856 2nd indicator blank 1st indicator 4 |
Such indicator filling in works also for empty “Relationship” value |
| Electronic access: Relationship: Related resource |
856 2nd indicator 2 1st indicator 4 |
|
| Electronic access: Relationship: Resource |
856 2nd indicator 0 1st indicator 4 |
|
| Electronic access: Relationship: Version of resource |
856 2nd indicator 1 1st indicator 4 |
|
| Electronic access: Relationship: empty value |
856 2nd indicator empty 1st indicator 4 |
|
15.18 - Settings > Orders
The Orders section of the Settings app is where you establish whether you want to require approval to open orders, your closing order reasons, how orders interact with the Inventory app, order templates, order lines limits, and PO number settings.
Permissions
In order to interact with order settings, a user needs to be assigned the following permissions:
- Settings (Orders): Can view all settings. This permission allows you to view all of the Orders settings.
- Settings (Orders): Can view and edit all settings. This permission allows you to view and edit all of the Orders settings.
- Settings (Orders): Can view Order Templates. This permission allows you to view Order Templates in Settings > Orders.
- Settings (Orders): Can view, edit Order Templates. This permission allows you to view and edit Order Templates in Settings > Orders.
- Settings (Orders): Can view, edit, create Order Templates. This permission allows you to view, edit, and create Order Templates in Settings > Orders.
- Settings (Orders): Can view, edit, delete Order Templates. This permission allows you to view, edit, and delete Order Templates in Settings > Orders.
For information on assigning permissions to users, see Assigning permissions to a user record.
Settings > Orders > General > Approvals
If you want to require approval to open orders, select “Approval required” to open orders. When selected, an additional step between Pending and Open is added. A user with the appropriate permission has to approve the order via a separate action or by checking an approval box on the order record. Once the order is approved, the date and time of the approval is captured, along with the username of the person who made the approval. If this setting is not activated, the approval date and time will match the date and time that the order was opened. For more information, see Approving an order.
Settings > Orders > General > Closing purchase order reasons
Use this setting to configure the reasons for an order closure. FOLIO provides default closing purchase order reasons, which cannot be edited or deleted, but you can add reasons to track closures specific to your library.
Creating a closing purchase order reason
-
Click New.
-
Enter a Reason in the box.
-
Click Save. The Reason is saved.
Editing a closing purchase order reason
-
Find the Reason you want to edit and click the pencil icon.
-
Edit the Reason.
-
Click Save. The Reason is saved.
Deleting a closing purchase order reason
-
Find the Reason you want to delete and click the delete icon.
-
In the Delete Reason dialog, click Delete. A confirmation message appears and the Reason is deleted.
Settings > Orders > General > Order templates
Use this setting to configure your order templates. Order templates can be used to populate consistent information that you may always fill out when ordering from a specific vendor, for example. Note: Any order templates you create are shared among all users who have permission to create orders.
Order templates contain the same fields found in order records but also include order line information, which is automatically applied to any order lines added to the order record that uses the order template.
Creating an order template
To create a new order template, follow the steps below. To hide a field from view during order creation, click on the eye icon beside the field name. The eye icon will display an angled slash mark to indicate that the field will be hidden. When the user creates a new order and selects the template, only the fields with the eye turned on will display. Note: Template name is the only required field for a new order template.
-
Click New.
-
Click Hide all eligible fields to turn off visibility for all fields that can be hidden during order creation. You can then turn on only the fields that you want to display by unselecting the eye icon beside those fields.
-
Fill in information as needed for the remaining order creation fields. Follow the instructions under Creating an order for more information. Click on the eye icon to hide fields as needed.
-
Click Save. A confirmation message appears and the template is saved.
Editing an order template
-
Select the order template you want to edit.
-
In the order template window, select Actions > Edit.
-
Edit the order template.
-
Click Save. A confirmation message appears and the template is updated.
Deleting an order template
-
Select the order template you want to delete.
-
In the order template window, select Actions > Delete.
-
In the Delete template dialog, click Delete. A confirmation message appears and the template is deleted.
Settings > Orders > General > Purchase order lines limit
Use this setting to limit the number of order lines that you can add to an order. If you do not want to have a limit, enter 999. The default value is equal to the minimum order lines limit of 1. If you change tha value in this setting, click Save to capture the update.
Settings > Orders > General > Opening purchase orders
If you want to allow users the option to save and open a purchase order in the same step, select Allow save and open purchase order when creating or editing a purchase order line.
If you want to turn off FOLIO’s ability to check for potential duplicate purchase order lines, check Disable duplicate check that occurs when opening orders and saving purchase order lines. When this setting is unchecked, FOLIO will scan for potential duplicate purchase order lines based on the title and product IDs entered on the purchase order line. If a potential duplicate is found, staff will see a popup window notifying them of potential duplication, with further information about the detected duplicate purchase order lines. Staff may choose to proceed with creation and opening of their purchase order or may cancel the action.
Settings > Orders > General > Acquisition methods
If you want to add additional acquisition methods for use in the Orders app, select New, add the name of the new acquisition method, and select Save.
Settings > Orders > PO number > Edit
If you want users to be able to edit the auto-generated PO number on an order, select User can edit. If this option is not selected, then the PO number is locked.
Settings > Orders > PO number > Prefixes
Use this setting to configure prefixes, which are used in orders. You can add prefixes to orders to provide context. For example, your institution may require all orders originating in the library to begin with “lib”. This can be configured as a prefix to prepend to an order’s PO number.
Creating a prefix
-
Click New.
-
Enter a Name in the box.
-
Optional: Enter a Description in the box.
-
Click Save. The Prefix is saved.
Editing a prefix
-
Find the Prefix you want to edit and click the pencil icon.
-
Edit the prefix.
-
Click Save. The Prefix is updated.
Deleting a prefix
-
Find the Prefix you want to delete and click the delete icon.
-
In the Delete Prefix dialog, click Delete. A confirmation message appears and the Prefix is deleted. Note: A prefix cannot be deleted if in use on order records.
Settings > Orders > PO number > Suffixes
Use this setting to configure suffixes, which are used in orders. You can add suffixes to orders to provide context. For example, your institution may require all orders originating in the library to end with “lib”. This can be configured as a suffix to append to an order’s PO number.
Creating a suffix
-
Click New.
-
Enter a Name in the box.
-
Optional: Enter a Description in the box.
-
Click Save. The Suffix is saved.
Editing a suffix
-
Find the Suffix you want to edit and click the pencil icon.
-
Edit the suffix.
-
Click Save. The Suffix is updated.
Deleting a suffix
-
Find the Suffix you want to delete and click the delete icon.
-
In the Delete Suffix dialog, click Delete. A confirmation message appears and the Suffix is deleted. Note: A suffix cannot be deleted if in use on order records.
Settings > Orders > Inventory interaction > Instance matching
When a library opts to create at least an instance record corresponding to their purchase order line, staff may choose to link to an existing instance record or create a new record. If creating an instance record, the default FOLIO behavior is to first search instances to find a match for one or more of the product IDs provided on the purchase order line. Matching is based on both the ID and the type. If a matching product ID and type is found in Inventory, that instance will be linked to the purchase order line and the system will not create a new instance for that record. If no matches are found, the system will create a new instance record and link the purchase order line to that instance.
A library may choose to select the Disable instance matching checkbox. When activated, a new instance will always be created if the library opts to create Inventory records when they open the order, except when manully linked to an instance record.
Settings > Orders > Inventory interaction > Inventory interactions defaults
Use this setting to determine how materials you are ordering interact with the Inventory app. The settings you select here determine the default interaction based on the Order format (Electronic, Physical, P/E Mix, or Other) you select for the order line item. The interactions you select can be changed when you add or edit an order line, in the Create inventory field of the Physical resource or E-resource details section of the order line, if needed. The inventory interactions are initiated when the order is opened.
There are four default interactions you can select:
- Instance, holdings, item. Once the order is opened, an instance, holdings, and item are found or created in the Inventory app.
- Instance. Once the order is opened, an instance is found or created in the Inventory app.
- Instance, holdings. Once the order is opened, an instance and holdings are found or created in the Inventory app.
- None. Nothing is found or created in the Inventory app.
Settings > Orders > Inventory interaction > Instance status
Use this setting to determine the instance status that is assigned to the instances that are created through opening an order. Note: If you have not selected a default, then you may encounter problems when trying to receive an item or when you close an order.
For information on managing instance status values, see [Settings > Inventory > Instances > Instance status types]](/docs/settings/settings_inventory/settings_inventory/#settings--inventory--instance-status-types).
Settings > Orders > Inventory interaction > Instance type
Use this setting to determine the instance resource type that is assigned to the instances that are created through opening an order. Note: If you have not selected a default, then you may encounter problems when trying to open an order that should create a new instance.
For information on managing instance type values, see Settings > Inventory > Instances > Resource types.
Settings > Orders > Inventory interaction > Loan type
Use this setting to determine the loan type that is assigned to the items that are created through opening an order. Note: If you have not selected a default, then you will not be able to open orders where new items are being created. For information on managing loan type values, see Settings > Inventory > Loan types.
15.19 - Settings > Organizations
The Organizations section of the Settings app is where you establish the categories you want to use to classify the contact people and contact information you add to an organization, as well as any types you may wish to use to classify the organization records for filtering purposes.
Permissions
In order to interact with Organizations settings, a user needs to be assigned the following permissions:
- Settings (Organizations): Can view and edit settings. This permission allows the user to view, create, edit, and delete all organizations settings.
- Settings (Organizations): View settings. This permission allows the user to view, but not interact with, organizations settings.
You can assign permissions to users in the Users app.
Settings > Organizations > Categories
Categories are a way to classify the contact people and contact information you add to an organization. Categories are defined by your library and can be used to group contact information and contact people to make them easier to find and identify. You need to first add the categories in the Settings app in order to assign them to organization contacts.
For more information on adding contact information and contact people to organizations, see Contact information and Contact people.
Creating a new category
-
Click New.
-
Enter a category Name in the box.
-
Click Save. The category is saved and appears in the Categories list.
Editing a category
-
Find the category you want to edit and click the pencil icon.
-
Make the changes to the category name.
-
Click Save. The category is updated.
Deleting a category
Note: Categories may be deleted when in use on Organization records. FOLIO will not produce a warning to prevent the deletion.
-
Find the category you want to delete.
-
Click the trash can icon.
-
In the Delete Category dialog, click Delete. The category is deleted and a confirmation message appears.
Settings > Organizations > Types
Libraries may create controlled lists of organization types to facilitate filtering based on the nature of the library’s relationship with the organization, e.g. Subscription agent, consortium. An organization may have multiple types assigned to its record. This value can also be exported within the Orders CSV, when applied to selected vendors.
Creating a new type
-
Click New.
-
Enter a type Name in the box.
-
Enter a type Status: Active or Inactive. Inactive types will not appear in the dropdown menu to assign to Organization records, but will still appear within the Types filter in the Organizations app.
-
Click Save. The type is saved and appears in the Types list.
Editing a type
-
Find the type you want to edit and click the pencil icon.
-
Make the changes to the type name or status.
-
Click Save. The type is updated.
Deleting a type
-
Find the type you want to delete.
-
Click the trash can icon.
-
In the Delete Type dialog, click Delete. The type is deleted and a confirmation message appears. Note: Types cannot be deleted when in use on an Organization record. You will see an error: “This type cannot be deleted, as it is in use by one or more records.”
15.20 - Settings > Users
The Users section in the Settings app provides configuration options for managing user records, including user information, patron blocks, fee/fine processing, permissions, and service points.
Definition of terms related to Settings > Users:
- Permission. Value assigned to a user, which grants them access to FOLIO records or allows them to carry out specific tasks in FOLIO.
- Permission set. A group of permissions that allows a user to perform a specific set of tasks. For example, you may want to group certain permissions together to create job-specific permissions sets. Permission sets are defined by your library in Settings > Users > Permission sets.
- Invisible permission. A permission defined by a FOLIO developer in the back-end module.
- Visible permission. A permission defined by a FOLIO developer in the front-end UI module.
Permissions
The following are all the permissions for Users in the Settings app:
Invisible permissions
- Settings (Users): Can view address types. This permission allows the user to view Address types in the General section of Settings > Users.
- Settings (Users): Can view all patron blocks entries. This permission allows the user to view all entries in the Patron blocks section of Settings > Users.
- Settings (Users): Can view custom fields. This permission allows the user to view Custom fields in the General section of Settings > Users.
- Settings (Users): Can view feefines-related entries. This permission allows the user to view all entries in the Fee/fine section of Settings > Users, including Owners, Manual charges, Waive reasons, Payment methods, Refund reasons, Comment required, and Transfer accounts This permission does not apply to Transfer criteria.
- Settings (Users): Can view general entries. This permission allows the user to view all entries in the General section of Settings > Users.
- Settings (Users): Can view patron groups. This permission allows the user to view Patron groups in the General section of Settings > Users.
- Settings (Users): Can view permission sets. This permission allows the user to view Permission sets in the General section of Settings > Users.
- Settings (Users): View all settings. This permission allows the user to view all settings in Settings > Users.
Visible permissions
- Settings (Users): Can create, edit and remove address types. This permission allows the user to create, edit, or remove Address Types entries in the General section of Settings > Users.
- Settings (Users): Can edit if comment required. This permission allows the user to edit Comment required entries in the Fee/fine section of Settings > Users.
- Settings (Users): Can create, edit and remove owners. This permission allows the user to create, edit, or remove Owners in the Fee/fine section of Settings > Users.
- Settings (Users): Can create, edit and remove patron blocks limits. This permission allows the user to create, edit, or remove Limits in the Patron blocks section of Settings > Users.
- Settings (Users): Can create, edit and remove patron blocks templates. This permission allows the user to create, edit, or remove Templates in the Patron blocks section of Settings > Users.
- Settings (Users): Can create, edit and remove patron groups. This permission allows the user to create, edit, or remove Patron groups in the General section of Settings > Users.
- Settings (Users): Can create, edit and remove payment methods. This permission allows the user to create, edit, or remove Payment methods in the Fee/fine section of Settings > Users.
- Settings (Users): Can create, edit and remove permission sets. This permission allows the user to create, edit, or remove Permission sets in the General section of Settings > Users.
- Settings (Users): Can create, edit and remove refund reasons. This permission allows the user to create, edit, or remove Refund reasons in the Fee/fine section of Settings > Users.
- Settings (Users): Can create, edit and remove transfer accounts. This permission allows the user to create, edit, or remove Transfer accounts in the Fee/fine section of Settings > Users.
- Settings (Users): Can create, edit and remove transfer criteria. This permission allows the user to create, edit, or remove Transfer criteria in the Fee/fine section of Settings > Users.
- Settings (Users): Can create, edit and remove waive reasons. This permission allows the user to create, edit, or remove Waive reasons entries in the Fee/fine section of Settings > Users.
- Settings (Users): Can create, edit, and view custom fields. This permission allows the user to create, edit, and view Custom fields in the General section of Settings > Users.
- Settings (Users): Can create, edit, view and delete custom fields. This permission allows the user to create, edit, view and delete Custom fields in the General section of Settings > Users.
- Settings (Users): Can create, edit, and view departments. This permission allows the user to create, edit, and view Departments in the General section of Settings > Users.
Settings > Users > Permission sets
Use this setting to create permission sets for your library. Permission sets are customized collections of permissions that can be assigned to users. For example, you can create permission sets that correspond to specific job roles and assign the set, rather than each individual permission, to all library staff with that role.
Additionally, if permissions change because of a new release, a FOLIO administrator can edit the permission set for a particular role to update the assigned permissions. The change to the permission set then propagates out to the users who have that permission set assigned, and the administrator does not have to update permissions for each individual user.
For more information about permissions, see Platform Essentials > Permissions.
Create a permission set
- In the Permission sets pane, click New.
- To name the permissions set, enter a Permission set name. The system does not automatically enforce uniqueness in naming permission sets. To avoid creating permission sets with duplicate display names, make sure this new permission set has a unique name.
- Optional: Enter a Description of the permission set.
- Under Assigned permissions, click Add permission. You can assign individual permissions or existing permission sets to the new permission set.
- In the Select Permissions modal, search and filter by Permission type and/or Permission assignment status or type in the name of the permission or permission set into the search box.
- Select the permission(s) or permission set(s) to assign to the new permission set.
- Click Save & close. The permission(s) or permission set(s) are added to the new permission set.
- Click Save & close. The new permission set is saved.
Edit a permission set
- In the Permission Sets pane, find the permission set you want to edit and select it.
- Click Edit.
- Make your desired changes to the permission set.
- Click Save & Close.
Delete a permission set
Note: A permission set can be deleted even if it is currently assigned to a user. Deleting the permission set removes it from the users to whom it was assigned.
- In the Permission Set pane, find the permission set you want to delete and select it.
- Click Edit.
- In the Edit window, click Delete.
- In the Delete permission set? dialog, click Delete. A confirmation message appears and the permission set is deleted.
View assigned users
To view a list of users assigned to a specific permission set:
- In the Permission sets pane, click on a permission set. The details for that permission set will open in a new pane.
- Open the Assigned users accordion, if necessary, to view a list of users assigned to that permission set.
Assign or unassign permission sets
To assign or unassign a permission set to a user:
- In the Permission sets pane, click on a permission set. The details for that permission set will open in a new pane.
- Open the Assigned users accordion, if necessary, to view a list of users assigned to that permission set.
- Click the Assign/unassign button.
- In the User record modal, search for the user record or filter by Status, Patron group, or User assignment status.
- In the User search results pane, check or uncheck the box(es) next to Name to select or deselect the appropriate user(s) to update their permission set assignment.
- Click the Save button. A confirmation message, Permissions set user assignment updated successfully appears.
Settings > Users > Patron Groups
Use this setting to create patron groups for your library. Patron groups are classes of library users. For example, you may want to create a patron group called Faculty or Undergraduates.
Only one patron group can be assigned to a user record. Patron groups are also used to create Circulation rules.
Create a patron group
- In the Settings app, select Users > Patron groups.
- In the Patron groups pane, click New.
- Enter a name for the Patron group in the box. Patron group names must be unique and should not contain any punctuation.
- Optional: Enter a Description of the patron group.
- Optional: Enter a number in the Expiration date offset (days) box. This number represents
the number of days of active status for user records assigned to the patron group.
- Click Save. The patron group is saved.
Edit a patron group
- In the Settings app, select Users > Patron groups.
- In the Patron groups pane, find the Patron group you want to edit and click the pencil icon in the actions column.
- Make your changes to the Patron group, Description, or Expiration offset date (days).
- Click Save. The changes to the patron group are saved.
Delete a patron group
A patron group can be deleted only if it is no longer applied to any user records. To delete a patron group, you must first check that no users are currently assigned to that group.
To see the number of user records assigned to a patron group, complete the following:
- In the Users app, in the User search pane, select the checkbox next to the appropriate Patron group. The list of user records assigned to that patron group appears in the User search results pane. The number of records found displays at the top of the pane. If 0 records found appears, the Patron group can be deleted.
To delete a patron group, follow these steps:
- In the Settings app, select Users > Patron groups.
- In the Patron groups pane, find the patron group you want to delete and click the trash can icon in the Actions column.
- In the Delete Patron group dialog, click Delete. A confirmation message appears and the patron group is deleted.
Settings > Users > Address Types
Use this setting to configure address types. Address types are used to categorize the addresses that are entered in the Contact information section of a user record. For example, you may want to create the address types: office, work, or home address.
Note: Address types should be configured before bulk loading of patrons occurs if mailing addresses are to be stored.
Create an address type
- In the Settings app, select Users > Address Types.
- In the Address Types pane, click New.
- Enter a name for the Address Type in the box. The Address Type must be unique.
- Optional: Enter a Description of the Address Type.
- Click Save. The Address Type is created.
Edit an address type
- In the Settings app, select Users > Address Types.
- In the Address Types pane, find the Address Type you want to edit and click the pencil
icon in the actions menu.
- Make your changes to the Address Type or Description.
- Click Save. The Address Type is saved.
Delete an address type
An address type can be deleted only if it is not assigned to any user records. To delete an Address Type, you should first check to make sure no user records are assigned the address type.
To see the number of user records assigned to an Address Type:
- In Settings > Users > Address Types, the number of user records assigned to an Address Type will display in the # of Addresses column.
- If a - is displayed, no user records are assigned to this address type and the address type can be deleted.
In the Settings app, select Users > Address Types.
In the Address Types pane, find the Address Type you want to delete and click the trash can icon in the actions column.
In the Delete Address Type dialog, click on the Delete button. A confirmation message appears and the Address Type is deleted.
Settings > Users > Departments
Use this setting to configure departments. Departments can be added in the Extended information section of a user record. For example, you may want to add departments to reflect library staff or faculty’s departments.
Create a department
- In the Settings app, select Users > Department.
- In the Departments pane, click New.
- Enter a Name for the department in the box.
- Enter a department Code in the box.
- Click Save. The department is saved.
Edit a department
In the Settings app, select Users > Department.
In the Departments pane, find the department you want to edit and click the pencil icon in the actions column.
Make your changes to the Name or Code.
Click Save. The department is updated.
Delete a department
In the Settings app, select Users > Department.
In the Departments pane, find the department you want to delete and click the trash can icon in the actions column.
In the Delete Department dialog, click Delete. A confirmation message appears and the department is deleted.
Settings > Users > Custom fields
Use this setting to configure custom fields. Custom fields are used to track additional information in a user record.
Create a custom field
- In the Custom fields pane, click New.
- In the Edit custom fields pane, in the Accordion title box, enter the name of the user record section for the custom field(s).
- Click Add custom field and select the type of field you want to create: Checkbox, Multi-select, Radio button set, Single select, Text area, or Text field.
- Configure the custom field by checking the box next to Hidden and/or Required. Add a name for the field in the Field name box.
- Optional: To add additional custom fields, repeat steps 3-4.
- Click Save & close. The custom field(s) are saved.
Edit a custom field
- In the Custom fields pane, click Edit.
- In the Edit custom fields pane, make your changes to the custom field.
- Click Save & close. The custom field is updated.
Delete a custom field
Custom fields can be deleted if they are in use, but any information tied to the fields is also deleted.
- In the Custom fields pane, click Edit.
- In the Edit custom fields pane, click the trash can icon next to the custom fields you want to delete. Clear out all of the fields to remove the accordion from appearing in user records.
- Click Save & close.
- In the Delete field data dialog, click Save & lose data.
Settings > Users > Number generator options
- Number generator off: the barcode can be filled manually only.
- Number generator on, editable: the barcode can be filled using the generator and be edited, or filled manually.
- Number generator on, fixed: the barcode can be filled using the generator only.
Settings > Users > Owners
A Fee/fine owner is the agent or office that manages fines for FOLIO transactions. Fee/fine owners collect fees/fines for FOLIO service points.
Libraries may use owners in different ways, such as creating a fee/fine owner for each service point, or creating a fee/fine owner for each library’s accounting office, that may collect fee/fines for multiple service points.
If your library intends to charge any fines, it is important that every service point be assigned to a fee/fine owner, even if you do not expect fines to accrue for items associated with that service point. Ensuring that the service point is assigned to an owner will prevent unexpected errors.
When manually creating a fee/fine, Fee/fine owner is a required field.
Create a fee/fine owner
- In the Fee/fine: Owners pane, click New.
- Enter a name for the Owner in the box.
- Optional: Enter a Description about the owner.
- Optional: Select the desired Associated service points. Note that while a fee/fine owner does not have to have associated service points, you will not be able to use the fee/fine owner in workflows unless it has service points associated with it.
- Click Save. The fee/fine owner is saved.
Edit a fee/fine owner
- Find the owner you want to edit and click the pencil icon in the actions column.
- Make your changes to the Owner, Description, or Associated service points.
- Click Save. The owner is updated.
Delete a fee/fine owner
- In the Fee/fine: Owners pane, find the owner you want to delete and click the trash can icon in the Actions column.
- In the Delete Fee/fine Owner dialog, click Delete. A confirmation message appears and the owner is deleted.
Settings > Users > Manual charges
Use this setting to configure fee/fine types. For example, fee/fine types could be overdue fines, processing fees, or lost item fees.
When manually creating a fee/fine, Fee/fine Type is a required field.
Create a fee/fine type
- In the Fee/fine: Manual charges pane, select the Fee/fine Owner from the drop-down list.
- Optional: Click Edit to assign a Default Charge Notice and/or Default Action Notice to the template and click Save.
- Click New.
- Enter a name for the Fee/Fine Type.
- Optional: Enter the Default Amount for the fee/fine.
- Optional: Select a Charge Notice.
- Optional: Select an Action Notice.
- Click Save. The Fee/fine type is saved.
See Settings > Circulation > Patron notice templates for more information about Patron notice templates.
Edit a fee/fine type
- In the Fee/fine: Manual charges pane, find the fee/fine type you want to edit and click the pencil icon in the Actions column.
- Make your changes to the manual charge.
- Click Save. The manual charge is updated.
Delete a fee/fine type
- In the Fee/fine: Manual charges pane, find the fee/fine type you want to delete and click the trash can icon.
- In the Delete Fee/fine Type dialog, click Delete. A confirmation message appears and the fee/fine type is deleted.
Settings > Users > Waive reasons
Use this setting to configure Fee/fine: Waive reasons.
Creating a waive reason
- In the Fee/fine: Waive reasons pane, click New.
- Enter a name for the Reason in the box.
- Optional: Enter a Description about the waive reason.
- Click Save. The waive reason is saved.
Edit a waive reason
- In the Fee/fine: Waive reasons pane, find the waive reason you want to edit and click the pencil icon in the actions column.
- Make your changes to the Reason or Description.
- Click Save. The waive reason is updated.
Delete a waive reason
- In the Fee/fine: Waive reasons pane, find the waive reason you want to edit and click the trash can icon in the actions column.
- In the Delete Waive reason dialog, click Delete. A confirmation message appears and the waive reason is deleted.
Settings > Users > Payment methods
Use this setting to configure payment methods. Payment methods are specific to a fee/fine owner. When paying a fee/fine, Payment method is a required field.
Create a payment method
- In the Fee/fine: Payment methods pane, select the Fee/fine Owner from the drop-down list.
- Click New.
- Enter a Name for the payment method.
- Click Save. The payment method is saved.
Edit a payment method
- In the Fee/fine: Payment methods pane, find the payment method you want to edit and click the pencil icon in the actions column.
- Update the Name as needed.
- Click Save. The payment method is updated.
Delete a payment method
- In the Fee/fine: Payment methods pane, find the payment method you want to edit and click the trash can icon.
- In the Delete Payment method dialog, click Delete. A confirmation message appears and the payment method is deleted.
Settings > Users > Refund reasons
Use this setting to configure refund reasons. When refunding a fee/fine, Refund reason is a required field.
Create a refund reason
- In the Fee/fine: Refund reasons pane, click New.
- Enter a Name for the refund reason.
- Optional: Enter a Description about the refund reason.
- Click Save. The refund reason is saved.
Edit a refund reason
- In the Fee/fine: Refund reasons pane, find the refund reason you want to edit and click the pencil icon in the Actions menu.
- Make your changes to the Name or Description.
- Click Save. The Refund reason is updated.
Delete a refund reason
- In the Fee/fine: Refund reasons pane, find the refund reason you want to edit and click the trash can icon.
- In the Delete Refund reason dialog, click Delete. A confirmation message appears and the refund reason is deleted.
Use this section to configure whether comments are required when fees/fines are paid, waived, refunded, or transferred. By default, comments are not required.
To require a comment when a fee/fine is fully or partially paid, under Require comment when fee/fine fully/partially paid, select Yes. A confirmation message appears and the Require comment setting is saved.
To require a comment when a fee/fine is fully or partially waived, under Require comment when fee/fine fully/partially waived, select Yes. A confirmation message appears and the Require comment setting is saved.
To require a comment when a fee/fine is fully or partially refunded, under Require comment when fee/fine fully/partially refunded, select Yes. A confirmation message appears and the Require comment setting is saved.
To require a comment when a fee/fine is fully or partially transferred, under Require comment when fee/fine fully/partially transferred, select Yes. A confirmation message appears and the Require comment setting is saved.
Settings > Users > Transfer accounts
Use this setting to configure available transfer accounts. Transfer accounts are used when your library needs to transfer transactions (for charge or credit) to entities outside of the library. For example, a transfer account may be the bursar’s office or a collection agency.
Create a transfer account
- In the Fee/fine: Transfer accounts pane, select the Fee/fine Owner from the drop-down list.
- Click New.
- Enter a Name for the transfer account.
- Optional: Enter a Description of the transfer account.
- Click Save. The transfer account is saved.
Edit a transfer account
- In the Fee/fine: Transfer accounts pane, find the transfer account you want to edit and click the pencil icon in the actions column.
- Make your changes to the Name or Description.
- Click Save. The transfer account is updated.
Delete a transfer account
- In the Fee/fine: Transfer accounts pane, find the transfer account you want to edit and click the trash can icon in the actions column.
- In the Delete Transfer account dialog, click Delete. A confirmation message appears and the transfer account is deleted.
Settings > Users > Transfer criteria
The Transfer Criteria section contains many sections to allow for a wide variety of criteria to be configured. Use this information to configure the criteria for transferring accounts. For more information about transfer accounts, see Settings > Users > Transfer accounts.
Create transfer criteria
In the Transfer criteria pane, select the Schedule period.
Add a number to the Fee/Fines older than (days) field.
Click the + sign to add patron group(s) in the Patron groups list.
Select the transfer owner from the Transfer owner drop-down list.
Select a transfer account from the Transfer account drop-down list.
Select the Fee/fine owner.
Add Transfer type, Transfer description, and Transfer code to each Fee/fine type.
Click Save to save the transfer criteria or click Run manually to run a report.
Scheduling
The Scheduling dropdown allows you to configure the frequency of the transfer process. If you want to run the transfer manually, you can skip this section.
The following options and suboptions are available:
- Never (run manually)
- Hours
- Days
- Weeks
- Weeks between runs
- Run at
- Run on weekdays
Example:
To set the schedule to occur twice a week on Monday and Thursday at 12:00am CDT, you would configure the following options:
- Set the “Frequency” option to “Weeks”.
- Set the “Weeks between runs” option to “0”.
- Set the “Run at” option to “12:00 AM”.
- Set the “Run on weekdays” to the options “Monday” and “Thursday”.
Criteria
The Criteria section allows you to configure the criteria for the transfer process.
The following options are available to configure the criteria:
- No criteria (always run)
- This option will always run the transfer process when the schedule is met.
- All of
- This option will run the transfer process when all the criteria is met.
- Any of
- This option will run the transfer process when any one or more of the criteria are met.
- None of
- This option will run the transfer process when none of the criteria is met.
The following are options for the criteria:
- Age
- Amount
- Fee/fine owner
- Fee/fine type
- Item location
- Item service point
- Patron group
Example:
To set the criteria to run the transfer process for all fees/fines that are older than 30 days, you would configure the following options:
- Set the “Criteria” option to “All of”.
- Click on the “+” button on the top right corner to add a criteria.
- Set the criteria to “Age”.
- Set the “Comparison operator” to “Greater than but not equal to”
- Set the “Number of days old” option to “30”.
Aggregate by patron
The Aggregate by patron section is used to enable/disable aggregating data by patron. This is useful if you want to generate a file that aggregate all the data by each patron and list them, so each row would represent data of one patron instead of one fee/fine. If you do not want to aggregate by patron, make sure the Group by patron box is unchecked.
Note: If Group by patron box is unchecked, then the body format, in between the Header format and Footer format, will be called Account data format. If Group by patron box is checked, then the body format will be called Patron data format.
If you want to aggregate by patron, check the box and you can configure the aggregate criteria, which include the following options:
- None (include all patrons)
- Number of accounts
- Total amount
For both number of accounts and total amount, you need to set a comparison operator and a number of accounts or total amount. The following comparison operators are available:
- Less than but not equal to
- Less than or equal to
- Greater than but not equal to
- Greater than or equal to
Example:
To set the criteria to run the transfer process for all patrons that have a total amount greater than or equal to $100, you would configure the following options:
- Check the “Group by patron” box.
- Select the “Filter type” to be “Total amount”.
- Select the “Comparison operator” to be “Greater than or equal to”.
- Enter “100” in the “Total amount” box.
The sections Header format, Account data format/Patron data format and Footer format allow you to configure the format of the file that is generated by the transfer process. The format is configured using a series of blocks, in a column based structure. Each block can be configured to contain a fixed value or a variable. The variable will be replaced with the actual value when the file is generated.
You need to configure all data you want to include in the file, including whitespace and delimiters. If you do not want to include a section, you can leave it blank.
The following tokens are available for all sections:
- Newline (LF)
- Newline (Microsoft, CRLF)
- Tab
- Comma
- Whitespace
- Text
- Current Date
- Format
- There are several options for the format of the date(eg. ISO Day, American Date, etc.)
- Timezone
- There are several options for the timezone(eg. American/Chicago, etc.)
The following tokens are available in the Header and Footer sections only:
- Number of Accounts
- Total Amount
- Has a checkbox to include decimal point checkbox.
The following tokens are available in the Account data format/Patron data format section only:
- Account amount
- Account date
- Fee/fine type
- User info
- Item info
For certain tokens, there is a gear icon to configure the format of the value. The following options are available:
- Desired length
- You can enter an integer for the desired length.
- Fill extra spaces with
- You can enter a character to fill extra spaces with (eg. 0, " “, etc.).
- Add characters to
- You can select to add characters to the beginning or end of the value.
- Truncate if too long
- You can select to truncate the value if it is longer than the desired length.
Example:
Here is what an example header structure would look like with variables:
$$$LIB{day_of_year}{current_date}Library B&F YBR{row_count}{fee_fee_total}{year}{quarter}
Here is what the header would look like with the variables replaced with actual values and the date is 02/01/2021:
$$$LIB3202012023Library B&F YBR000170000097195020231
Note: Some values have been padded with zeros to ensure the correct number of characters. This must be specified in the format and is detailed below.
To configure this header in the transfer criteria, you would add the following elements:
- Arbitrary Text
- Current date
- Format: ISO Day
- Timezone: American/Chicago
- Current date
- Format: American Date
- Timezone: American/Chicago
- Arbitrary Text
- Tab
- Text
- Number of accounts
- In the Gear settings:
- Desired length: 5
- Fill extra spaces with: 0
- Add characters to: Start
- Truncate if too long: Checked
- Total amount
- Include the decimal point: Checked
- In the Gear settings:
- Desired length: 11
- Fill extra spaces with: 0
- Add characters to: Start
- Truncate if too long: Checked
- Current date
- Format: Year
- Timezone: American/Chicago
- Current date
- Format: Quarter
- Timezone: American/Chicago
Preview
The preview pane displays a preview of the header, account data and footer based on the criteria you have configured. You can use this preview to verify that the criteria you have configured is correct, before saving or running.
There are two checkboxes in the preview pane to configure how the preview is displayed:
- Wrap long lines
- Display invisible characters (newlines, tabs, and spaces)
Transfer accounts
Here, you can specify where the transfer accounts will be sent. In addition, you can configure any conditional statements regarding the transfer accounts.
To configure the Transfer to section, you will need to select options for the two dropdowns:
- Fee/fine owner
- The fee/fine owner that the transfer accounts will be sent to.
- Transfer account
- The transfer account that the transfer accounts will be sent to.
Optionally, you can configure multiple conditional statements for the transfer accounts. To configure a conditional statement, you have to click Add condition, then in the same way as the Criteria section, you will configure your critera. After that, you can configure the Transfer to section for the conditional statement.
Running the transfer
To run the transfer now without saving, click the “Run manually” button.
To save the criteria and run the transfer on the desired schedule, click the “Save” button.
Settings > Users > Conditions
Automatic patron blocks allow the library to set limits that are automatically enforced. The limits are applied in real time and displayed in the same areas as manual blocks. Patrons can be automatically blocked from checking out, renewing, and/or requesting.
Automatic patron blocks are displayed in the Users app in the Patron blocks section of a user record. Depending on which actions are blocked, the blocks also display in the Check out app after patron barcode entry or patron look-up or if an item barcode is scanned, in the Users app Loans section if you want to renew an item, and in the Requests app after a patron barcode/patron look-up.
The block is automatically removed once the patron falls below the limit.
Note: Conditions and limits have to be in place in order for automated patron blocks to work.
Conditions determine which actions patrons are barred from doing once they hit the limits as outlined for their patron group in Settings > Users > Limits.
These are all the categories for which you can set conditions and limits:
- Maximum number of items charged out
- Maximum number of lost items
- Maximum number of overdue items
- Maximum number of overdue recalls
- Maximum outstanding fee/fine balance
- Recall overdue by maximum number of days
- In the Conditions pane, select the condition you want to configure.
- In the selected condition pane, select the action(s) that occur when the defined limits are exceeded: Block borrowing, Block renewals, and/or Block requests.
- Enter a Message to be displayed (required)
- Click Save. A confirmation message appears and the patron block condition is saved.
Edit patron block conditions
- In the Conditions pane, select the condition you want to edit.
- In the selected condition pane, make your changes to the condition.
- Click Save. A confirmation message appears and the patron block condition is saved.
Remove patron block conditions
- In the Conditions pane, select the condition you want to remove.
- In the selected condition pane, clear out any blocks and messages.
- Click Save. A confirmation message appears and the patron block condition is saved.
Settings > Users > Patron Block Templates
Libraries can choose to create templates for use with patron blocks that staff can apply to user records. This allows libraries to have more consistent patron messaging, and can improve reporting.
Patron block templates are created in Settings > Users > Templates.
Create patron block template
- In the Patron block templates pane, select New in the top right corner. A New patron block template window will open.
- Enter a Template name.
- Enter a Block code (optional). Block codes can be used for reporting or integration purposes. They do not appear in the Users app.
- Enter a Description (optional). This description will only appear when viewing the template in settings.
- Enter a Display description (optional). This appears to staff when applying the block to a particular patron record.
- Enter a Message to Patron (optional). This appears to staff when applying the block to a particular patron record, and can be accessed by discovery layer tools to display to a patron when viewing their library account online.
- Check the boxes for the appropriate Block actions - borrowing, renewals, or requests (optional).
- Click Save & close. The patron block template is saved.
Edit patron block template.
- In the Patron block templates pane, select the template you wish to edit. It will open for viewing in a fourth pane.
- Click Edit to open the template in edit mode.
- Make changes as desired.
- Click Save & close to apply changes.
Delete patron block template
- In the Patron block templates pane, select the template you wish to edit. It will open for viewing in a fourth pane.
- Click Edit to open the template in edit mode.
- Click Delete in the top right.
- Click Delete in the confirmation pop-up.
Settings > Users > Limits
Limits determine the maximum number of materials, recalls, fee/fines, or overdues, that when reached, the conditions you configured in Settings > Users > Conditions are applied to a patron’s account. Limits are established based on patron groups.
Create patron block limits
- In the Limits pane, select the patron group for which you want to configure limits.
- In the selected patron group pane, enter a limit for each category. Leave the field blank if you do not want to set a limit for a certain category.
- Click Save. A confirmation message appears and the block limits are saved.
Edit patron block limits
- In the Limits pane, select the patron group with the limits you want to edit.
- In the selected patron group pane, make your changes to the limits.
- Click Save. A confirmation message appears and the block limits are saved.
Remove patron block limits
- In the Limits pane, select the patron group with the limits you want to remove.
- In the selected patron group pane, set the limit value(s) to zero to clear out the limit(s).
- Click Save. A confirmation message appears and the block limits are saved.
15.21 - Settings > Remote Storage
The Remote storage section of the Settings app is where you configure options to connect to an external remote storage system.
Libraries generally use remote storage systems when they are housing books in a facility that is not the library. Often these facilities have high-capacity storage, where books are housed by size to be able to store as many items as possible. Libraries with these facilities need systems to keep track of where the books are in the facility and help manage patron requests to have items retrieved and shipped to the library for their use.
The Juniper release supports connections to CAIASoft and Dematic. Generally, settings in this area will be managed by your library’s FOLIO administrator.
If a library does not use remote storage, they do not need to install remote storage modules or configure any settings in this area of FOLIO.
Permissions
The permissions listed below determine what you can do or not do with the individual parts of the Remote storage section of Settings. If none of these permissions are assigned to a user, the user will not see this area of the Settings app.
- Remote storage: Create, edit, delete. This permission allows the user to view, create, edit, and delete remote storage settings.
- Remote storage: View. This permission allows the user to view all remote storage settings.
Settings > Configurations
A configuration entry must be created for each remote storage system. Directions are different for Dematic EMS (API), StagingDirector (TCP/IP), and CAIASoft.
Create a configuration for Dematic EMS (API)
- Click New.
- In the Create configuration screen, provide the Remote storage name, Provider name, and URL (domain).
- Click Save & close.
Create a configuration for StagingDirector (TCP/IP).
- Click New.
- In the Create configuration screen, provide the Remote storage name, Provider name, URL (domain), and Status URL.
- For the Data synchronization schedule, choose how often FOLIO and your remote storage system will synchronize data. You may choose an interval of minute(s), hour(s), day(s), week(s), or month(s).
- Click Save & close.
Create a configuration for CAIASoft
- Click New.
- In the Create configuration screen, provide the Remote storage name, Provider name, URL (domain), and Credential properties.
- For Accession holding workflow preference, choose one of two options:
- Change permanent location: When an item is accessioned into CAIASoft, if the holdings permanent location does not have the same location as the new remote location of the item, the holdings permanent location is changed.
- Duplicate holdings: When an item is accessioned into CAIASoft, and a holdings record for the new remote location does not already exist, the non-remote holdings record is duplicated, the location on the new holdings record is changed to the item’s location, and the item is moved to that new holdings record.
- For Returning workflow preference, choose one of two options:
- Items received at remote storage scanned into FOLIO: When this option is selected, FOLIO will expect that an item will be scanned directly in FOLIO and FOLIO will send an update to CAIASoft indicating that the item is expected to be stored, and set the item’s FOLIO item status to Available.
- Items received at remote storage scanned into CAIASoft: When this option is selected, FOLIO expects that items will be scanned for return in CAIASoft. When items are scanned in CAIASoft, CAIASoft will send information to FOLIO; if FOLIO finds open requests on the item, CAIASoft will immediately move the item into requesting workflows. If the item is not requested, FOLIO will check the item in and change the item status to Available.
- Click Save & close.
Edit a configuration
- From the list of configurations, choose the one you wish to edit. It will open in a fourth pane.
- On the fourth pane, choose Actions > Edit.
- In the edit pane, make changes as desired.
- Click Save & close.
Delete a configuration
You will not be able to delete a configuration if any locations on your FOLIO instance are associated with the configuration.
- From the list of configurations, choose the one you wish to delete. It will open in a fourth pane.
- From the fourth pane, choose Actions > Delete.
- Click Delete on the pop-up window to confirm.
Settings > Accession Tables
Libraries only need to configure accession tables if they are using CAIASoft.
Accession tables provide a way to configure how locations change when items are accessioned into CAIASoft. The Original location is the item’s location at the library (non-remote); the Final location (Remote) is the location that that item should be moved to when received in CAIASoft. The location chosen as the Final location (Remote) must be associated with your CAIASoft provider as part of its configuration options.
To configure accession tables, first choose your Remote storage name from the drop-down list.
Map an original location to a final location
- Click the pencil icon under Actions for the location you wish to configure.
- Under Final location (Remote), click the dropdown and select the location that the non-remote location should map to at your remote storage facility. You may map more than one onsite non-remote location to a single remote location.
- Click Save to save your changes.
Edit a mapping between an original location and a final location
- Click the pencil icon under Actions for the Original location you wish to configure.
- Under Final location (Remote), click the dropdown and make changes as desired.
- Click Save.
Remove a mapping between an original location and a final location
- Click the pencil icon under Actions for the Original location you wish to configure.
- Under Final location (Remote), click the dropdown and choose Select location name or code.
- Click Save.
15.22 - Settings > Reporting
The Reporting section of the Settings app is where you can configure FOLIO’s connection to an LDP database instance, set limitations on running queries and establish connections to GitHub repositories for the sake of running parameterized SQL queries.
Permissions
The following are the permissions for Reporting in the Settings app:
- Settings (Reporting): browse and load LDP saved queries This permission allows a user to browse and load queries that they or other users have saved using the Reporting app’s “Build query” feature.
- Settings (Reporting): Can modify default record limits This permission allows a user to set the amount of records/rows that can be returned and exported to a CSV (can be different values) when running a query in the Reporting app.
- Settings (Reporting): Can modify LDP database connection details This permission allows a user to configure the Reporting app’s connection to an LDP instance including the username and password used to query the LDP reporting database.
- Settings (Reporting): Can modify templated-query repos configuration This permission allows a user to create new or modify existing connections to GitHub repositories for the purpose of accessing parameterized SQL queries via the Reporting app.
- Settings (Reporting): Can select which tables are available to search This permission allows a user to select/remove which tables will appear in the “Table” dropdown while using the Reporting app’s “Build query” feature.
- Settings (Reporting): create and update LDP saved queries This permission allows a user to save queries they’ve created using the Reporting app’s “Build query” feature as well as edit and overwrite existing queries (whether they are the report’s creator or not).
Settings > Reporting > Record limits
The Record limits setting allows you to set the default and maximum numbers of records to show in a user’s query results. You may also restrict the number of records a user can export using the Maximum number to export setting.
- Default number to show
- Maximum number to show
- Maximum number of export
Settings > Reporting > Table availability
The Table availability setting
- Shows the schema and tables in the connected database and allows tables to be “turned off” from being able to query against them so that users cannot include them in queries. This is useful for tables that may contain restricted data, such as PII (Personally Identifiable Information).
Currently recommended to disable
It is currently recommended to disable tables: srs_marc, srs_marctab, srs_records.
Currently the app does not support indexing of certain columns. Keeping them enabled can cause performance issues and extra stress on the database.
Settings > Reporting > Database configuration
The Configure database connection URL & credentials setting is used to set the connection from the FOLIO application instance to the LDP reporting database instance. This is also used to set the username and password to be used by the LDP app to query the LDP reporting database.
Settings > Reporting > Report repositories
The Report repositories setting allows you to configure connections to GitHub repositories for the purpose of accessing SQL queries created by individual institutions or the wider FOLIO reporting community. Queries saved in these repositories can be run using the Reporting app’s “Run report” option and can be configured to display parameters to filter the data output. The GitHub user, repository name, repository branch, and directory within the repository must be specified here.
For information on how to set up SQL queries compatible with the Reporting app in GitHub, please refer to Authoring reports for the FOLIO Reporting App.
15.23 - Settings > Tags
The Tags section of the Settings app is where you enable the use of tags in FOLIO apps.
Permissions
To interact with Tag settings, a user needs to be assigned the following permission:
- Settings (Tags): Can enable or disable tags for all apps. This permission allows the user to enable or disable tags globally in FOLIO.
Note: This is the only permission available for Tags settings. You are unable to view and access Tags settings if you do not have this permission assigned to you. You can assign permissions to users in the Users app.
Allowed characters
Tags cannot be saved with space characters or pipe characters (|). They are removed before the tag is created.
Upper case characters will be converted to lower case when the tag is saved.
Use this setting to enable or disable tags across the following FOLIO apps:
- Finance > Funds
- Inventory
- Invoices
- Orders
- Organizations
- Receiving
- Requests
- Users
- Select the Enable tags checkbox.
- Click Save. A confirmation message appears and the setting is saved.
- Clear the Enable tags checkbox.
- Click Save. A confirmation message appears and the setting is saved.
15.24 - Settings > Tenant
The Tenant section of the Settings app is where you configure specific settings that apply to your entire FOLIO installation. Generally, settings in this area will be managed by your library’s FOLIO administrator.
Permissions
The permissions listed below determine what you can do or not do with the individual parts of the Tenant section of Settings. If none of these permissions are assigned to a user, the user will not see this area of the Settings app.
- Settings (tenant): Can create, edit and remove service points. This permission allows the user to create, read, update, and delete service points.
- Settings (tenant): Can create, edit and remove locations. This permission allows the user to create, read, update, and delete institutions, campuses, libraries, and locations.
- Settings (tenant): View locations. This permission allows the user to view institutions, campuses, libraries and locations.
- Settings (tenant): Can edit language, localization, and currency. This permission allows the user to change the locale, time zone, and primary currency.
- Settings (tenant): Can maintain preferred plugins. This permission allows the user to edit preferred plugins.
- Settings (tenant): Can maintain SSO settings. This permission allows the user to create, edit, and delete SSO configurations.
- Settings (tenant): Can manage tenant addresses. This permission allows the user to create, read, update, and delete addresses.
Settings > Tenant > Addresses
Use this setting to manage addresses used by your library within FOLIO. For example, you can add your library’s acquisitions address and then use this address within the Orders app for billing and shipping.
Creating a new address
- In the Addresses pane, click New.
- Enter a Name for the address in the box.
- In the Address box, enter the physical address. Press Enter to format your address with multiple lines.
- Click Save. The address is added to the created.
Editing an address
- Find the address you want to edit.
- In the actions column, click the pencil icon.
- Make your desired changes to the address.
- Click Save. The address is updated.
Deleting an address
Note: Before deleting an address, you should make sure it is not in use for any purchase orders. FOLIO doesn’t stop you from deleting an address that is assigned to an order record. If you delete an address that is in use, it is deleted from the Bill to or Ship to fields in the order record.
- Find the address you want to delete.
- In the actions column, click the trash can icon.
- In the Delete Address dialog, click Delete. A confirmation message appears and the address is deleted.
Settings > Tenant > Language and localization
Use this setting to change your location, timezone, and/or currency for all users of your FOLIO instance. To make temporary changes for your current session, click Change session locale. For more information, see Settings > Developer > Session locale.
Update your library locale, time zone, or currency
- Locale (for language display, date format, etc.). Locale adjusts FOLIO’s language display, date format, and number format to the standard for the locality selected.
- Time zone (time zone used when showing date time information). Time zone adjusts FOLIO’s time zone for when dates are displayed. Time zones are based on the standard tz database time zone names.
- Primary currency (for currency symbol to display). Primary currency adjusts FOLIO’s currency symbol, using ISO 4217 standard codes.
- Select a Locale, Time zone, and/or Primary currency from the drop-down lists.
- Click Save. A confirmation message appears and your changes are saved.
Settings > Tenant > Preferred plugins
Use this setting to change your preferred plugins for different FOLIO actions.
Currently, FOLIO doesn’t have multiple plugins to choose from for each of the actions listed. Leaving the values as the default — allows the system to update plugin versions automatically. Once changed from —, only the specific plugin version or (none) are available as options.
Changing any of the preferred plugins to (none) disables the action for all FOLIO users, which may break app workflows.
Settings > Tenant > SSO settings
Use this setting if your library wishes to implement Single Sign-On (SSO) for staff members to log into FOLIO. SSO allows library staff to use the same username and password they use for other services at their library, removing the need to maintain a separate username and password just for FOLIO.
Note: Enabling single sign-on generally requires coordination with your IT staff and/or your identity provider.
- Identity Provider URL. A URL where metadata about the identity provider can be accessed by FOLIO.
- Download metadata. After selecting all of your SSO settings, click Download metadata to download an XML, which you should send to your identity provider. This file will need to be re-downloaded if you make any changes to these settings.
- SAML binding. Depending on your configuration, select Redirect binding to use an HTTP redirect to the identity provider’s sign on page, or POST binding to send an HTTP POST from the FOLIO login page.
- SAML attribute. The attribute in the identity provider that uniquely identifies the user.
- User property. The attribution in FOLIO where the SAML attribute can be found.
Settings > Tenant > Service Points
Use this setting to configure your library’s service points. In FOLIO, a service point is a library staff work location.
A service point is needed when you want to have at least one of the following services at that location:
- Check in items.
- Check out items.
- Request items for patron delivery.
- Request items for patron pickup.
- Put items in transit to another location.
- Charge fines for transactions, which occurred at that location.
Every location that has physical materials needs an associated primary service point in order to manage those materials. Therefore, you should create your desired service points before creating your location hierarchy.
Staff who use the Check in, Check out, Requests, and Users apps must have a service point assigned to them in their user record.
There is no requirement that a service point be a place that is providing service to patrons. Libraries may find that it is helpful to establish internal service points for areas such as shelving, conservation, or collection development.
All service points should be associated to a fee/fine owner in Settings>Users, even if you do not expect to charge fines to patrons. Setting up the connection will ensure that fine transactions do not unexpectedly fail in the future if your library begins to use fines (manual or automatically charged.)
Creating a service point
- In the Service points pane, click New.
- In the New service point window, enter a Name for the service point. The name must be unique to your FOLIO tenant.
- Enter a Code. The code is the machine readable name of the service point and must be unique to your FOLIO tenant.
- Enter a Discovery display name. This name is used in discovery services to identify the service point to patrons. It does not have to be unique.
- (Optional): Enter a Description of the service point. The description only appears in Settings.
- (Optional): Enter the location’s Shelving lag time (minutes). This number is used to set expectations for how long until materials returned to this service point are reshelved.
- (Optional): Select whether the service point is a Pickup location. If the service point is a pickup location, it appears as a Pickup location option for patrons in the Requests and Users app.
- (Required if your service point is a Pickup location): Enter a Hold shelf expiration period, which determines how long the request remains in Open - Awaiting pickup status.
- (Required if your service point is a Pickup location): Specify the Closed library date management for hold shelf expiration date calculation. This tells FOLIO what to do with the hold shelf expiration date if it lands in a time when the service point is closed.
- If the hold shelf expiration period is calculated in minutes or hours, then you can choose to keep the original expiration date/time, move the expiration date/time to when the service point is closing, or move the expiration date/time to the beginning of the next open set of hours.
- If the hold shelf expiration period is calculated in days, weeks, or months, you can choose to keep the original expiration date, move the expiration date to the end of the previous open day, or move the expiration date to the end of the next open day.
- (Optional): Select the Hold, Pick slip, Request delivery, and/or Transit checkboxes to determine which staff slips print by default for this service point.
- Click Save & close. A confirmation message appears and the service point is created.
The Assigned locations accordion is updated when the service point is assigned to any locations in the location tree.
Editing a service point
- In the Service points pane, find the service point you want to edit and select it.
- In the service point details pane, click Edit.
- In the Edit window, make your desired changes.
- Click Save & close. A confirmation message appears and the service point is updated.
Deleting a service point
You cannot delete a service point in the FOLIO user interface.
Settings > Tenant > Location setup
Use the settings under Location setup to configure the four parts of the item location tree. Locations must be configured in order to create holdings and items in Inventory, to circulate items using the Check in and Check out apps, and to request items using the Requests app.
The location setup has four elements that are hierarchical in relationship, from the top down the hierarchy is: Institutions > Campuses > Libraries > Locations.
Effective location
In FOLIO, items have an effective location that is computed according to location values in the holdings and items record. Circulation rules use an item’s effective location when applying business logic to circulation transactions.
Holdings must have a permanent location value. A holding may also have a temporary location value. Items may also have a permanent location value and/or a temporary location value. The item’s effective location value is the first value that it finds, in this order:
- Item Temporary Location
- Item Permanent Location
- Holdings Temporary Location
- Holdings Permanent Location
Tips for implementers
- There is nothing in FOLIO that requires that elements of the location tree correspond to the geography of your campus. You may find it helpful to consider whether a specific library or libraries in your system are better modeled as a campus, or whether a particular workflow means you need additional campuses or institutions.
- Because the location tree has a hierarchy, you should create your values in the hierarchy order: institutions, campuses, libraries, and then locations.
- Locations must have at least one associated service point. You should create service points before you create your location tree.
- The four pieces of the location tree can be elements in circulation rules, along with patron groups, material types, and loan types. You may wish to consider your circulation rule strategy while setting up your locations.
Settings > Tenant > Institutions
Use this setting to configure your institutions. An institution is the highest level of the FOLIO location hierarchy, and typically represents legal entities such as the college or university.
FOLIO libraries need at least one institution created to be able to populate elements down the hierarchy.
Creating an institution
- In the Institutions pane, click New.
- Enter a Name and Code. The name and code should be unique. FOLIO doesn’t stop you from making institutions with the same name and/or code, but it does cause problems for your staff in writing circulation rules.
- Click Save. The institution is created
Editing an institution
- In the Institutions pane, find the institution you want to edit.
- In the actions column, click the pencil icon.
- Make your desired changes.
- Click Save. The institution is updated.
Deleting an institution
Note: If the institution has an associated campus, you cannot delete it.
- In the Institutions pane, find the institution you want to delete.
- In the **actions **column, click the trash can icon.
- In the Delete Institution dialog, click Delete. A confirmation message appears and the institution is deleted.
Settings > Tenant > Campuses
Use this setting to configure your campuses. A campus is the second highest level of the FOLIO location hierarchy, and typically represents distinct spaces or domains within an institution, like a downtown campus or online program.
FOLIO libraries need at least one institution and one campus to create elements further down the location hierarchy.
Creating a campus
- In the Campuses pane, select the Institution under which the campus should be created.
- Click New.
- Enter a Name and Code. The name and code should be unique. FOLIO doesn’t stop you from making campuses with the same name and/or code, but it does cause problems for your staff in writing circulation rules.
- Click Save. The campus is created.
Editing a campus
- In the Campuses pane, select the Institution under which the campus is located.
- Find the campus you want to edit.
- In the actions column, click the pencil icon.
- Make your desired changes.
- Click Save. The campus is updated.
Deleting a campus
Note: If the campus has an associated library, you cannot delete it.
- In the Campuses pane, select the Institution under which the campus is located.
- Find the campus you want to delete.
- In the **actions **column, click the trash can icon.
- In the Delete Campus dialog, click Delete. A confirmation message appears and the campus is deleted.
Settings > Tenant > Libraries
Use this setting to configure your libraries. A library is the third level of the FOLIO Location hierarchy, and typically represents physical buildings on a physical campus, or domains of service in a virtual campus, like a subject-specific library or an annex.
FOLIO libraries need at least one institution, campus, and library to be able to create the final element of the location tree.
Creating a library
- In the Libraries pane, select the Institution under which the library should be created.
- Select the Campus under which the library should be created.
- Click New.
- Enter a Name and Code. The name and code should be unique. FOLIO doesn’t stop you from making libraries with the same name and/or code, but it does cause problems for your staff in writing circulation rules.
- Click Save. The library is created.
Editing a library
- In the Libraries pane, select the Institution under which the library is located.
- Select the Campus under which the library is located.
- Find the library you want to edit.
- In the actions column, click the pencil icon.
- Make your desired changes.
- Click Save. The library is updated.
Deleting a library
Note: If the library has an associated location, you cannot delete it.
- In the Libraries pane, select the Institution under which the library is located.
- Select the Campus under which the library is located.
- Find the library you want to delete.
- In the actions column, click the trash can icon.
- In the Delete Library dialog, click Delete.
- Click Save. A confirmation message appears and the library is deleted.
Settings > Location setup > Locations
Use this setting to configure your locations. A location is the fourth and most detailed level of the FOLIO Location hierarchy, and typically represents specific shelving areas, like the stacks, reserves, or specific language collections.
Locations and service points
Each location must have at least one service point associated with it and designated as primary. Locations may also have additional service points that are non-primary. Non-primary service points are not required.
When an item is returned at another service point that is not associated with the location, it is put in transit to the primary service point. When an item is checked in at a location’s non-primary service point, it is not put in transit to the primary service point.
The most common use case for a non-primary service point is if your library has multiple service desks in the same building, or decides to create a service point for staff working “behind the scenes” in addition to a service point for a patron-facing service desk. In those cases, one service point can be the primary service point for locations in that building, and the other service points would be non-primary service points for those locations. This allows staff at those non-primary service points to discharge and shelve items for the library without putting them in transit to the main service point.
Creating a location
- In the Locations pane, select the Institution under which the location should be created.
- Select the Campus under which the location should be created.
- Select the Library under which the location should be created.
- Click New.
- Enter a FOLIO Name for the location. The name must be unique to your FOLIO tenant. The name and code appear in other locations like Inventory.
- Select whether the location is used for Remote storage.
- Enter a Code. The code is the machine readable name and must be unique to your FOLIO tenant.
- Enter a Discovery display name. This name is used in discovery services to identify the location to patrons. It does not have to be unique.
- Select a primary Service point for the location from the drop-down list.
- Optional: To add a non-primary service point to the location, click Add service point and select the service point from the drop-down list. Repeat as needed. To remove a service point, click the trash can icon.
- Optional: Select the location’s Status. By default, all locations are Active.
- Optional: Enter a Description of the location.
- Click Save & close. The location is created.
Editing a location
- In the Locations pane, select the Institution under which the location is located.
- Select the Campus under which the location is located.
- Select the Library under which the location is located.
- Find the location you want to edit and select it.
- In the location details pane, click Actions > Edit.
- Make your desired changes.
- Click Save & close. The location is updated.
Duplicating a location
- In the Locations pane, select the Institution under which the location is located.
- Select the Campus under which the location is located.
- Select the Library under which the location is located.
- Find the location you want to duplicate and select it.
- In the location details pane, click Actions > Duplicate.
- Make your desired changes to the location.
- Click Save & close. The location is created.
Deleting a location
Note: If the location is in use by at least one record in Inventory, you cannot delete the location. In those cases, it is recommended that you edit the location and make the status Inactive. It doesn’t remove the location from Inventory location dropdown menus, but it gives staff a dialog message if they select an inactive location.
- In the Locations pane, select the Institution under which the location is located.
- Select the Campus under which the location is located.
- Select the Library under which the location is located.
- Find the location you want to delete and select it.
- In the location details pane, click Actions > Delete.
- In the Delete location dialog, click Delete. A confirmation message appears and the location is deleted.
15.25 - Settings > Software versions
The software versions page lists all components that run for the current tenant. When reporting a bug try to communicate the version of the affected module to help the support and development teams.
Permissions
There is no explicit permission to view Settings > Software versions. If a FOLIO user has access to view any area of Settings, they will also be able to see Settings > Software versions.
Page layout
The page shows three columns.
- User interface: Information about Stripes (the FOLIO UI framework) and its associated infrastructure
- Foundation
- User Interface - App Modules
- User Interface - Plugin Modules
- User Interface - Settings Modules
- User Interface - Handler Modules
- Okapi: Information about Okapi (the FOLIO API gateway) and its associated infrastructure
- Base Okapi Version
- Okapi Modules
- Okapi Interfaces
- UI/Service Dependencies: Information about dependencies between different areas of FOLIO infrastructure
- Foundation
- App modules
- Plugin modules
- Handler modules
Flower release
Look for these modules to find out which FOLIO flower release the system runs. This is a good indicator if the official platform-complete set of modules has been installed and no individual changes have been made.