This is the multi-page printable view of this section.
Click here to print.
Return to the regular view of this page.
Reporting with LDP/Metadb
The Library Data Platform (LDP) is a project that develops an open-source platform which is utilized by both the FOLIO and ReShare projects to provide statistical and operational analytics. The LDP software extracts data from FOLIO modules into a relational database (informally called “the LDP” by many in the FOLIO community), making it possible to engage in complex reporting and analytics using FOLIO data. While some FOLIO apps have built-in reports or the ability to download results from a search-and-filter workflow, the LDP supports larger and more complex queries that combine data from across the FOLIO apps.
LDP is the current software platform. The next generation software platform Metadb has been released and has been adopted by some institutions. Metadb is a new streaming data integration platform intended to eventually replace LDP. Find detailed and very recent information about the platforms on the project website.
Some FOLIO apps include functionality that allows the user to download data as a CSV (comma separated values) file. For example, the Users app allows you to run an overdue loans report and download the results as a CSV file. See the documentation on individual apps for more details on this functionality where it is available.
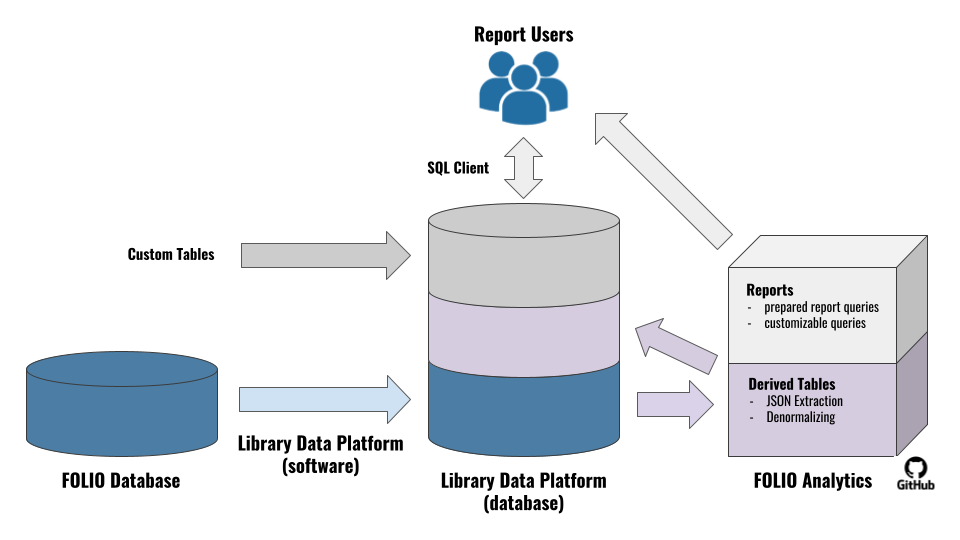
The basic flow of data from FOLIO to LDP/Metadb is described in the figure below. The LDP/Metadb extracts data from the database used by FOLIO apps. From the LDP/Metadb, data flows into two types of queries: derived tables (which simplify the FOLIO data and save the results back into the LDP/Metadb) and report queries (which meet specific needs of report users). These queries are shared via the FOLIO Analytics query repository and also form the backbone of ad hoc querying.
- Open-source software and query development
- Built on trusted database platforms
- Ability to create custom tables to import non-FOLIO data
- Historical tracking of FOLIO records
- Ability to connect from a wide variety of reporting applications
- Ability to perform cross-app FOLIO queries
- Ability to query FOLIO data without impacting production application performance
- Ability to query a simplified FOLIO data model through the use of derived tables
- Nearly real time data through streaming technique
- Expanded JSON data array extraction
- Full FOLIO data coverage
FOLIO Data Coverage in LDP
LDP utilizes the FOLIO APIs to get most of its content. To see more details about the APIs can be found at FOLIO Developers API documentation.
LDP pulls data from the following FOLIO modules*:
- mod-audit
- mod-circulation-storage
- mod-configuration
- mod-courses
- mod-email
- mod-feesfines
- mod-finance-storage
- mod-inventory-storage
- mod-invoice-storage
- mod-notes
- mod-orders-storage
- mod-organizations-storage
- mod-source-record-storage
- mod-users
Note: Metadb features full FOLIO data coverage.
1 - Reporting App
The Reporting app provides a FOLIO interface for interacting with an LDP database. There are two section to the app, the Query builder and Saved queries. The Query builder allows you to build a query with the option to save it for later use. Saved queries allows you to load a previous query into the Query builder to start editing or run.
Permissions
The permissions listed below allow you to set user permissions to interact with the Reporting app. You can assign permissions to users in the Users app. If none of these permissions are assigned to a user, they are unable to see the Reporting app or any related information.
The following are all the Reporting app permissions:
.
-
Reporting: all permissions – This permission allows the user to see and use the Reporting app.
-
Settings (Reporting): Can modify templated-query repos configuration
-
Settings (Reporting): Can modify reporting database connection details
-
Settings (Reporting): Can modify default record limits
-
Settings (Reporting): Can modify saved-query configuration details
-
Settings (Reporting): Can select which tables are available to search
Schema
Think of schema as the “buckets” in which data tables live. The schema drop-down menu allows you to select one schema at a time to use in your query. Three schemas are available: public, folio_reporting, and local. For a fuller explanation of schemas and examples of some defaults included see Library Data Platform - Using schemas.
Table
The Table drop-down menu allows you to select a data table from the schema you have selected to use in your query. Tables are where related data lives. Tables belong to a specific schema. With the schema and table selected, the other fields will unlock and update based on the selection.
Filter by column
The Filter by column drop-down menu allows you to refine your results by selecting a column and applying constraints. You can create multiple filters using the Add Filter button. When you use multiple filters, results are generated using the AND operator. Once you select a column to filter on, you may select equality and inequality operations in combination with a numeric value (e.g., a date or a count), TRUE, or FALSE. Operators include:
- equal to (=)
- not equal to (<>)
- less than (<)
- less than or equal to (<=)
- greater than (>)
- greater than or equal to (>=)
- TRUE (not case sensitive)
- FALSE (not case sensitive)
Here are some examples for filtering by column:
- find where previously_held = TRUE
- find where _version > 1
When entering date ranges, both YYYY-MM-DD and MM/DD/YYYY are supported. The LIKE and ILIKE operators, which allow pattern matching within character-based column data, will be included in a future release. LIKE is case-sensitive, while ILIKE is case-insensitive.
Show columns
The Show columns drop-down menu allows you to select one or more fields from the schema and table you have selected to show in your query results. By default all columns will be present. The list of columns you wish to include will build as you select each column from the drop-down menu.
To limit, simply click on the Show Columns drop-down and click on the listed fields.
To remove added fields you can either click on the x next to the field name in the box or from the drop-down list, click on the field again to deselect it.
Order by column
You can click the Add ordering criterion button to add one or more columns to use to order your results. Options such as ascending in the next field to the right will appear in a drop-down menu, which you may combine with additional options, such as Nulls at end in the third field to the right. If you wish to order on multiple columns you can click the Add ordering criterion button again. To remove a column sort click the trashcan icon.
Limit number of results
The Limit number of results drop-down menu allows you to restrict the number of rows returned in your query results to 1, 10, 100, or 1000. This is useful if you just want to see a sample of the full results set, especially if you expect the number of rows returned to be particularly large.
Save icon
The Save icon at the top right of the Query builder allows you to save a query once you have built it. Once saved, queries will appear in the list in the Saved queries section of the Reporting app.
Saved queries
The Saved queries section of the Reporting app lists queries that have been saved by Reporting app users by clicking the Save icon in the Query builder section of the Reporting app. Anyone with access to the Reporting app may click and run the queries in the Saved queries list. Queries may be removed from this list by clicking the trash can icon next to the individual query on the right end of the list.
2 - LDP and Metadb
In order for the LDP software to connect to FOLIO, it needs read-only access to Okapi and the FOLIO database. The LDP can be hosted and administered locally by an institution’s own staff or by contracting hosting services out to a third party. You can find specific system requirements in the LDP documentation.
Installing and configuring the LDP software*
There are three main software components to install for your LDP implementation: LDP2, ldpmarc, and Folio Analytics. In general, install the latest production release for the LDP and ldpmarc software components, which do not have a dependency on FOLIO (flower) software release versions. For FOLIO Analytics, see https://github.com/folio-org/folio-analytics/blob/main/README.md.
Documentation
For detailed information about how to set up and configure the LDP software, please review this link to access individual links to guides in the LDP repository. There you also will find the latest versions and fixes of the LDP software.
Setting up derived tables
To let report users take full advantage of the community-developed report queries as well as having a good starting point for ad hoc querying, it is strongly recommended to set up a nightly update on derived tables.
Note: use of views and materialized views is not supported in LDP databases and may cause the LDP software to be unable to perform data updates.
You can find instructions in Github on how to set up FOLIO Reporting Derived Tables.
Data privacy
The LDP software is designed to support GDPR and other data privacy requirements. Administrators can exclude a predefined set of tables.
See the Anonymization Guide for information on how to activate and configure these features.
The pages linked below list attributes that contain potential personal data:
Adding local data
As documented in the user guide, it is also possible to load and create local data into your LDP reporting database.
Using schemas
The concept of schemas allows you to organize tables and permissions within one database. In LDP we have initially four relevant schemas:
- public: contains all extracted tables and its current data from the bound FOLIO tenant
- history: stores data that have been updated in the past or may no longer exist
- folio_reporting: contains all derived tables created and supported by the community
- local: common area for report users to create or import own data
Besides using the local schema, you might consider setting up separate schemas for different report user groups or purposes. You are free to create more schemas for your local needs (e.g., to provide data for different departments or to separate and protect sensitive data).
Learn more about the schema concept and how to configure schemas using Postgres’s Schema Documentation.
For a granular setup of permissions, see also the built-in Roles and Privileges concepts of Postgres.
Moving and loading data
Loading and moving data into an LDP reporting database is as simple as it is for databases in general.
For Postgres there are two common approaches:
- COPY: SQL command for moving table data via csv files
- pg_dump / pg_restore: Postgres command line tools for importing and exporting data
The next generation software platform Metadb has been released and has been adopted by some institutions. Metadb is a new streaming data integration platform intended to eventually replace LDP. For installing and configuring Metadb follow the Metadb Documentation at the Library Data Platform - resources site.
3 - MARC Transformation
The marct tool is part of the Library Data Platform (LDP) project. The marct tool converts SRS/MARC records from JSON to tabular format in preparation for loading them into an LDP reporting database. SRS stands for Source Record Storage. MARC stands for Machine-Readable Cataloging, which is a standard format for storing data elements within bibliographic records in computer systems. Once the MARC data has been loaded into the reporting database, marct performs incremental updates to the data, which saves time on the data transfer from the transactional to the reporting database.
The marct tool reads the SRS MARC data from the database tables marc_records_lb and records_lb. Next, it transforms only the current versions of the records from these tables into tabular data. The transformed records are written to the folio_source_record.marc__t table.
Once the MARC data is transformed, the folio_source_record.marc__t table is ready to be used in queries that require MARC data from the reporting database. For example, the query below shows the contents of the MARC 008 field, which captures general bibliographic information about a library item.
SELECT
	sm.instance_hrid,
	sm.field,
	sm.content
FROM folio_source_record.marc__t AS sm
WHERE (sm.field = '008')
LIMIT 10
;
For detailed information about how to set up and configure the marct tool for LDP, please review the guide linked below:
Metadb includes native marct tables when it is installed. For information about how MARC data is transformed in Metadb, please review the guide linked below:
4 - FOLIO Analytics
Note: This documentation covers FOLIO Analytics v1.7.0, which was released at approximately the same time as the FOLIO Poppy release.
What is the FOLIO Analytics repository
The FOLIO Analytics repository contains reports and other analytics developed for FOLIO and designed to run on the Library Data Platform. Reports developed for FOLIO are stored as code written in Structured Query Language (SQL). The SQL queries can be opened inside of database querying software to pull data out of the LDP.
You can read an introduction to the repository at its overarching README file on GitHub. The file describes the following:
- The two types of SQL queries to be found in the repository:
- Report queries, which you can copy and paste to run on your LDP.
- Derived table queries, which simplify and speed up report queries. A derived table is simply a table created using data from one or more other tables. These queries are managed behind the scenes through LDP administration so that they run automatically and generate the derived tables in the database.
- Documentation for the queries.
- Examples of reporting applications that can be used to run the queries.
- How the queries are organized in the repository.
The first section below outlines how to make use of the report queries in the FOLIO Analytics repository to generate reports on FOLIO data. Other sections of the documentation cover administration of derived tables and use of derived tables for ad hoc querying.
Using queries from the FOLIO Analytics repository
FOLIO Analytics has releases aligned with FOLIO flower releases as well as monthly rolling releases. This allows institutions to match the FOLIO Analytics version to the FOLIO flower release that they’re running.
Report queries in the FOLIO Analytics repository are laid out in a particular structure that will make it easy for you to find the various areas you need as you build your knowledge of SQL.
- Introductory comments. Queries may start with a short block of text that is not part of the query. These “comments” often describe basic components of the query and give a brief description of the purpose.
- Parameters. To make things easier for the user, queries typically include a “parameters” section at the top that allows one to easily specify the values needed for filtering on a field.
- Subqueries. Queries may include several groups of smaller queries, which may be referred to as subqueries. These subqueries help simplify and rearrange different parts of the database to make the final query easier. (Note: The official term for these parts of the query is common table expressions, or CTEs. Calling them subqueries is meant to emphasize the role they play in the larger query.)
- Main query. The main query determines the final look of the report. Under the keyword
SELECT, you will see a list of the fields that will show up in the final report. After the keyword FROM, there is a list of the tables the fields are coming from. The keyword WHERE specifies the filters that should be applied to limit the rows in the report. Additional keywords may appear after the WHERE keyword to further customize the output of the report. Comments can appear throughout the query to provide instructions or clarifications.
Locating queries in the repository
Report queries for LDP are stored in the sql/report_queries folder of the repository and sql_metadb/report_queries for Metadb. Each subdirectory contains one or more SQL queries, along with documentation that describes the purpose and output of the queries.
Once you have located a desired report query, you can perform the following steps to run the query and generate a report:
- Copy the query code from GitHub.
- Open a database query tool.
- Connect to the LDP.
- Paste the SQL query code into a local file.
- Run the SQL query.
- Export the query results in the desired format.
The following section demonstrates this workflow using DBeaver, a database querying tool that has a free community edition and is available for Windows, Mac OSX and Linux operating systems.
Example of running a query using DBeaver
Copy the query code from GitHub
- In the sql folder of the FOLIO Analytics Repository, click on the report_queries folder.
- Click on the subfolder for the report you are interested in. For this example, open the ACRL Circulation query file by clicking first on the acrl subdirectory and then on the circulation subdirectory, and finally clicking on the acrl_circulation.sql file.
- To open the query file directly, click on the raw button located in the upper right corner of the file preview box.
- To copy the query code, type Ctrl-A (Cmd-A on Mac) to highlight all of the text, followed by Ctrl-C (Cmd-C on Mac) to copy the text.
- Install the DBeaver community edition corresponding to your operating system.
- Open DBeaver.
- To add your database connection, click on the New Database Connection button toward the top of the Database Navigator tab. It should look like an electrical plug with a plus sign.
- In the Select your database window that pops up, click on the PostgreSQL symbol and then click Next.
- Fill out the connection dialog:
- You will need to get the following information from your local LDP/Metadb administrator:
- Host (typically looks like a URL, like ldp.institution.edu)
- Port (typically 5432)
- Database name
- User name and password
- SSL mode (will likely be “require”)
Note that a hosted LDP/Metadb reporting database is currently available for the FOLIO community. It provides access to data from the FOLIO reference environment folio-snapshot and is updated hourly. For login info, please review the
Library Data Platform testbed documentation.
- In addition to the first page of connection details, you must click on the SSL tab to select “require” under SSL mode.
- Finally, expand Connection Settings in the sidebar on the left and select the Initialization subheading. In the settings on the right, make sure the Auto-commit check box is selected.
- When you are done setting up the connection, you can double click on the connection name in the Database Navigator tab to connect to the database.
Paste the SQL query code into a local file
- To create a new script file, either click on the New SQL Editor button in the toolbar (it will look like a document with a plus sign) or select New SQL script from the SQL Editor menu.
- If you have multiple databases, DBeaver may prompt you to select the one you want to query. Select the correct database and click on select. The new script window should show up on the right, with the script editor on the top and the results window (currently empty) on the bottom.
- Paste the copied query code from GitHub into the script editor. (Once you paste in your copy of the script, you can change it however you want. This is your copy of the SQL. Read more about tailoring queries below, and note that you should pay special attention to the “parameters” section in your query.)
- To save the query, select “Save As” from the “File” menu and navigate to your preferred directory, using a filename with “.sql” as the file extension.
Run the SQL query
- To run the query, either click on the Execute SQL Script button on the left side of the script editor (it should be the third button from the top and look like a document with a “play” symbol inside of it) or select Execute SQL Script from the SQL Editor menu.
- The results will hopefully then appear in the results panel below the script.
Note: When querying parts of the database with a lot of data, like the inventory tables, there may be a long delay before results are returned.
Export the query results as a CSV
- To export the results, right-click inside the results table and select Export data….
- Complete the data export wizard:
- Select “CSV” as the data transfer target type and click Next >.
- Adjust any data transfer settings and click Next >.
- Adjust any output settings (e.g., output directory, file name pattern) and click Next >.
- Confirm settings and click Start to export the file.
Tailoring queries
Many queries allow you to specify the correct values for report filters by editing the “parameters” sections at the top of the query. You should always review and update the parameters before running your query. If you do not update the values in the parameters section, the default values will be used, and in many cases these may be inappropriate for the data in LDP/Metadb.
To edit the parameter values, all you need to do is type in the measure value of interest between the single quotation marks at the start of one or more parameter lines. The values must be typed in exactly as they appear in the database. Possible values might be suggested in query comments (although those examples may not be in use at your institution). If you do not want to filter the data, you can remove anything between the single quotation marks.
To further tailor the query, consult the introduction to this section above to identify the different sections you may wish to review and modify. One edit you may want to make would be to add your own comments to guide yourself and others. Comment text will be gray (in DBeaver) and will not affect how the query runs. There are two ways to make comments. Typing -- will create a comment out of the rest of that particular line of the file. To create a comment that spans multiple lines, use /* at the beginning of the comment and */ at the end of the comment.
Another edit you may want to make would be to remove a field from the report. To do this, you can look for the SELECT keyword in the main query section (which is usually where you will see the longest list of field names). Inside the list of fields after that SELECT keyword, you can delete the lines that list fields you do not want to include. Just make sure that the last item in the list, the one that appears right before the FROM keyword, is not followed by a comma.
For more advanced query writing techniques, refer to the documentation on ad hoc querying using LDP or Metadb tables.
Troubleshooting queries
What to do if you do not get any results
- Check to see if a parameter was entered by the report writer that does not apply. If not, seek out additional training here or through your local (or the larger) FOLIO community.
What to do if there are errors
- Check to see if the error message indicates that a derived table is missing. These derived tables are stored in a schema called folio_reporting (LDP) or folio_derived (Metadb), so that schema name followed by a table name might appear in the error message. If a derived table is missing, contact your LDP/Metadb administrator.
- If you edited the query, check to make sure you don’t have a comma appearing at the end of a list, like the list of the fields that occurs after the
SELECT keyword.
- If you can’t determine what is causing the error, consult with your local LDP/Metadb administrator or either your local or the larger FOLIO Reporting community.
If the shared queries do not meet your needs, you can also develop your own “ad hoc” (or as needed) queries to pull data from LDP/Metadb. In addition to creating queries with different fields and table connections than the shared queries, ad hoc queries make it possible to connect FOLIO to other custom tables available in your local LDP/Metadb. Because LDP/Metadb is built on standard relational database software, you can build ad hoc LDP/Metadb queries in the same way you would build queries for any other database, such as writing an SQL query and using a database query tool to run the query.
Learning SQL
To develop ad hoc queries, you will need to write query scripts using Structured Query Language (SQL). The table below includes a few resources for learning SQL.
| Training Resource |
Description |
| The Data School: Learn Introductory SQL Concepts |
An interactive tutorial with an approachable style. The tutorial has built-in SQL evaluation, so you don’t need to set up a separate database tool to try the exercises. |
| Select Star SQL |
An interactive book that teaches SQL concepts using real-world datasets and problems. The book has built-in SQL evaluation, so you don’t need to set up a separate database tool to try the exercises. |
| SQL Murder Mystery |
The SQL Murder Mystery is designed to be both a self-directed lesson to learn SQL concepts and commands and a fun game for experienced SQL users to solve an intriguing crime. They also have a walkthrough for SQL beginners. |
| CodeAcademy: |
A course called Learn SQL and a list of SQL Commands. Without a Pro account, course features are limited. |
| Linked In Learning |
Linked In Learning provides access to several courses on SQL at many levels of expertise. Requires a paid subscription. |
After learning how to use SQL, there are a few resources that outline specifics of how LDP/Metadb organizes FOLIO data.
- The LDP User Guide. This guide includes details about writing SQL that works for the LDP data model; note especially the sections describing the data model, JSON queries, and the differences between the relational attributes and JSON fields. The guide also includes a section that describes the historical data functionality within the LDP, which allows users to compose queries that explore how FOLIO data records change over time.
- The Metadb User Guide This guide acts as a user and administrator’s guide to Metadb. It includes information about configuring Metadb as well as creating SQL queries using Metadb tables.
- SchemaSpy (LDP)./ SchemaSpy (Metadb) This SchemaSpy installation is attached to the LDP reference environment, which pulls data from the FOLIO snapshot reference environment. SchemaSpy gives a concise list of LDP/Metadb tables and fields and can be helpful when developing queries, if your local LDP/Metadb uses the same software version as the LDP reference environment.
- FOLIO Schema Parser. This lightweight FOLIO Schema Parser automatically populates a spreadsheet using FOLIO’s data schema documentation, connecting FOLIO fields to LDP tables and fields. It can be helpful as a tool for quickly looking up what fields are available from FOLIO apps and what LDP tables include those fields.
- Shared LDP derived tables./Shared Metadb derived tables The derived tables (found in the folio_reporting schema of the LDP or the folio_derived schema for Metadb) often serve as the best starting point for ad hoc queries. The derived tables combine and simplify the original FOLIO tables in ways that make query development much easier. You should work with your local LDP/Metadb administrator to determine how your local LDP/Metadb is using derived tables (e.g., what FOLIO Analytics release you are using, how frequently the derived tables are updated).
Sharing ad hoc queries
If your ad hoc query might be of use to other institutions, we encourage you to consider submitting it to the folio-analytics repository. Our contributing guidelines describe the requirements for new contributions to the repository.
Tips for using DBeaver to write an ad hoc query
Developing ad hoc queries using DBeaver follows a similar workflow to the example workflow above. You can either start with an existing report query or derived table query and modify it for your own uses, or you can write the SQL code from scratch.
An example of a simple ad hoc query might be:
SELECT
	group_name,
	COUNT(user_id) AS num_users
FROM
	folio_reporting.users_groups
GROUP BY
	group_name
;
This code specifies that the report should contain two columns: group_name and a column that stores a calculation of the count of values in the user_id column, which should appear in the query with the label “num_users.” The code then specifies that these columns are coming from the folio_reporting.users_groups derived table. Finally, it specifies that the data from the original table should be separated into separate groups using values from the group_name column, so that the num_users calculation is done separately for each group. The result is a table where each value of group_name is matched with a count of the number of users in that group.
As you are writing your query file in DBeaver, you may find it helpful to browse the LDP using the Database Navigator tab. For example, you can expand the connection, then expand the Schemas, then expand the folio_reporting (LDP) or folio_derived (Metadb) schema, then expand Tables to see the available derived tables. Each table can be expanded to see its available columns. To browse the data in a table, right-click on a table and select View Data. Use the same procedure to browse the tables and columns available in the various schemas.
5 - LDLite
LDLite is a tool that is part of the Library Data Platform project. It provides basic LDP data reporting functions without requiring the LDP reporting database server to be installed. It also can be used to supplement a LDP database with additional or real-time FOLIO data.
LDLite allows users to query FOLIO directly. Once connected to Okapi-based services, the LDLite software can provide some features of the full Library Data Platform software such as JSON transformation. The transformed data can be saved in an embedded database as a simple file on the user’s computer or into a shared database like the LDP database. Users must be running Python to install LDLite.
LDLite can also be used to report on MARC data retrieved from Source Record Storage (SRS). This feature is still in the experimental stages and not officially supported at this time. Instructions for setting up access to MARC data from LDLite are available on GitHub.
For more information about LDLite and access to the code base, see the GitHub repository.